The kitchen island is the one element that changes everything. In fourteen years of converting warehouses and urban apartments into homes, I’ve watched clients agonize over cabinet finishes and countertop materials. The island is the decision that shapes how a kitchen actually works. It determines traffic flow and sets the visual tone. It handles daily life in ways perimeter cabinetry can’t match.
These kitchen island ideas cover the full range: industrial raw steel, polished quartz waterfalls, freestanding butcher blocks, and built-in appliance centers. Some cost under $400 to pull off; others require a contractor and a permit. Each one solves a real problem — storage, seating, prep space, or simply making a kitchen feel designed rather than assembled. If you’re working on countertop ideas alongside your island plans, think about both surfaces together so materials stay cohesive.
Before you pick a style, measure your actual clearance. The National Kitchen and Bath Association sets 42 inches as the minimum working aisle for one cook, 48 inches for two. An island that looks beautiful in a showroom can turn your kitchen into an obstacle course if the math doesn’t work. These kitchen island ideas are only worth pursuing if the dimensions actually fit your floor plan.
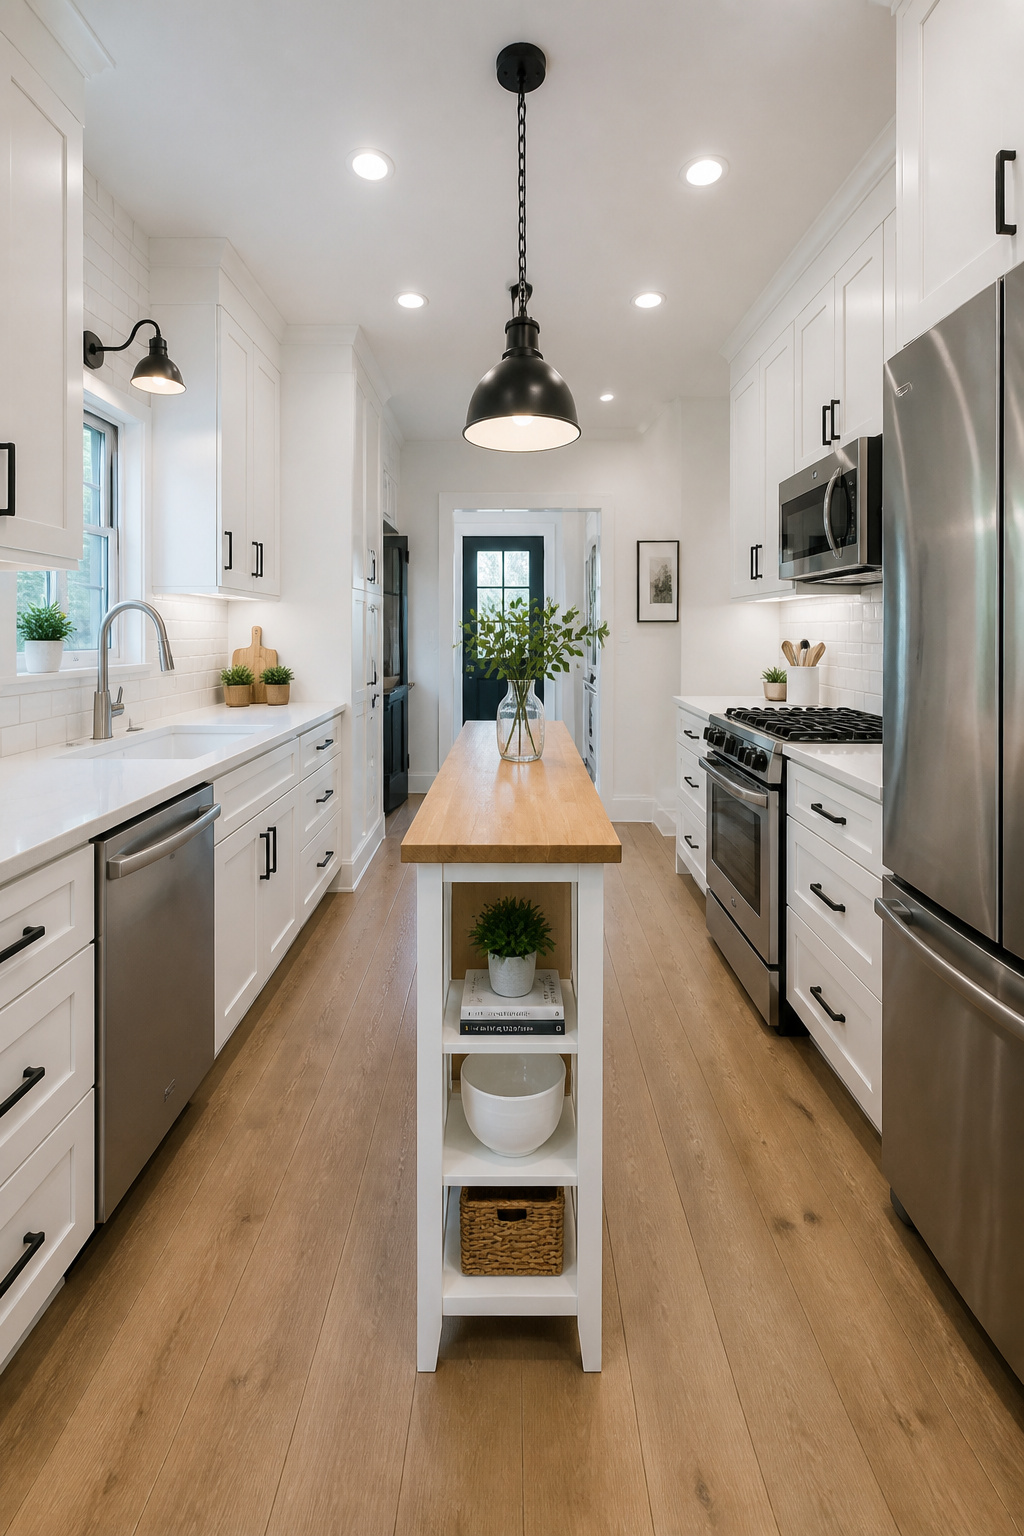
1. Raw Steel Frame Kitchen Island Idea with Butcher Block Top
Steel and wood is the industrial combination that never gets old — and in a kitchen, it earns its keep beyond looks. The steel frame handles weight, heat, and impact without complaint. The butcher block top is kind to knife edges, easy to refinish, and warm enough to balance the cold of the metal.
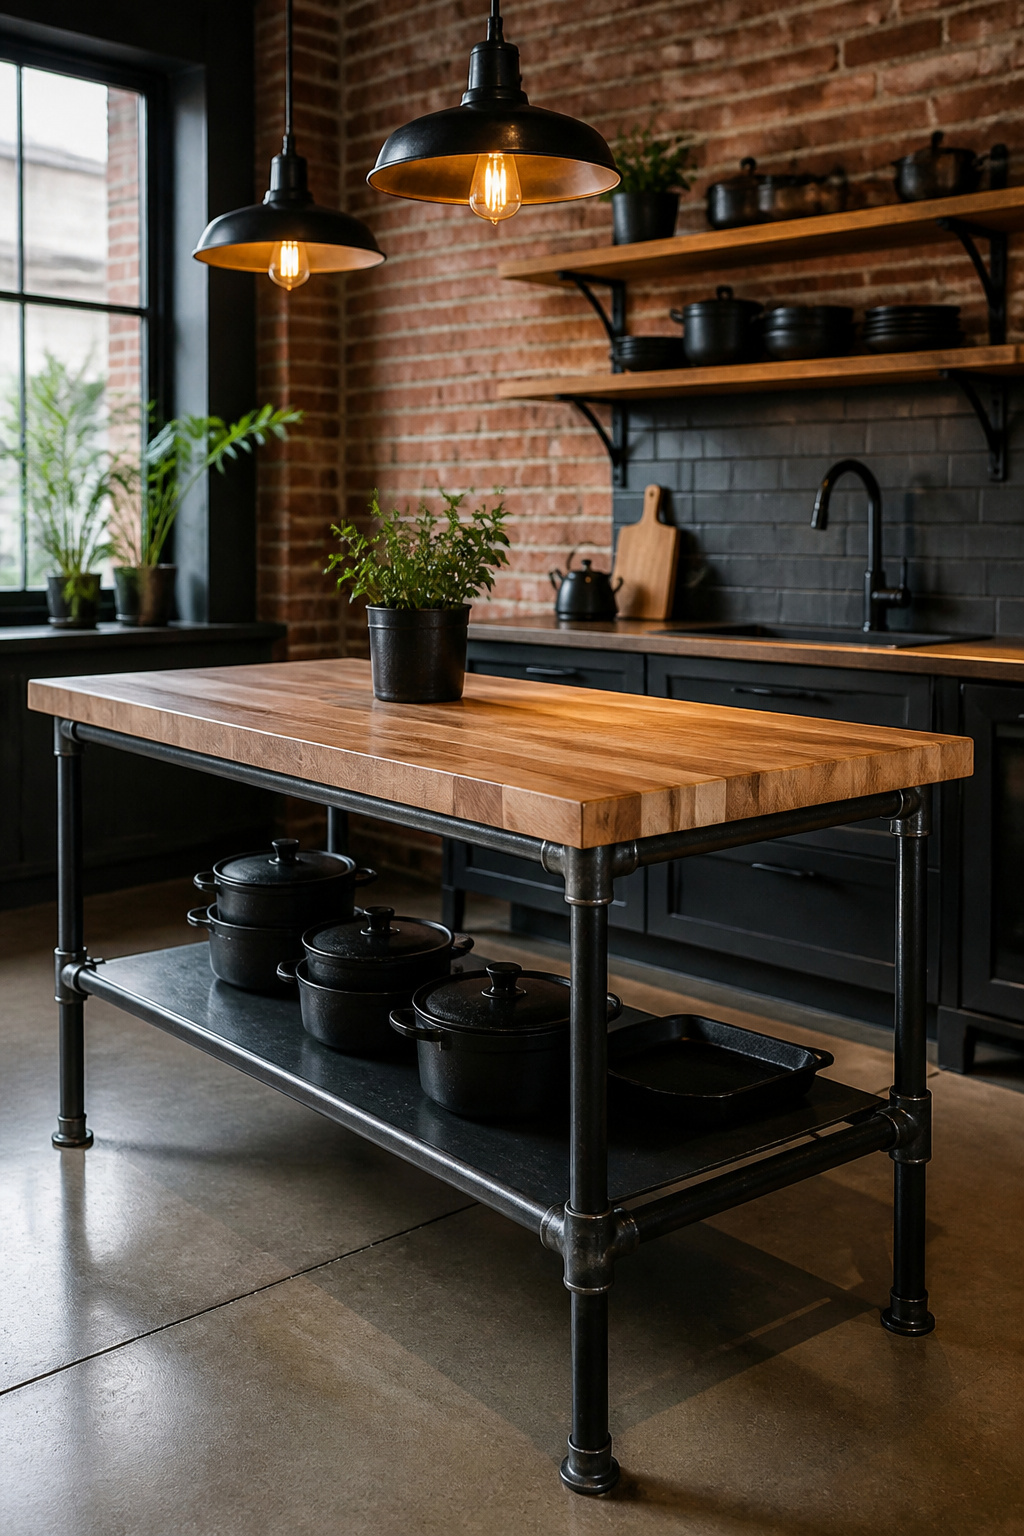
For the frame, spec 10-gauge cold-rolled steel at 1-inch square tube. Thinner gauges save money but flex under heavy use — a wobbling island is a daily frustration. Standard height is 36 inches, matching most countertops for a flush workspace. Weld the joints rather than bolt them; bolted connections loosen over time under the vibration of chopping and mixing.
Choosing the Right Butcher Block
Hard maple is the best choice for a kitchen island top. It closes its grain after cutting. It resists bacteria better than softer woods and handles heavy use without deep grooves. A 1.5-inch-thick slab is the minimum for an island. Thinner slabs will warp from the kitchen’s humidity cycle over time. Boos Blocks makes reliable maple slabs; a 48×25-inch slab runs about $280. Local hardwood dealers often beat that price for custom dimensions.
Finishing and Maintenance
Oil the butcher block with food-grade mineral oil before the first use. Saturate it completely, let it sit overnight, then wipe away the excess. Repeat once a month for the first year, then quarterly after that. For the steel, apply two coats of matte clear lacquer after sanding to 150-grit. Black oxide gives a darker look and adds mild rust resistance. Avoid exterior clear coats — they off-gas in a heated kitchen.
2. Waterfall Quartz Island for a Sleek Architectural Statement
A waterfall edge turns a kitchen island into a piece of architecture. The countertop material runs continuously over the side of the island to the floor, creating one unbroken surface. Done well, it reads as a slab of stone suspended in the room. Done poorly — with visible seams or mismatched pattern alignment — it looks like a mistake.
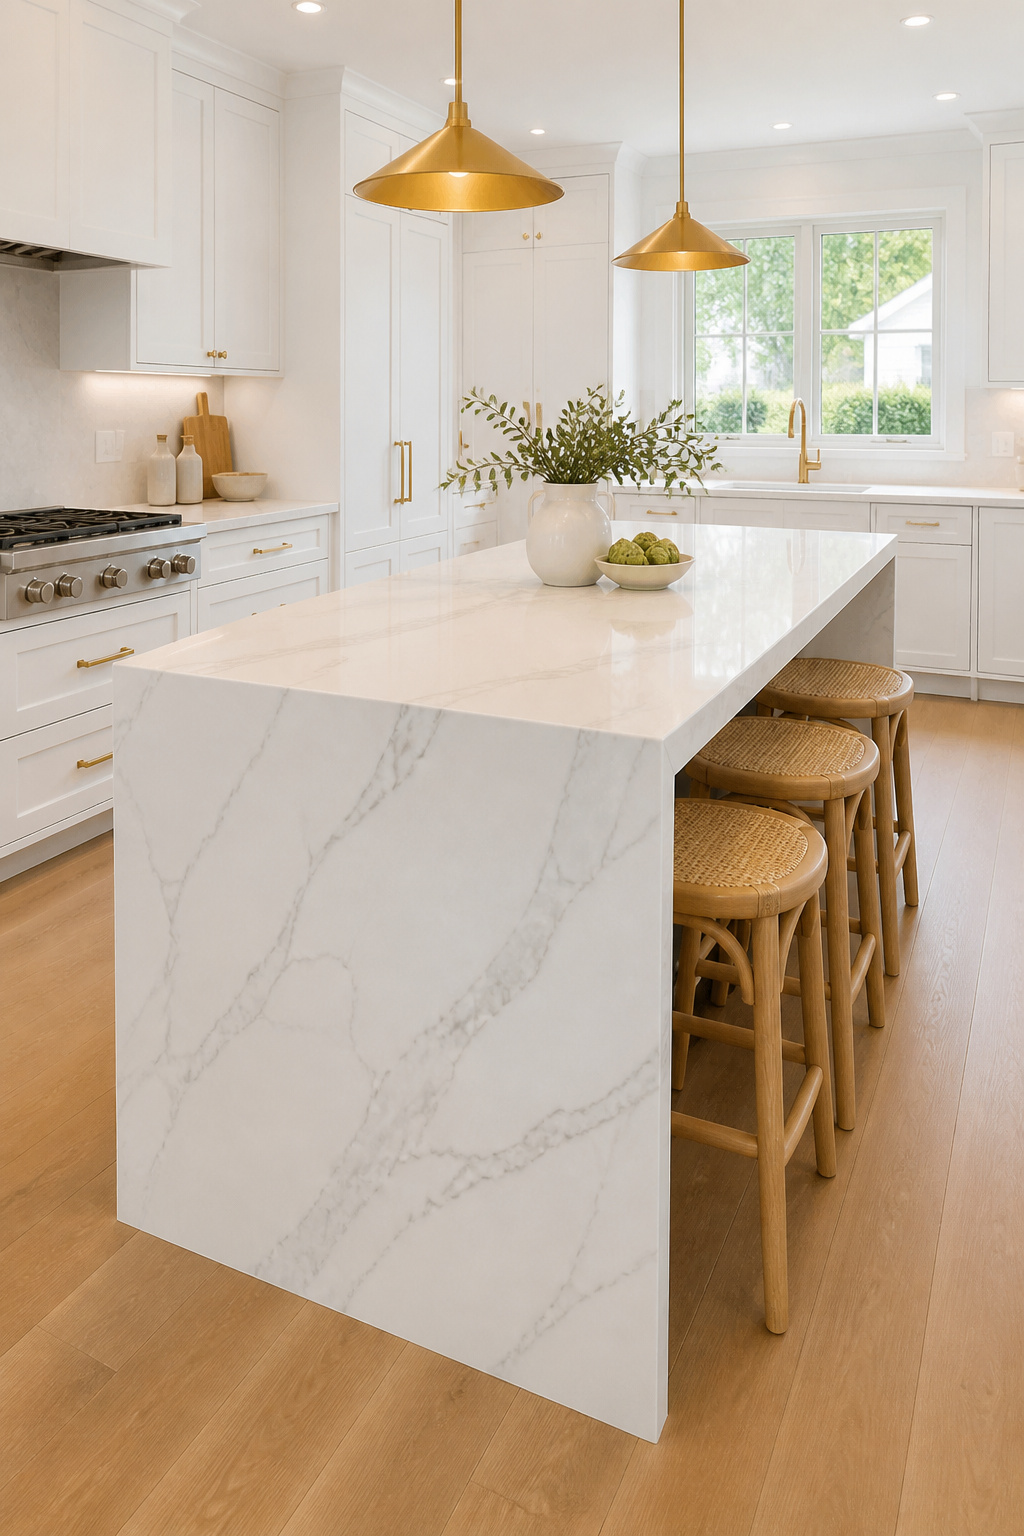
The key to getting a waterfall right is slab matching. Two pieces of stone are cut from the same slab and mitered at the corner. The veining must flow continuously across the joint. This process — bookmatch or straight match depending on the vein direction — requires ordering 20–30% extra material. Your fabricator should show you the matched pieces before cutting.
Quartz or Marble?
Quartz wins on practicality every time. For kitchen island ideas centered on a statement surface, quartz is the material that holds up to daily use without requiring constant care. It’s non-porous, doesn’t need sealing, resists staining from coffee and olive oil, and keeps its color consistently across slabs. Marble is more beautiful. The depth and variation of natural stone can’t be replicated. But it etches from acids — lemon juice, vinegar, wine — and scratches more easily. For an island in a working kitchen, quartz is the better choice. For a kitchen used gently, marble is worth the maintenance trade-off. If you want to explore stone options further, the 20 Magnificent Kitchen Countertop Ideas guide covers both materials in more detail.
Sizing for Seating
A comfortable seating overhang needs at least 15 inches — 18 inches is better. That gives knee clearance without the overhang becoming structurally unstable. Counter-height islands (36 inches) pair with 24–26-inch stools; bar-height islands (42 inches) need 28–30-inch stools. If your island is under 48 inches long, stick to two stools. Three is crowded and difficult to pull out.
3. Repurposed Industrial Cart Turned Kitchen Island
This is the kitchen island idea that gets you a piece with genuine history — and often, genuine quality. Vintage factory carts were built to take punishment. A baker’s rack or a machinist’s cart has already proven itself over decades of hard use. It also comes with wheels.
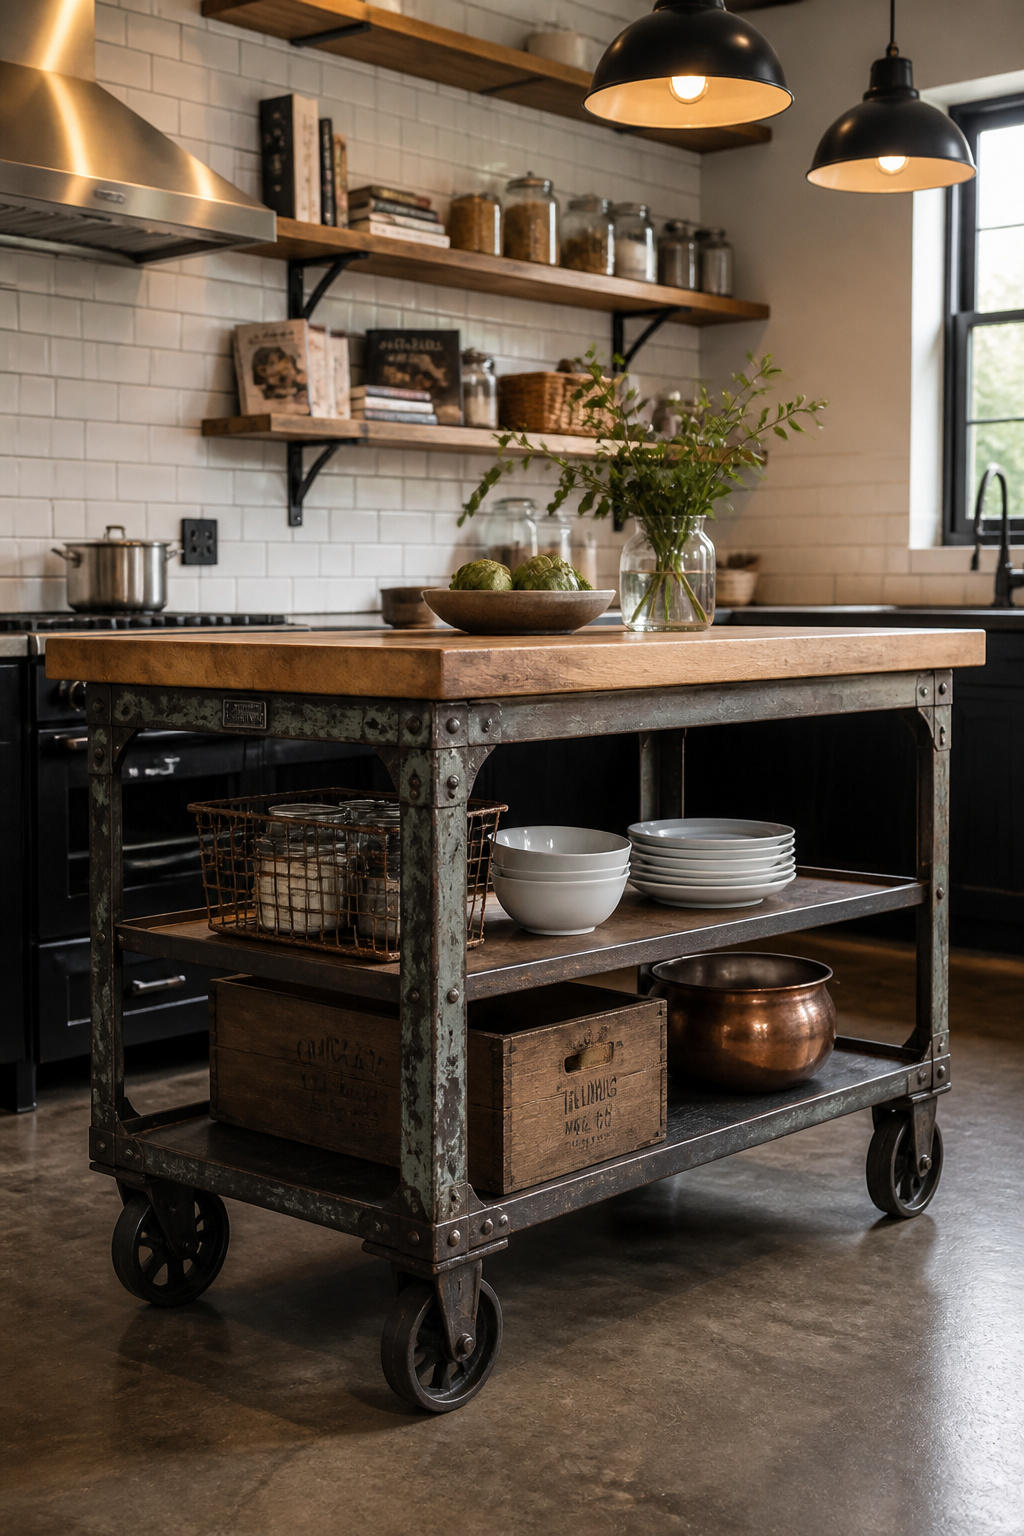
The best sources are eBay (search “factory utility cart” or “industrial cart cast iron wheels”) and Facebook Marketplace. Local salvage yards work well when factories close. Prices range from $50 for a basic steel shelf cart to $800 for a purpose-built baker’s or machinist’s unit. Cast iron wheels are preferable to rubber — they handle kitchen cleaning and heat without degrading.
What to Check Before You Buy
Look for welded construction, not bolted. A wobbling cart that was once held together by hardware will only get worse. The top surface should be flat and refinishable — or plan to add a butcher block top cut to fit. Height should be 34–36 inches. If the cart is shorter, heavy-duty plate casters can add 3–4 inches and give you locking wheels. Wheel locks should engage both the spin and roll simultaneously.
Food Safety
Carts from food manufacturing or bakery operations often carry NSF certification stamps — these were already built for contact with food. Workshop carts from auto shops or machine shops are a different story. Oil and solvent contamination can penetrate porous materials and won’t fully come out. If the cart smells like motor oil or coolant, it’s not worth the risk in a kitchen.
4. Two-Tier Kitchen Island Idea for Open-Plan Living
Open-plan kitchens have a specific problem. The mess of cooking is visible from the living room the whole time you’re working. A two-tier island solves this with a visual screen. The upper tier hides the prep area from the sofa without building a wall. It also creates two distinct work zones at two different heights.
The standard configuration puts the lower prep tier at 36 inches — counter height — and the upper breakfast bar at 42 inches. This 6-inch step creates the visual break and the screen. The minimum footprint for two tiers is 48×36 inches; smaller than that and the step feels cramped. Most builders make the upper tier 10–15 inches deep — enough for plates and glasses without dominating the surface.
Cabinet Configuration Below Each Tier
The lower tier gets the most storage potential. Plan for deep drawers: 10–12 inches for pots and sheet pans at the bottom, 6–8 inches for utensils in the middle, 4 inches for cutlery at the top. For your island storage strategy overall, the Optimize Kitchen Island Cabinets for Storage & Design guide covers drawer and cabinet configurations in more depth than most renovation guides bother to. Under the upper bar tier, narrower cabinets or open shelving work well for glassware and bottles — items you want to reach while sitting.
Seating Clearance
The step overhang on the upper tier needs at least 10 inches of knee clearance — not 6. Most people underspecify this and end up with bar stools that can’t tuck under properly. If the overhang is less than 10 inches, sitting at the upper tier is uncomfortable within the first meal.
5. Concrete-Top Island with Exposed Pipe Legs
Concrete is the material that looks exactly as substantial as it is. A concrete-top island projects something closer to architecture than furniture. Paired with exposed black iron pipe legs, it turns a kitchen island into a statement that can’t be confused with anything from a showroom floor.
The weight issue is real. Standard 2-inch concrete runs 12 pounds per square foot. A 48×36-inch top weighs over 140 pounds, and that’s before you account for the cabinet base beneath it. Glass fiber reinforced concrete (GFRC) is the sensible alternative. It’s 75–80% lighter, far less prone to cracking, and achieves the same look. Most concrete countertop fabricators now work in GFRC rather than standard mix.
Poured-In-Place vs. Precast
Poured-in-place means building a form around the island and casting the concrete on site. It eliminates the logistical problem of moving a heavy slab, but requires experience to get a smooth finish without voids. Of all the kitchen island ideas on this list, the concrete option demands the most technical preparation. Precast means a concrete fabricator makes it in their shop and installs it — cleaner result, easier on your back, and typically similar in cost.
Pipe Legs and Sealing
Black iron pipe from any hardware store: 1.5-inch diameter, cut to 34–35 inches (accounting for flange height and top thickness). Floor flanges bolt to the base cabinet frame. A four-leg kit from an Etsy fabricator runs $150–$300 fully assembled. For sealing the concrete, Z Counterform TopCoat food-safe sealer is the industry standard — about $40 a can. Reseal annually. Concrete stains from acids, so always use a cutting board.
6. Colorblock Island: One Bold Tone Against Neutral Cabinetry
Painting an island a different color is the kitchen renovation that costs the least and has the most visible effect. A painted island changes the entire energy of a kitchen — it adds structure, gives the eye an anchor, and communicates a design decision rather than a default.
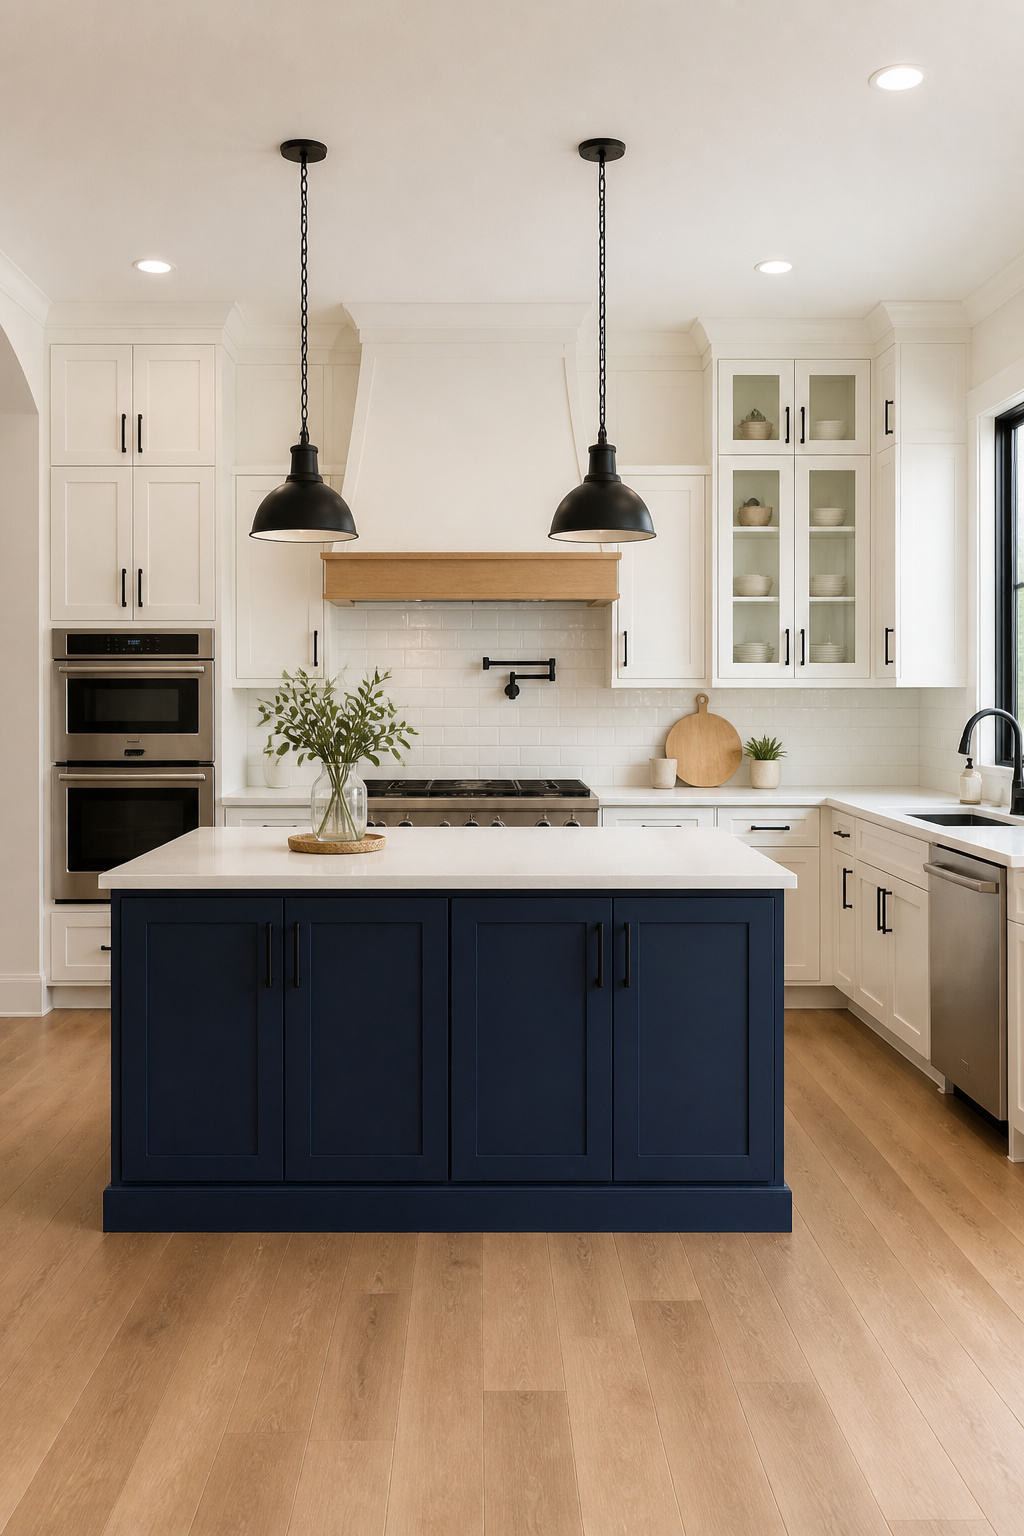
The colors that are working right now in kitchen design lean toward earthy and saturated rather than trendy: Evergreen Fog by Sherwin-Williams (a grey-green sage), Newburyport Blue by Benjamin Moore (soft navy with slight warmth), and Hague Blue by Farrow & Ball (a deeper teal-navy that rewards a larger kitchen). Black Onyx from Benjamin Moore remains the strongest choice for industrial and modern kitchens — a true matte black that holds up and doesn’t shift warm in bright light.
Paint vs. Factory Finish
Painting your existing island cabinets costs $200–$400 in materials or $500–$1,200 for a professional application. It works, but requires proper preparation: clean, scuff-sand, prime with shellac primer if the cabinets have been painted before, then apply two coats of a cabinet-specific enamel. Benjamin Moore Advance and Sherwin-Williams Emerald Urethane Trim are the right products — latex wall paint chips off cabinet surfaces within a year.
The Rule That Prevents Regret
A two-tone kitchen works when the island is 2–3 shades darker than the perimeter cabinets. Light grey cabinets with a navy island looks deliberate. The same grey with a bright olive or orange island looks accidental, like it arrived from a different house. When in doubt, pull a chip from the perimeter color, go three shades darker, and you’ll be in the right range.
7. Freestanding Kitchen Island Idea: Butcher Block on Casters
Not every kitchen island needs to be permanent. Freestanding islands on locking casters offer a flexibility that built-in islands never can. You can roll it to the side, take it when you move, and add it to a kitchen without a contractor visit.
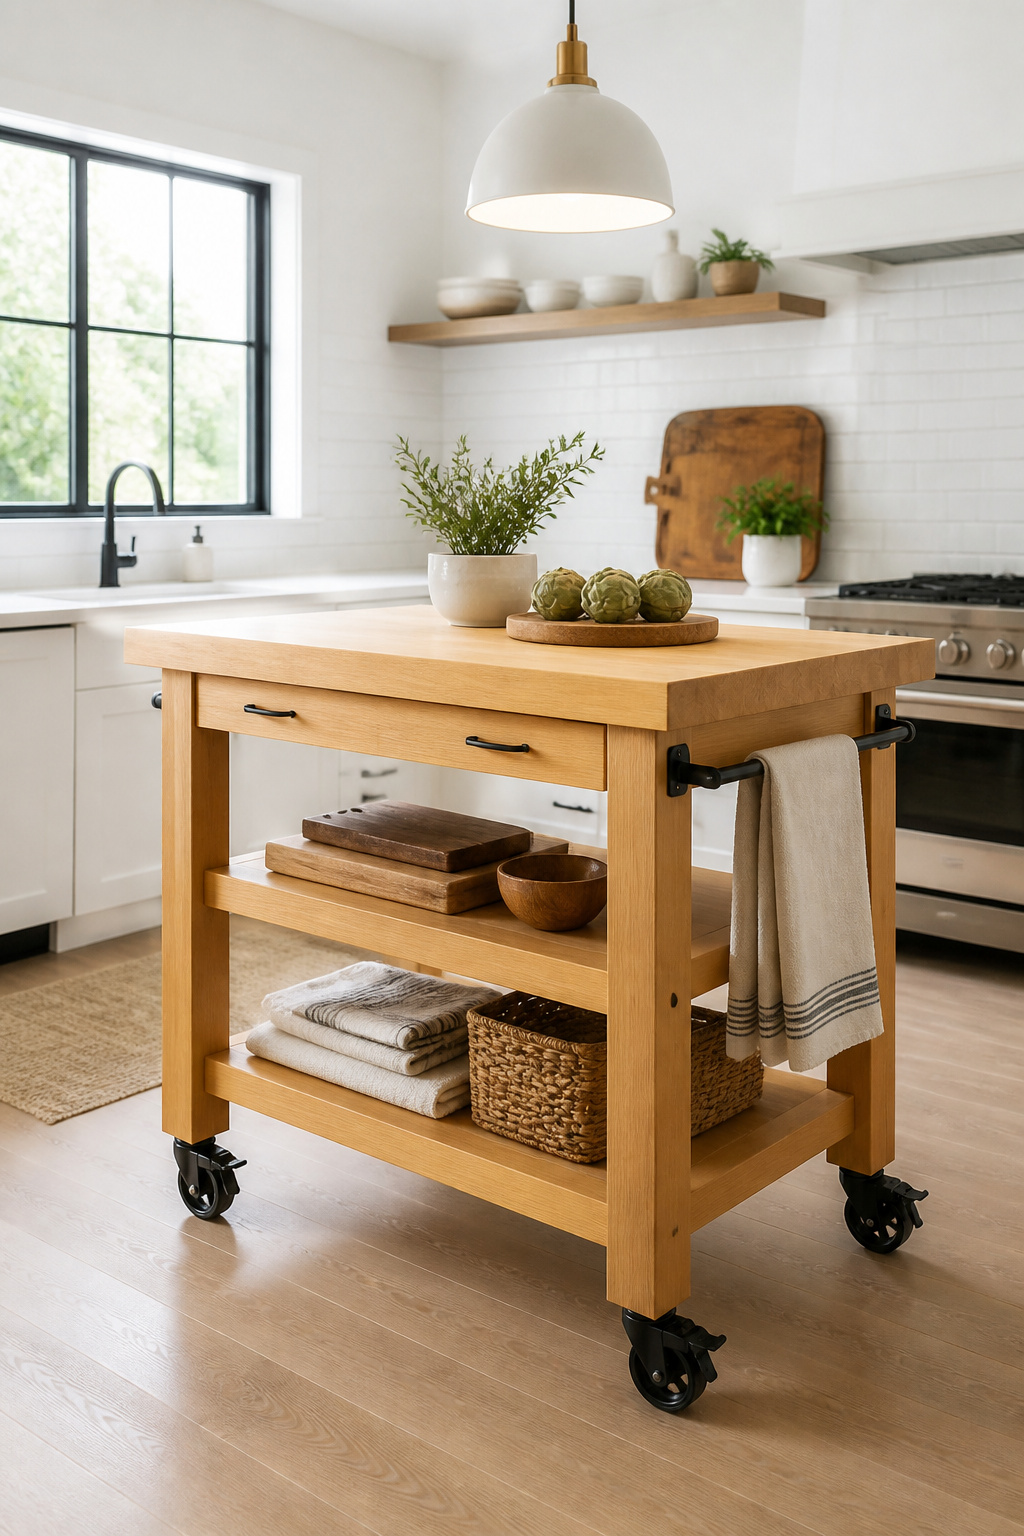
The caster quality is the part most people get wrong. The wheels that come with budget islands are often rated for 50–75 pounds each. That’s fine until the island is loaded with a stand mixer, cast iron pans, and a full fruit bowl. Use heavy-duty plate-mount casters rated for 250 pounds each, with a total-stop locking mechanism that locks both the swivel and the roll independently. Shepherd Hardware makes reliable options for about $12 each at hardware stores.
Sizing for Your Kitchen
A useful freestanding island needs a minimum top surface of 36×24 inches — smaller than that and it’s a cart rather than an island. The 48×24-inch profile is more practical for prep and still manageable in a medium-sized kitchen. Leave 42–48 inches on all sides for clearance; 36 inches is the absolute minimum and feels cramped.
The DIY Option
Build one from a custom butcher block top and hairpin legs. A 48×24-inch hard maple slab from a local hardwood dealer runs $120–$180. Four 28-inch hairpin legs from Amazon cost $60–$80. Add plate casters to the bottom of the legs. Total cost: under $300. The result is cleaner and more durable than most ready-made rolling islands at twice the price.
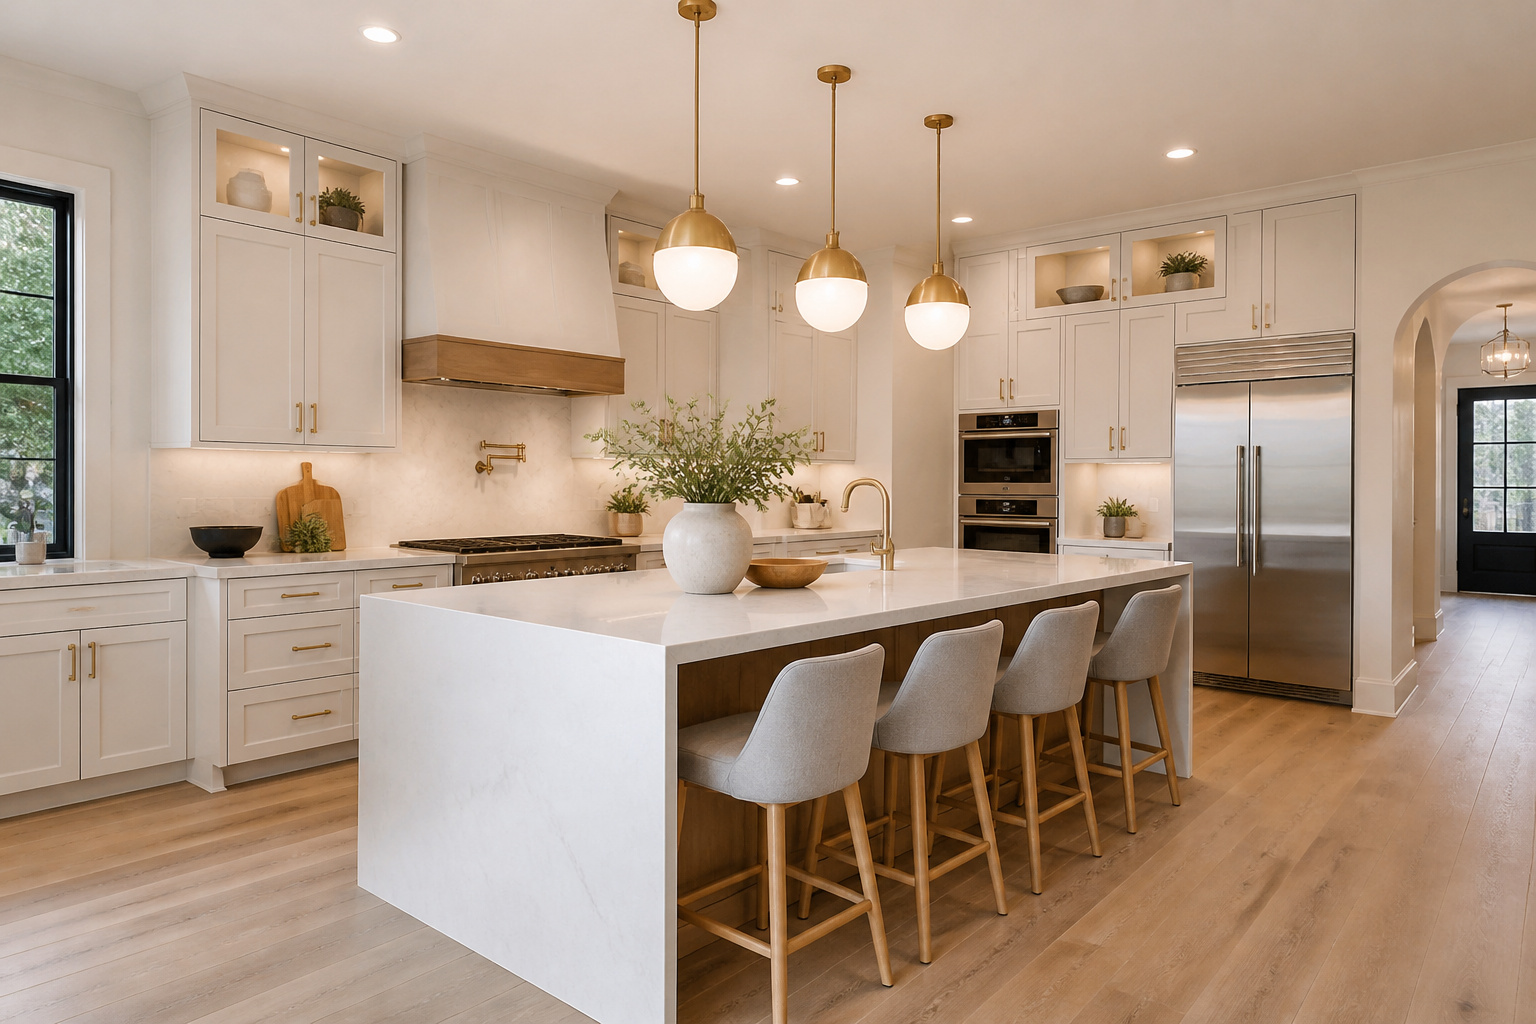
8. Integrated Breakfast Bar Island with Pendant Lighting Above
The breakfast bar island is one of the kitchen island ideas most people prioritize once they’ve seen it work in practice. It turns the island from a prep-only surface into the place people actually want to sit. When the seating and lighting are right, the island becomes the kitchen’s center of gravity.
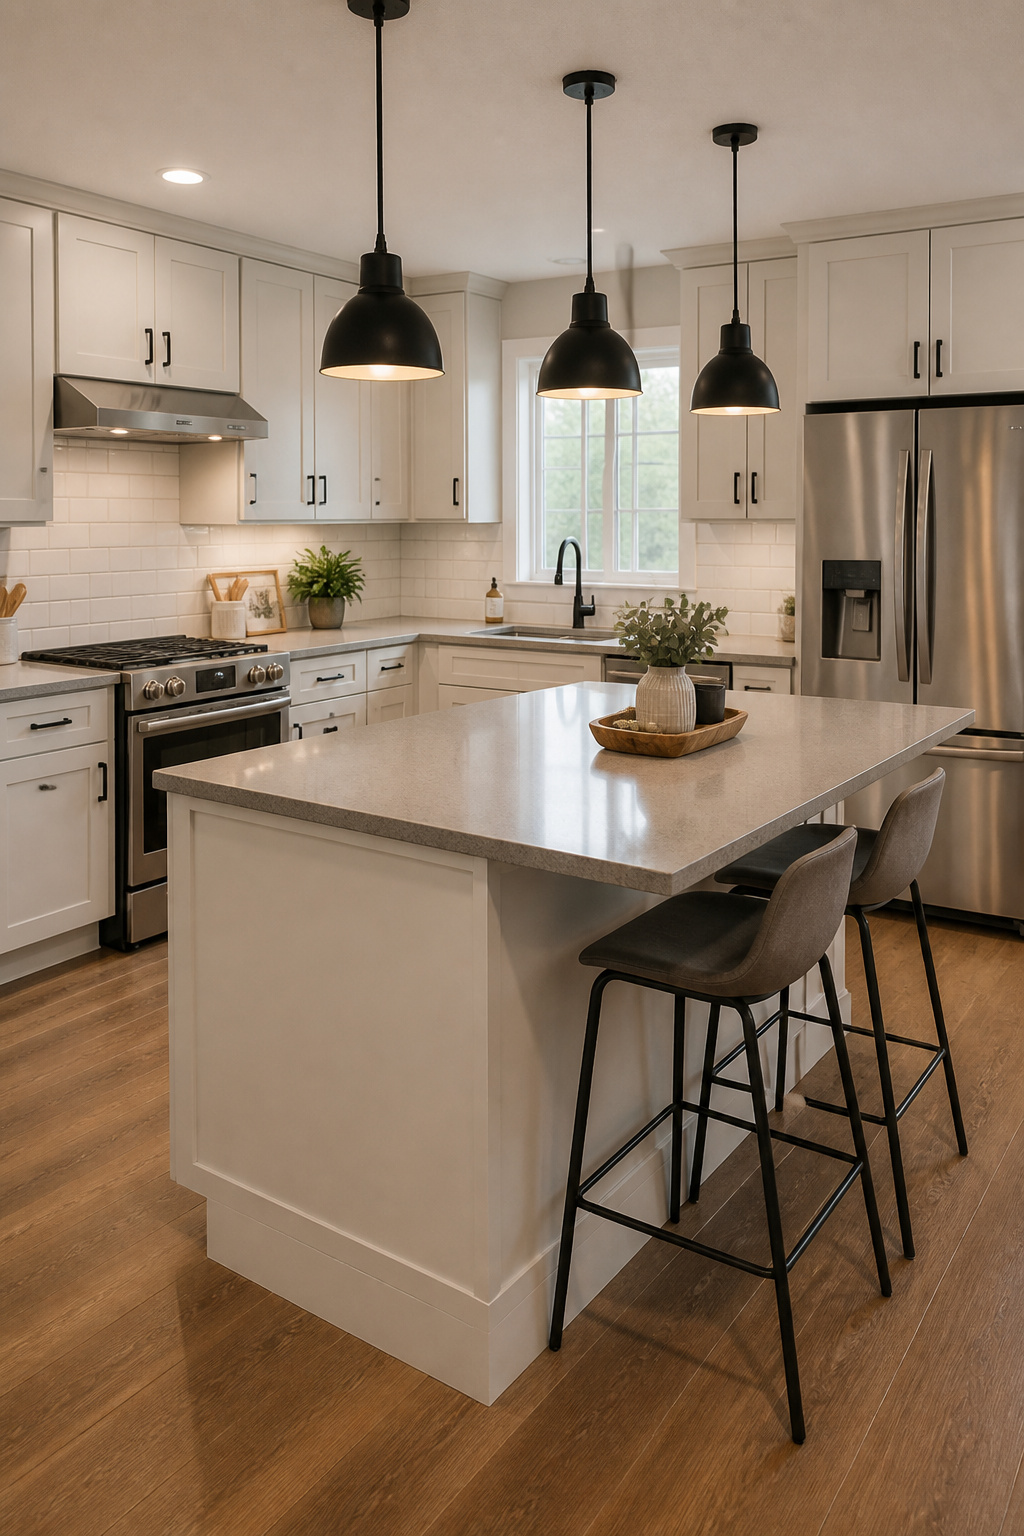
The overhang dimension is where most breakfast bar islands fall short. Fifteen inches is the minimum for comfortable seating. At 12 inches — which many stock islands ship with — there’s nowhere for your knees, and nobody uses it. Overhangs beyond 18 inches need corbels or steel brackets underneath to prevent cantilevering.
Pendant Light Placement
Hang pendant lights 30–36 inches above the countertop surface. For 9-foot ceilings, that puts the pendant base at 66 inches from the floor. For 8-foot ceilings, aim for 60 inches. Space pendants 24–30 inches apart along the island length — three pendants for a 48–60-inch island is the standard. For kitchen lighting ideas beyond just the island, the Kitchen Lighting Inspiration guide covers layering ambient, task, and accent light throughout the whole space. Install a dimmer on the pendant circuit: bright for prep, dimmed for dining.
Stool Selection
Counter height (36-inch island) needs 24–26-inch stools; bar height (42-inch island) needs 28–30-inch stools. Backless stools are better for tight clearance — they tuck fully under the overhang and don’t block circulation. Upholstered seats look comfortable but show every kitchen spill; leather wipes clean and patinas well with use. Metal and wood stools with a footrest are the most practical option for a busy household.
9. Black Steel and Quartz Minimalist Island for Modern Kitchens
The all-black island sits at the dramatic end of kitchen island ideas — and that’s exactly why it polarizes people. In the right kitchen, a black steel island with a light quartz top reads as confident and architectural. In the wrong one, it feels like furniture from a different house. The difference is about proportion and contrast.
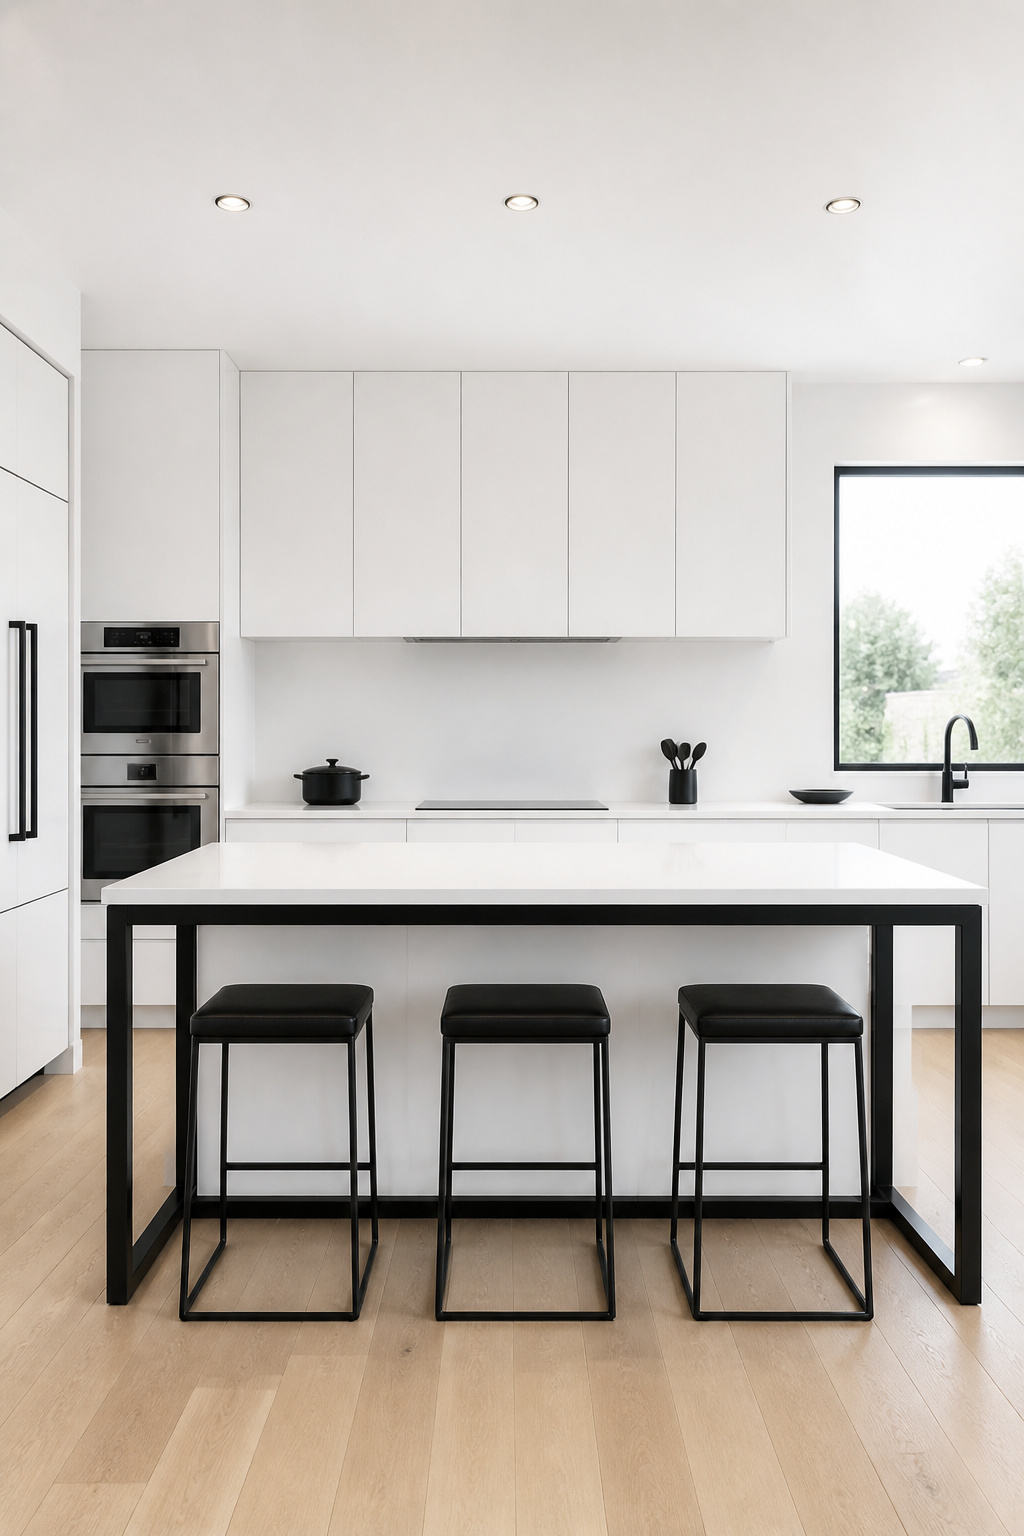
Black islands work best in kitchens over 200 square feet. In smaller spaces, a dark island can make the room feel compressed rather than dramatic. The counter — keep it white or light grey quartz, not black. An all-black island top and frame in a white kitchen reads as a monolith rather than a designed feature; the contrast between the dark frame and the light top is what gives it dimension.
Finish Options
Matte powder coat is the most durable black finish for a kitchen island — chip-resistant and hides fingerprints better than satin or gloss. Satin black shows fingerprints on every touch but wipes clean easily. Gloss black is beautiful for about three weeks before it looks perpetually smudged. For a kitchen with children or heavy daily use, matte is the correct choice.
Sourcing
The REFORM kitchen system from Denmark makes black anodized aluminum fronts that work with standard cabinet boxes — a complete island runs $3,000–$8,000 depending on size. At the budget end, IKEA VADHOLMA with a custom quartz top and powder-coated steel legs achieves most of the same look for under $800. Custom fabrication from a local cabinet shop lands in the middle: expect $2,500–$6,000.
10. Vintage Workbench Kitchen Island Idea: Character Over Convention
A vintage workbench from a machine shop or woodworking studio is the kitchen island idea that people stop and ask about. There’s an honesty to it. The surface has been used, the steel shows its years, the wood carries the marks of real work. No reproduction gets close to that. Finding a good one and preparing it for kitchen use takes more care than anything else on this list.
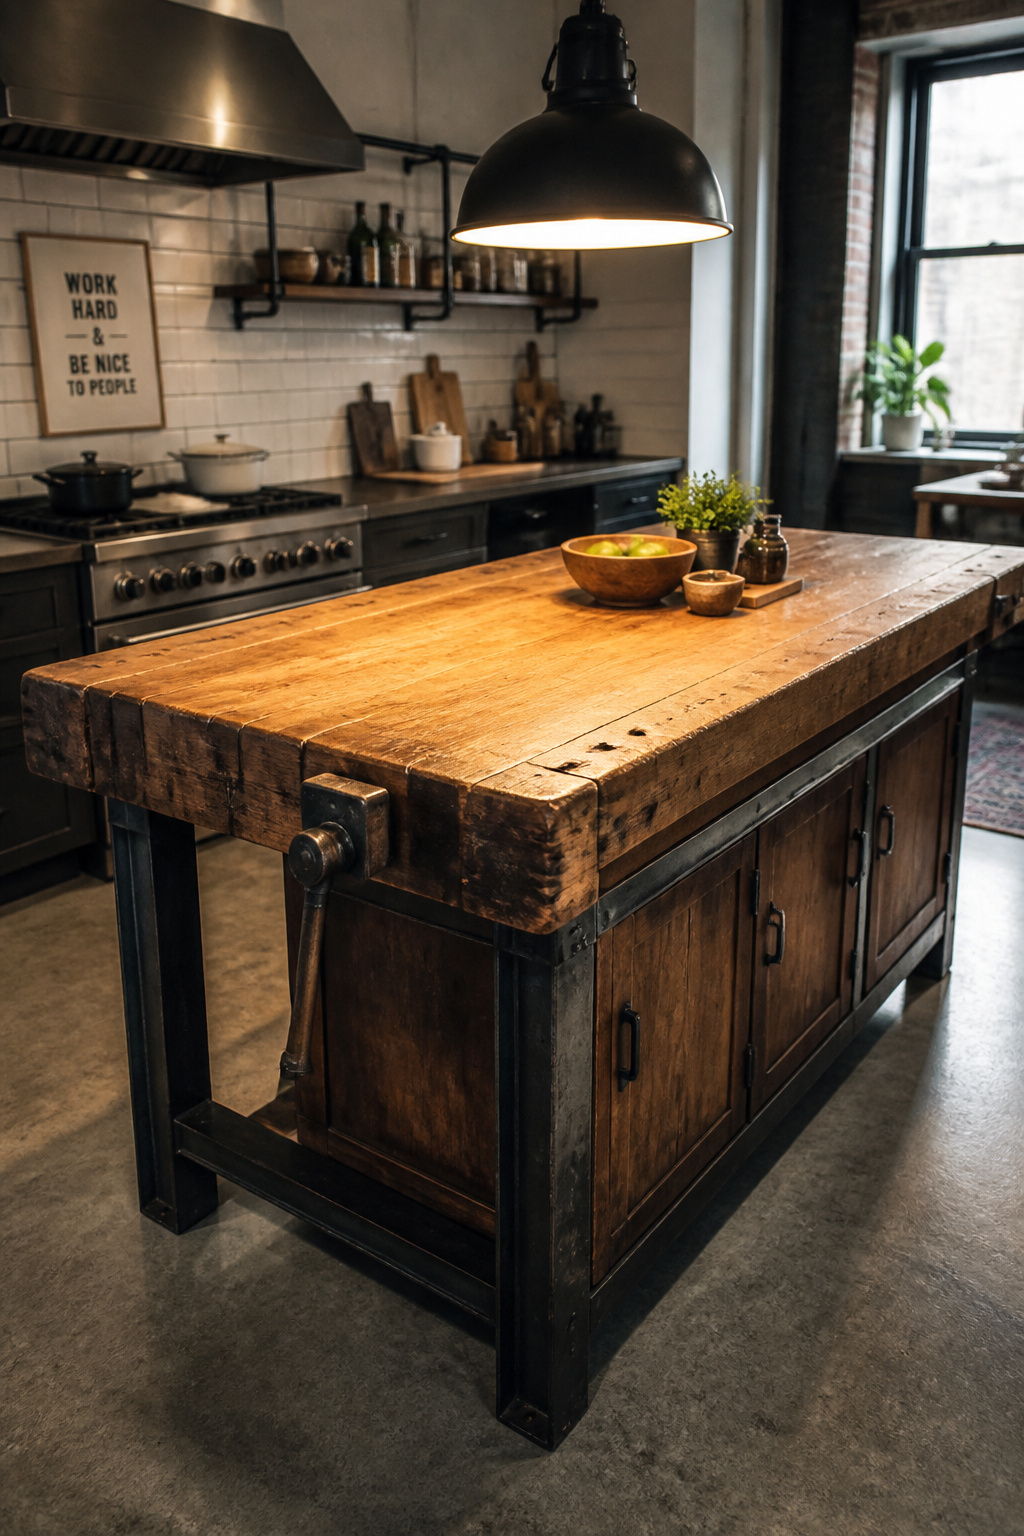
Types of Workbenches That Convert Well
Woodworker’s benches — those solid maple or beech slabs built to take plane and chisel work — are the best starting point. The wood is typically 3–4 inches thick, the frame is massive, and the height is close to counter standard. Machinist’s workbenches in heavy steel also convert well if the top is replaceable; a steel work surface from a machine shop is food-compatible once properly cleaned.
eBay is the primary market — search “vintage industrial workbench,” “machinist bench,” or “Wilton workbench.” Prices run $200–$900. Local estate sales with full workshop contents are often cheaper, sometimes drastically so. The risk is that you can’t test stability or smell it for contamination before buying online.
What to Avoid
Workbenches from auto shops, machine shops that used cutting oil, or garages with fuel and solvent spills are not worth reclaiming for kitchen use. Oil and solvent contamination penetrates porous wood and steel and can’t be removed. If the bench smells like motor oil or lubricant when you approach it, walk away. Benches from bakeries, food manufacturing, or woodworking studios that handled only dry materials are the safe choices.
11. Built-In Appliance Island with Integrated Cooktop
A cooktop island turns the island into the kitchen’s cooking engine — and fundamentally changes how you work in the space. Instead of cooking facing a wall, you cook facing the room. Guests and family can watch or talk without your back turned to them. It’s the configuration that makes cooking social rather than solitary.
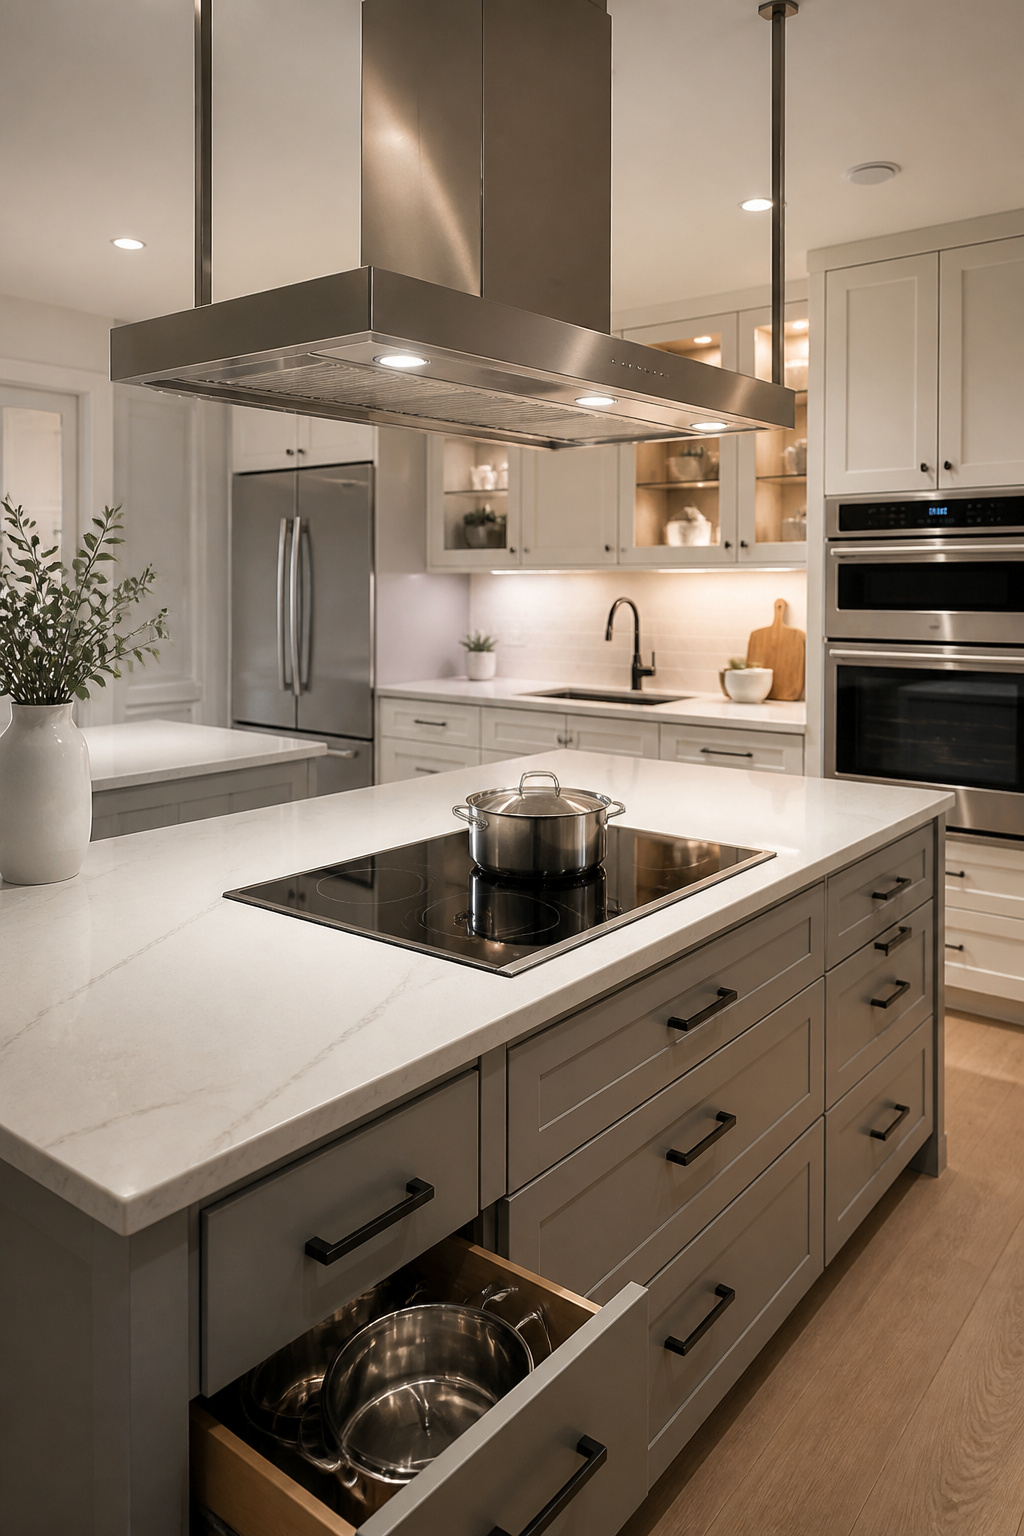
Ventilation is the part you cannot shortchange here. These kitchen island ideas with integrated cooktops come with a hard requirement: proper extraction, planned before anything else. An island cooktop needs either an overhead suspended range hood or a downdraft system built into the island surface. Overhead extraction captures 95%+ of smoke and vapors. Downdraft systems capture 70–80% — adequate for everyday cooking but not for high-heat searing or long stock reductions.
Hood Clearance
The bottom of the range hood should sit 30 inches above a gas cooktop, 24 inches above electric or induction. A suspended island hood at 30–42 inches below the ceiling becomes a visual focal point in the kitchen — size it proportionally to the island, not the cooktop. An undersized hood over a large island looks like an afterthought. For backsplash ideas that work around a cooktop island, the Kitchen Backsplash Design: 12 Timeless Ideas for Your Home guide covers materials that handle heat and steam in the cooking zone.
Induction vs. Gas
Induction is gaining ground on gas for island installations. It’s faster, requires only a 240V circuit rather than gas plumbing, and generates less combustion — meaning the ventilation requirement is less critical. A licensed electrician adding a 240V/50A circuit typically costs $200–$500. Running a flexible gas line through the floor requires a licensed plumber and costs $400–$800, plus the fire code requirements around exposed lines under an island.
12. Pull-Out Storage Island with Hidden Panel Drawers
Every kitchen island should be doing storage work — but most people under-design the drawer configuration and then complain about clutter. Storage-focused kitchen island ideas are some of the most impactful because they change how a kitchen functions rather than just how it looks. The difference between useful storage and a junk collector is almost entirely in the drawer layout, planned before construction.
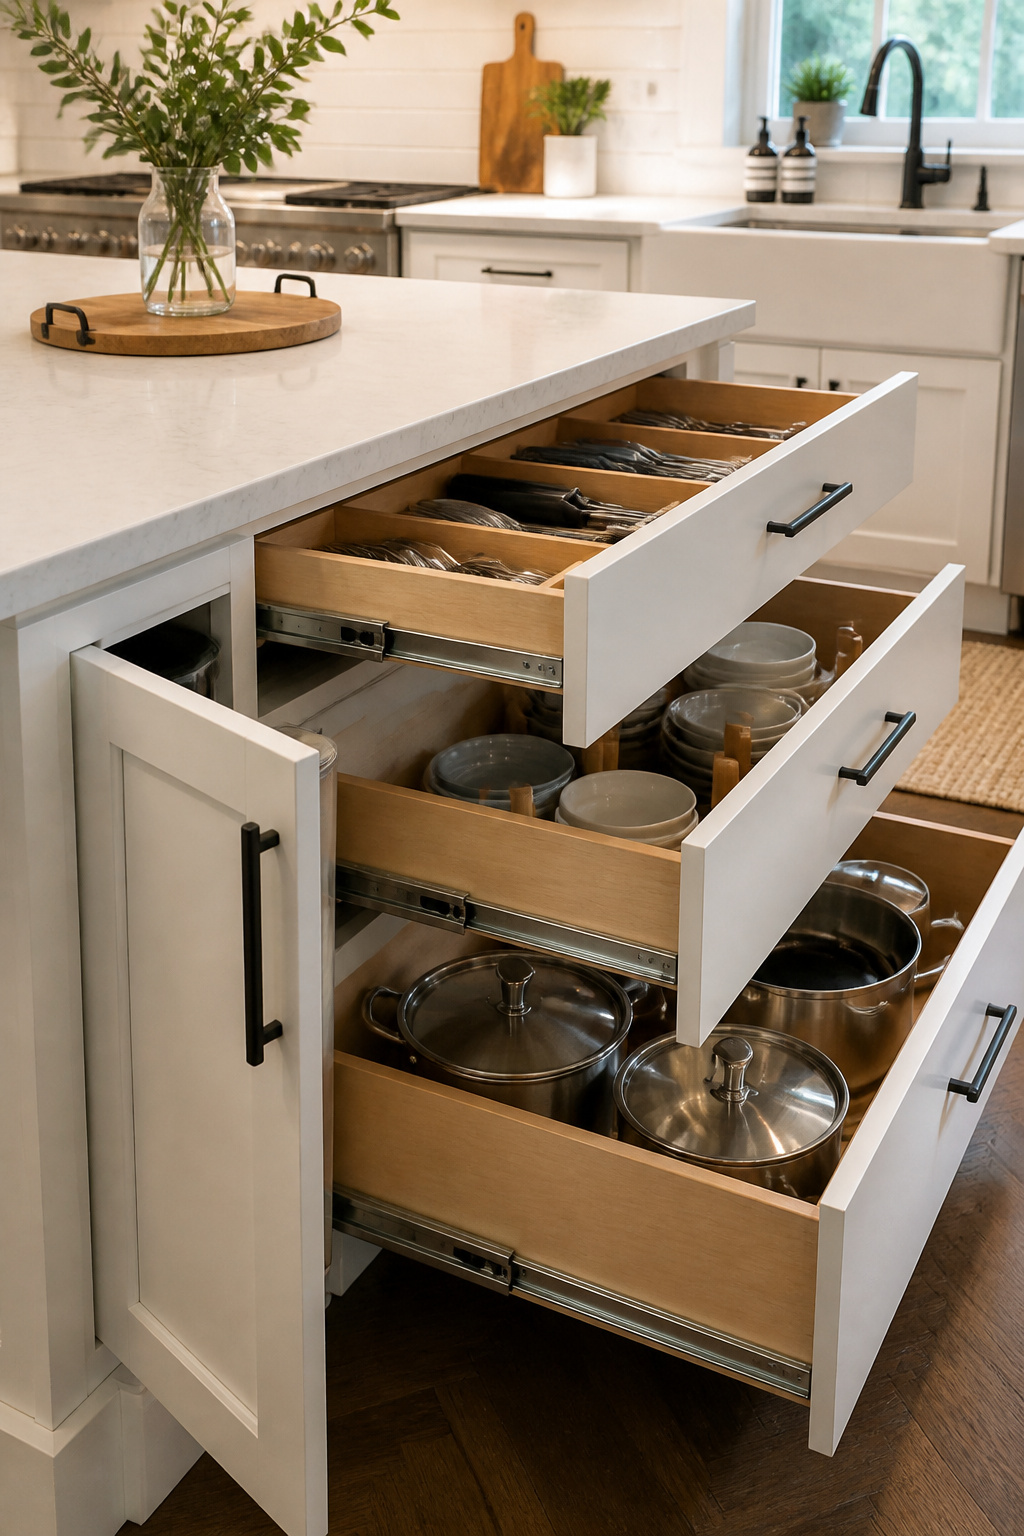
The drawer layout should match your cooking patterns, not a magazine photo. Bottom drawer: 10–12 inches deep for sheet pans and Dutch ovens. Middle drawers: 6–8 inches for spatulas, tongs, and wooden spoons. Top drawer: 4 inches for cutlery and small tools. OXO drawer organizers ($30–$50 for a configurable set) keep items from sliding and make everything visible.
Hardware That Matters
Blum TANDEM plus BLUMOTION soft-close slides are the industry standard for good reason. Available at Rockler or any decent hardware store, they run $35–$60 a pair. Cheap drawer slides fail at the most inconvenient moments — when you’re pulling out a heavy cast iron pan that lands on your foot when the slide collapses. This is not where to cut cost.
The Hidden Panel Look
Shaker-style flush panel doors on base cabinets look like a solid side panel from three feet away. The drawer gaps are small enough to disappear with full-overlay hinges and a consistent reveal. Semihandmade makes IKEA-compatible fronts at $60–$120 per door — the result looks custom at stock pricing. Group your drawers by cooking zone rather than category: a baking zone with parchment, rolling pin, and measuring cups all in one area; a stovetop zone with tongs, oils, and spoon rests adjacent to the cooktop side of the island.
13. Narrow Kitchen Island Ideas for Galley-Style Layouts
The galley kitchen presents the most constrained version of this challenge. The instinct is to skip the island entirely. But a narrow island, done right, adds prep space and storage without creating the obstacle course most people fear. The key is respecting the clearance numbers.
The NKBA minimum is 42 inches of clearance on each working aisle for one cook. A standard galley is 8–12 feet wide. In an 8-foot galley (96 inches), subtracting 84 inches for two 42-inch aisles leaves 12 inches — too narrow for a useful island. A 10-foot galley allows an 18-inch island with comfortable clearance. A 12-foot galley allows 24 inches of island depth — genuinely useful.
Making a Narrow Island Work
An 18-inch-deep island still functions well as a prep surface, a storage zone, and a visual anchor. Add open shelving on the non-traffic side for quick-access items — cookbooks, cutting boards, small bins. A butcher block top serves as a built-in cutting board across the whole surface. Keep the base simple: two columns of drawers or shelving without doors, which is easier to access in a tight space.
The End Extension Trick
Extend one end of the island 6–8 inches longer than the main body to create a small seating nook at the end. Two stools can fit at the end overhang without protruding into either aisle. It’s one of those details that reads as a design choice rather than a workaround — which it also is.
14. Shiplap-Sided Island for Farmhouse Kitchen Character
Shiplap on a kitchen island is one of those kitchen island ideas that costs a weekend in labor and changes the whole room. A standard cabinet-box island with flat sides becomes something with texture, depth, and a clear design point of view. Done with restraint, it elevates a kitchen. Done alongside open shelving, chicken wire inserts, and mason jar lights, it tips into visual noise.
The material choice matters more than most people realize. Real shiplap in pine or cedar looks the most authentic but expands and contracts with kitchen humidity — leave 1/16-inch gaps between boards and don’t glue the top row, which takes the most seasonal movement. MDF shiplap boards are dimensionally stable but heavy and will swell if they get wet consistently. PVC shiplap trim from manufacturers like Azek looks identical to wood, is completely waterproof, and never needs repainting. For a kitchen environment where spills and steam are regular, PVC shiplap is the practical recommendation. For more design ideas on pairing wood elements with a modern kitchen, the Modern Farmhouse Kitchen Design guide has 15 ideas that show how to avoid the dated look.
Finishing and the Dated Look Problem
Use satin or semi-gloss paint on shiplap in a kitchen — flat and matte finishes don’t wipe clean and show every smudge. Benjamin Moore Chantilly Lace reads bright white without the blue undertone that makes some whites look clinical. For a warmer tone, Sherwin-Williams Accessible Beige sits at the warmer end of neutral without reading yellow.
The way to avoid the farmhouse cliché is to pair the shiplap island with non-farmhouse elements: a simple waterfall quartz top, matte black hardware, or contemporary pendant lighting with a clean geometric profile. One strong traditional element surrounded by modern ones reads as considered. Multiple traditional elements together read as a theme park.
15. Mixed-Material Kitchen Island Ideas: Wood, Metal, and Stone Combined
A mixed-material island is the most sophisticated of these kitchen island ideas — and the hardest to get right. When it works, each material looks placed for a reason. When it doesn’t, it looks like three decisions that never spoke to each other.
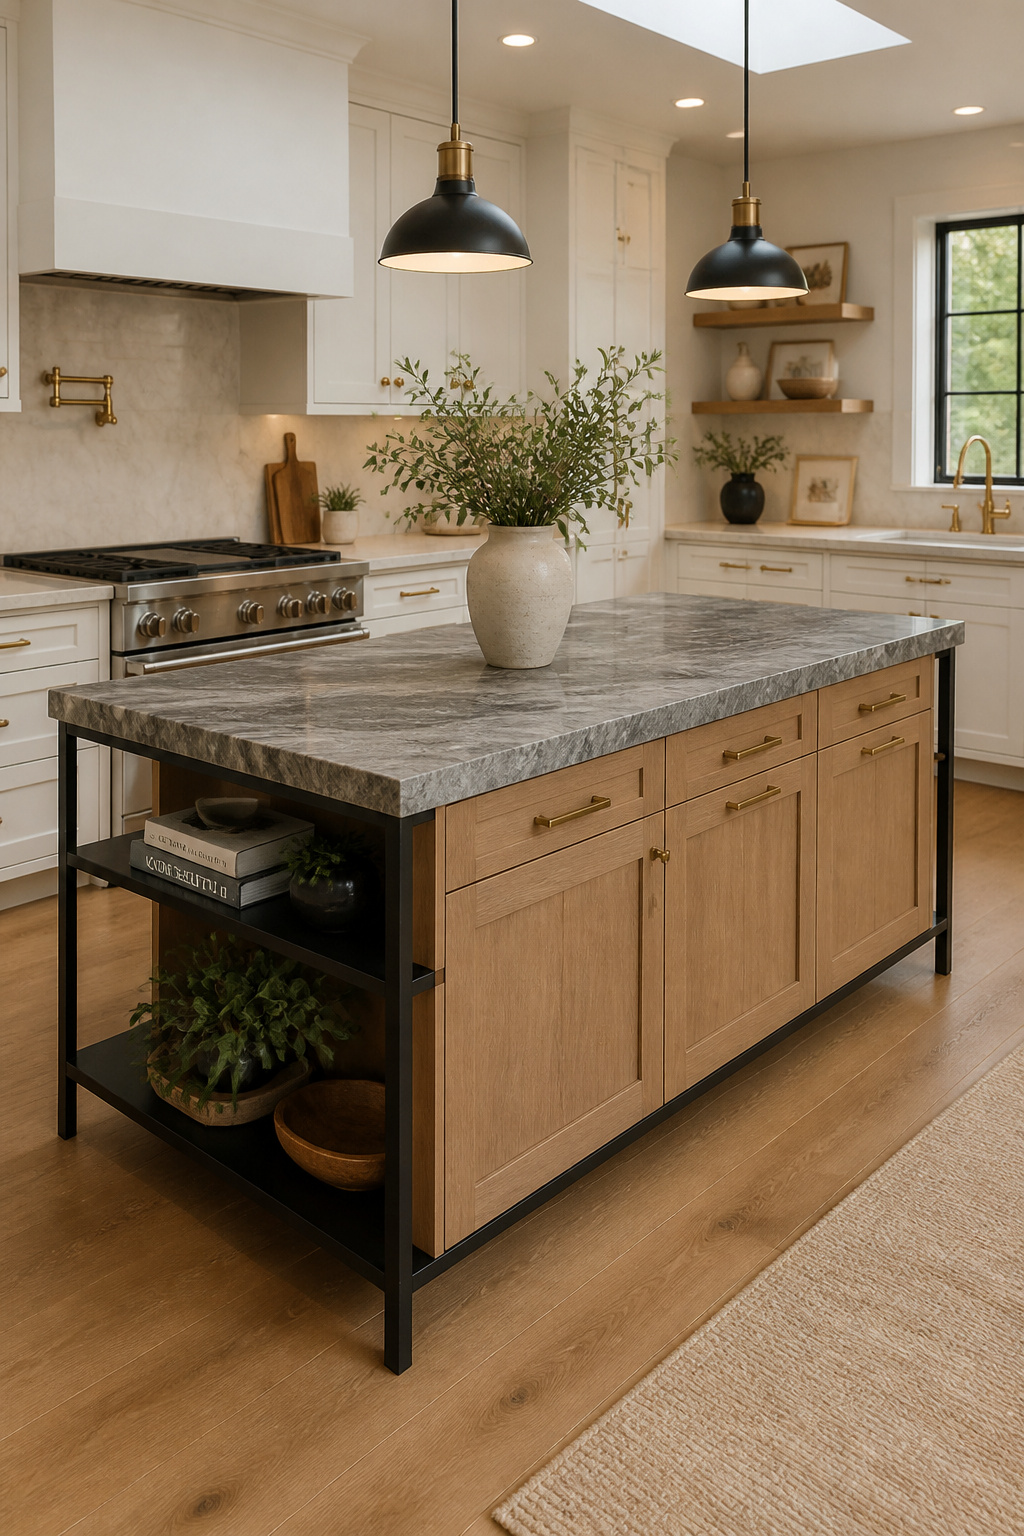
The three-material limit is a rule worth following. More than three materials on a single island creates visual chaos — every surface is competing for attention. Pick a dominant material (roughly 60% of the visual surface area), a secondary material (30%), and an accent (10%). The dominant material anchors the island. The secondary defines its structure. The accent rewards a closer look.
Common Pairings That Work
Walnut lower cabinets with white quartz top and brushed brass hardware — warm, contemporary, and visually connected to a natural material palette. White oak base with a marble or quartzite top and matte black metal legs — the Scandinavian-industrial pairing that photographs well and ages even better. A painted cabinet base with a butcher block end section and open metal shelving on one side — the most practical interpretation, with different surfaces dedicated to different functions.
Maintaining Visual Cohesion
Repeat each material elsewhere in the kitchen. If the island uses brushed brass hardware, use the same finish on faucets and fixtures. If it has white oak doors, echo that tone in flooring or shelving. A material that only appears on the island looks like an experiment. One that appears elsewhere looks like a system. For guidance on the full range of luxury kitchen surfaces that pair well with a mixed-material island, that guide covers stone, metal, and wood combinations in a kitchen context.
Choosing the Right Kitchen Island for Your Space and Lifestyle
Fifteen kitchen island ideas, each with a different starting point and a different result. Before you choose a direction, the right question isn’t “which looks best?” — it’s “what does this kitchen actually need?”
How to Match Island Size to Your Kitchen Footprint
The clearance numbers come first: 42 inches minimum on each working side, 48 inches if two people cook together. Measure your kitchen floor plan with these constraints applied, and you’ll see immediately whether the island you have in mind fits. Most people overestimate the available space. A kitchen that looks large when empty can feel tight once an island, cabinets, appliances, and people are all in place. If the math only works with 36-inch clearance, a freestanding cart beats forcing a permanent installation that creates friction every day.
Prioritizing Function
Storage-first households should prioritize drawer configuration above everything else. The number of drawers, their depth, and slide quality matter more than the finish. Cooking-focused kitchens should plan appliance integration and ventilation before any visual direction. Social kitchens should plan the breakfast bar overhang and stool selection first. None are exclusive, but one should drive the decisions and the others follow.
The One Decision That Matters Most
Whether the island is fixed or freestanding is the first decision among all kitchen island ideas you can’t undo cheaply. Fixed islands are permanent. Plumbing, gas, or structural changes require permits and contractors, and the island doesn’t move when you do. Freestanding islands can relocate, cost less, and require no professional installation. For renters or anyone uncertain about long-term plans, a high-quality freestanding island beats a mediocre fixed one every time. Start with what you know you need. Add what the kitchen asks for once you’ve lived in it for a season.