
Most people treat the backsplash as an afterthought. They choose it last, after cabinets are ordered and countertops are cut. That’s the wrong approach, and experienced designers know it. The backsplash runs at eye level. It catches light from every angle. It occupies the visual center of the room. Get it right, and your entire modern kitchen backsplash scheme holds together. Get it wrong, and even expensive cabinets look like they belong somewhere else.
I’ve specified backsplash materials across dozens of kitchen renovations — compact urban apartments, full loft conversions, and everything between. So these 16 modern kitchen backsplash ideas come from real projects. Each one has actual brand names, price brackets, and installation notes attached. Not mood-board inspiration that falls apart the moment you try to execute it.
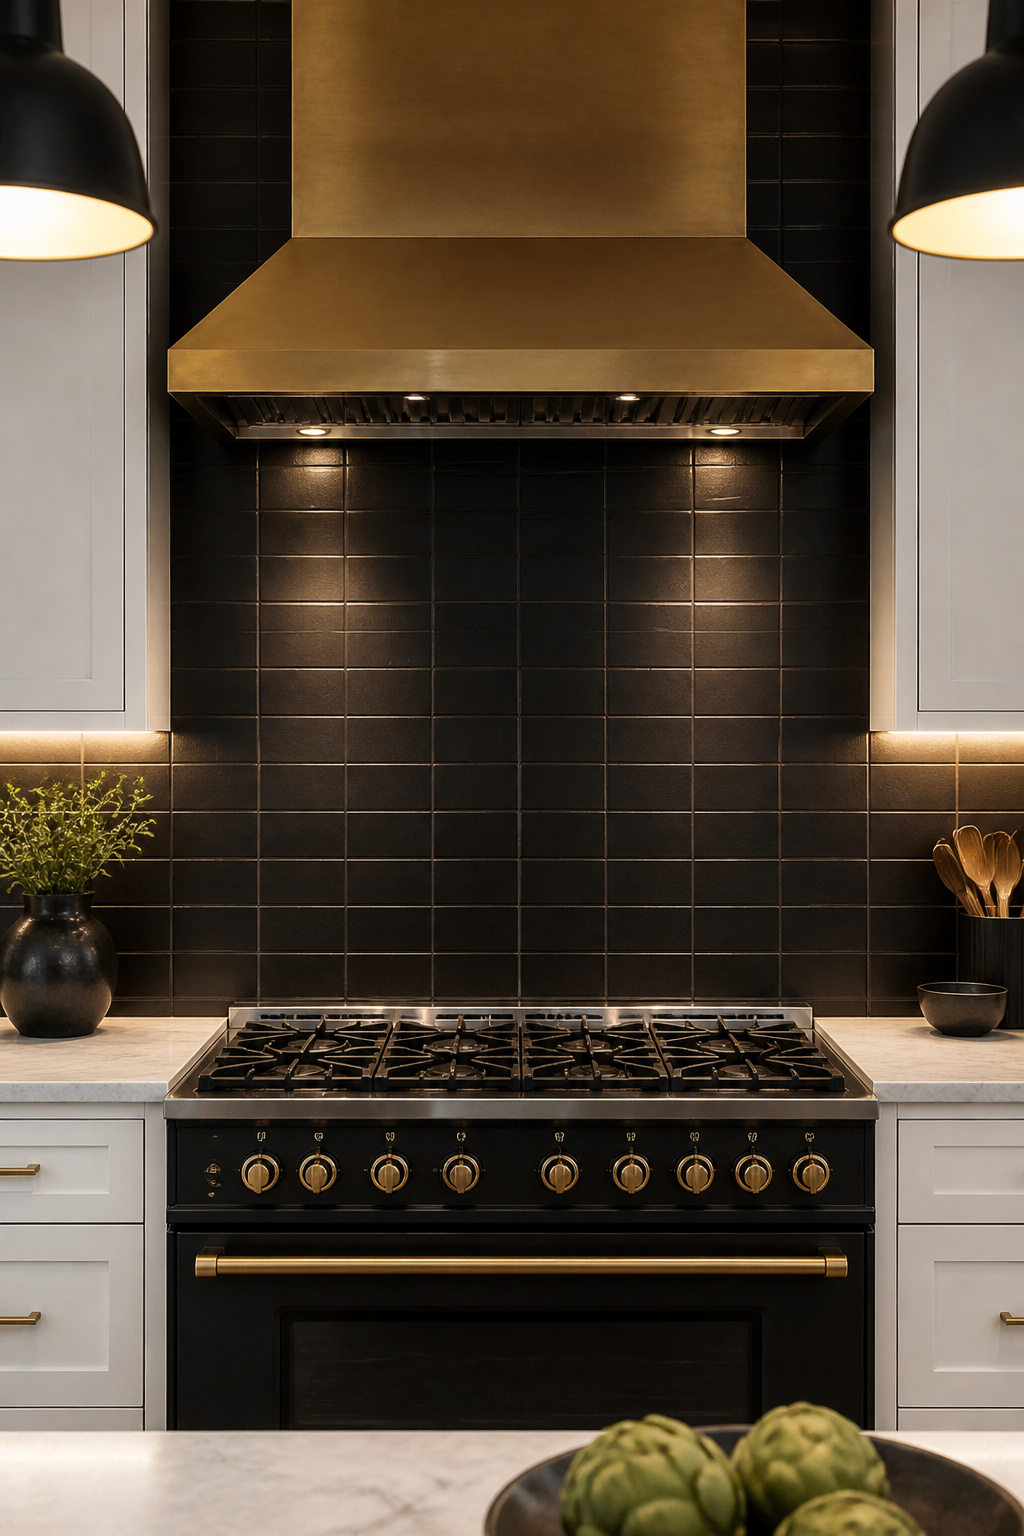
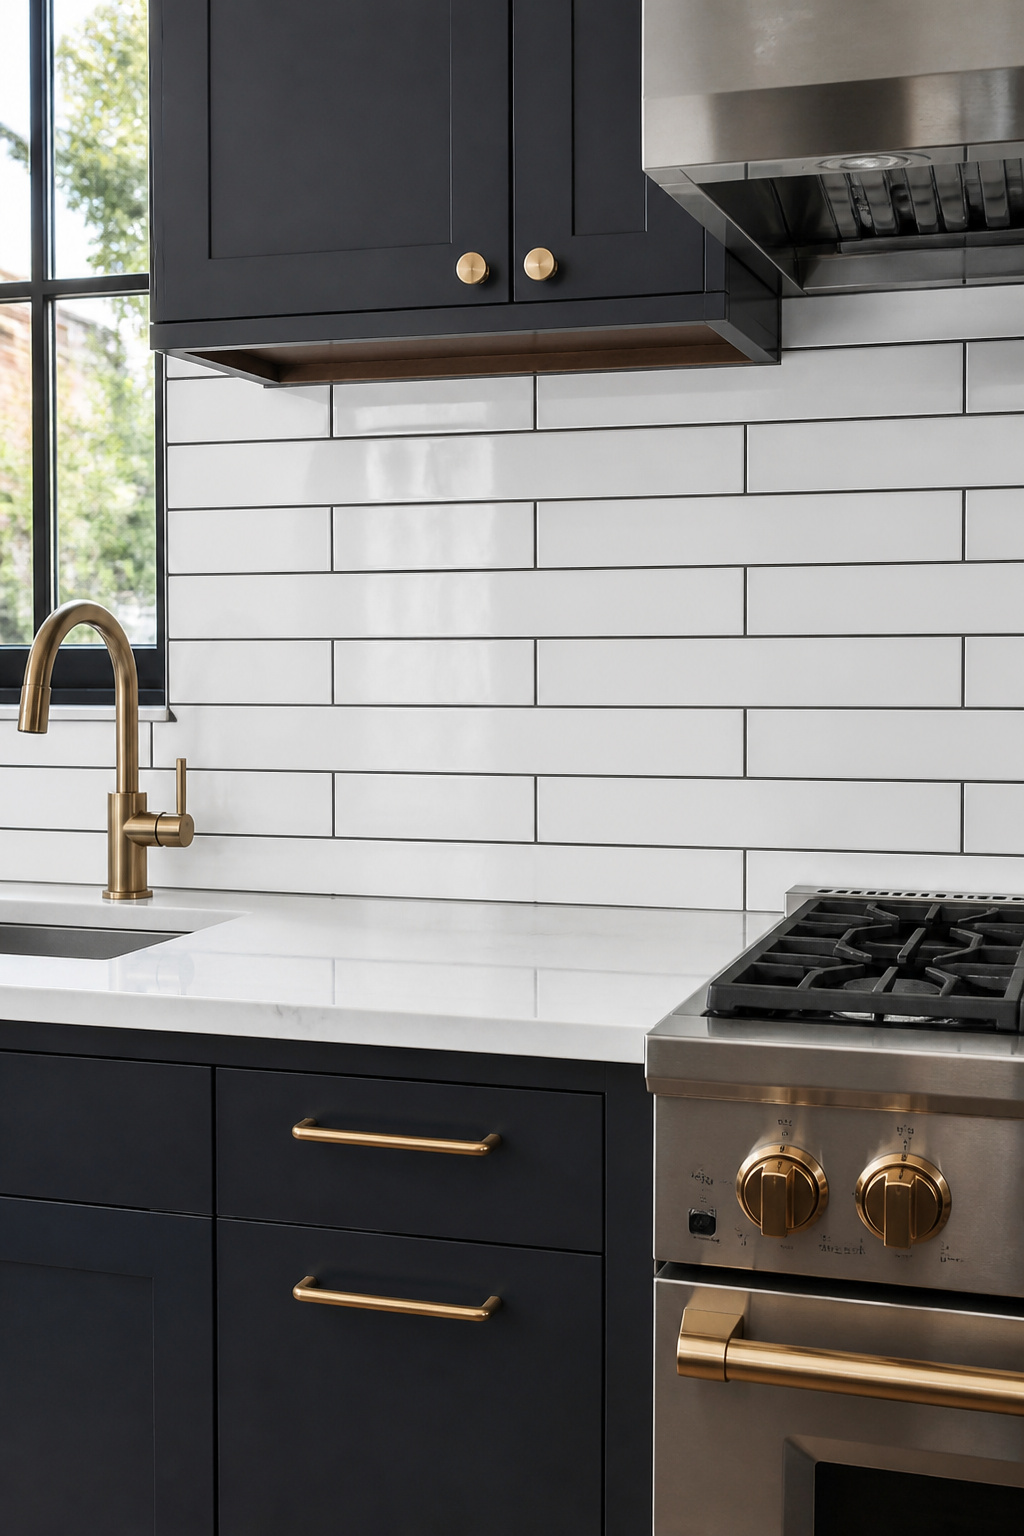
1. Matte Black Subway Tiles in a Vertical Stack Bond
The subway tile has dominated kitchen design for over a century. The matte black version installed in a vertical stack bond is its most architectural interpretation. Standard running bond emphasizes width. When you rotate the same tile to a vertical stack — each tile sitting directly above the one below — the eye follows the grout lines upward. In a kitchen that’s wide but only 8 feet to ceiling, that vertical pull is exactly what the space needs.
Why Vertical Stacking Changes the Proportions
Offset bond reads familiar. Vertical stack reads intentional. The eye follows straight grout lines upward. This adds perceived height without any structural change. In a kitchen with low ceilings or a narrow footprint, this is the cheapest proportion fix available.
Sourcing Matte Black Subway Tile
The 4×8 inch format reads more architectural than the classic 3×6. Fireclay Tile, Bedrosians, and MSI Surfaces all carry reliable matte black options. Ceramic runs $4–9 per square foot. Porcelain versions run $12–18 and are worth the upgrade behind a range, where heat and grease exposure are higher.
Grout Color Makes or Breaks It
Charcoal grout disappears into the tile and creates a single-tone graphic surface. White grout in a tight 1/16-inch joint adds crisp contrast. Avoid medium gray — it reads neither committed nor subtle. Request a sample board and view it under your kitchen’s actual lighting. Matte black tile reads completely differently under warm incandescent versus cool LED task lighting.
2. Large-Format Porcelain Slabs for Seamless Drama
If you want a modern kitchen backsplash that reads architectural rather than decorative, large-format porcelain slabs are the category that delivers. These aren’t standard tiles. They’re cut sections of full porcelain slabs in dimensions that eliminate visible grout lines almost entirely. The result is a surface that looks like one continuous piece of material. No assembled quality, no repeated pattern.
The Case for Reducing Grout Lines
Every grout joint is a visual break. In a modern kitchen, where the goal is cohesion and calm, fewer joints mean less visual noise. Large-format slabs in the 126×63 inch range can cover an entire run of kitchen wall with just one or two seams. The room reads quieter as a result.
Specifying the Right Slab
Dekton (Cosentino), Neolith, and Porcelanosa’s Urbatek range are the dominant players here. For a backsplash, specify 6mm thickness — it’s lighter and easier to bond to standard drywall than the 12mm countertop version. Dekton Rem and Dekton Kairos both have a realistic honed concrete quality. Installed cost runs $25–65 per square foot depending on material and complexity.
Best Finishes for a Modern Kitchen Backsplash
Matte or satin finishes diffuse light rather than reflecting it. That suits most modern kitchens. Glossy large-format slabs amplify every grease haze and water streak. In a working kitchen, you’ll be wiping them constantly. A lightly honed surface gives visual depth without the maintenance burden.
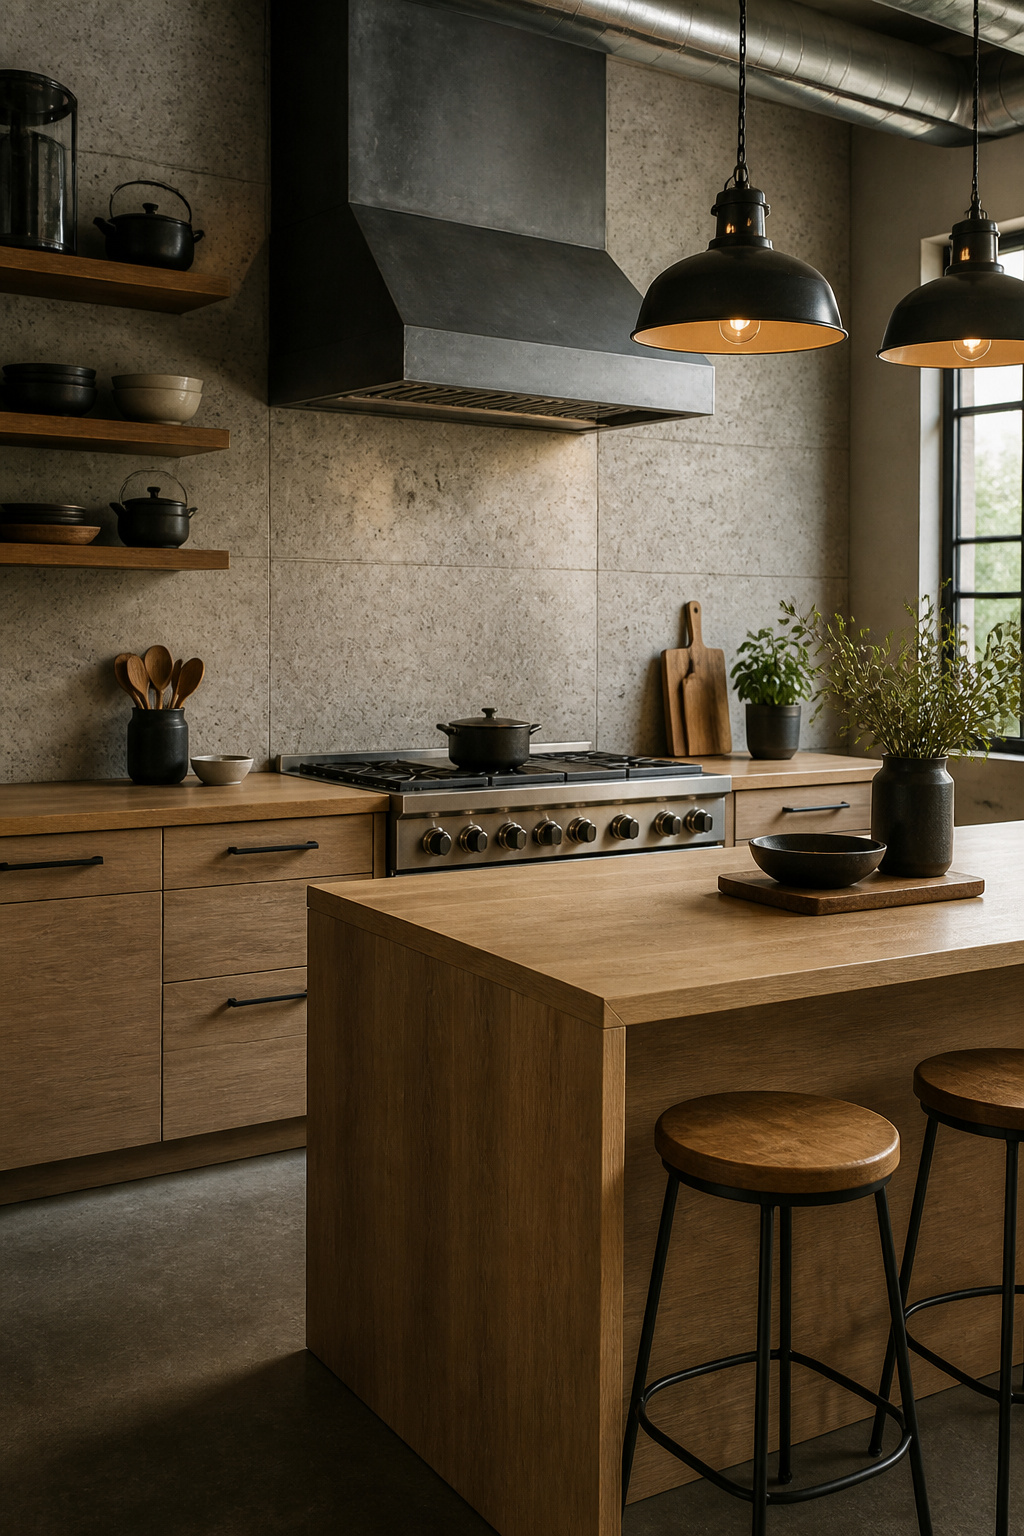
3. Honed Concrete Panels for an Industrial-Modern Look
Honed concrete is one of the most requested backsplash materials in urban renovation projects. It’s also one of the most misunderstood. Real cast concrete panels look extraordinary. But they’re heavy — 8–12 lbs per square foot — and require structural wall verification. Concrete-look porcelain from Atlas Concorde’s Boost range delivers a near-identical aesthetic at 2–3 lbs per square foot with zero maintenance required.
Real Concrete vs Porcelain Look-Alikes
The real thing has a depth that porcelain can’t fully replicate. Small natural variations in aggregate are part of the appeal. But in a working kitchen, those same variations trap grease differently in different areas. For the tactile authenticity, use real GRC (glass fiber reinforced concrete) panels at 1/4-inch thickness. They weigh 60% less than poured slabs and bond directly to standard drywall.
Sealing and Maintenance
For real concrete, apply Aqua Mix Sealer’s Choice Gold before grouting. Reapply every 12–18 months. For concrete-look porcelain, no sealing is needed. That’s a significant practical advantage in a high-use cooking space. Atlas Concorde’s Boost Ash, Boost Pearl, and Boost Smoke cover the warm, cool, and mid-tone gray range without the greenish cast that cheaper concrete-look tiles tend to show over time.
Pairing Honed Concrete With Other Materials
Warm wood and dark steel are the natural partners here. A walnut shelf bracket or an oak countertop softens the cold quality of gray concrete. Use matte black hardware — powder-coated rather than chromed — to keep the material palette intentionally raw.
4. Glossy White Subway Tiles With Dark Contrasting Grout
This is the most replicated modern kitchen backsplash combination for good reason. It costs very little, installs in a day, and the dark grout does all the visual work. The difference between a version that looks designed and one that looks like a builder installation comes down to three specific decisions: tile format, grout type, and joint width.
Why the Format Choice Matters
The standard 3×6 subway tile reads residential and familiar. The elongated 2×8 or 4×12 format reads architectural. In a modern kitchen with flat-front cabinets and integrated appliances, that extra proportion signals intention. Stacked bond reinforces the modern reading. Offset suggests traditional. Stack suggests contemporary.
Epoxy Grout vs Cement Grout
Cement grout in a strong dark color stains within months if left unsealed. Even with sealing, a cooking environment is hard on it. Laticrete Spectralock Epoxy grout in Midnight Black doesn’t stain, doesn’t need sealing, and holds its color for years. It costs roughly $2.50 per square foot more to install. That premium is worth paying. Ask your tile installer specifically for epoxy grout — many default to cement unless told otherwise.
The 1/16-Inch Joint Rule
Standard kitchen tile uses 1/8-inch grout joints. Narrowing to 1/16 inch makes the grout lines look like a design decision rather than a utility gap. Any unevenness in the tile becomes more visible with dark grout in tight joints. So specify a tile leveling system during install. It pulls each tile into precise alignment and makes the difference visible.
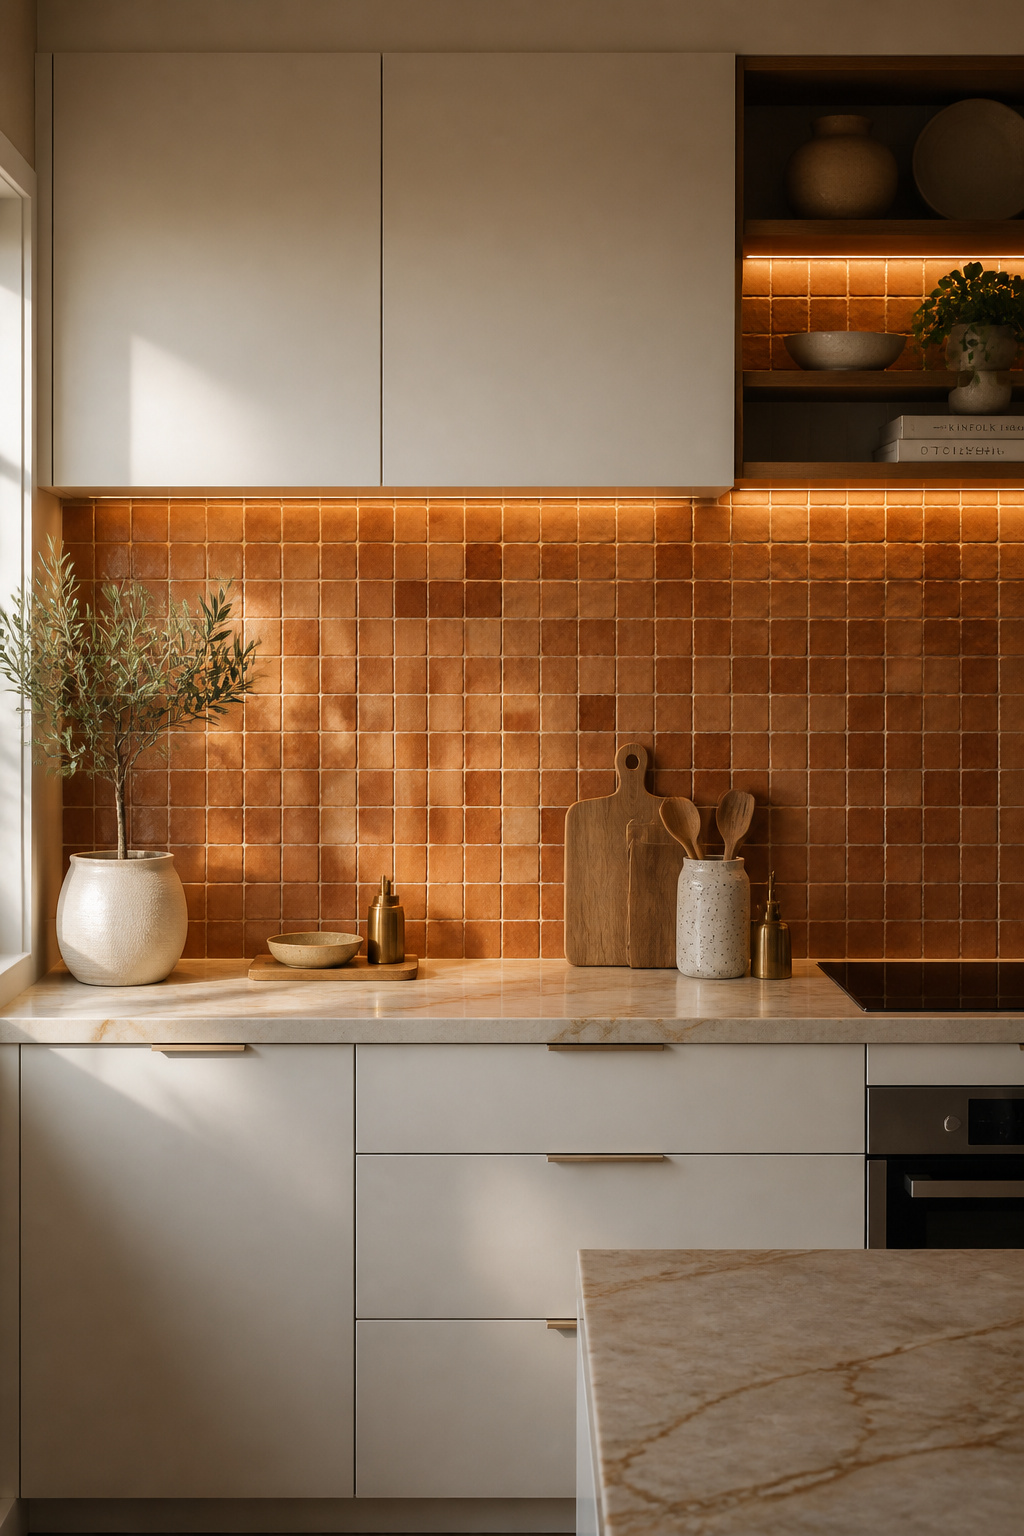
5. Zellige Terracotta Tiles for Handmade Texture
The appeal of zellige as a modern kitchen backsplash is exactly what makes it difficult to specify: each tile is slightly different. Hand-pressed Moroccan terracotta with a reactive lead-free glaze, zellige tiles vary in size, surface flatness, and color depth from piece to piece. The result is a surface that catches light in a dozen different ways simultaneously. No manufactured tile can replicate that quality.
Understanding Zellige Production
Zellige comes primarily from Morocco and Spain. Moroccan production has the most variation and the highest quality ceiling. Spanish production is more consistent but somewhat defeats the purpose. Cle Tile and Mosaic House carry reliable Moroccan options at $18–45 per square foot. The cost reflects the labor-intensive hand-forming and hand-glazing process.
Planning the Layout
Inherent size variation means tiles labeled 4×4 inches can range 3.75–4.25 inches. Flexible grout joints between 1/8 and 3/16 inch are required. Plan the layout from the center of the most visible run and work outward. Order 20% extra rather than the standard 10% overage. Color lots vary between production runs, and a reorder after running short risks a noticeable color shift.
Where Zellige Works Best
In a strictly minimal modern kitchen, terracotta zellige reads as an intentional warm counterpoint to flat cabinetry. It also works well behind an exposed range where the rest of the kitchen is white and flat. The one setting where it struggles: a kitchen already busy with pattern or heavy texture. Zellige earns its impact by being the room’s main textural moment.
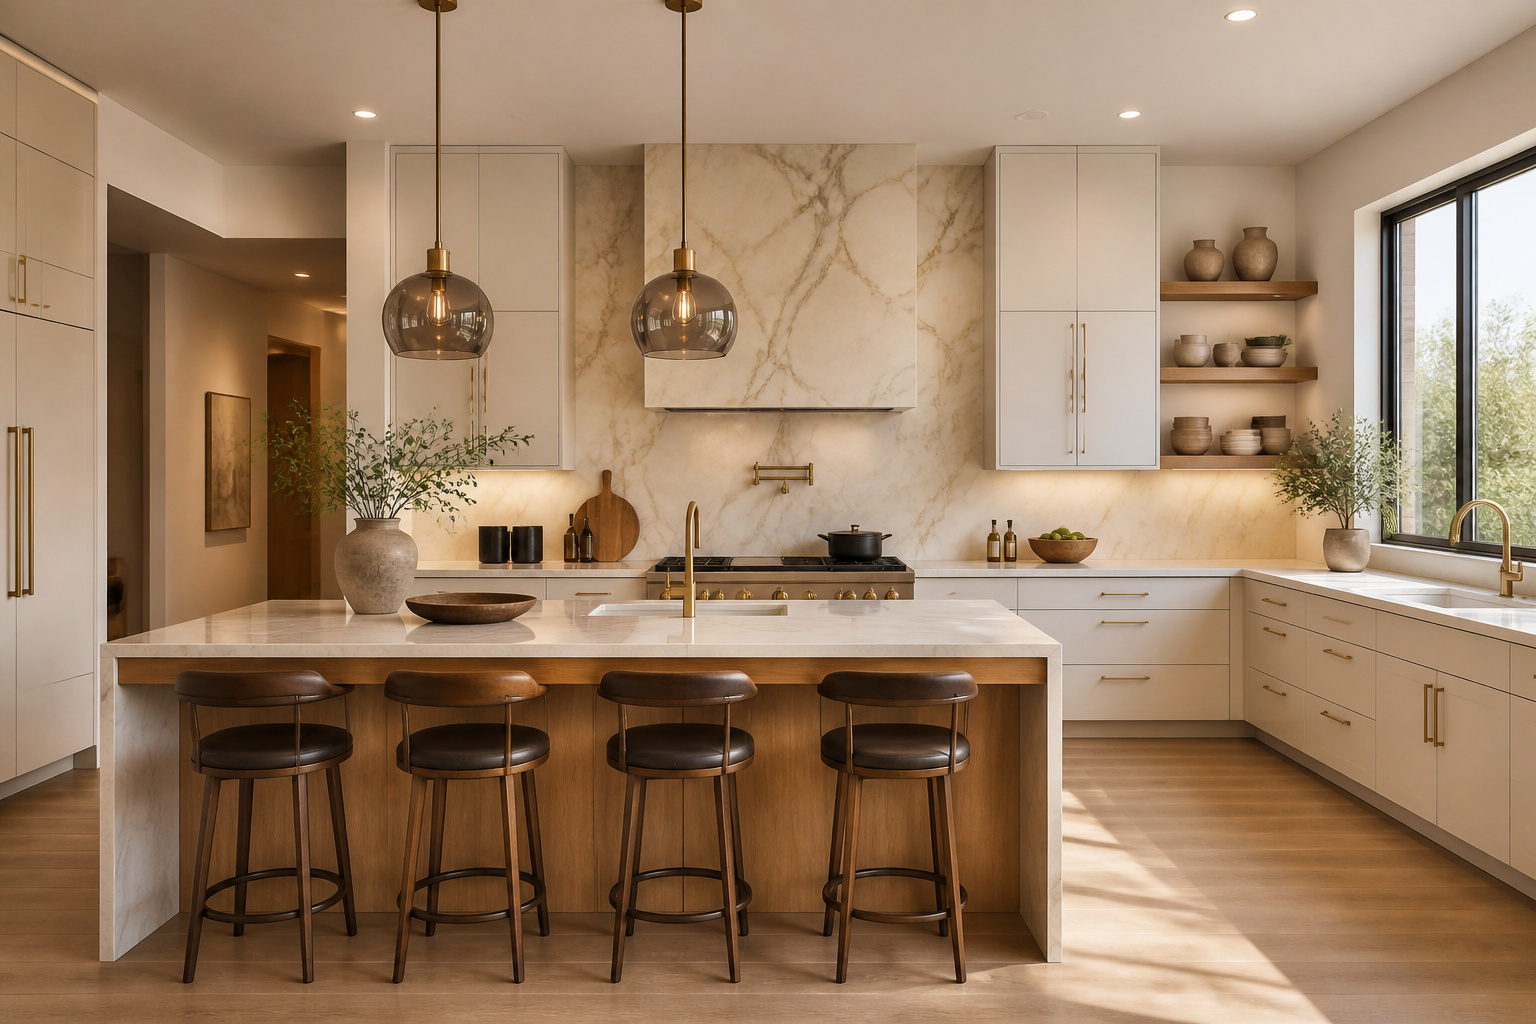
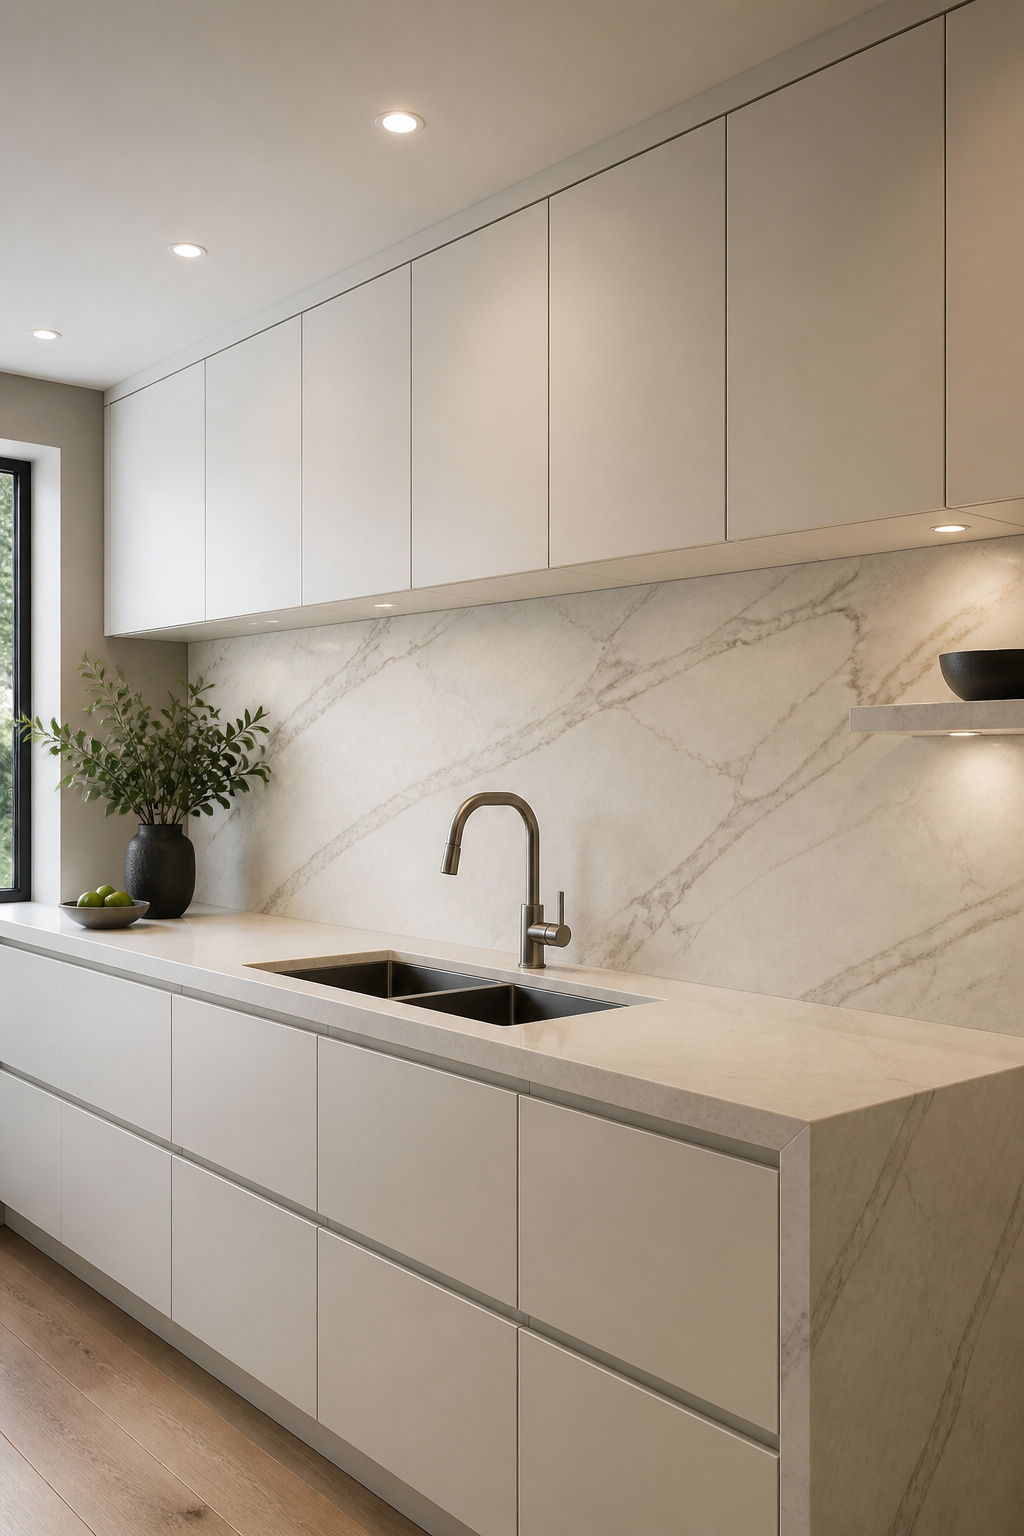
6. A Modern Kitchen Backsplash Trick: Waterfall Quartz From Counter to Wall
Running the countertop material continuously up the wall as a backsplash panel is one of the most effective modern kitchen backsplash moves in current design. Done correctly, the material flows from horizontal to vertical without a grout break. The surface reads seamlessly architectural. The assembled quality of conventional tile disappears entirely.
The Critical Specification Step
The wall panel and the countertop must come from the same slab lot. Quartz veining varies subtly between production batches. A mismatched veining direction or color shift between counter and wall panel immediately undermines the entire concept. Confirm this requirement with your fabricator before any material is purchased.
Thickness and Proportion
Countertops are typically cut to 3/4-inch or 1.2-inch thickness. The wall panel should match exactly. Some designers use a thinner 6mm wall panel to reduce cost. But the visible thickness difference at the transition looks like an error rather than a decision. Keep them matched.
When This Approach Pays Off
In kitchens with 9-foot ceilings or higher, a full-height quartz backsplash from counter to ceiling reads genuinely dramatic. In a standard 8-foot kitchen, a panel from counter to upper cabinet base — roughly 18–24 inches of wall — reads equally sophisticated. Installed cost runs $55–120 per square foot for the wall section. It’s expensive, but justifiable as a focal-point investment.
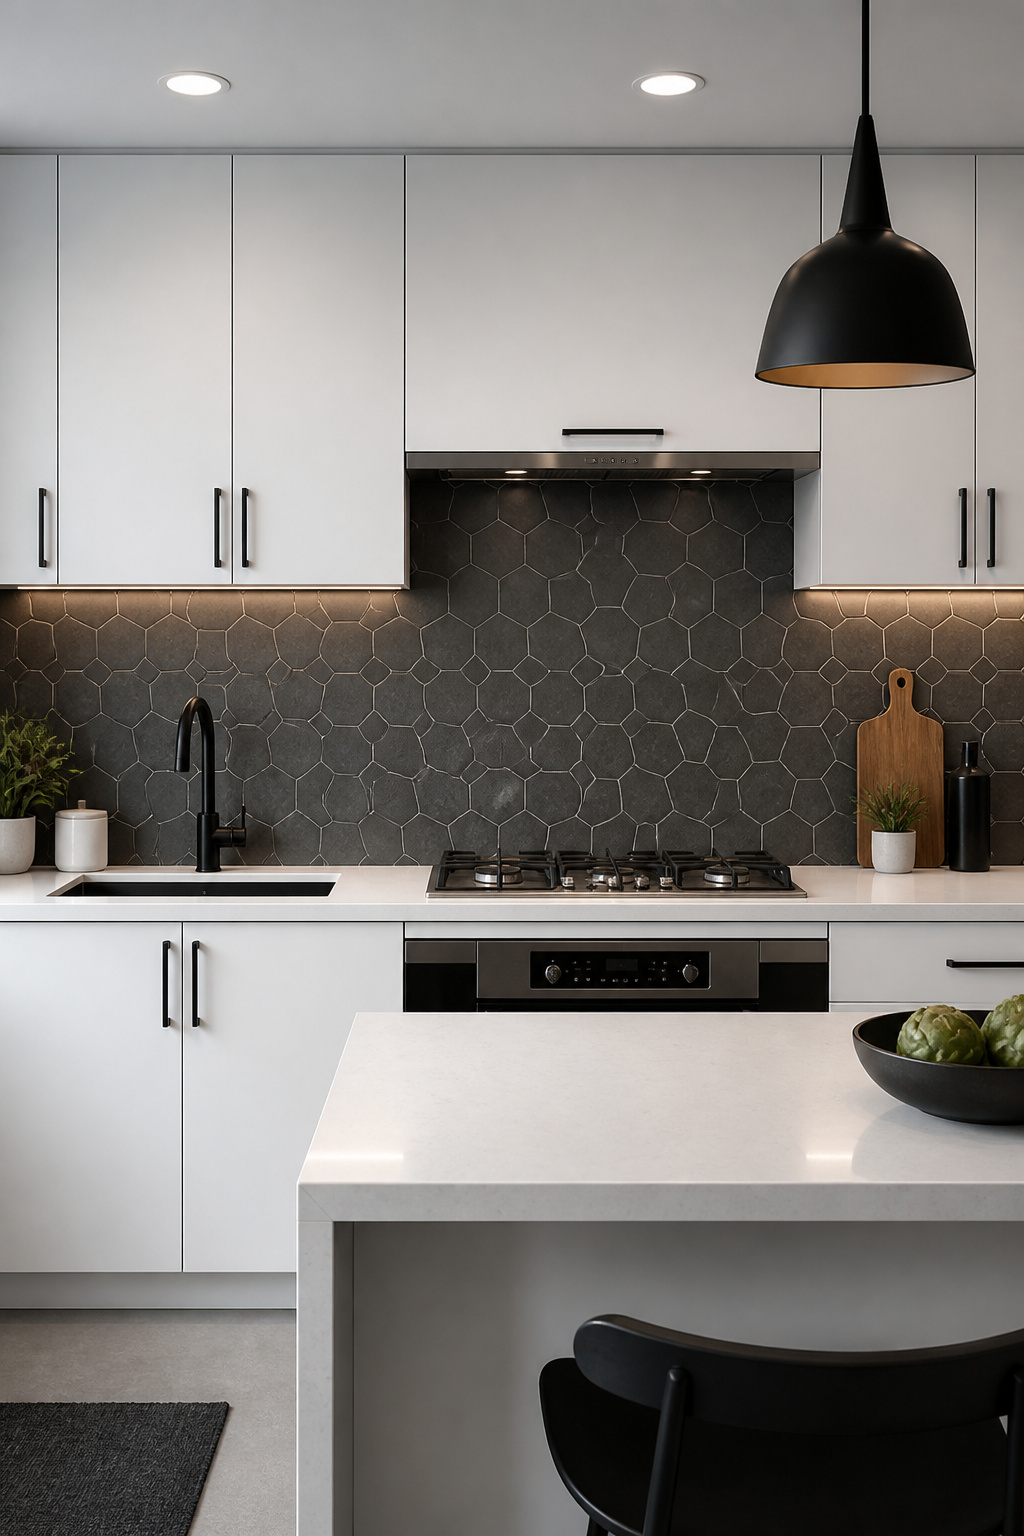
7. Charcoal Hexagon Tiles in a Geometric Pattern Grid
Hexagon tiles in a modern kitchen backsplash occupy an interesting position. They’re geometric enough to read contemporary. They’re familiar enough to avoid feeling experimental. And they come in a wide enough scale range to work in compact galley kitchens and large open-plan spaces alike. The scale you choose determines almost everything about how the finished wall reads.
Choosing the Right Hexagon Scale
A 2-inch hexagon creates fine, dense texture. It works as a feature strip but becomes exhausting over a full kitchen backsplash. The 4-inch format is the sweet spot for most modern kitchens. The 6-inch hexagon works on a single-wall range surround in a large kitchen. In a standard galley, it reads oversized.
Orientation and Pairing
Flat-side-up hexagon reads more structured and modern than point-up. Charcoal porcelain pairs well with white cabinetry and brushed nickel or matte black hardware. Avoid pairing it with wood-heavy kitchens — the cool tone of the hex can read cold against warm grain. Merola Tile’s Metro Hex in graphite and Bedrosians’ Colore Hexagon in slate are both reliable at $4–14 per square foot.
The Most Important Installation Step
Hexagon geometry means edge cuts at the sides and bottom are never clean rectangles. You’ll always have partial tiles that create slivers unless the layout is planned from center outward. Run a full dry-lay across the backsplash area before any adhesive is applied. This is the step most frequently skipped by installers under time pressure. It’s also the one that determines whether the finished wall looks intentional.
8. Mirrored Glass: A Smart Modern Kitchen Backsplash for Small Spaces
Mirror as a kitchen backsplash is underused in modern design. Part of the reason is its association with 1980s interiors. Part is maintenance concern. Both deserve a direct response. Antiqued mirror — with its slightly fogged, slightly warm patina — reads nothing like its predecessor from four decades ago. And the maintenance difference between mirror and glossy ceramic in a well-ventilated kitchen is marginal.
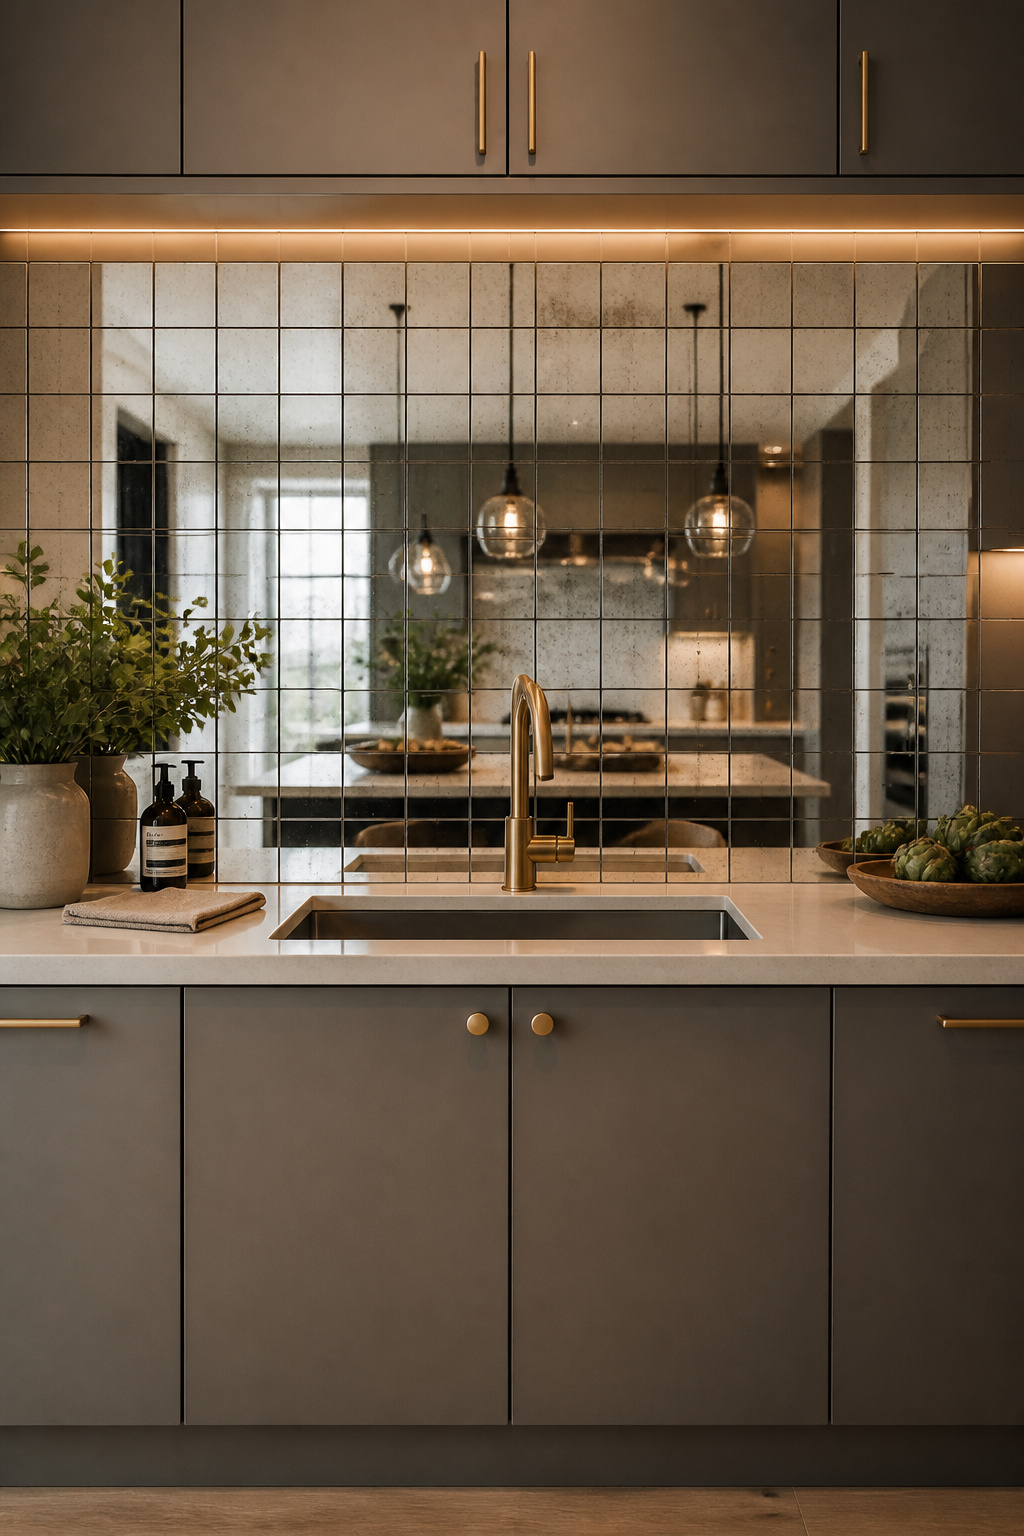
Antiqued vs Clear Mirror
Clear mirror amplifies every grease haze and fingerprint at eye level. In a kitchen, that means constant wiping. Antiqued mirror has a slightly fogged quality that’s far more forgiving. The slight bronze or smoke tint also reads warmer than flat clear glass. It integrates more naturally with wood tones and warm metal hardware. Ann Sacks, Restoration Hardware, and Zia Tile all carry good antiqued options at $15–40 per square foot.
Installation Cautions
Use mirror mastic adhesive rather than standard tile adhesive. Standard adhesive contains compounds that fog the mirror backing over time. You won’t see the problem until the installation is several months old and already irreversible. Also, never install mirror tile within 12 inches of a gas range burner. Thermal shock from direct heat can crack the glass panel. Position mirror on walls adjacent to the range rather than directly behind the open flame.
When the Space Case Is Strongest
In a galley kitchen under 10 feet wide, mirror backsplash doubles the apparent width by reflecting the opposite wall. In a larger open-plan kitchen, the spatial transformation is less dramatic. But the light-amplifying quality still makes it useful in a kitchen that needs more brightness from a fixed footprint.
9. Brushed Stainless Steel Sheet for a Chef’s Kitchen
There’s a clear reason every professional kitchen uses stainless steel on the walls behind cooking equipment. It’s impervious to heat, grease, and moisture. It wipes clean in seconds. And it ages with character rather than degrading. Adapting that logic to a residential modern kitchen backsplash is straightforward — as long as you specify the right gauge and finish.
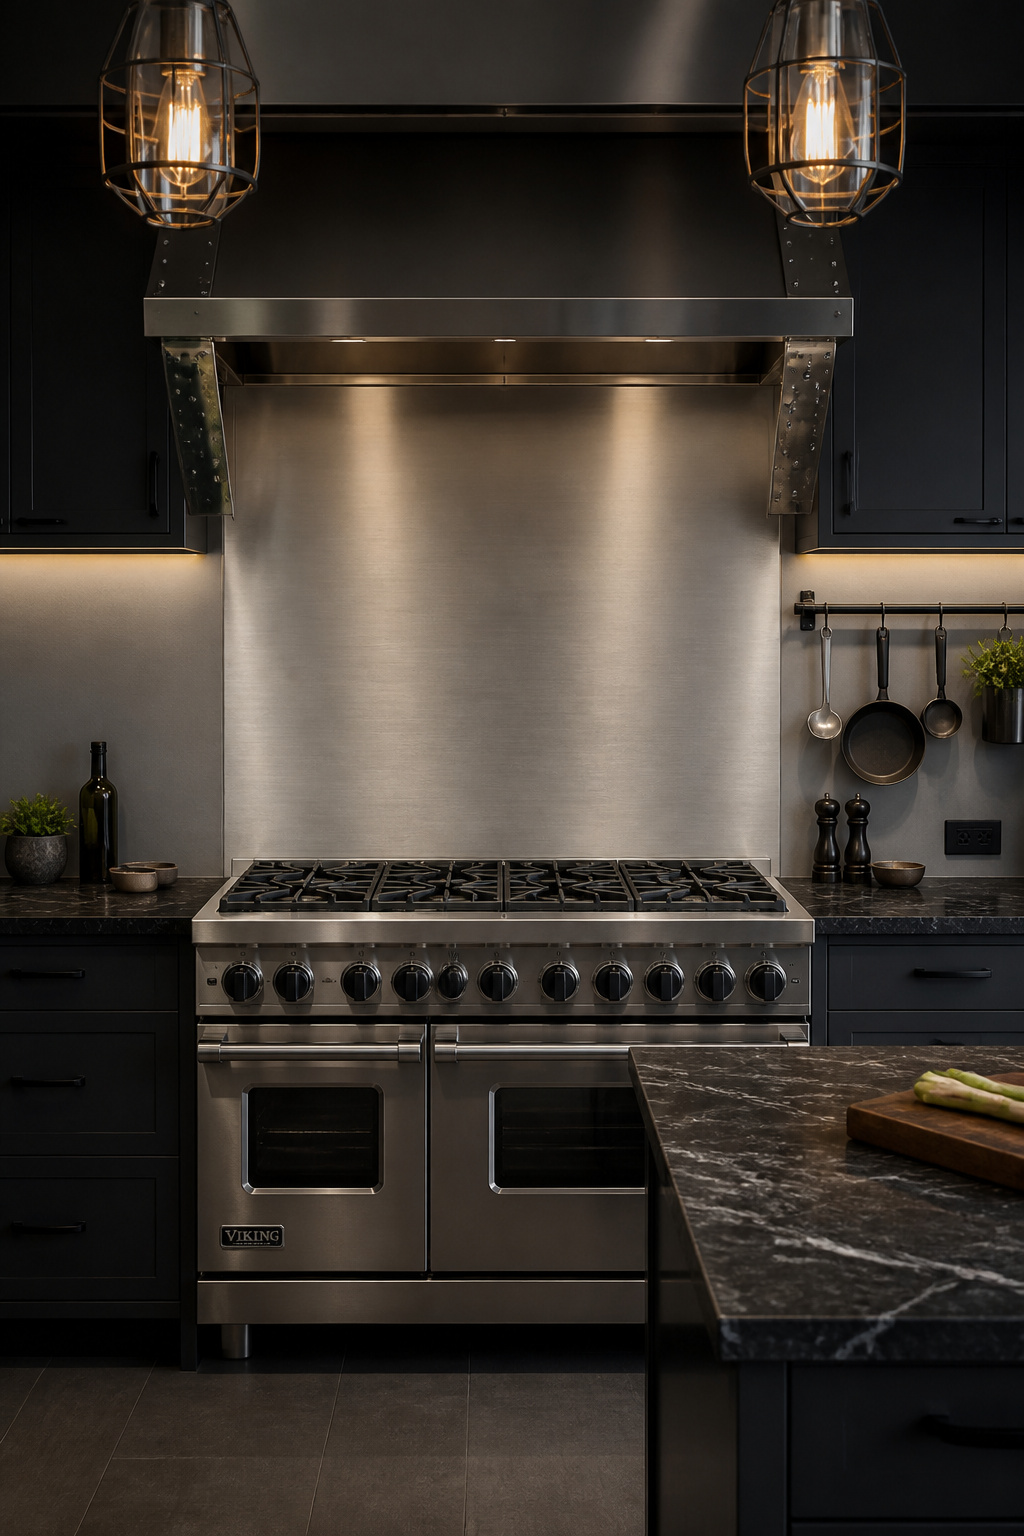
Professional Logic for Residential Use
Professional kitchens specify 16-gauge stainless for extreme commercial use. For a residential backsplash, 18-gauge delivers near-identical visual impact at lower cost. Type 304 stainless steel is the residential standard. Type 316 adds corrosion resistance useful in coastal environments where salt air accelerates oxidation over time.
Finish and Grain Direction
The #4 brushed finish is the standard kitchen specification — fine directional grain, non-reflective enough to suit a kitchen without looking harsh. All panels must have the brushed grain running in the same direction. Mismatched grain orientation between adjacent panels looks accidental rather than designed. Request this in writing with your fabricator. Custom stainless panels run $18–35 per square foot fabricated and installed through local sheet metal shops.
Managing Fingerprints and Marks
Bar Keepers Friend, applied with a damp cloth following the grain direction, removes fingerprints and water spots without scratching the surface. For a backsplash rather than a countertop, the maintenance load is manageable. You’re wiping it down with the stovetop cleaning routine, not handling it constantly. Also, the surface improves slightly over time — micro-scratches blend into the overall grain pattern and the panel develops an honest working quality.
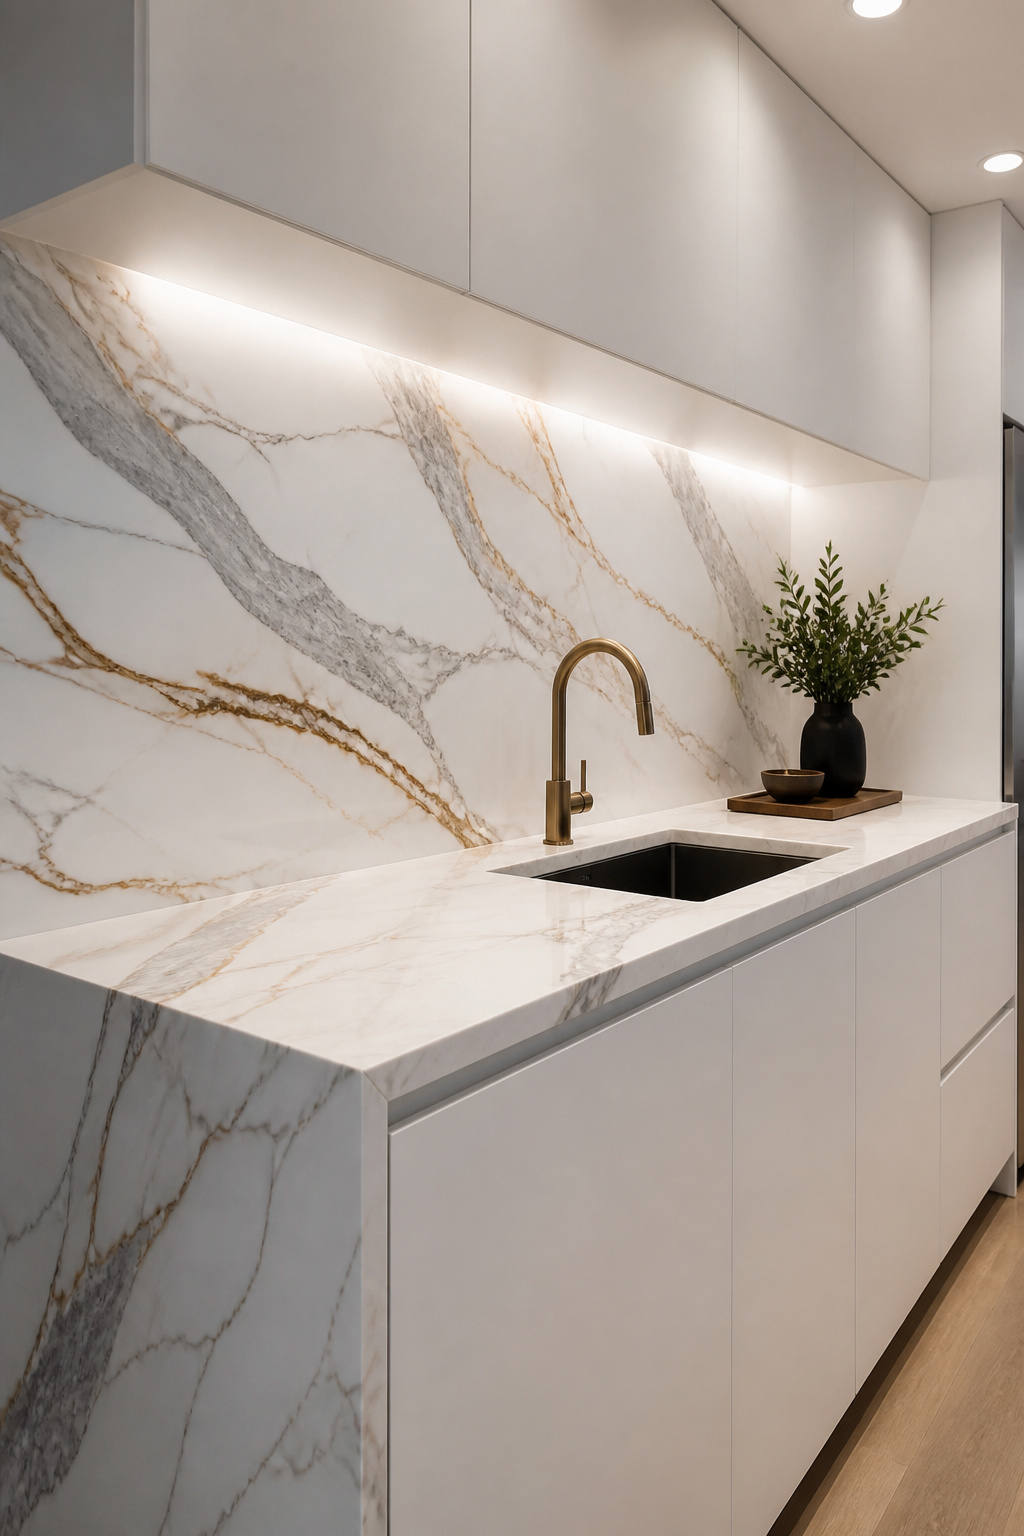
10. White Marble With Bold Veining as a Statement Wall
White marble as a modern kitchen backsplash sits at the intersection of enduring sophistication and genuine impracticality. It’s one of the most beautiful surfaces available. It’s also one of the most demanding to maintain in a working kitchen. Understanding that tension — and knowing where the practical alternatives measure up — is what separates a good material decision from an expensive regret.
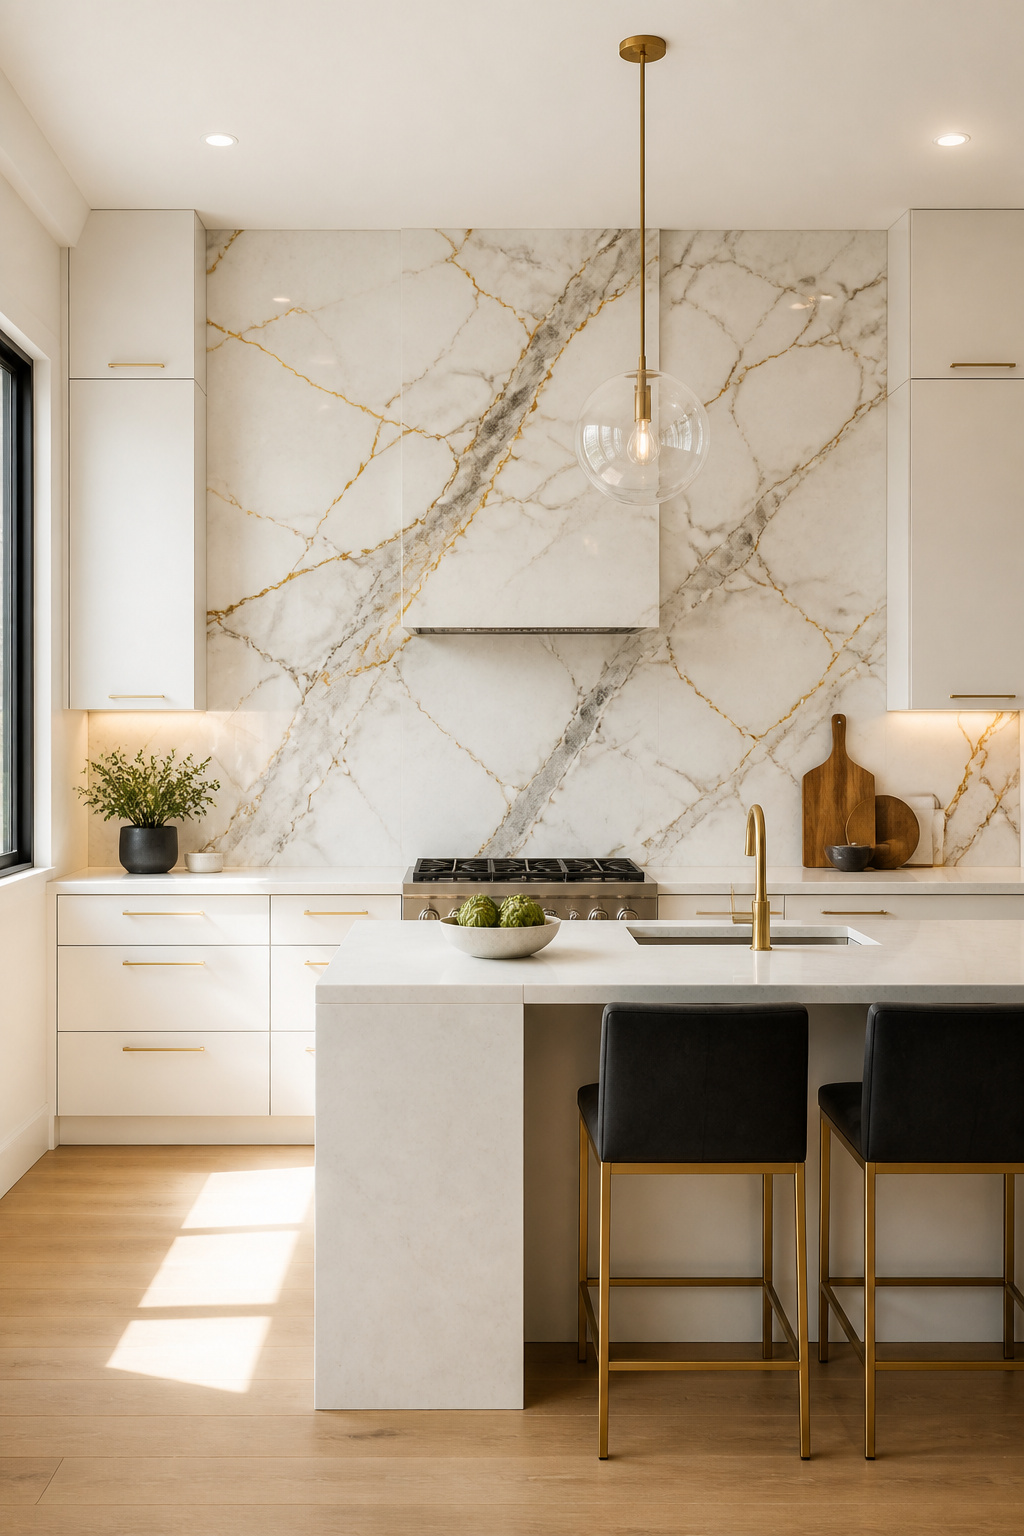
Choosing the Right Marble Type
Calacatta Gold has a cream-white ground with thick gold and warm gray veining. It reads opulent and warm. Statuario has a brighter white ground with thinner cool-gray veining — cleaner and more minimal. Arabescato is softer overall, with a medium gray ground and finer distributed veins. For a modern kitchen, Statuario pairs better with cool whites and minimal hardware. Calacatta pairs better with warm wood, brass, and cream. Always view the slab in person before purchasing — the kitchen backsplash design category name guarantees nothing about the individual piece’s veining quality.
The Porcelain Alternative
Atlas Concorde Marvel and MSI’s Calacatta porcelain are the most convincing marble-look options currently available. Digital imaging technology has brought the surface pattern quality to a level indistinguishable from real marble at normal installation distance. Installed cost runs $12–28 per square foot versus $35–95 for real marble. The porcelain requires no sealing and no special cleaning products.
Sealing Real Marble
Apply Stonetech BulletProof penetrating sealer before grouting. Reapply every 12 months. In a kitchen where tomato sauce and lemon juice are regular hazards, even properly sealed marble will develop an etched surface over years. Some designers consider this patina desirable. Others find it distressing. Know which camp you’re in before committing the budget.
11. Penny Round Mosaic: A Warm Modern Backsplash in Terrazzo Tones
The penny round tile has a long history as utilitarian flooring in early-20th-century bathrooms and diners. Its application as a warm modern backsplash in terrazzo-inspired color palettes is distinctly contemporary. The small circles create a surface that’s visually rich up close but reads as soft, unified tone from normal kitchen distances. That’s a rare quality in mosaic tile formats.
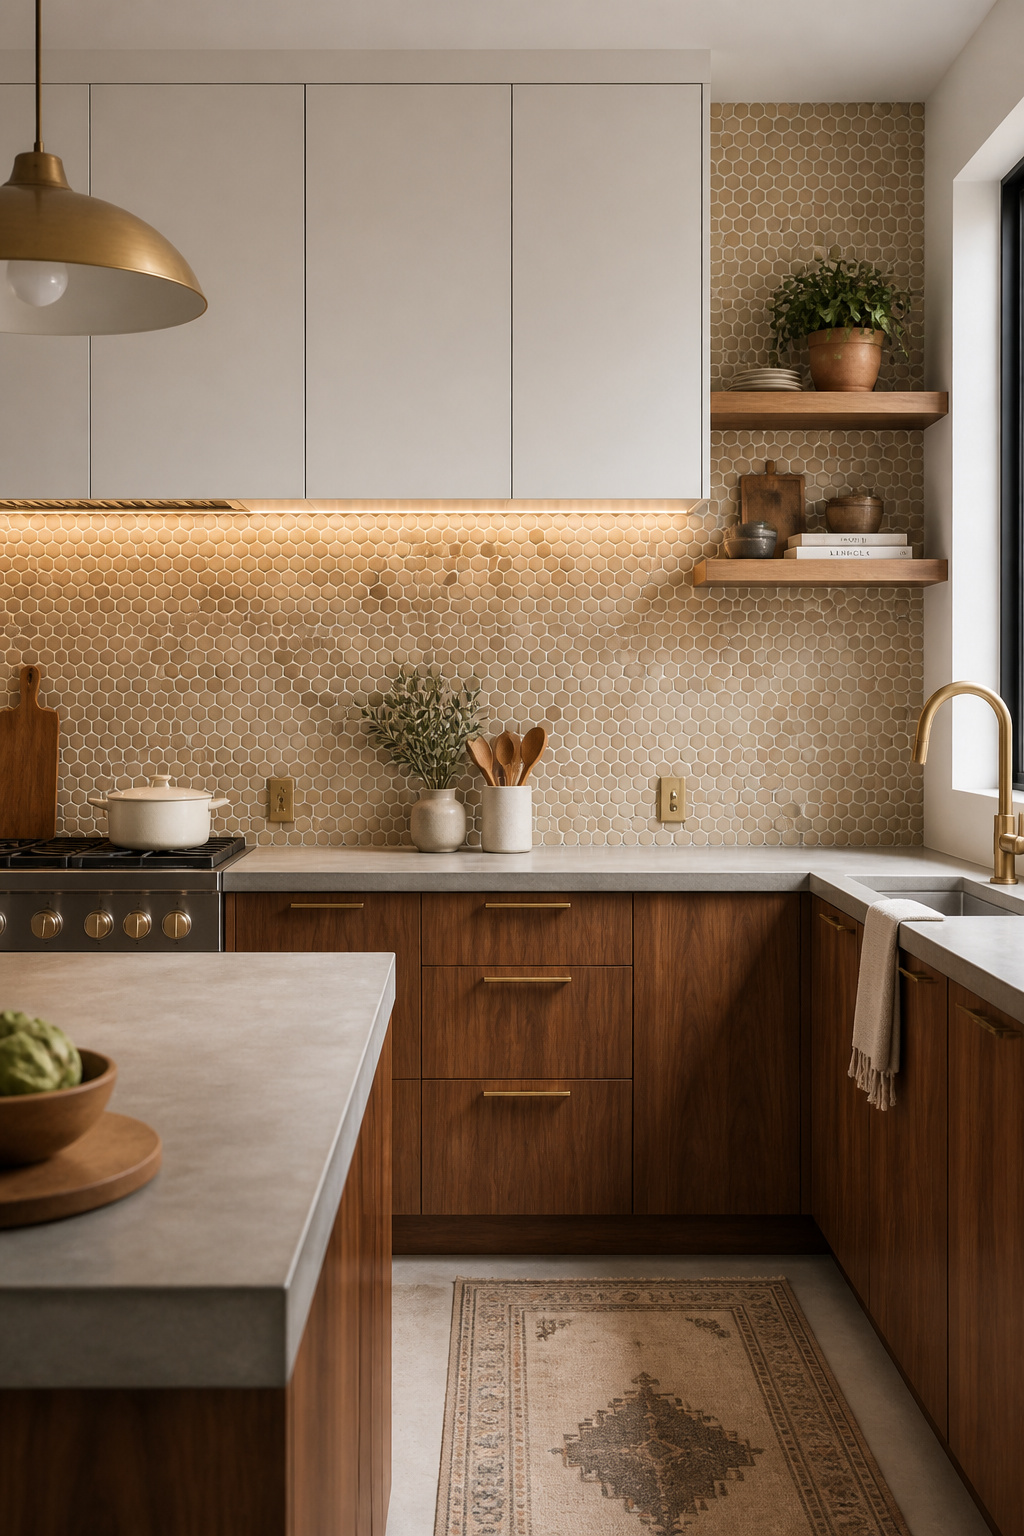
Why Small-Format Creates Big Sophistication
The penny round’s appeal at backsplash scale is its apparent simplicity. Unlike large graphic patterns or bold solid colors, a warm neutral penny round mosaic doesn’t compete with other materials in the kitchen. It complements them. The terrazzo palette — pale olive, dusty rose, off-white, caramel — draws color from wood cabinetry, stone countertops, and ceramic vessels simultaneously. The effect reads collected rather than designed.
Installation on Mesh Sheets
Penny rounds come mounted on mesh-backed sheets for faster installation. The critical step is aligning sheet seams carefully during layout. A misaligned sheet creates a visible grid pattern that undermines the organic quality entirely. Use unsanded grout in the 1/16-inch joints to avoid scratching the tile glaze. Fireclay Tile offers custom-blended penny round palettes at $14–32 per square foot. Also worth reading alongside this: the kitchen countertop ideas guide covers how different countertop materials pair with mosaic tile.
Where to Use It Strategically
Penny round mosaic works best as a feature zone rather than wrapping every kitchen wall. Its dense visual texture requires breathing room from flat surfaces. Flat cabinet fronts, a simple countertop, and clear floor tile let the penny round surface do its work without creating visual fatigue.
12. Fluted Ceramic Tiles for a Refined Textural Effect
Fluted ceramic tile — with its parallel raised ridges running along the tile length — has become one of the defining contemporary materials in modern kitchen backsplash design since roughly 2022. The reason is simple. It’s the one tile format that changes appearance completely depending on the angle and quality of light. A kitchen backsplash that reads differently at different times of day is a surprisingly rare and valuable quality.
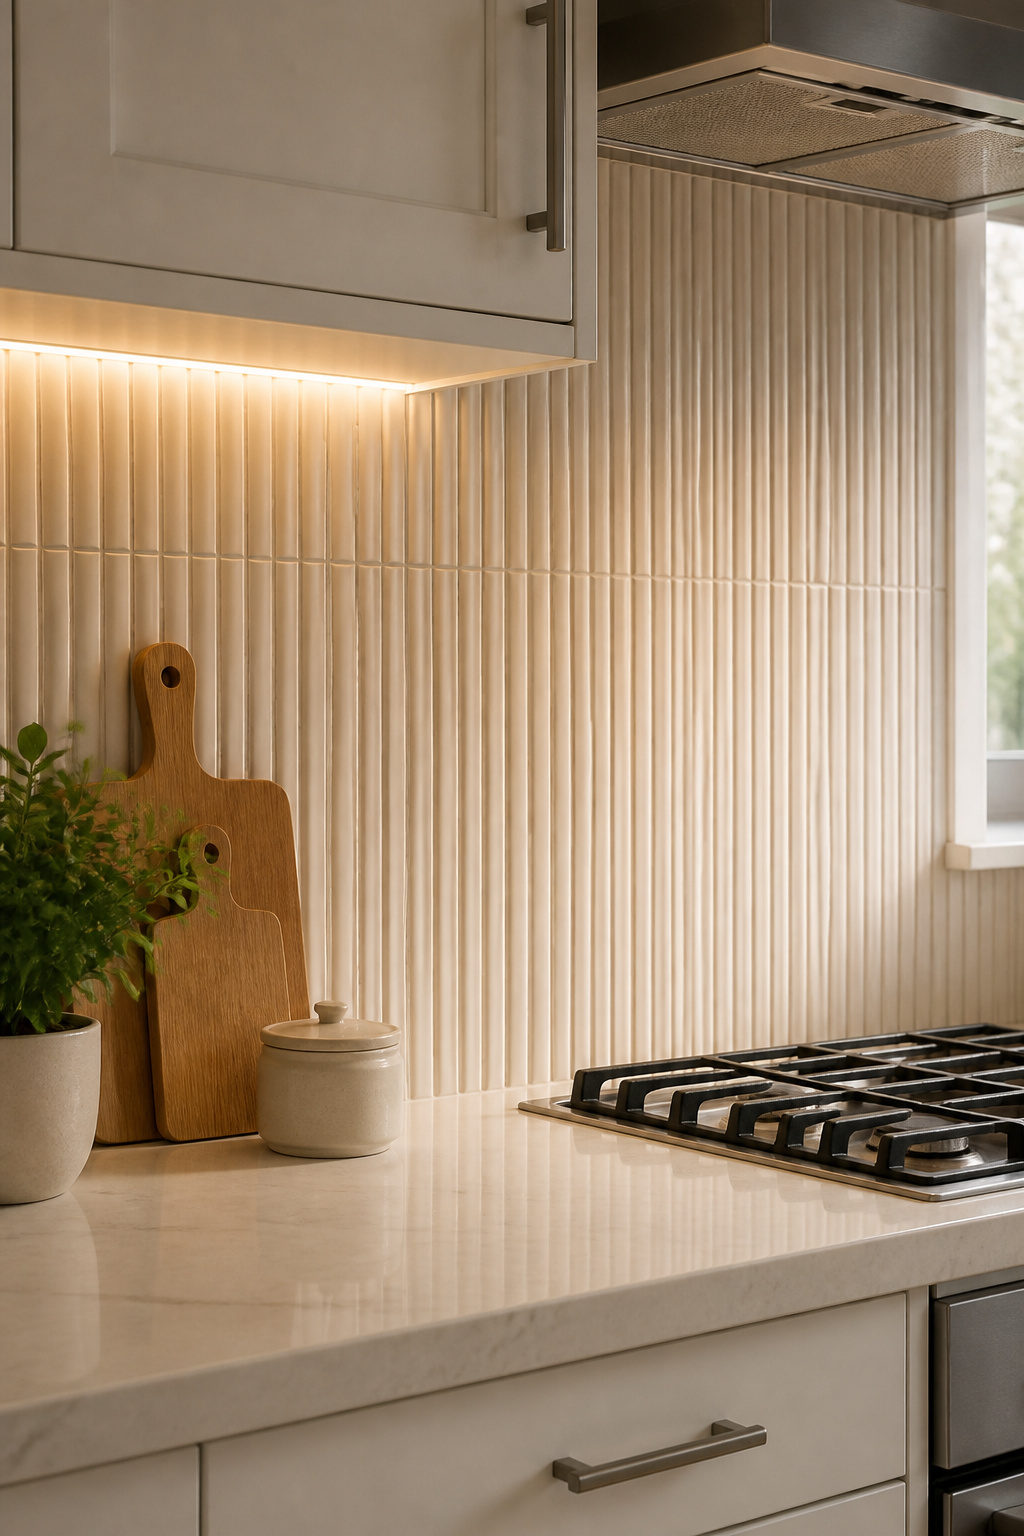
How Fluting Interacts With Light
Under cool overhead LED, the ridges create sharp shadow lines. The surface reads as a precise geometric pattern. Under warm under-cabinet light, the same tile glows softly. In natural daylight, it reads closer to flat. This light-responsive quality is why fluted ceramic earns its higher price point. Fioranese, Wow Tile, and Bert & May London all offer good options at $18–42 per square foot.
Projection Depth and Color
A 3mm projection is subtle — texture visible, no strong shadows. An 8mm projection is dramatic but potentially overwhelming in a smaller kitchen. A 5–6mm depth is the practical sweet spot. Off-white, matte stone, and warm putty are the most successful colors. Strong or saturated colors amplify the texture to a point where the surface reads busy rather than refined.
Cleaning Fluted Tile
The ridge channels collect kitchen dust over time. A soft silicone scraper or a detail brush handles routine maintenance without damaging the glaze. In a backsplash position, accumulation is slower than you’d expect. Most kitchens only need targeted channel-cleaning once a month. The maintenance is manageable, and the visual return is significant.
13. Basalt Stone Slabs With Minimal Joints for Urban Drama
Basalt is one of the most underspecified stone materials in residential kitchen design. It’s also one of the most architecturally appropriate for urban interiors. A dense, fine-grained volcanic rock, it shares a visual vocabulary with concrete. But unlike concrete, one application of penetrating sealer is typically all it needs for years of use.
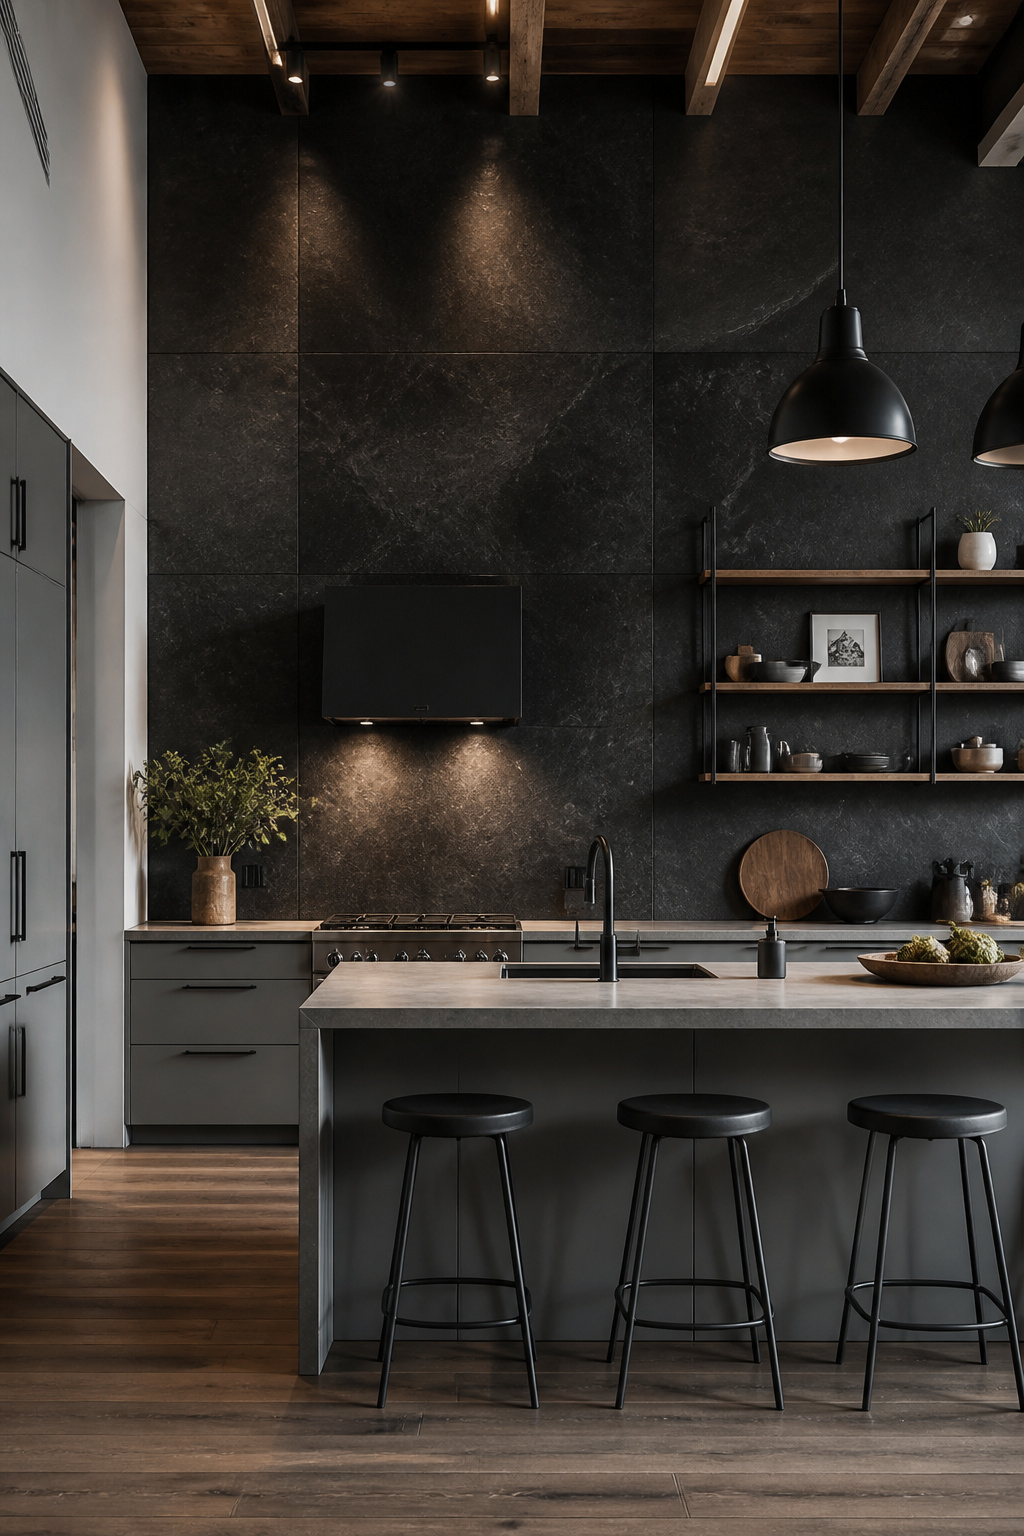
What Sets Basalt Apart
Slate, soapstone, and concrete-look porcelain all occupy adjacent territory. But basalt has qualities each of them lacks. It’s denser than slate and less prone to surface flaking. It’s more visually consistent than soapstone. And it carries a genuine geological character that porcelain can’t replicate at close range. The slight blue-green cast in some varieties adds depth without adding complexity. Stone Source and Walker Zanger carry honed options at $22–55 per square foot.
Honed vs Natural Cleft
Honed basalt suits a modern kitchen backsplash better than natural cleft in most urban applications. Honed is easier to clean and more consistent in color. It reads cleaner against flat cabinet fronts. Natural cleft has a rawer quality useful in industrial-style kitchens. However, it requires more effort to clean around irregular surface variations.
Pairing Basalt in Context
Basalt’s near-black color demands contrast from surrounding materials. White or light gray cabinets, a concrete or light quartz countertop, and steel hardware all work well together. Avoid dark cabinetry. Basalt in a predominantly dark kitchen creates a cave-like quality. That’s striking in a showroom and exhausting to live with.
14. Handpainted Zellige: The Most Personality-Packed Modern Kitchen Backsplash
If the other materials on this list are defined by restraint — by subtlety, seamlessness, and intelligent management of texture and light — handpainted zellige is the deliberate exception. It’s the modern kitchen backsplash option for kitchens that have decided to have a point of view. And it rewards that decision with a surface that looks like nothing else available at any price.
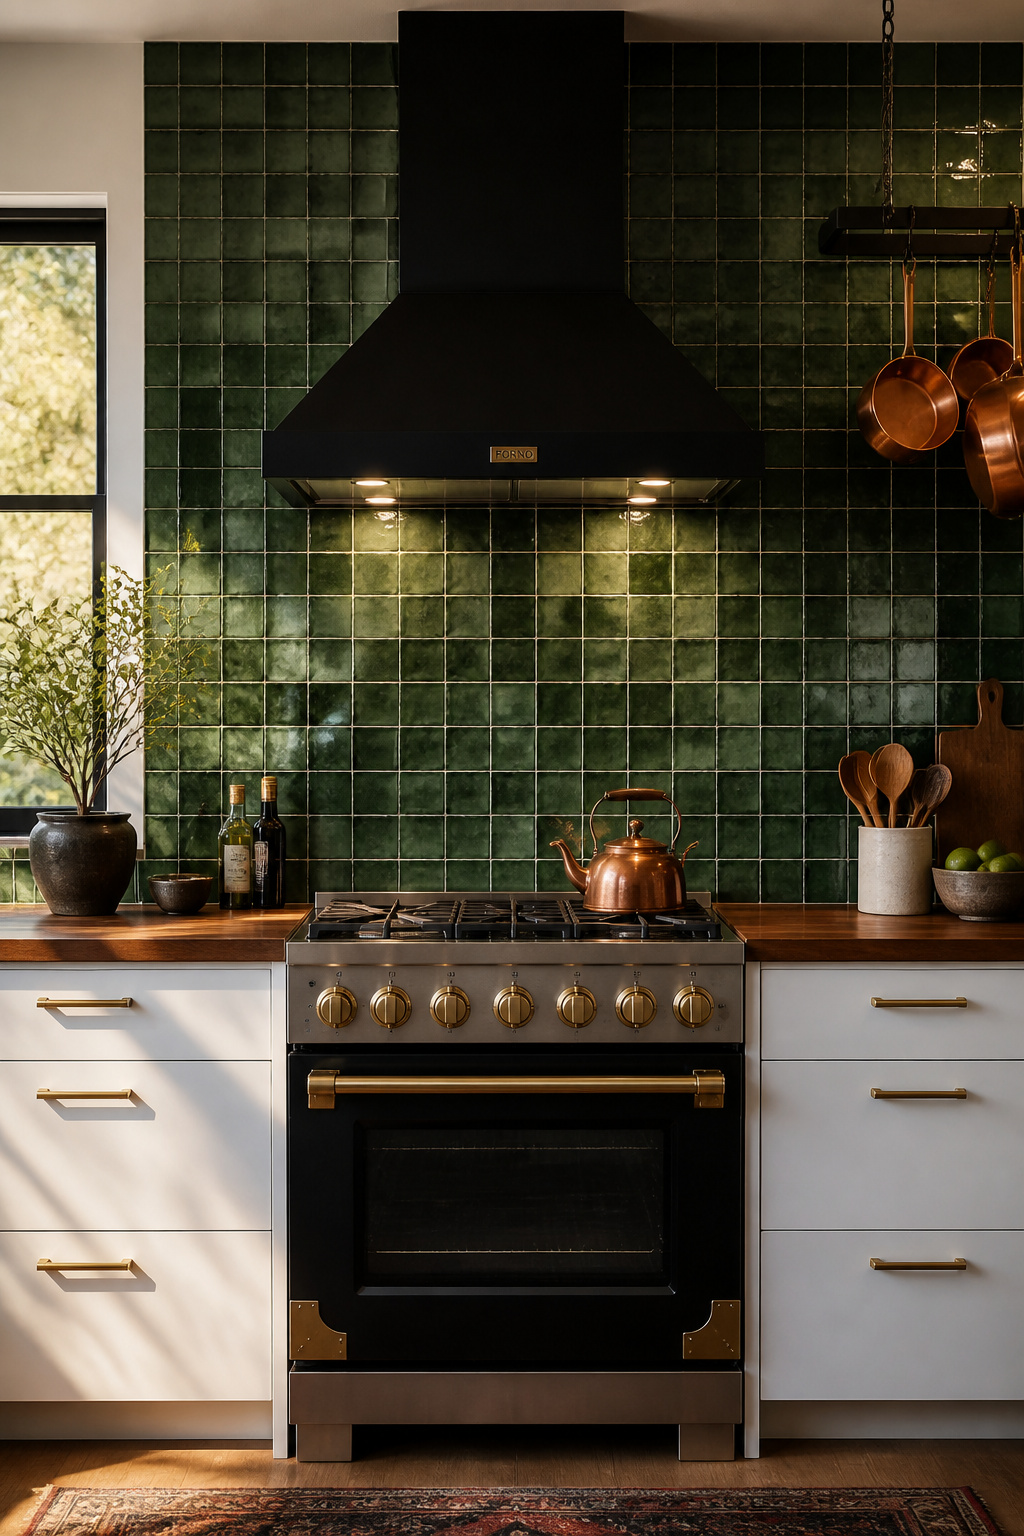
Single-Color vs Multi-Color Blend
For a modern kitchen, a single strong color reads more intentional than a multi-color blend. Forest green, cobalt blue, dusty sage, and butter yellow are the current palette leaders. Forest green zellige works with white or walnut cabinets and almost any hardware finish. Cobalt works best against concrete gray or warm white — it’s demanding against already-cool cabinetry. Cle Tile’s Zellij line and Mosaic House’s bejmat format are the most consistent US sources at $25–60 per square foot.
The Grout Decision
Matching grout to the dominant tile color reads more refined than contrast grout here. The tiles already have inherent variation from the hand-glazing process. Contrast grout adds another variable that can make the surface look busy rather than rich. A warm putty or pale gray grout in a 3/16-inch joint works across most single-color zellige applications.
Installing as a Feature Zone
A range-surround application — from counter to hood height, flanked by flat tile or quartz on either side — is the most effective way to deploy bold zellige in a modern kitchen. It positions the material as a considered architectural accent rather than a maximalist statement. The surrounding surfaces stay quiet enough to let the zellige read clearly. If you’re planning a coordinated kitchen where the island and backsplash share a color story, the kitchen island decor guide is a useful read alongside this.
15. Ribbed Glass Panels for a Translucent Layered Effect
Ribbed glass — architectural glass with parallel channels running along the panel — has moved from commercial interiors to residential kitchen design over the past three years. The driver is its relationship with under-cabinet LED strip lighting. It’s the only backsplash material that doesn’t merely reflect or absorb light but actively scatters it. The result is a distributed luminosity across the entire wall surface.
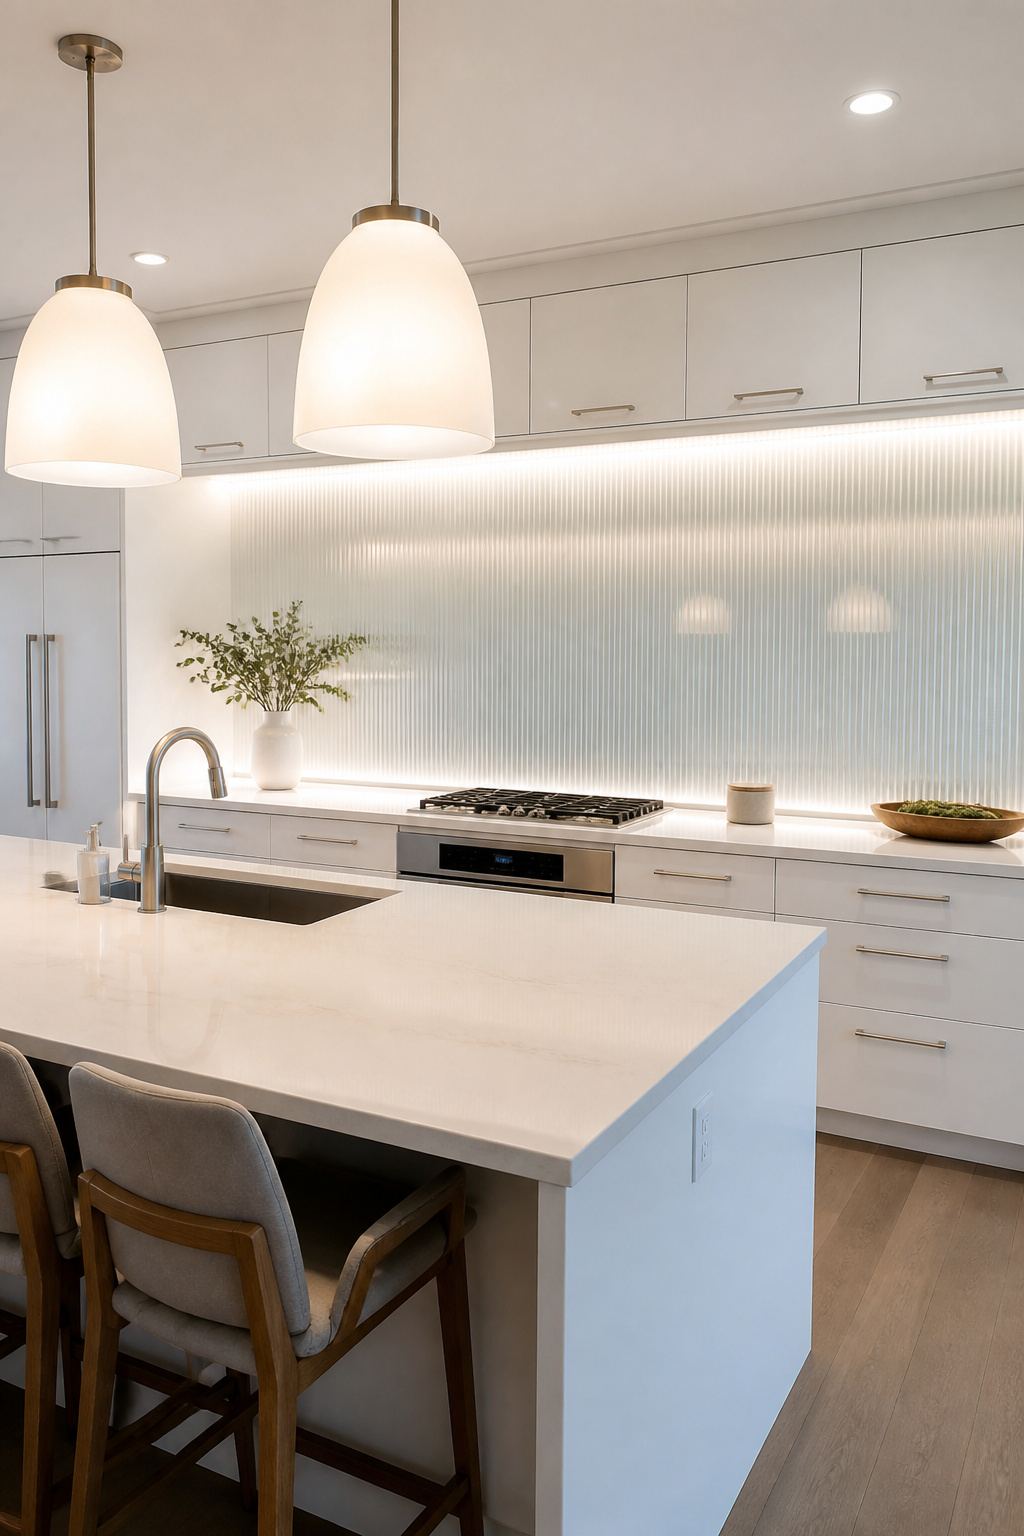
How the Ribs Change the Light
A flat glass panel reflects light from a single angle. You see the light source, or you see its reflection. Ribbed glass scatters incoming light in multiple directions from each rib face. When an LED strip is positioned 3–4 inches from the glass, the result is a soft distributed glow across the entire panel. Even areas not directly in front of the light source are illuminated. That quality makes ribbed glass one of the few backsplash materials that actively improves the kitchen’s ambient lighting. You can explore more layered illumination approaches in the kitchen lighting ideas guide.
Panel Specification
Standard ribbed glass panels run 24×48 inches up to 48×96 inches. Custom sizes are available from glass suppliers. Low-iron (ultra-clear) glass has a neutral color without the slight green cast of standard glass. It’s worth the modest premium for a backsplash where color accuracy matters. Installed cost runs $28–65 per square foot depending on glass specification and framing.
The Lighting Placement Rule
Position under-cabinet LED strips at 3–4 inches from the glass panel face. Closer than 3 inches creates a bright hot-spot at the panel’s top edge. Further than 4 inches, the ribs lose their light-play quality entirely. The color temperature of the LED strip determines the color cast of the glow. In a kitchen with warm wood tones, 2700K keeps the glass looking warm rather than clinical.
16. Smoked Mirror With Antiqued Patina: A Dramatic Modern Backsplash Idea
Smoked mirror occupies a specific position in the modern kitchen backsplash vocabulary. It’s more sophisticated than clear mirror. It’s more atmospheric than flat tile. And it’s more forgiving in daily use than either. The bronze or pewter tint applied to the mirror’s backing reduces reflectivity by roughly 40%. That eliminates the harsh full-reflection quality of clear mirror while preserving the light-amplifying and space-expanding benefits.
Why Smoked Mirror Reads More Sophisticated
Clear mirror in a kitchen reflects everything precisely — every grease haze, every object on the counter, every person moving through the space. Smoked mirror’s tint softens and slightly obscures the reflection. The effect is closer to dark atmospheric depth than a literal mirror image. The antiqued patina version adds deliberate surface aging — small foxed spots of darker patina — that reads characterful and intentional. This treatment is particularly strong where other surfaces also have a dark, material-forward character: dark countertops, gunmetal hardware, charcoal cabinet fronts.
Best Kitchen Configuration
Full-height applications — counter to upper cabinet base — work better than partial heights. A partial height looks like the material didn’t quite reach its intended extent. Kitchens with dark or charcoal flat-front cabinets get the most from smoked mirror. The tonal coherence between dark cabinet, dark counter, and darkly reflective backsplash creates a unified atmosphere. Pair with matte black or gunmetal hardware rather than polished chrome, which introduces a conflicting reflectivity level.
Sourcing and Specification
Smoked mirror is available in standard sheet sizes from Faux Direct, Glass and Mirror America, and Reflection Mirror at $20–50 per square foot. Specify the tint level before ordering — “smoke” ranges from a pale bronze that’s still quite reflective to a near-opaque charcoal. Medium smoke is the most versatile choice for kitchen use. As with standard mirror tile, use mirror mastic adhesive rather than standard tile adhesive to prevent backing fogging over time.
How to Choose the Right Modern Kitchen Backsplash for Your Space
Sixteen options is a lot to reconcile into a single decision. The most useful thing I can offer here isn’t another framework. It’s a short decision process I use with clients who are stuck choosing their modern kitchen backsplash.
Match Material Weight to Your Kitchen’s Existing Palette
Every kitchen has a dominant material weight — a combination of how many different materials are present and how visually complex each one is. If your kitchen already has figured wood grain cabinets, a stone countertop with strong veining, and a patterned floor, the backsplash should be quiet. Large-format slab, brushed steel, or flat concrete-look tile all work. If the kitchen is deliberately minimal — flat white cabinets, solid countertop, simple floor — the backsplash can absorb one moment of visual complexity. Zellige, fluted ceramic, or smoked mirror are all candidates.
Pick One Quality and Commit
The most coherent modern kitchen backsplash decisions are based on prioritizing one of three qualities: texture (fluted ceramic, zellige, penny round mosaic), pattern (hexagon, handpainted zellige, vertical subway stack), or reflectivity (mirror tile, smoked mirror, ribbed glass). Kitchens that try to achieve all three simultaneously lose the clarity that makes a modern design read as modern. Decide which quality matters most in your specific kitchen. Let that decision eliminate two-thirds of the list.
Starting Points When the Budget Is Fixed
If the renovation budget is tight, the highest-impact modern kitchen backsplash for the money is the contrast-grout subway tile. Standard ceramic, epoxy grout in a strong dark color, tight joints, and either elongated format or vertical stacking — it costs less than almost everything else on this list. But it consistently outperforms its price bracket when those three decisions are executed correctly. From there, large-format porcelain slabs and continuous quartz surfaces are the next investments that deliver genuine architectural impact. Whatever you choose, view a physical sample in your actual kitchen under your actual lighting before ordering. Photos are not a substitute for that final confirmation.