
There’s a particular moment in a well-designed outdoor kitchen. The food is nearly ready. The pendant lights glow warm above the island. A dozen people have naturally gravitated toward the cooking zone without anyone asking them to. That moment doesn’t happen by accident. It happens because the outdoor kitchen decor pulled people in and gave them a reason to stay.
Most outdoor kitchens start as appliances on a patio. A grill, a counter, maybe a mini fridge — functional, but not yet a destination. Outdoor kitchen decor is what makes that shift happen. The right decisions in lighting, materials, textiles, and living elements work together to turn a cooking setup into a space you use year-round. These 15 ideas cover the full picture, from structural changes that cost hundreds to a $4.99 hardware swap that changes the whole look.
1. Weather-Resistant Pendant Lighting Over the Island
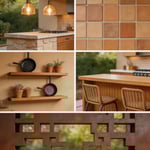
Overhead lighting is the first step toward making an outdoor kitchen feel like an actual room. Pendant lights directly above the island anchor the cooking zone visually. They define the space the way a chandelier defines a dining room — without them, the area reads as a counter with appliances rather than a designed space.
The key specification is the IP rating. Look for IP44 minimum, which protects against splash from any direction. For coastal properties with salt air exposure, IP65 is the safer choice. Materials that hold up outdoors include powder-coated aluminium, marine-grade stainless, and sealed teak. Natural rattan or wicker will mildew and degrade within a year in most climates, however appealing it looks in a product photo.
Choosing the Right Bulb Temperature
For a space that feels warm and sociable, stick to LED bulbs in the 2700K–3000K range. That warmer tone mimics candlelight and makes food look appetising at night. Cool-white LEDs at 4000K or above work fine for task lighting, but they feel clinical after dark. That’s exactly the opposite of the atmosphere you’re after at an evening gathering.
Hang pendants 30–36 inches above the countertop for task lighting over prep areas. For ambient light over a seating section, 60–72 inches from the floor works better. The Kichler Seaside Medium Outdoor Pendant ($149–$229) and the Quoizel Harbor Point 3-Light ($189) are both solid IP-rated choices. If your pergola isn’t wired, weatherproof pendant cord kits with a hook mount let you run from a GFCI outlet — no electrician required, convincing permanent look.
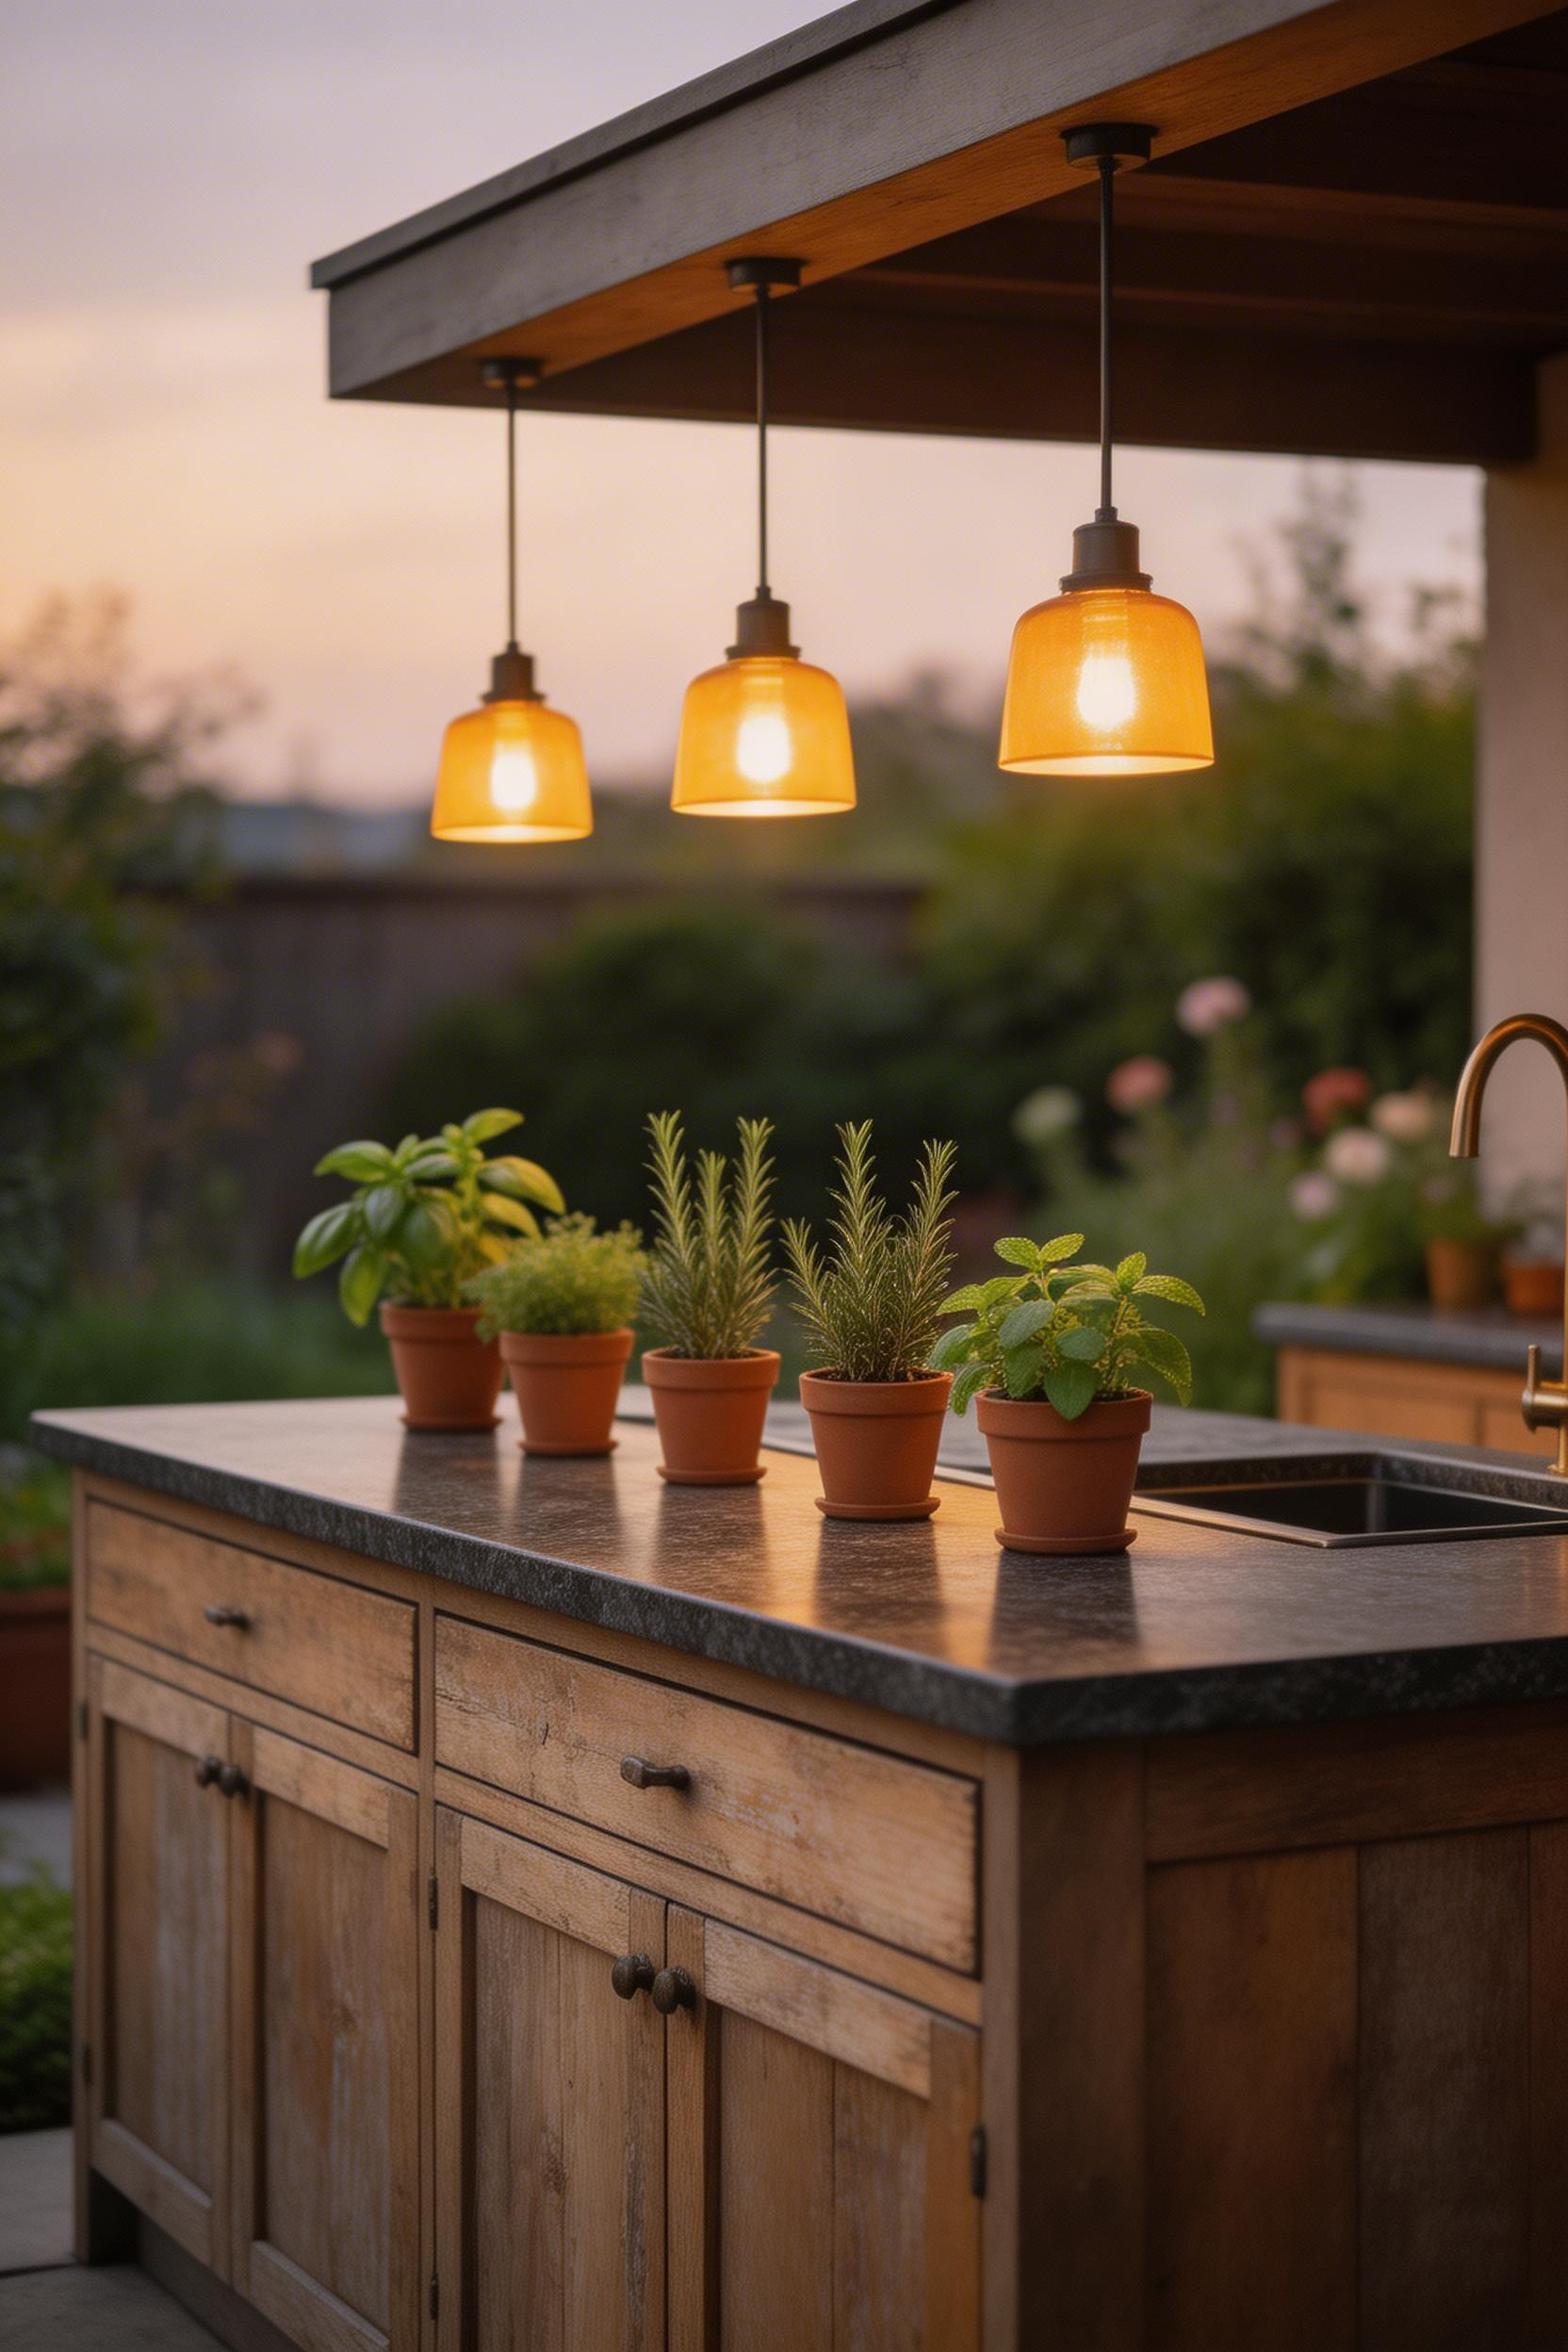
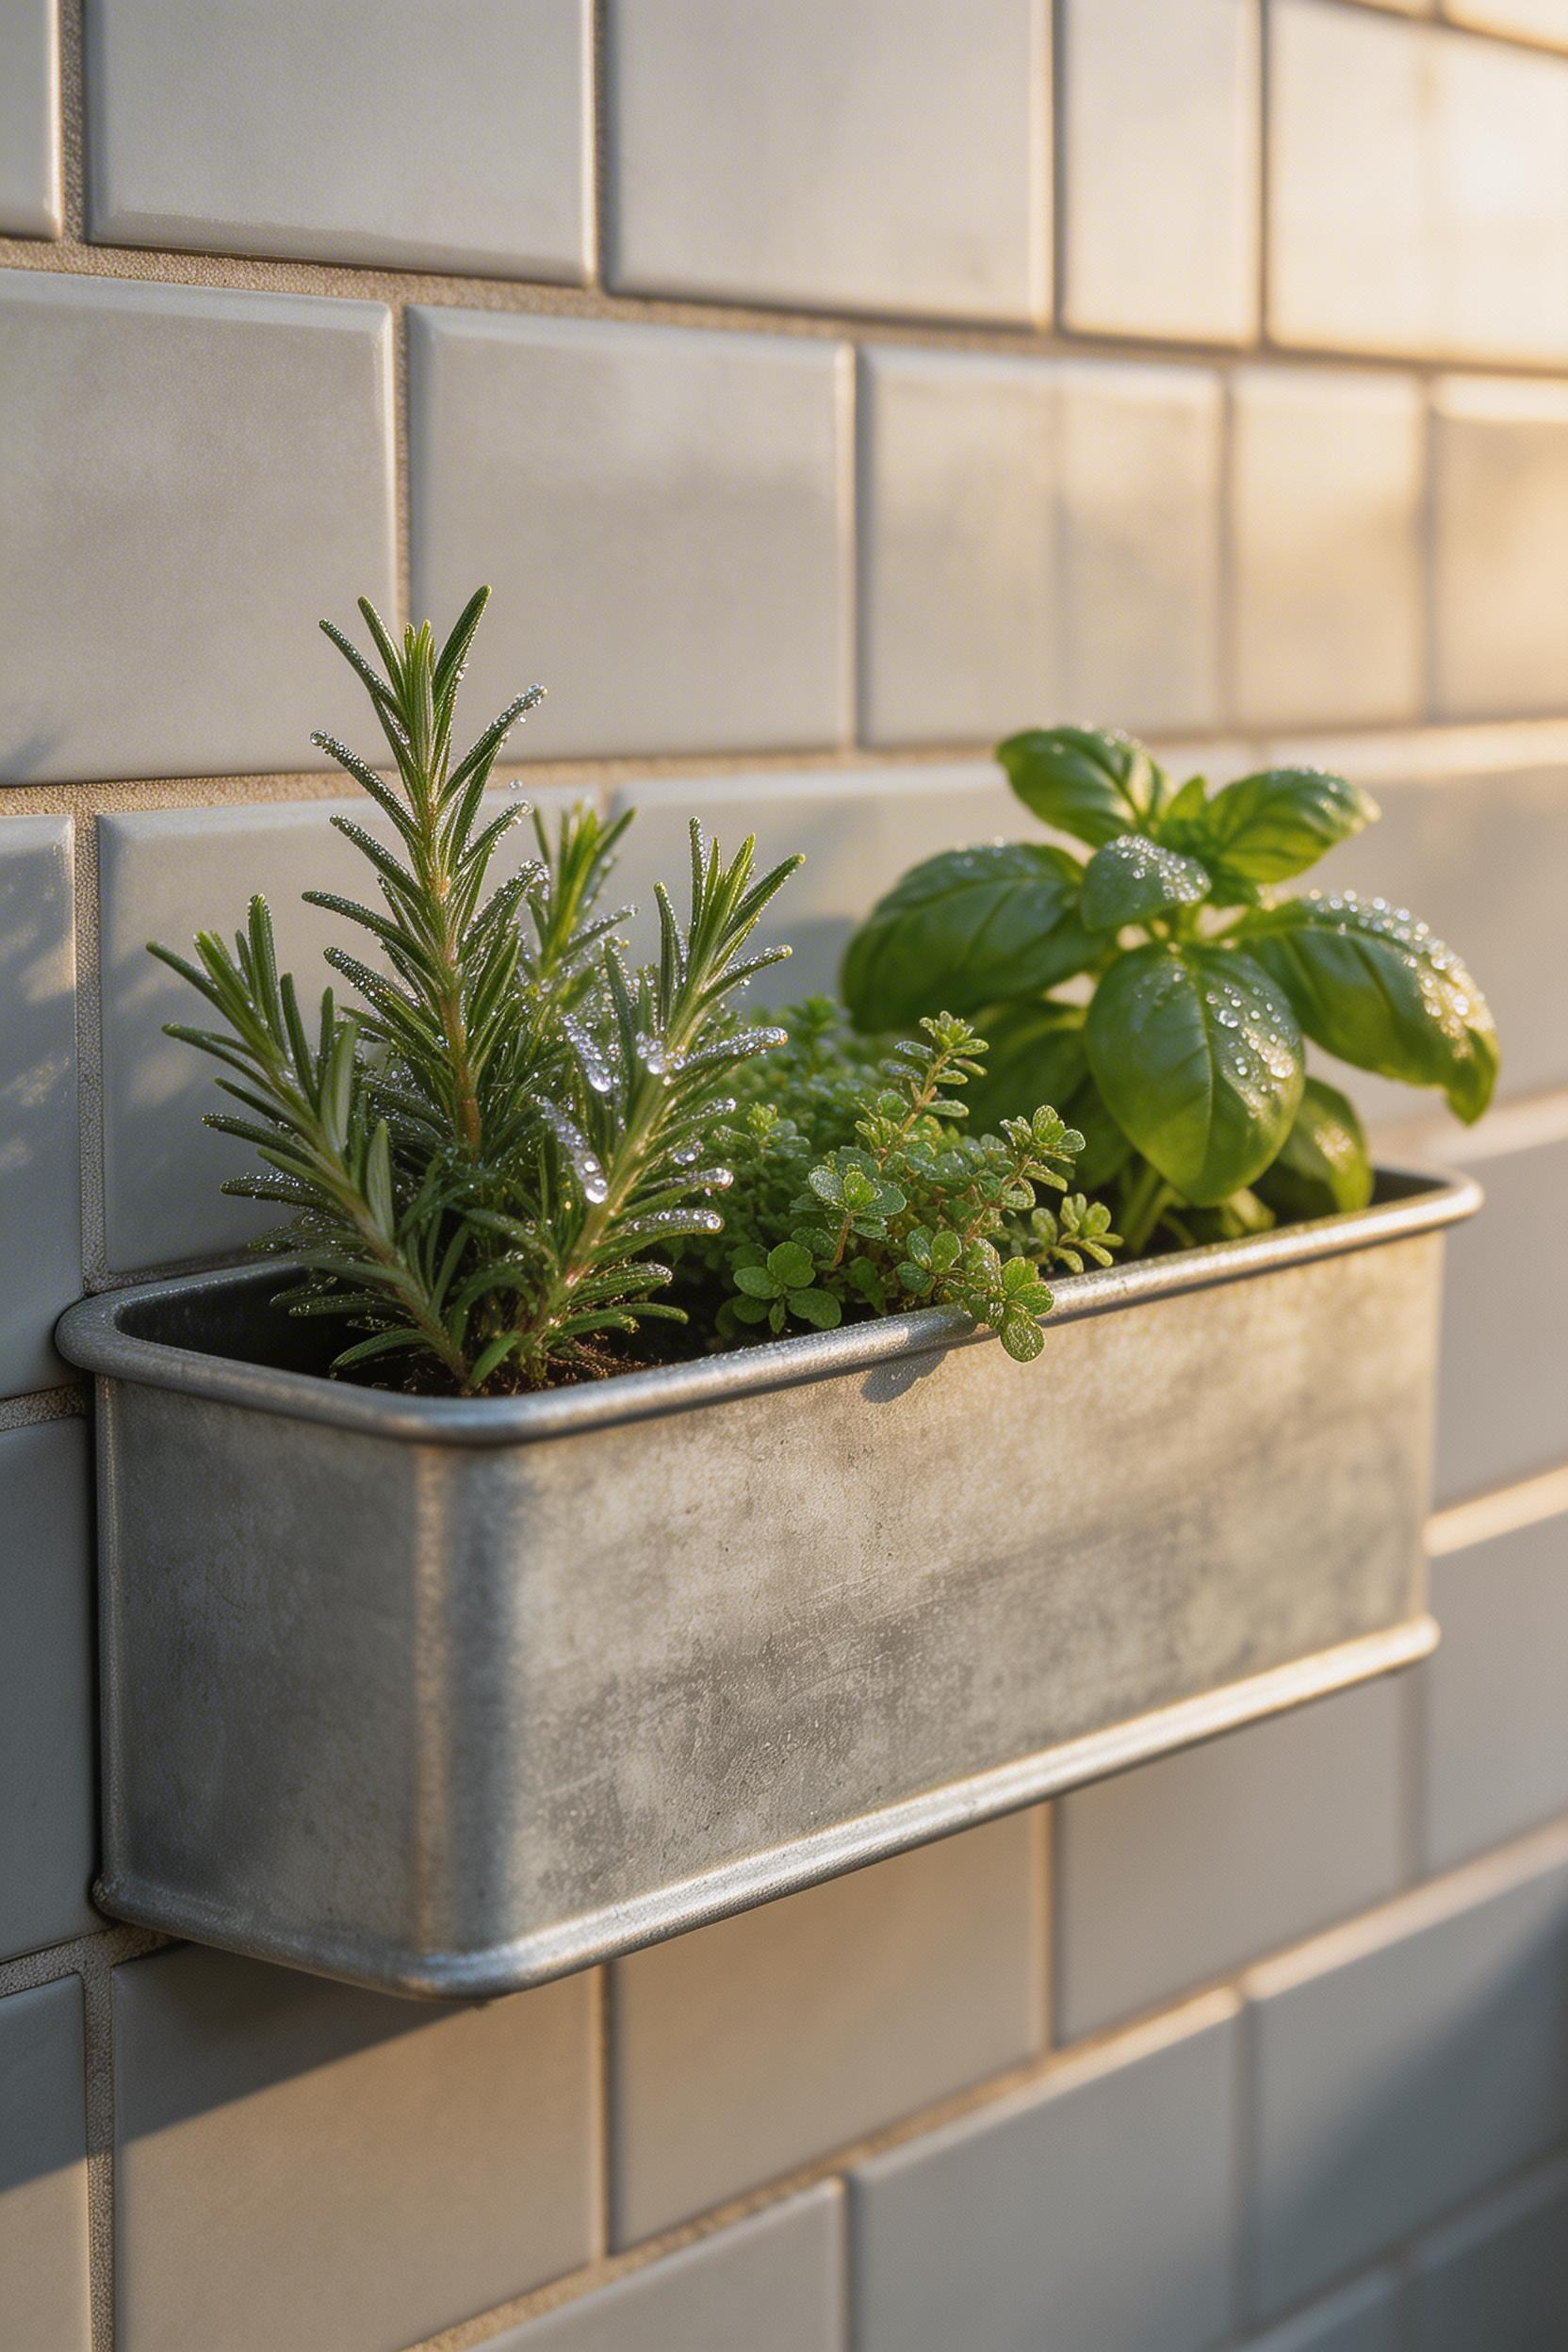
2. Built-In Herb Garden as Living Decor
A herb planter at counter height is one of the most efficient uses of space in an outdoor kitchen. It’s useful, visually alive, and gives guests something to talk about. People who’d walk past a pot of basil in a garden will actually snip a handful when it’s sitting next to the chopping board. That practicality and greenery combined make this one of the best additions per dollar spent.
The best herbs for outdoor kitchen proximity are drought-tolerant Mediterranean varieties: rosemary, thyme, oregano, chives, and sage. All handle heat well and look attractive year-round in mild climates. Basil and mint are more useful for cooking, but they need more consistent moisture and partial shade. Place them slightly further from the grill, not next to it.
Vertical vs. Counter-Top Planting
For limited counter space, vertical planter pockets in galvanised steel hold 9–12 plants in the footprint of a single pot. The Veradek Metallic Series Trough Planter ($85–$120) mounts cleanly to a tile or stone wall. It looks like an architectural feature, not a garden addition. Self-watering planters with a built-in reservoir reduce watering frequency by 50–60% in hot climates — worth it if there’s no nearby tap.
Drainage is non-negotiable. Planters sitting in standing water will rot roots within two weeks. Use a gritty, perlite-amended potting mix and ensure at least half-inch drainage holes per four-inch section of base. Group herbs by water needs: drought-tolerant varieties together, thirsty herbs like basil in a separate planter. It makes maintenance far simpler.
3. Tiled Backsplash: A Bold Outdoor Kitchen Decor Statement
A tiled backsplash brings colour, texture, and visual focus to a zone that otherwise reads as purely functional. It also protects the wall behind the grill from heat, grease, and smoke. Done well, it’s one of the most impactful improvements to outdoor kitchen decor relative to its cost.
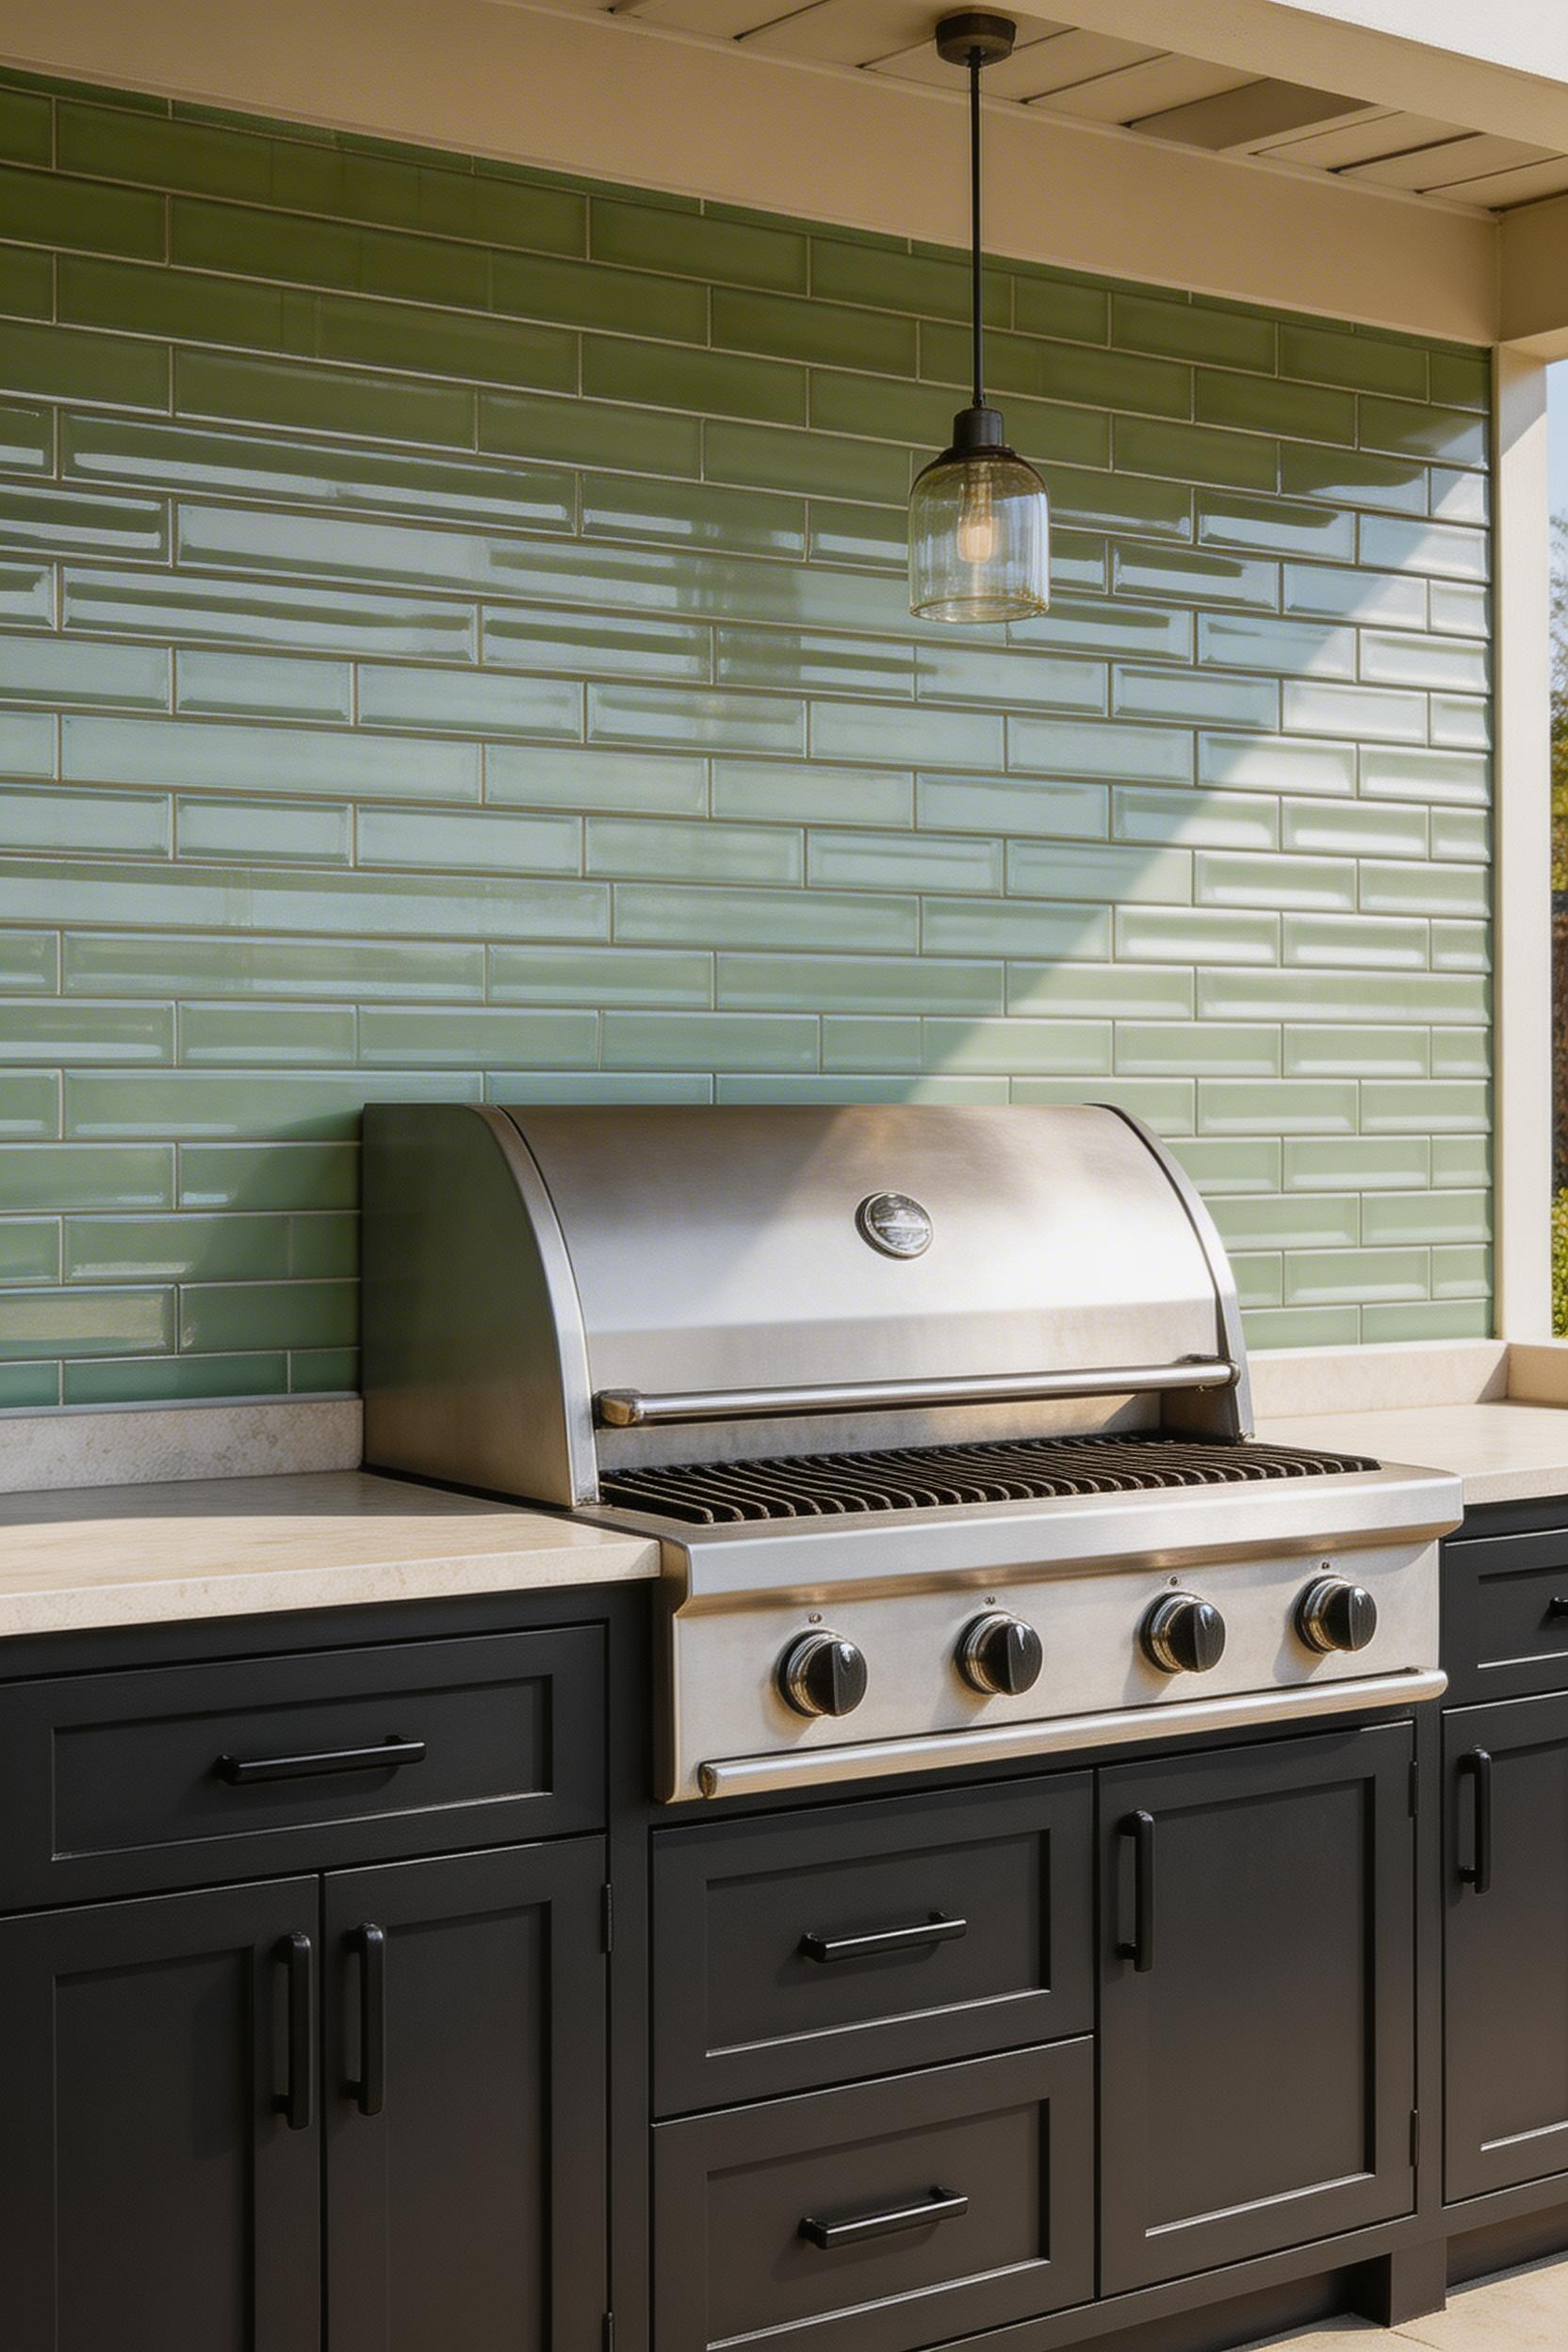
The fundamental rule for outdoor tile: it must resist freeze-thaw cycles. Standard indoor ceramic cracks in frost. Look for porcelain with a Class 4 or 5 absorption rating (less than 0.5% water absorption). Natural stone is also suitable when properly sealed. A Mohs hardness of 7+ resists chipping from dropped cast-iron and grease splatter.
Format and Pattern Choices
Large-format tiles — 24×24 or 12×24 inches — have fewer grout lines. That means less cleaning and a sleeker overall look. But the elongated 4×8 or 3×6 subway format remains the most popular outdoor kitchen backsplash choice because it reads as classic without dating. The Daltile Restore 4×16 Matte Ceramic ($2.89/sq ft) has excellent outdoor ratings and is widely available. For more drama, MSI Montauk Black Slate ($4.99/sq ft) creates a striking contrast against stainless appliances and light cabinetry.
Use polymer-modified thinset for outdoor installation. Choose epoxy-based grout near the grill for maximum stain resistance. Keep the backsplash at least 18 inches tall behind the grill zone. Also, leave a small expansion gap at corners near the cooking area — skip this and you’ll get cracked grout within a season from heat movement.
4. Bar Cart or Rolling Beverage Station
A styled beverage station does something specific for the overall space: it creates a second focal point. When drinks are set up at a distinct station, guests migrate there naturally. Conversation flows without crowding the grill. The whole space functions better socially as a result.
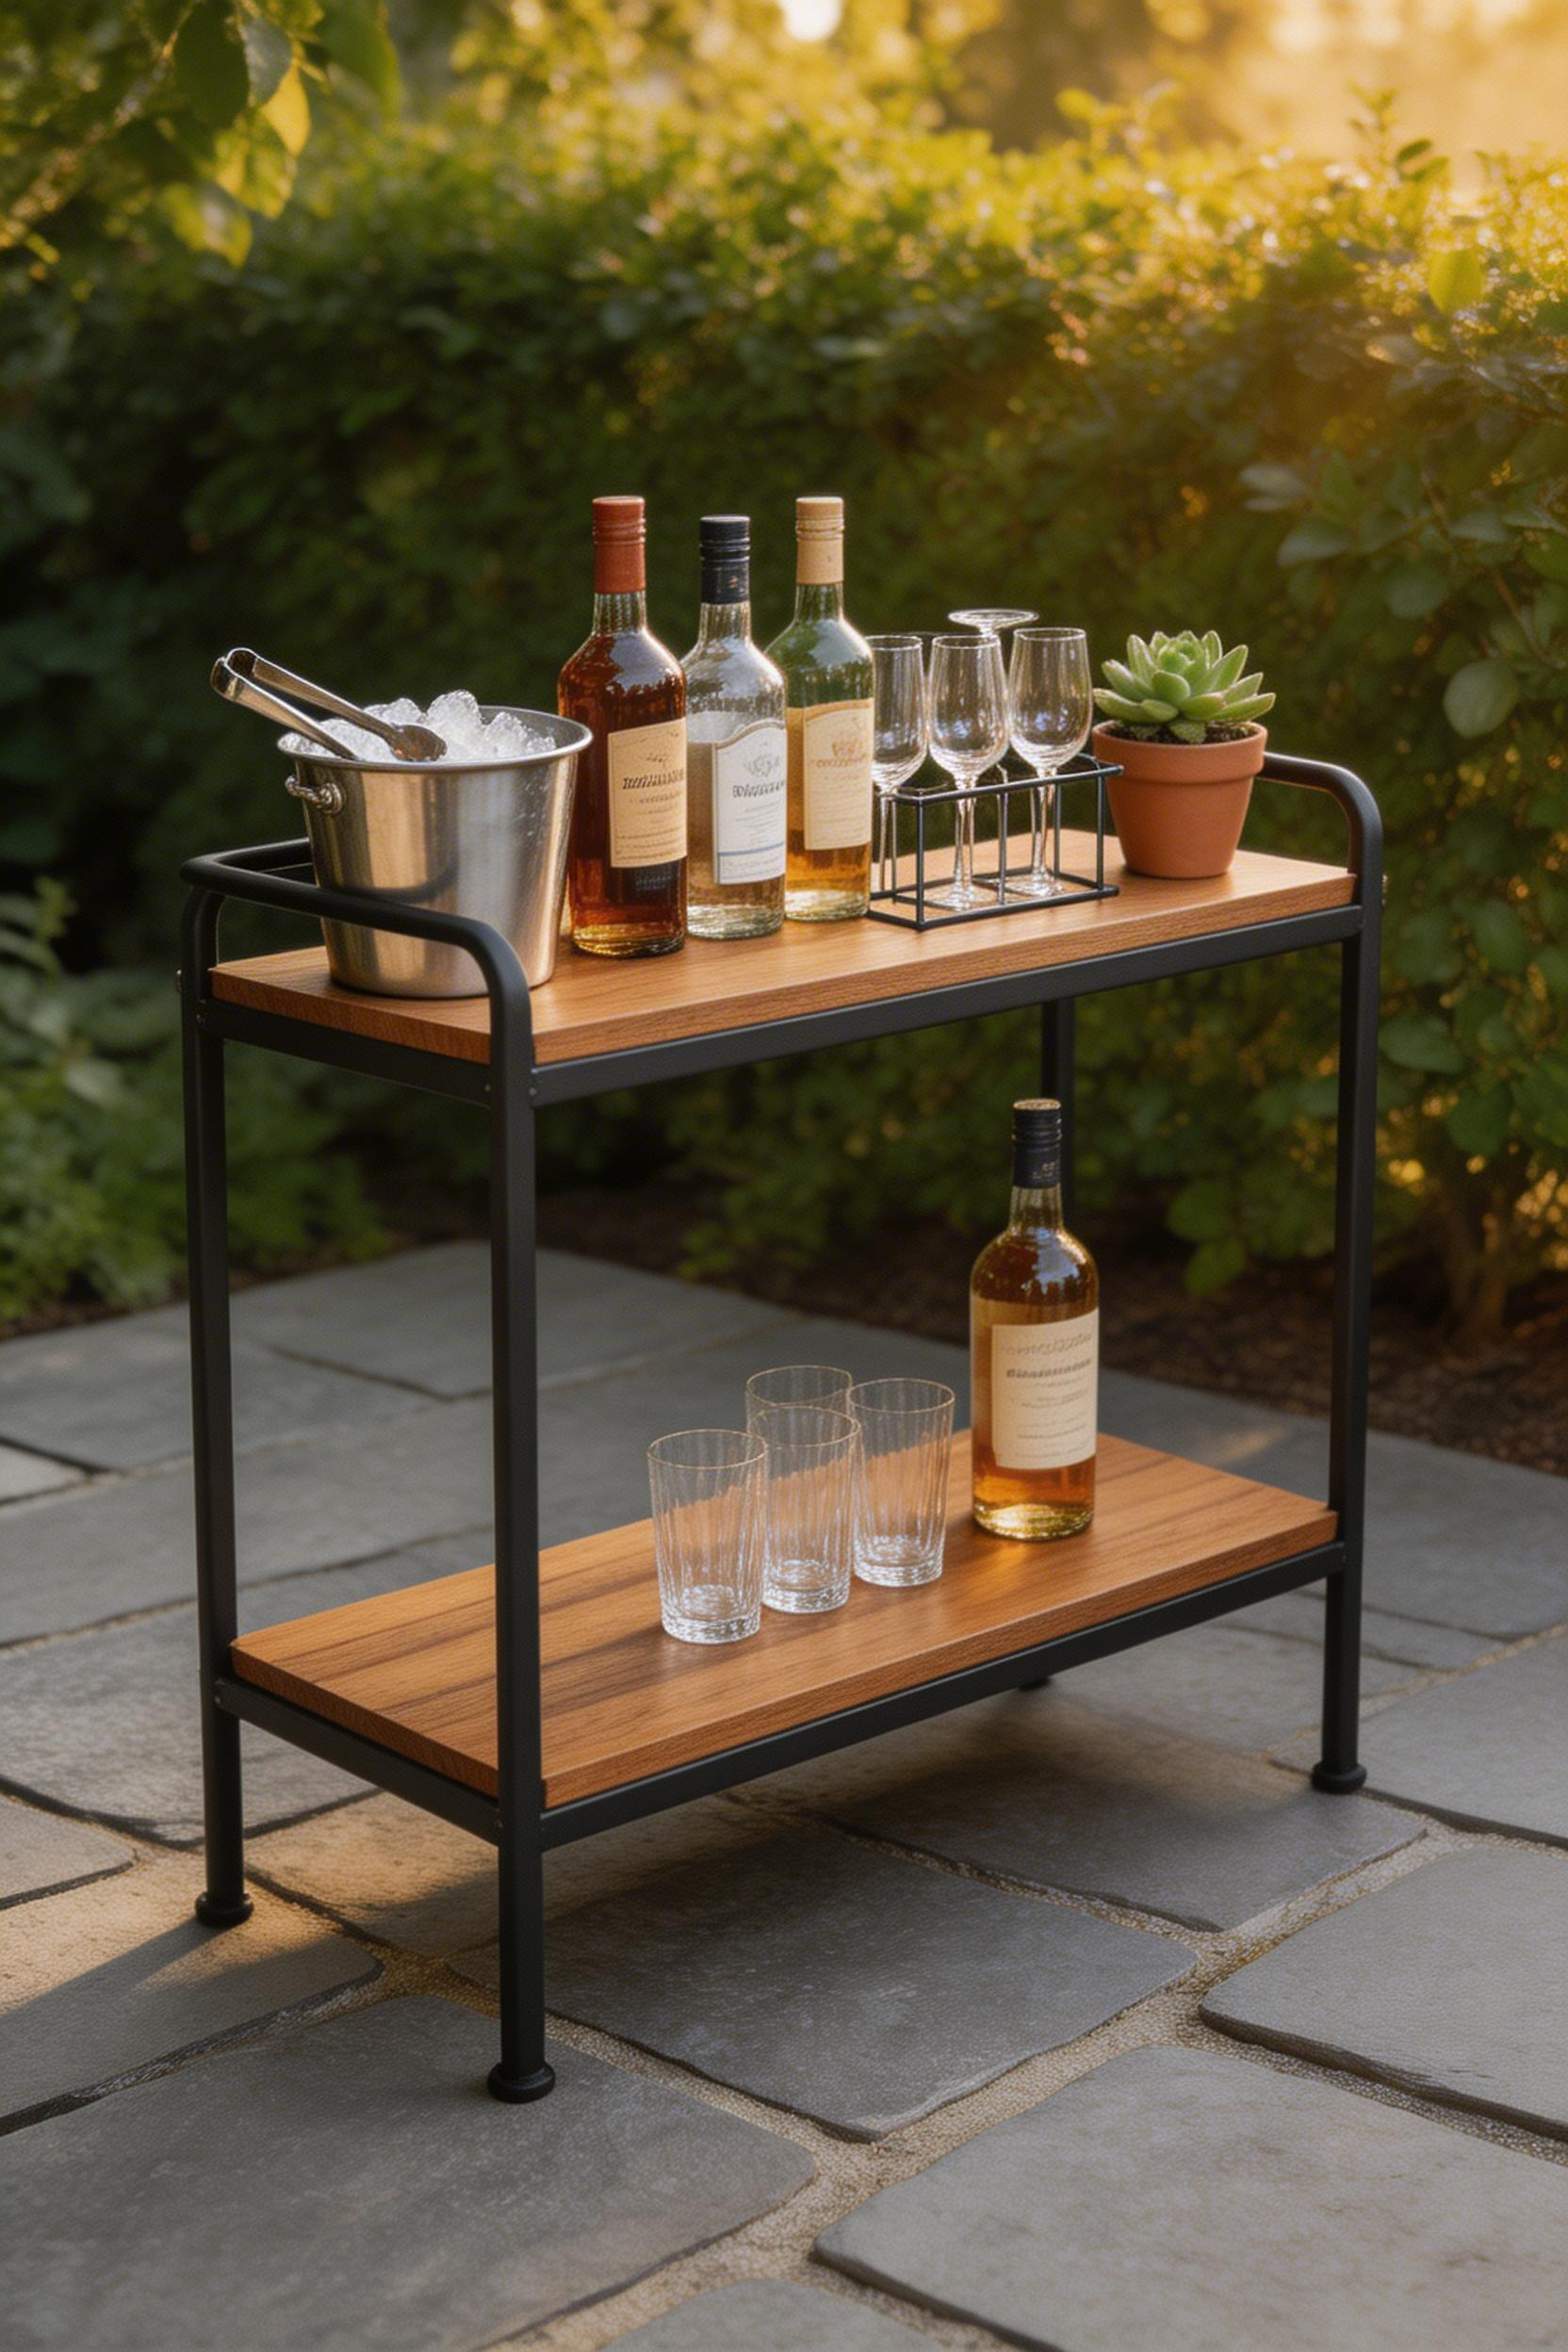
The best outdoor bar carts combine a flat top for drinks and a lower shelf for bottles, ice buckets, and glassware. Powder-coated steel frames with teak or reclaimed wood shelves offer the best combination of durability and warmth. Locking wheels are essential. A cart without them will roll on uneven pavers and tip on a slope — both annoying and dangerous when it’s loaded with glass.
What to Look For in the Materials
Avoid natural wicker regardless of how good it looks in the product photo. It degrades in UV and moisture within a season outdoors — sometimes faster. Synthetic resin wicker rated for full sun is a reliable alternative. The Crosley Palm Springs Bar Cart ($179) in powder-coated steel is a solid performer. The Safavieh Bradbury ($219) with its teak-and-aluminium combination has a genuinely coastal look.
Also check the weight capacity before buying. A fully loaded cart with ice, bottles, and glassware can reach 50–60 lbs. The minimum rating to look for is 75 lbs. Wheel diameter should be 3 inches or more for smooth movement over pavers or decking. One practical addition: a built-in bottle opener mounted to the side costs about $12 and gets used constantly.
5. Outdoor-Rated Artwork and Wall Panels
This is the most overlooked element in any outdoor cooking space. Yet it’s one of the most immediate ways to signal that the space was designed rather than assembled. A piece of art on an exterior wall transforms the backdrop of the cooking zone. Bare rendered concrete or timber cladding becomes a considered composition. The catch, however, is that most art doesn’t survive outdoors.
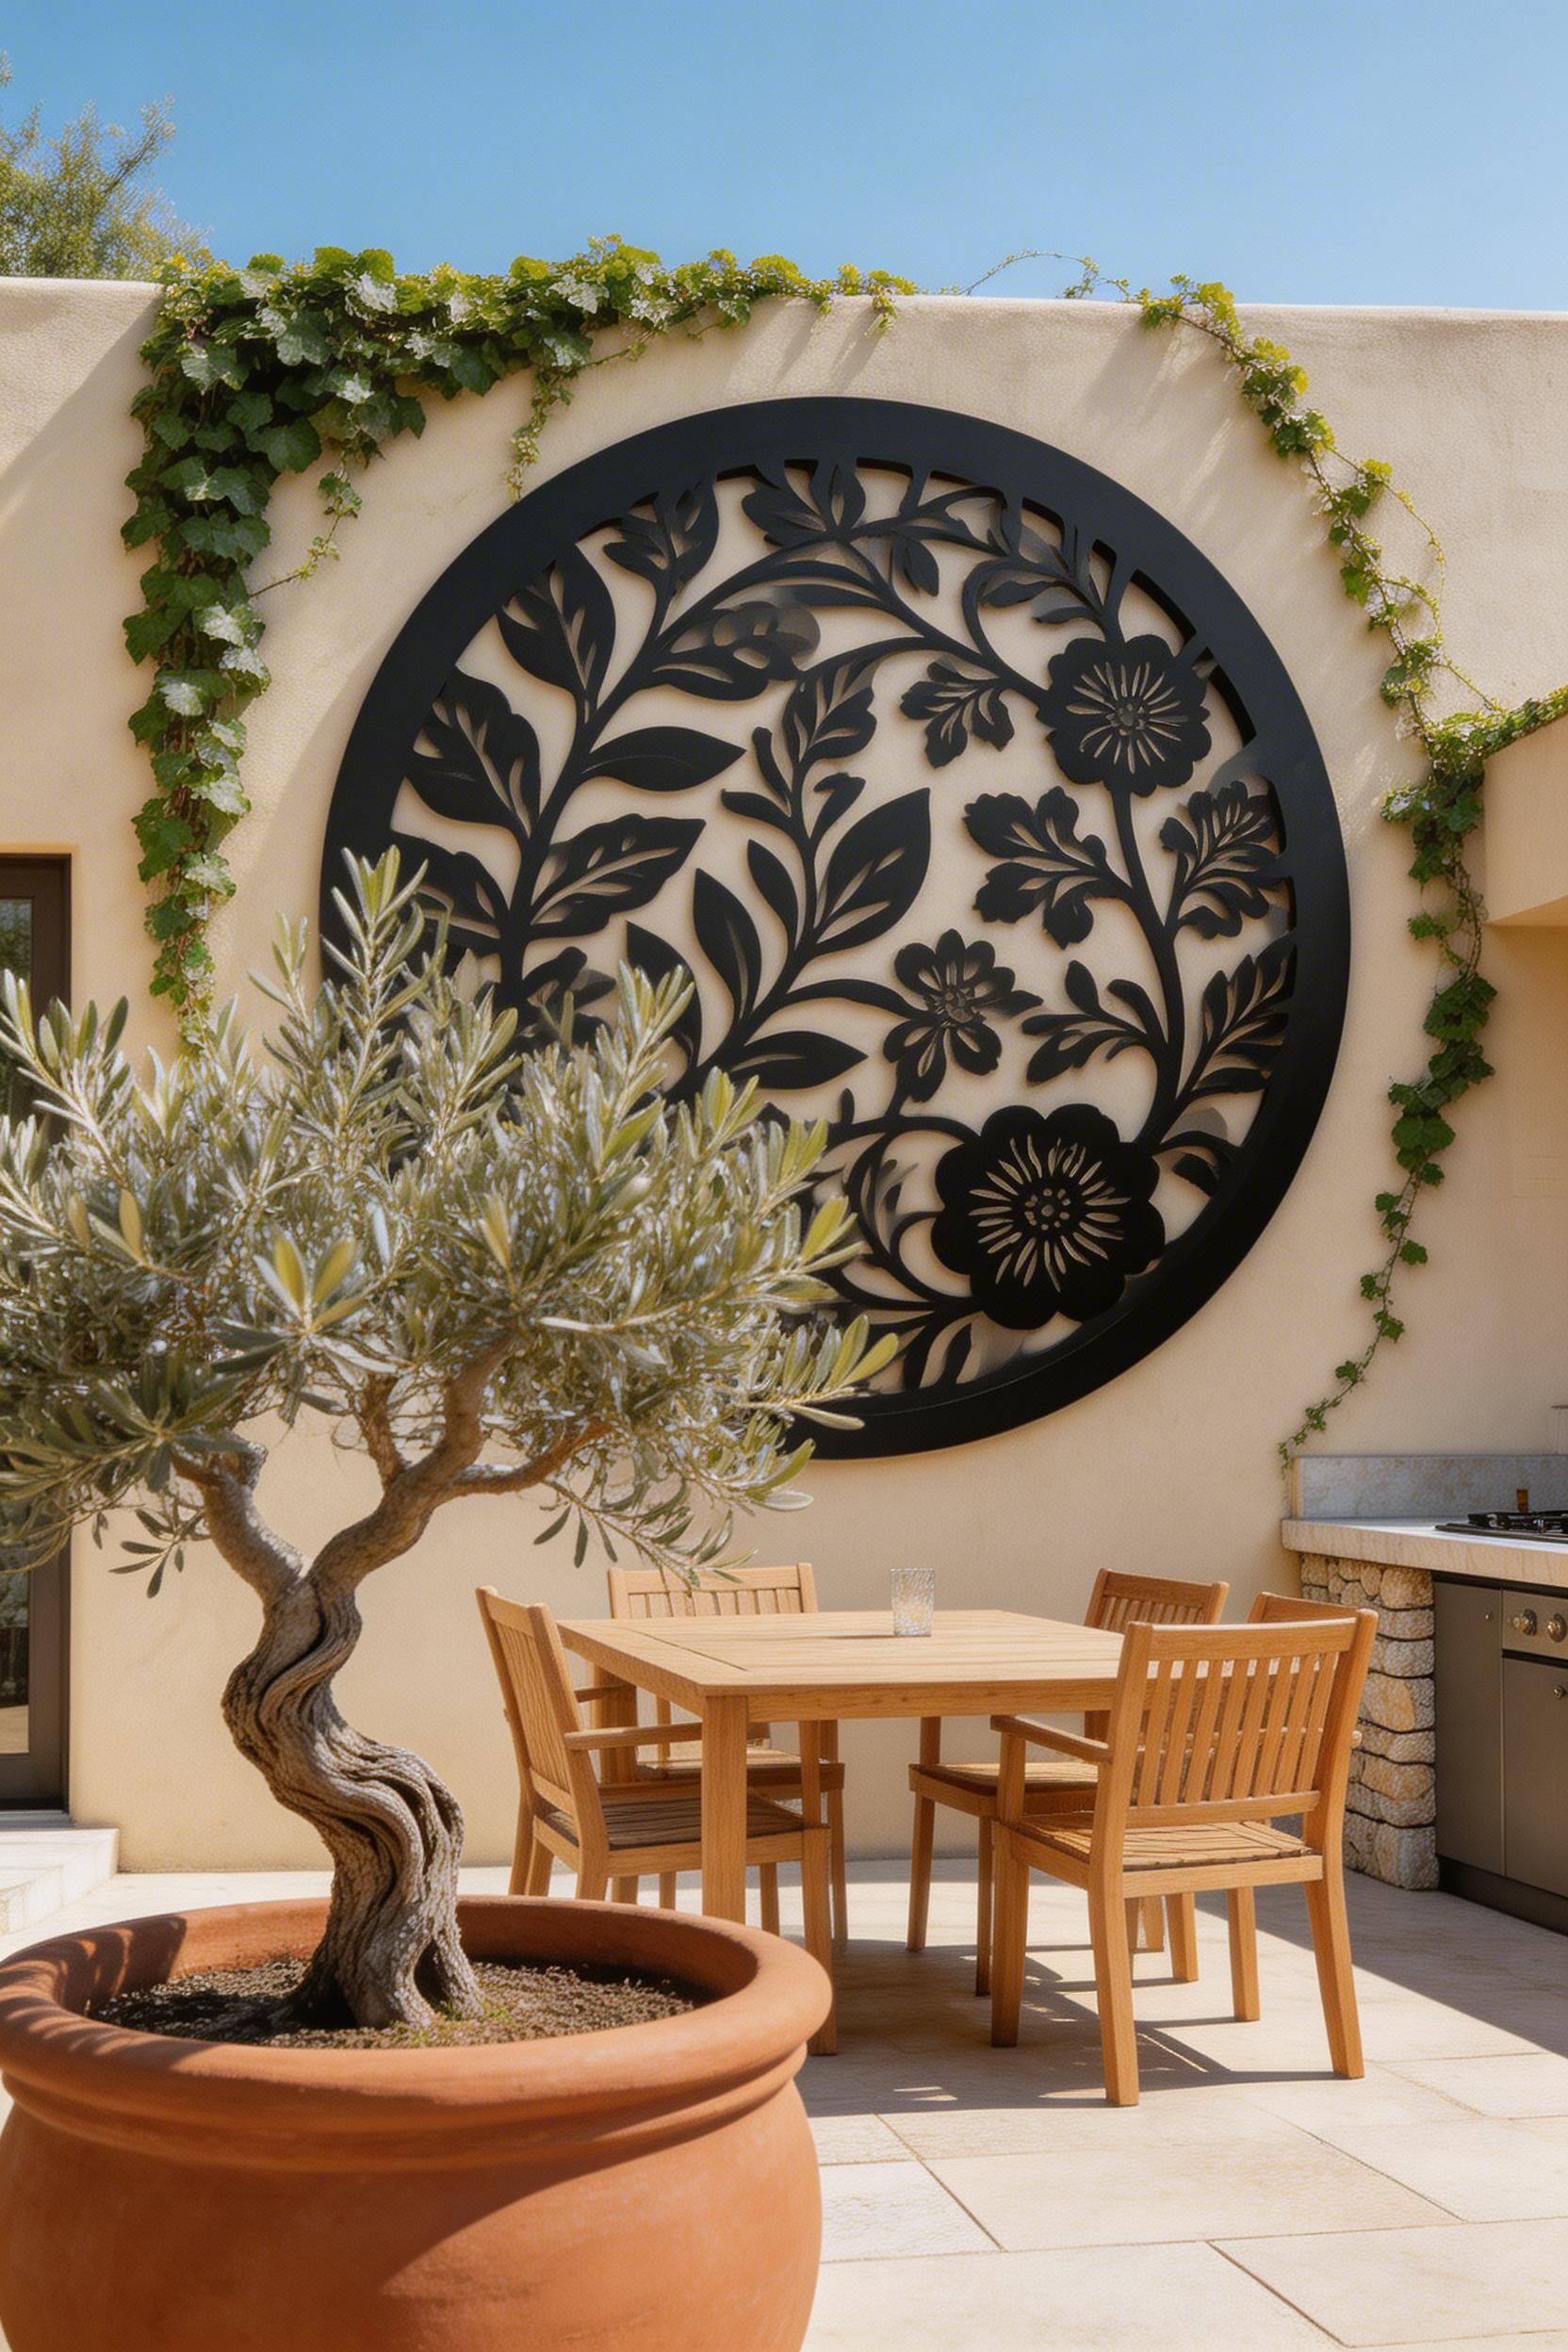
True outdoor art uses aluminium substrate (dibond) or powder-coated steel — not canvas over wood, which warps. Standard framed prints mildew outdoors too. UV-resistant inks on aluminium hold colour for over 70 years under accelerated UV testing. That’s roughly equivalent to 15 real outdoor years. Metal wall panels with geometric or botanical cutout patterns work well because they function as art, partial shade, and windbreak simultaneously.
Scale and Mounting
Outdoor scale is always larger than indoor scale. A piece that looks substantial inside reads as negligible against an open sky. Go with a single piece at 24×30 inches minimum, or create a cluster of three to five smaller pieces. Use stainless steel or hot-dip galvanised mounting hardware — standard zinc screws rust visibly within months outdoors. Standoff mounts with at least one inch of gap allow air circulation and prevent trapped moisture behind the artwork.
The most affordable option that genuinely looks designed: a single large powder-coated steel laser-cut panel in a botanical or geometric motif. Garden metal art suppliers offer these for $60–$120. They read as intentional design choices, not afterthoughts.
6. Statement Rug to Define the Outdoor Kitchen Dining Zone
In outdoor kitchen decor, a rug does the same job as a room divider. It defines the dining area as a distinct zone, gives the space warmth and texture, and tells guests where to gather. Without it, an open-plan outdoor kitchen often has too much dead space between the island and the furniture.
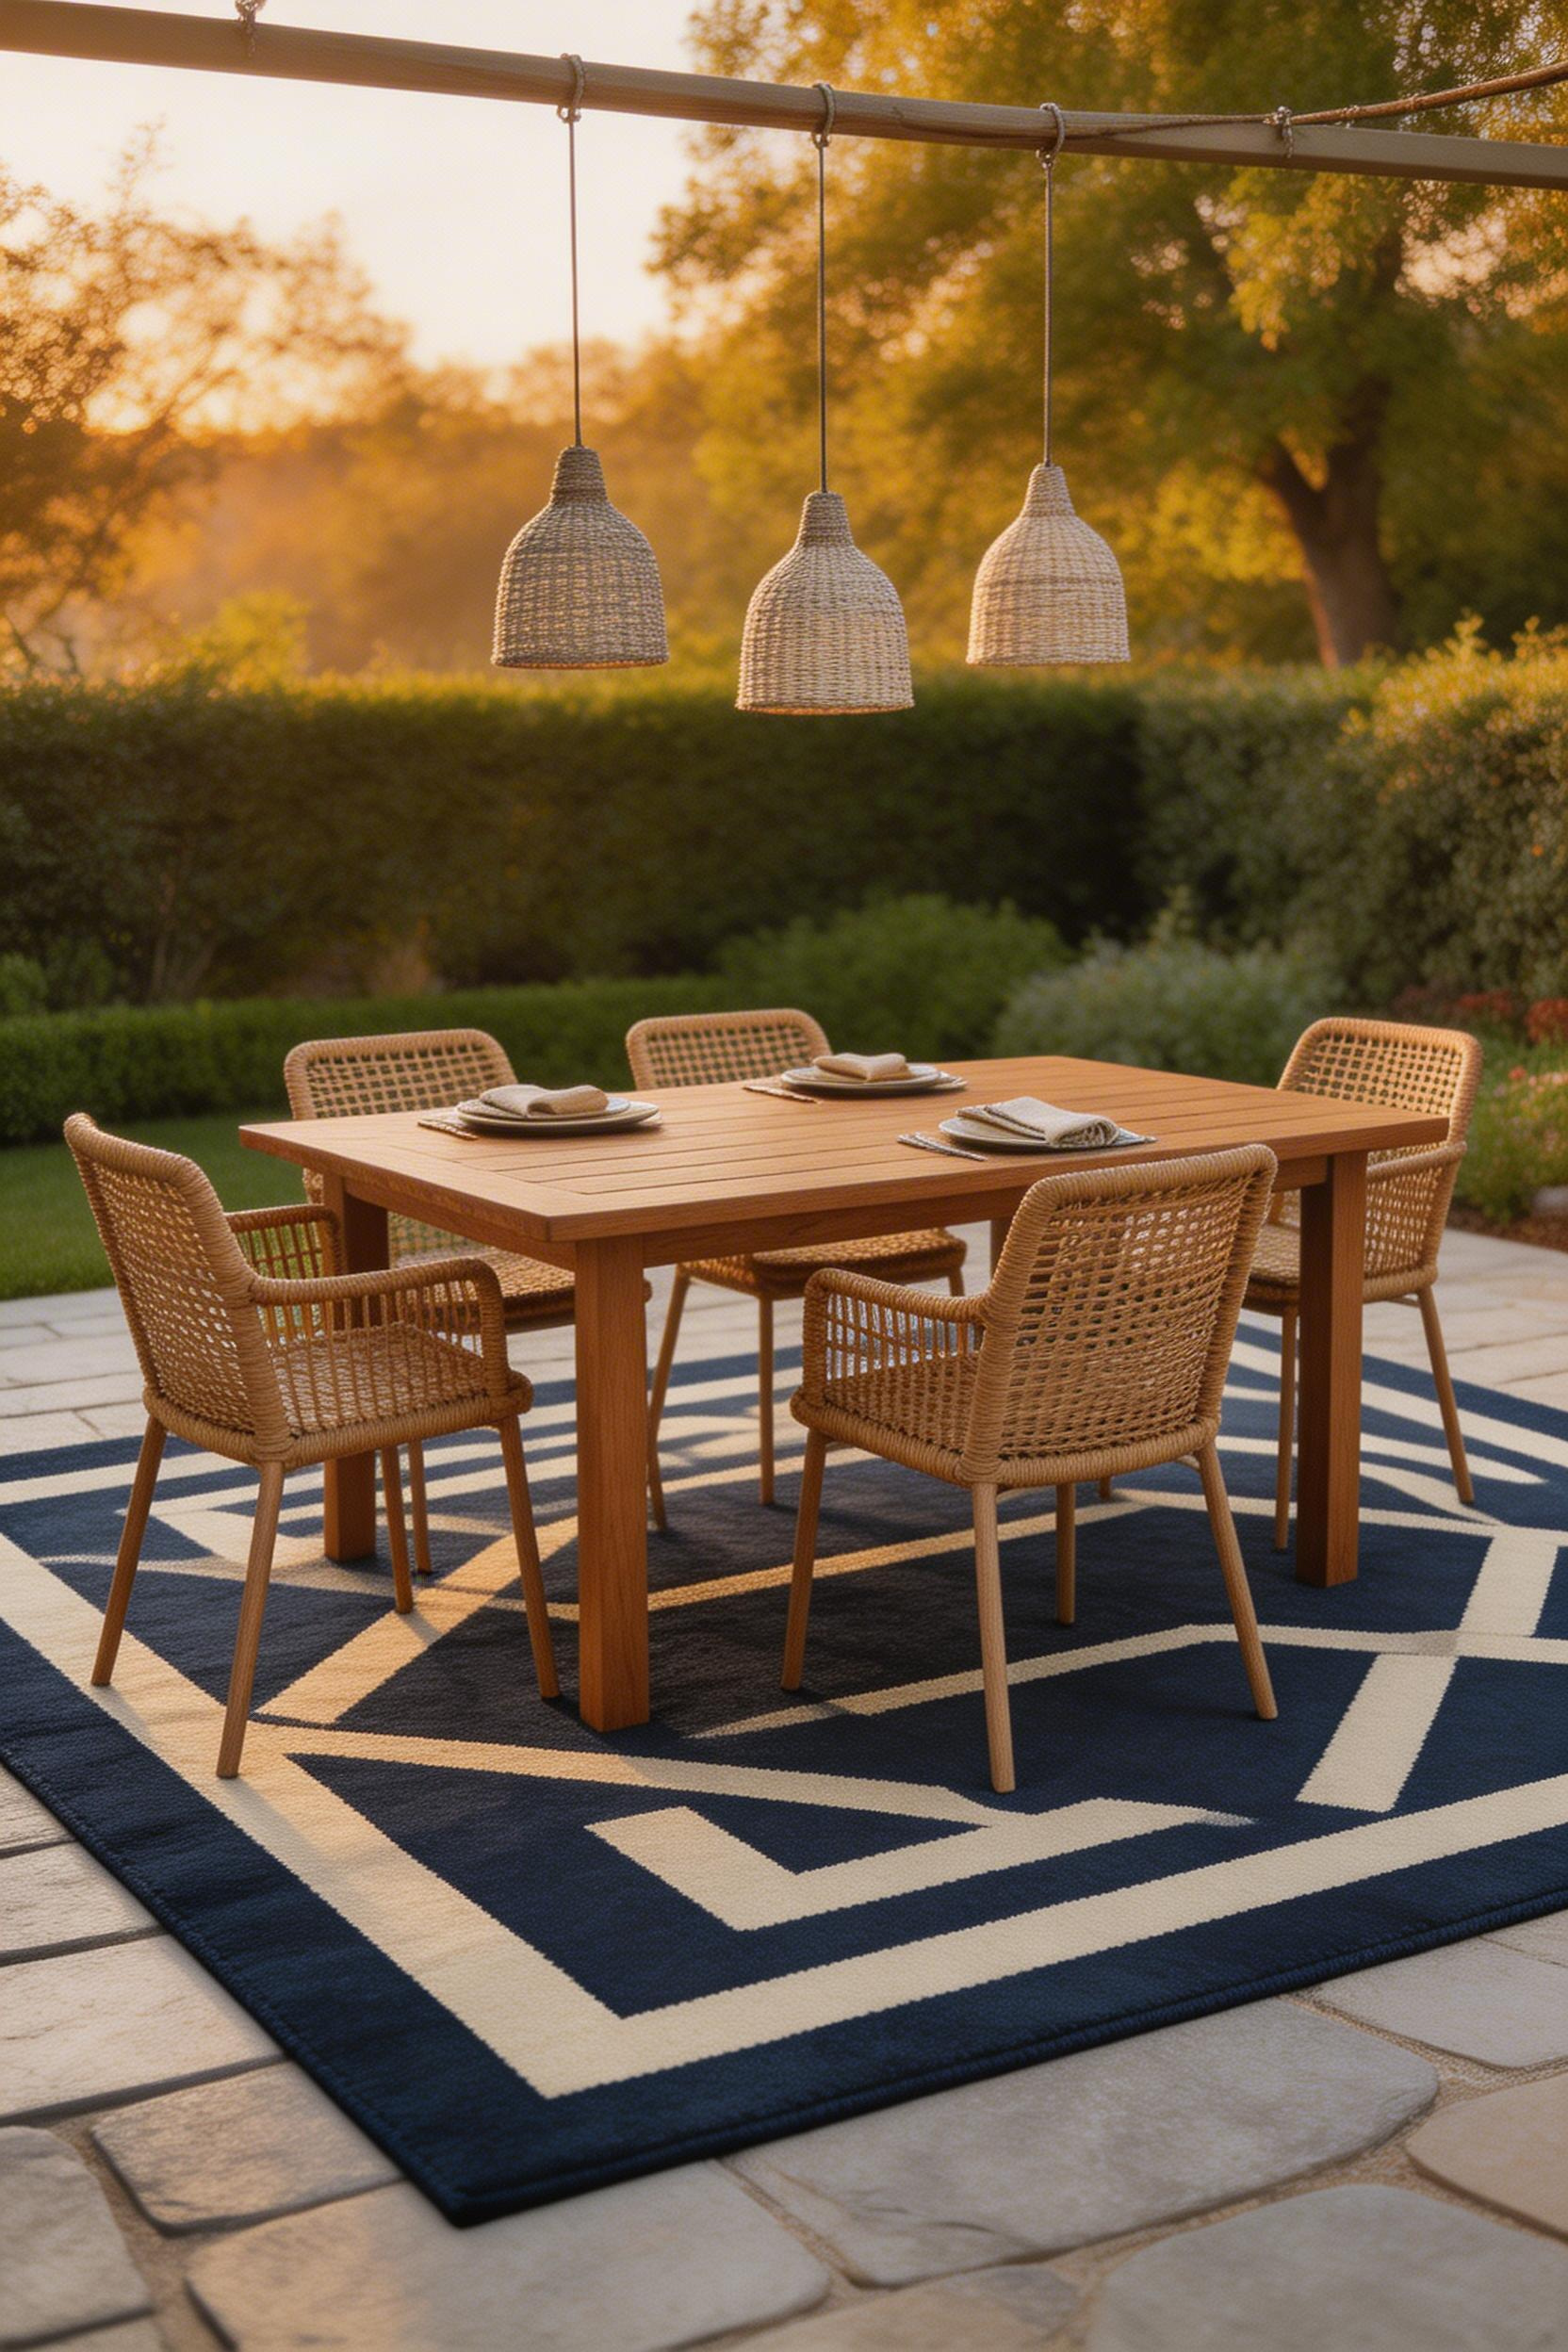
Polypropylene (olefin) is the right material for most outdoor settings. It’s UV-resistant, waterproof, mold-resistant, and machine washable. Recycled PET rugs made from plastic bottles have improved significantly. They’re now a sustainable alternative with near-identical durability. Both are far better choices than natural fibre rugs (jute, sisal, seagrass). Natural fibres absorb moisture, mold, and degrade within a single wet season outdoors.
Getting the Size Right
The most common error in outdoor rug sizing is going too small. The rug should extend at least 24 inches beyond the table on all sides when chairs are tucked in. This keeps chair legs on the rug when people are seated. Without it, chairs end up half-on, half-off the mat — which looks unfinished and catches on the edge. For a typical 60×84-inch outdoor dining table, that means a 9×12-foot rug minimum.
Bold geometric patterns hide dirt better than solid colours. Stripes age gracefully outdoors. For hard surfaces like pavers or concrete, use a non-adhesive open-weave rubber rug pad that allows water drainage. Hose down polypropylene rugs monthly rather than waiting until they look dirty — organic debris sets deeply in damp weather, so two minutes with a hose keeps them looking good for years.
7. Potted Olive Trees as Natural Framing
Framing an outdoor kitchen with large potted trees makes the space feel like it belongs where it is. Two matching olive standards flanking the entrance to the cooking zone read as intentional architecture. They provide scale, greenery, and a sense of enclosure — without blocking light or requiring permanent landscaping changes.
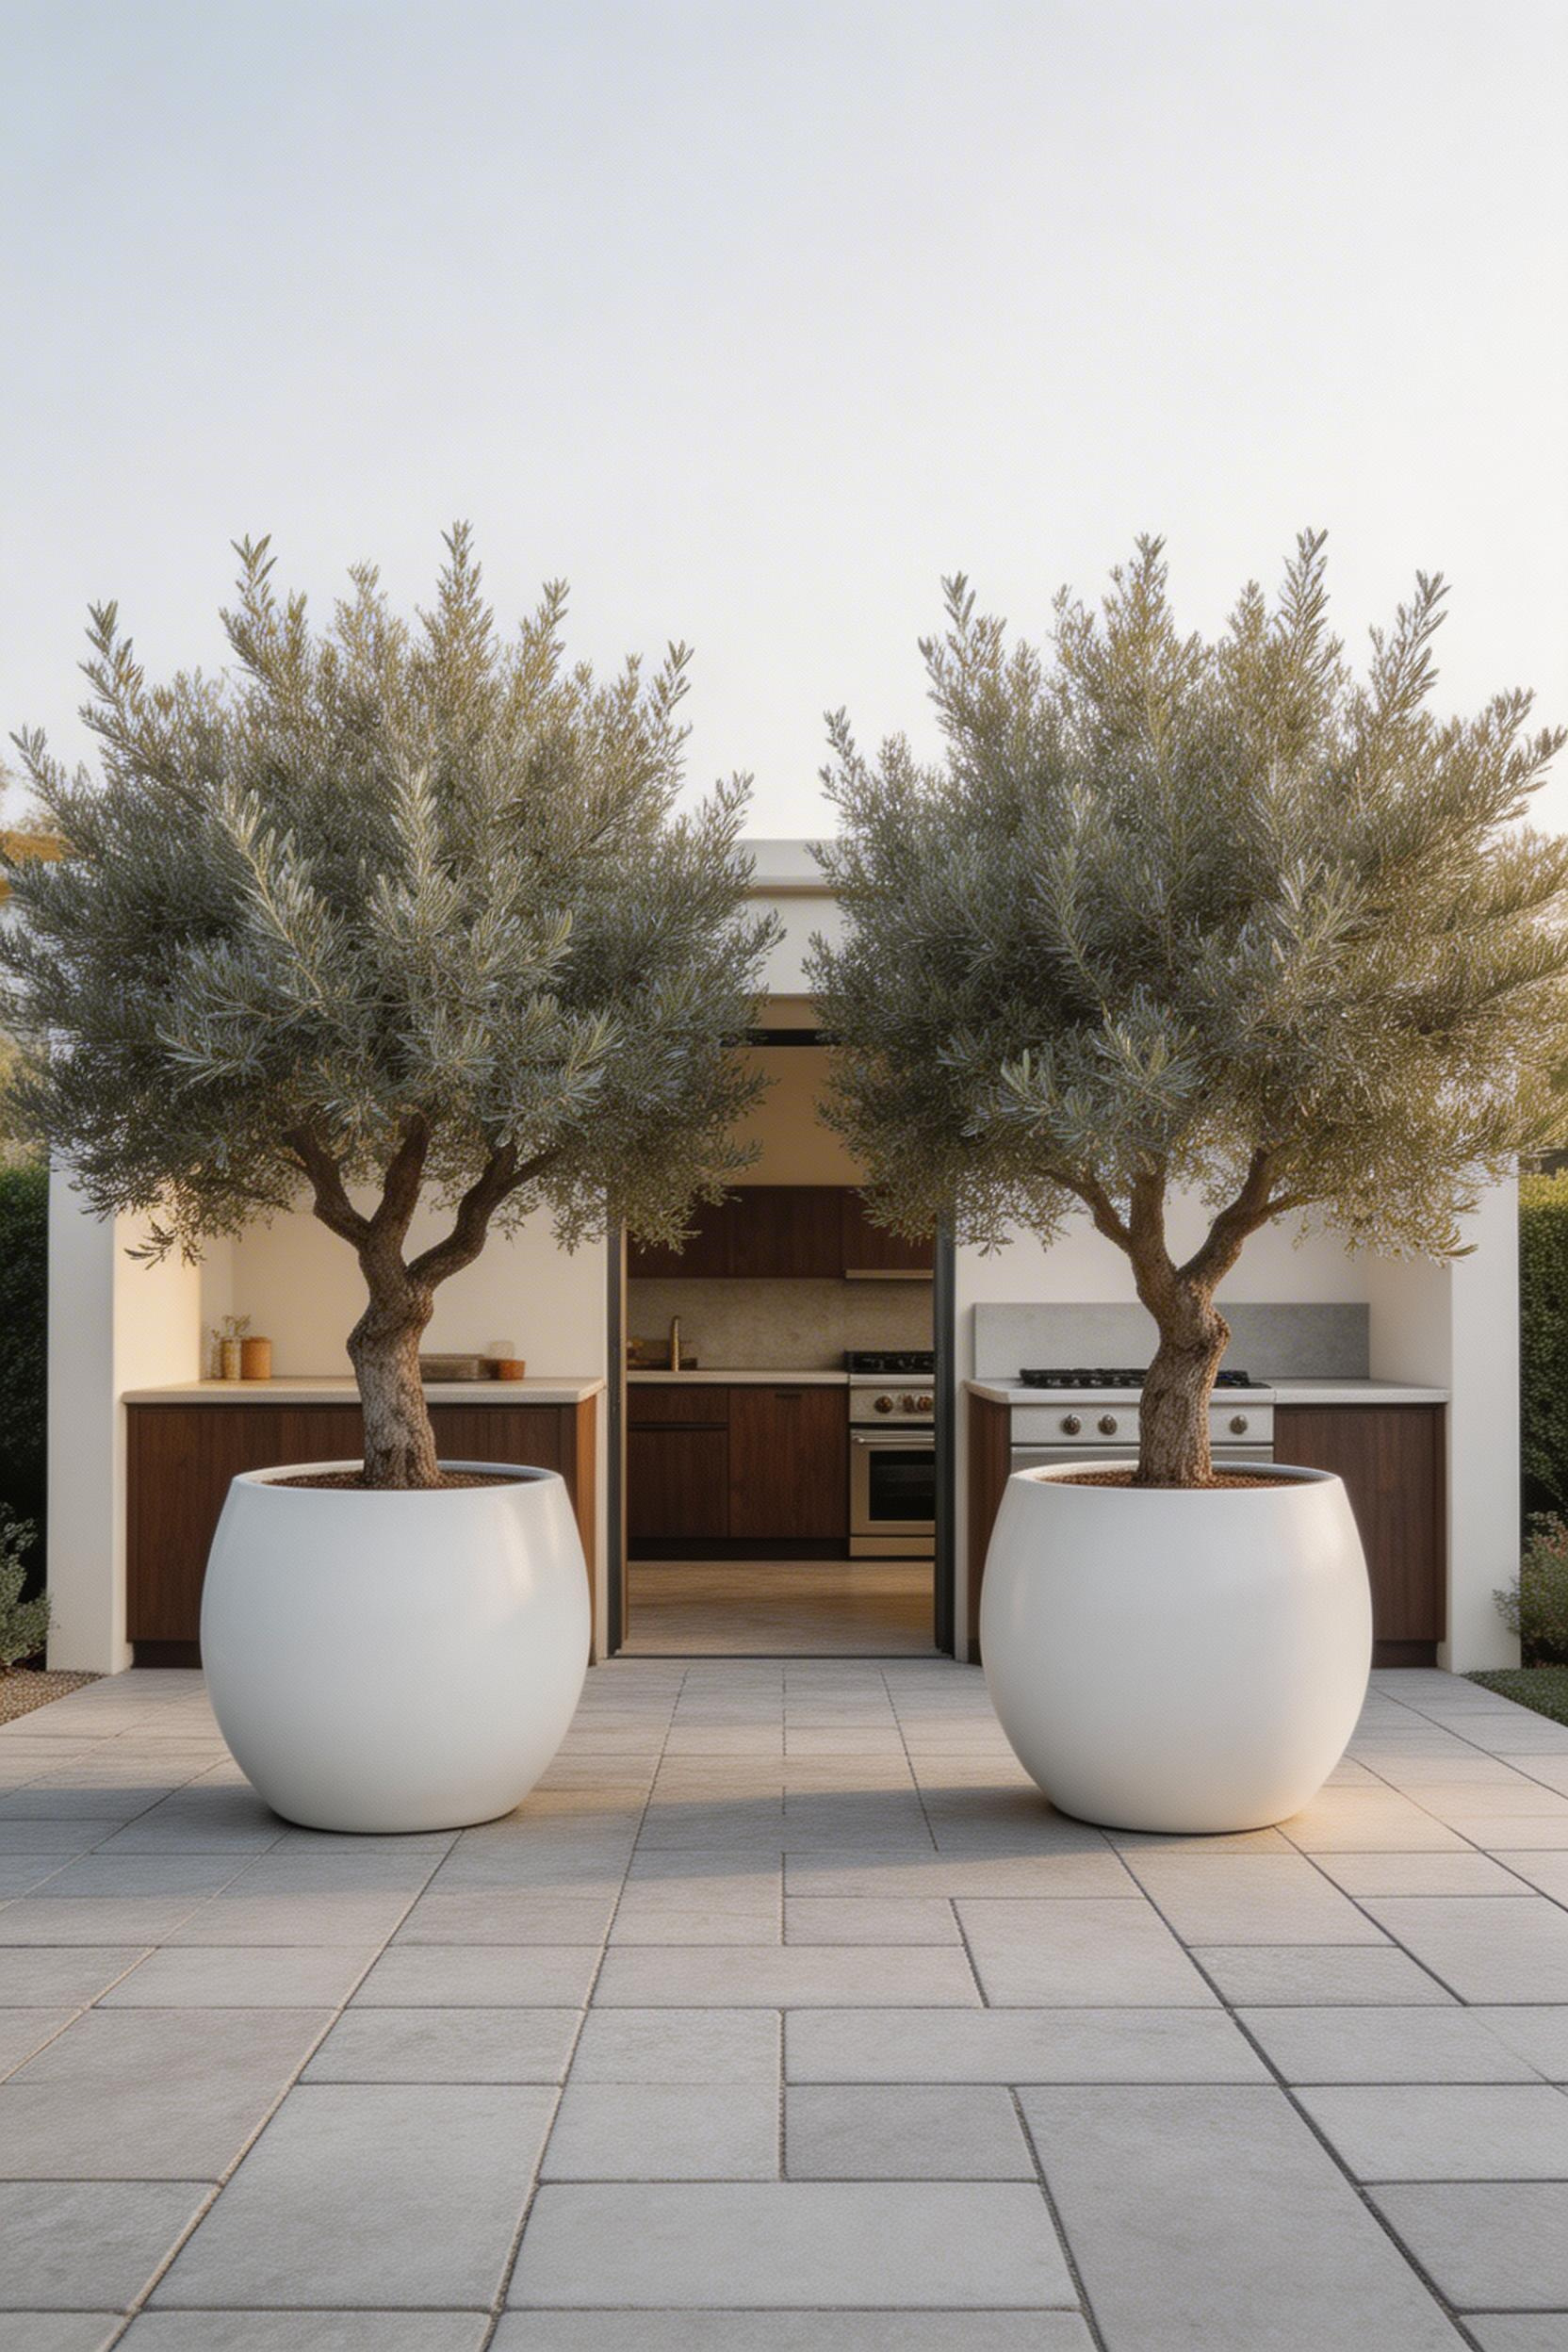
Olea europaea (European olive) is the standard choice for this role. It’s drought-tolerant once established, silvery-green year-round in mild climates, and visually mature even when relatively young. Standard-trained forms — single clear trunk with a lollipop canopy — at five to six feet in a 20-inch container cost $120–$250 at most garden centres. In USDA zones 8b and above, they overwinter outdoors if protected from hard frost.
Container Choice and Care
Frost-proof containers are non-negotiable in climates with winter freezes. Standard terracotta cracks. So does most glazed ceramic. Fibreglass containers like the Crescent Garden Cylinder Planter ($89) are lightweight, genuinely frost-proof, and available in colours that suit contemporary or rustic outdoor kitchen styles. Bay laurel is a good culinary alternative — the leaves are edible, the form is similar, and it’s slightly hardier in cooler zones.
For both trees, use a gritty, free-draining compost: roughly 50% loam, 25% grit, 25% perlite. Water thoroughly but infrequently. Olives strongly prefer drying out between waterings. Overwatering in containers is the most common reason they fail. Place two matching standards symmetrically — asymmetric placement tends to look like a leftover plant rather than a design decision.
8. Wooden Ceiling or Shade Structure Detailing
Of all the outdoor kitchen decor decisions on this list, a pergola or overhead timber structure has the largest single impact on how the space feels. It’s also the change most likely to affect how often the kitchen gets used. Once there’s a ceiling overhead — even a partial slatted one — the space stops feeling like a patio and starts feeling like a room.
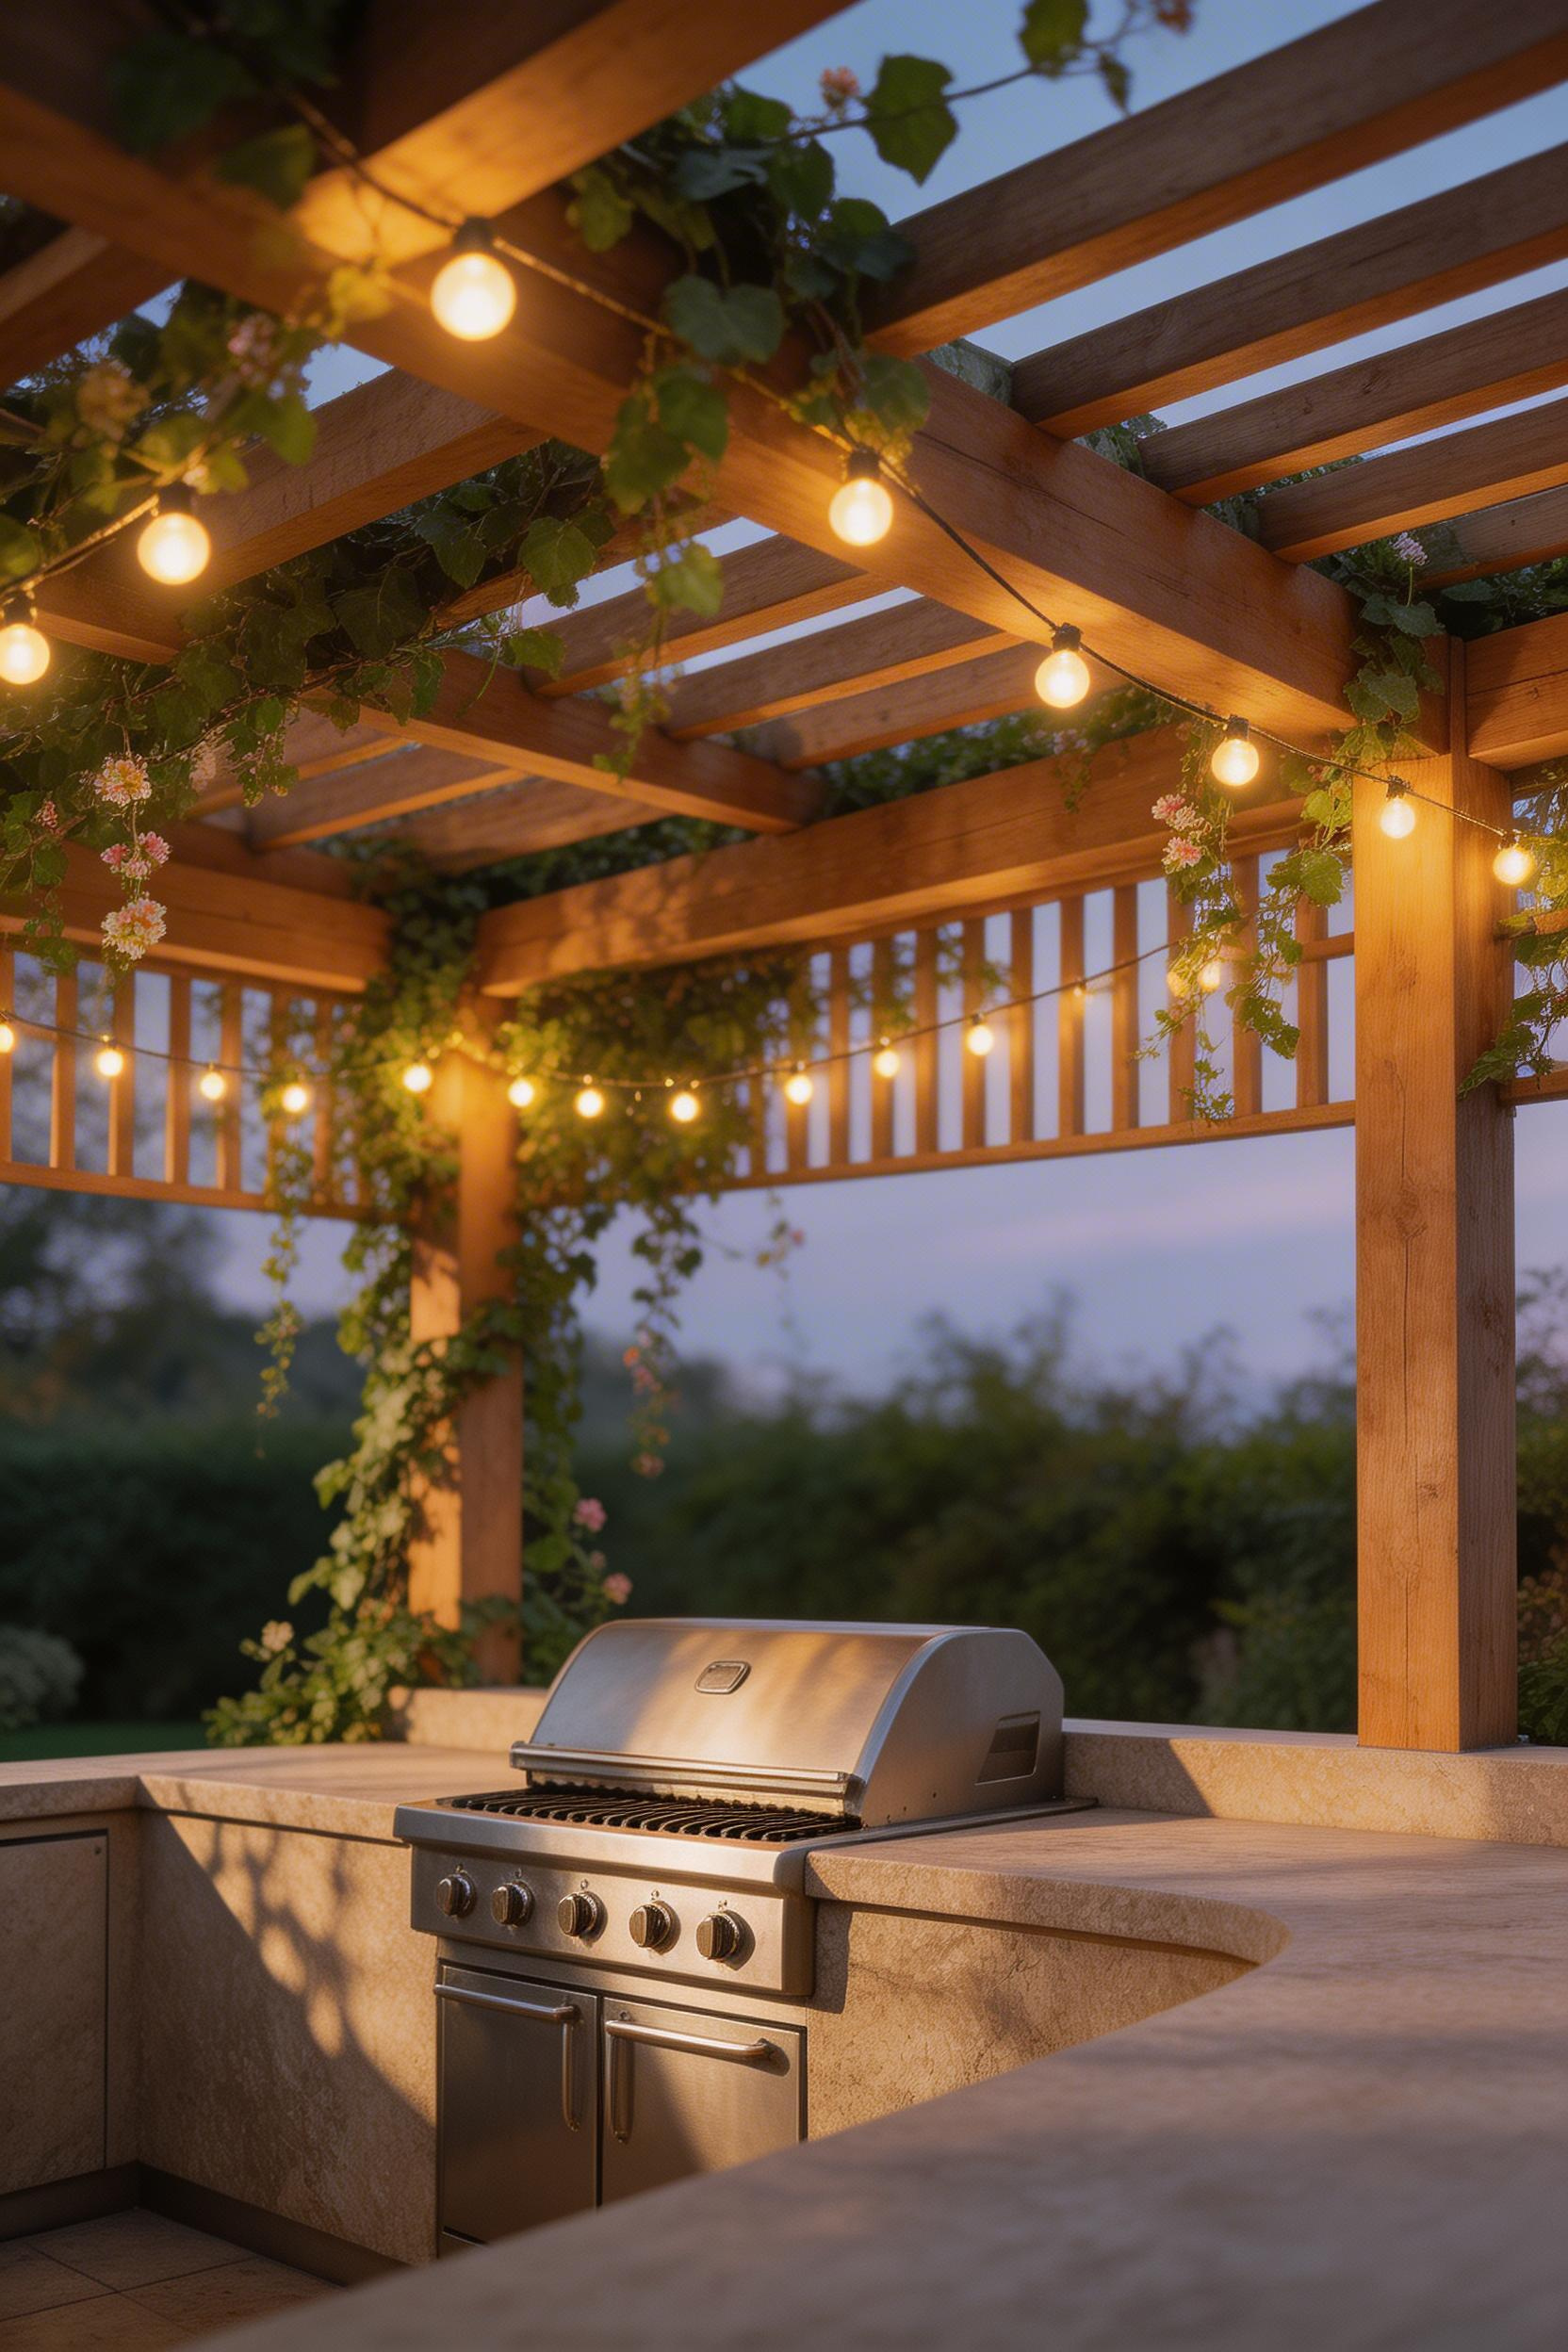
Western red cedar is the most practical overhead structure timber for most regions. It’s naturally rot-resistant, light enough for DIY spans, and beautiful either stained or left to silver naturally. Ipe and teak are the premium alternatives — denser and more durable, but considerably more expensive ($8–$14 per linear foot versus $2–$5 for cedar). A slatted pergola with roughly 60% shade coverage hits the sweet spot. There’s enough shade for comfortable cooking, but enough gap for smoke and heat to escape freely.
Lighting Integration and Structure
Built-in wiring channels (conduit) running through pergola posts allow pendant lighting and outdoor speakers without visible cable runs. Plan this at the construction stage, even if you’re not adding lighting immediately. Running conduit after posts are in is significantly harder. Staining with a semi-transparent oil-based deck stain every two to three years preserves cedar’s colour. Leaving it untreated develops a silver-grey patina — and many people prefer that result anyway.
For a freestanding kit, the 8x10ft cedar options at Home Depot and Lowe’s ($699–$1,299) are good quality for the price. Check local building codes first — permits are often required for structures over 200 square feet. For more inspiration on extending this overhead approach, the ideas in back porch pergola design work equally well when adapted for an outdoor kitchen setting.
9. Countertop Edge Profiles That Elevate Outdoor Kitchen Decor
The countertop edge is one of the most overlooked details in the entire outdoor kitchen. It’s visible from multiple vantage points simultaneously — from the side, from above when prepping food, and from the seating position at the island. Getting the edge profile right is a small decision with a disproportionate visual return.
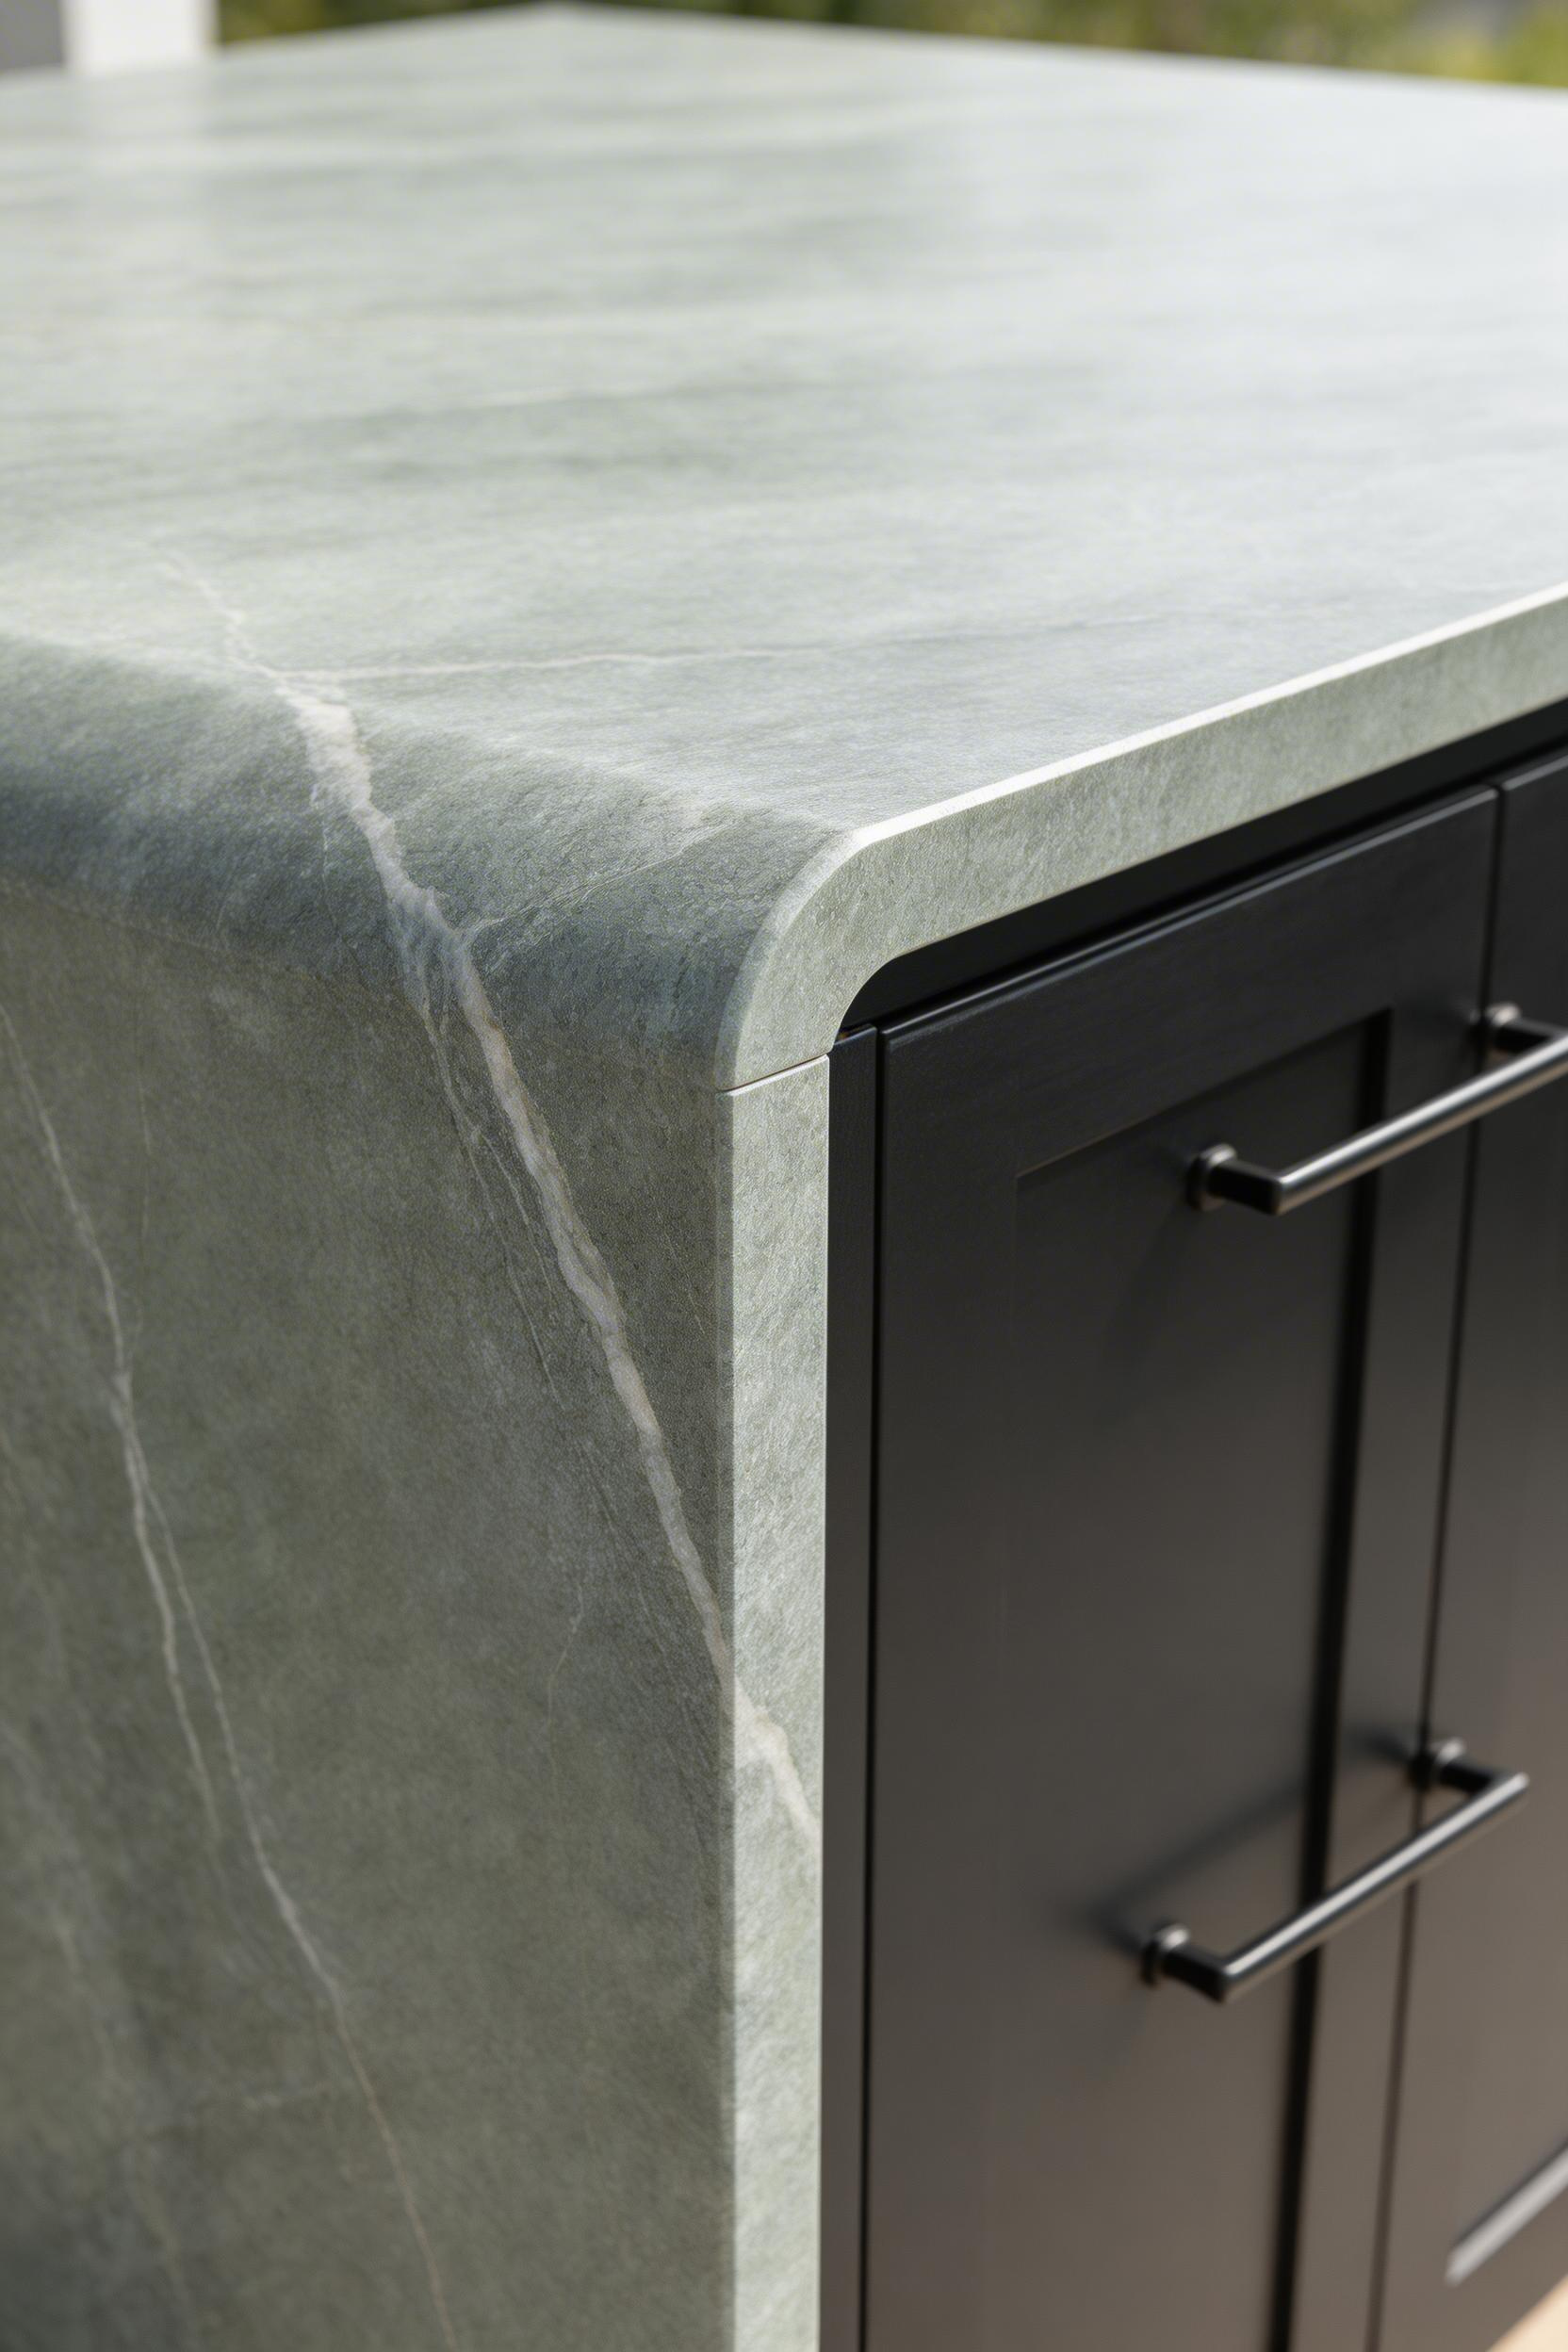
The eased edge — a slightly chamfered 90-degree profile — is the most popular outdoor choice. It reads as modern and is the least likely to chip. The bullnose has a softer, fully rounded profile that suits natural stone and more traditional styles. The waterfall edge, where the countertop material wraps down over the island sides, has become the signature look in high-end outdoor kitchens. It’s striking and architectural, though it adds 20–35% to material cost.
Choosing the Right Material for Outdoors
For outdoor countertops, quartzite is displacing granite as the go-to premium choice. Despite granite’s reputation for durability, quartzite is actually less porous and needs less frequent sealing. According to the Stone Fabricators Alliance, quartzite outdoor installations have grown 40% year-over-year since 2021. Sea Pearl quartzite ($65–$95/sq ft installed) has a grey-green veining that suits coastal and contemporary styles particularly well.
Compact laminate such as Trespa Meteon ($45–$75/sq ft) is the best low-maintenance alternative. It’s UV-stable, frost-resistant, and available in large slabs that minimise seams. For any outdoor countertop, minimum thickness should be 1.5 inches. Thinner than that and overhangs become structurally questionable. Also, apply a penetrating sealer to concrete countertops annually — unsealed concrete stains permanently from cooking oils and wine. For broader countertop context, the kitchen countertop ideas on this site cover indoor applications that translate well to outdoor spaces too.
10. Open Shelving With Styled Cookware Display
Open shelving in an outdoor kitchen forces you to be intentional about what you display. When done well, the result looks designed rather than stocked. In this context, a single shelf above the prep area — styled thoughtfully — does more to make the space look considered than almost any other $50–$100 investment.
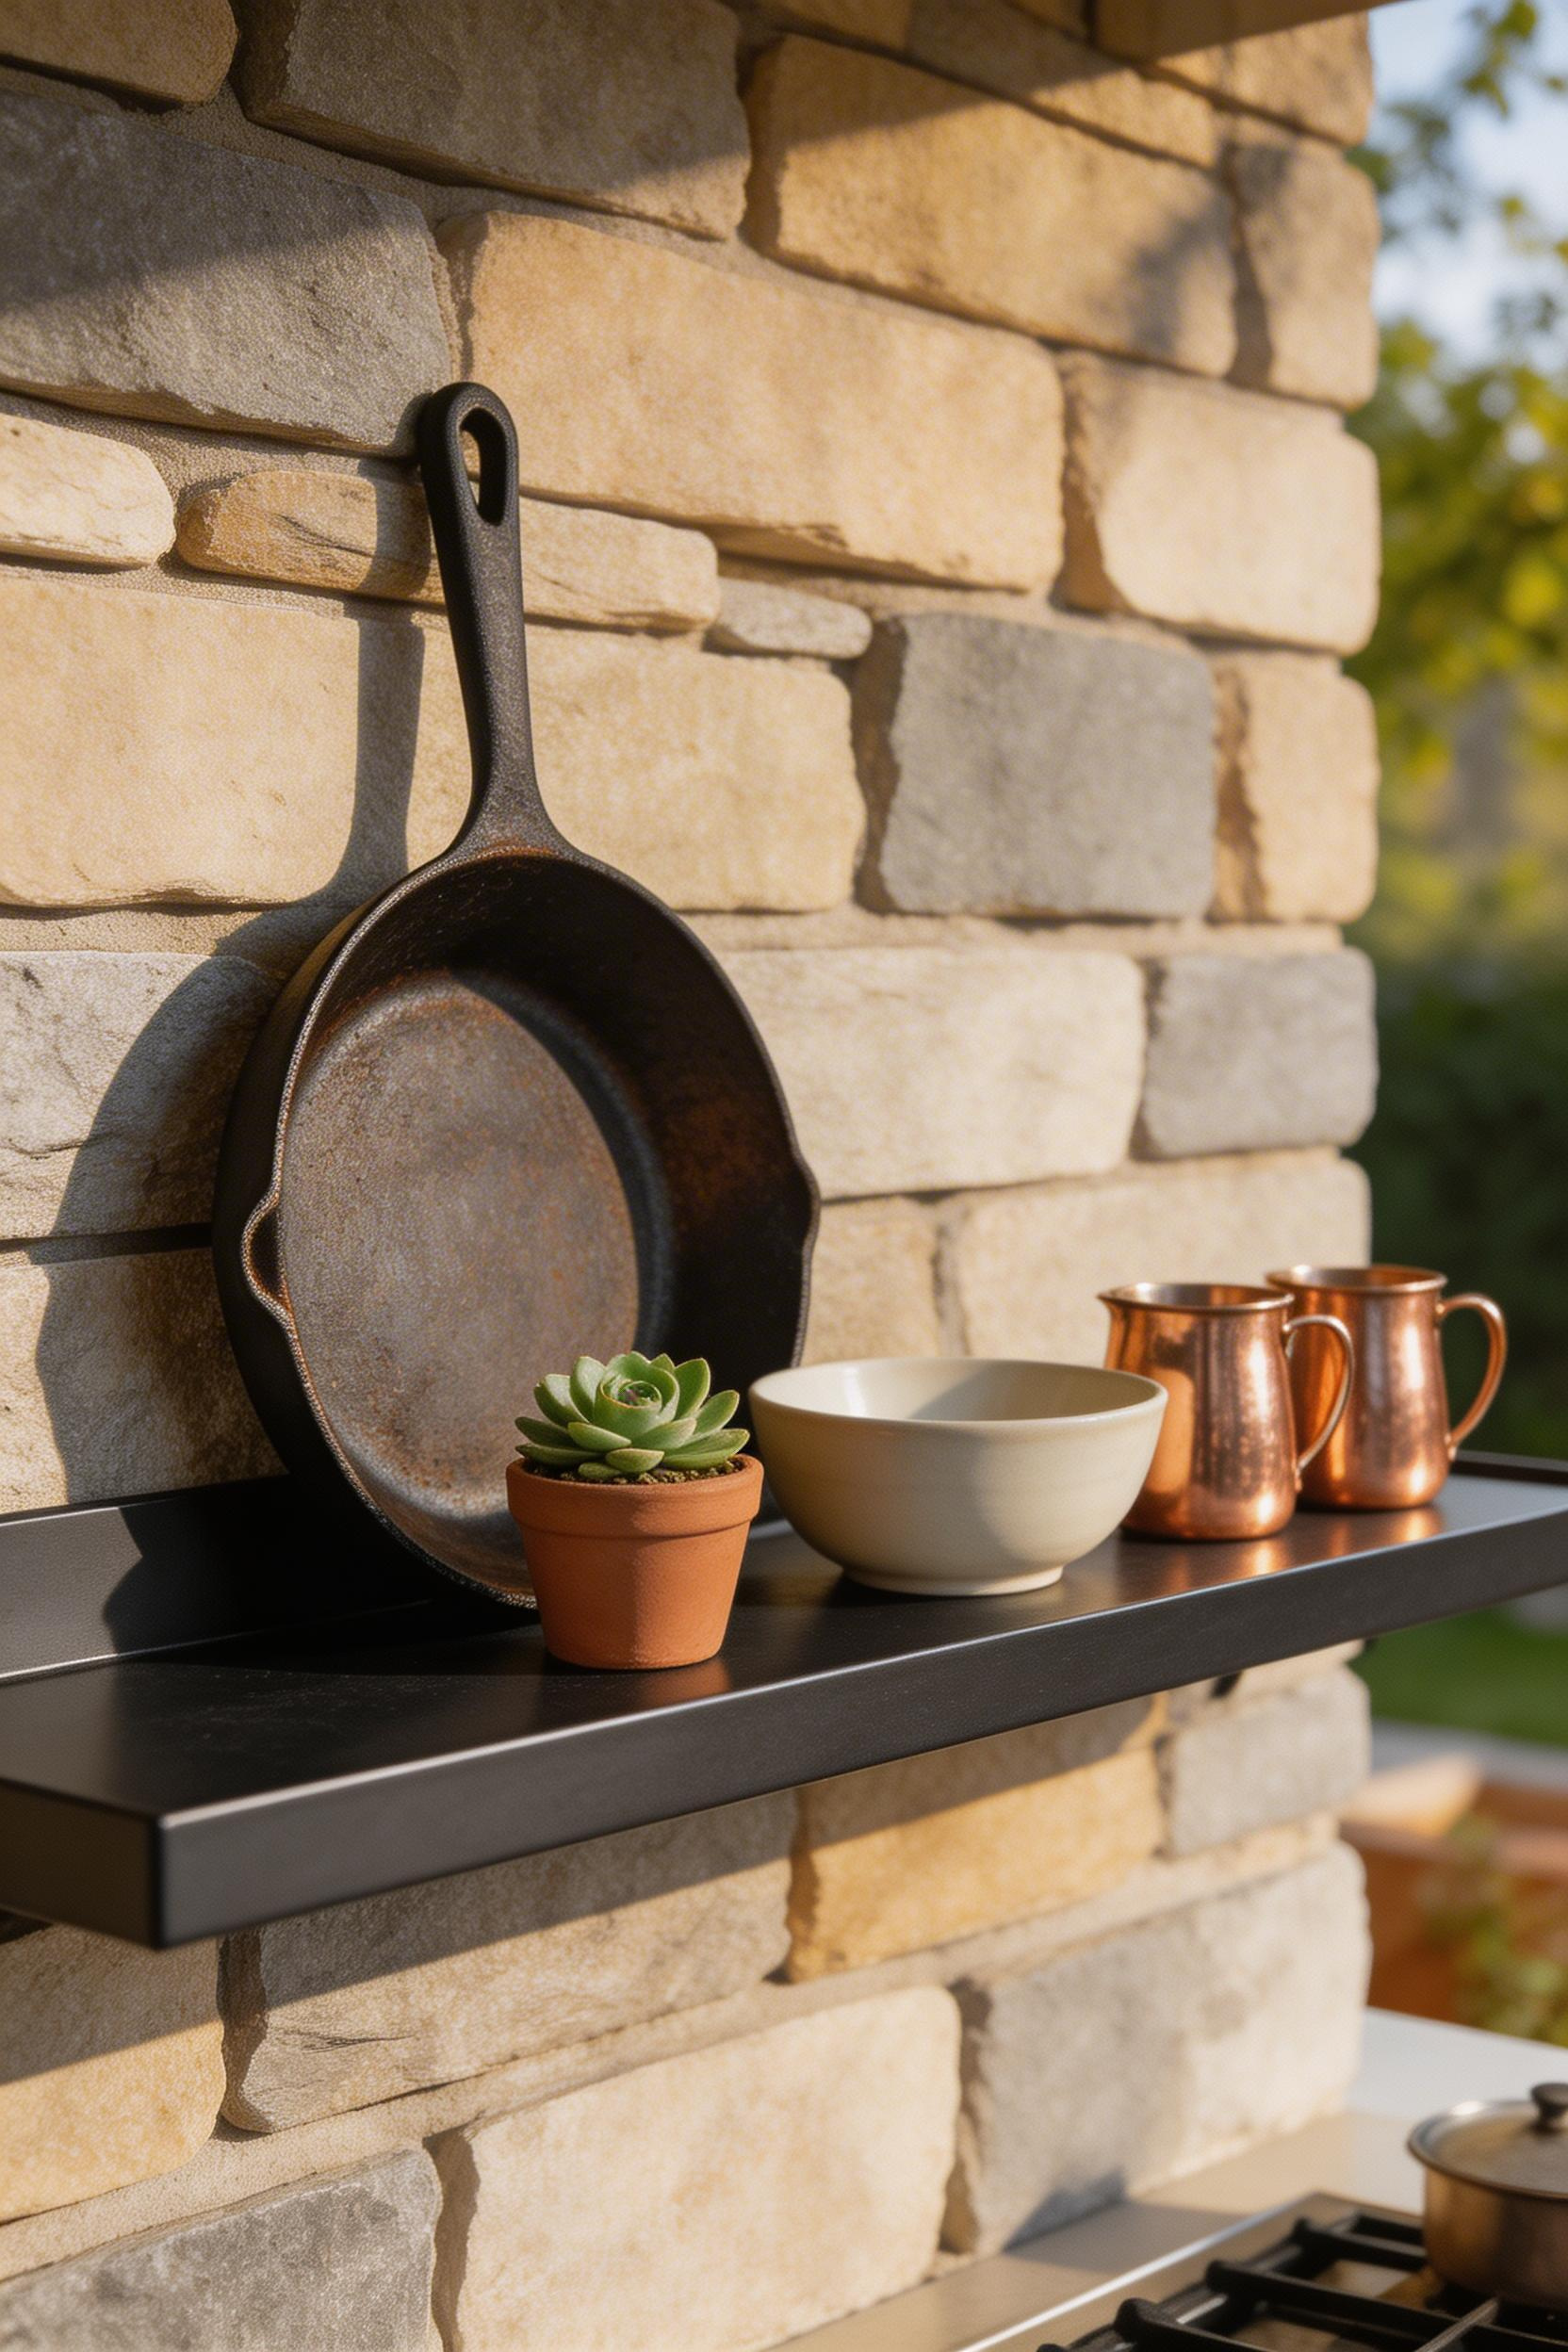
Powder-coated steel shelves are the outdoor standard. Marine-grade aluminium is the premium option for coastal settings where salt air accelerates surface rust on standard steel. Mount a single shelf 18–20 inches above the counter surface — high enough to clear most cookware, low enough to reach while cooking. Bracket-mounted shelves on a concrete or stone wall need masonry expansion anchors rated for at least 50 lbs per bracket.
The Three Rules for Outdoor Shelf Styling
What to display: enamelled cast-iron, ceramic serving bowls, stainless or copper tools, potted succulents, and lanterns. What not to display: wooden cutting boards, glass storage jars, paper towel rolls, and anything with adhesive labels. Use odd-numbered groupings, vary heights, and include at least one living element. Without a plant, open shelving outdoors reads as storage. With one, it reads as design.
The Lodge 10-inch Cast Iron Skillet ($29–$49) deserves a mention here. It’s permanently weatherproof when well-seasoned. Standing it on a shelf looks completely intentional in a way that stainless accessories don’t. Also, place open shelves at least 24 inches horizontally from the cooking surface to avoid grease accumulation. If you’re carrying rustic kitchen decor elements into your outdoor space, cast iron displayed openly is one of the most cohesive ways to extend that aesthetic outside.
11. String Lights: Essential Outdoor Kitchen Decor After Dark
String lights are consistently ranked the number-one outdoor decor purchase. In a 2023 HomeAdvisor survey, 68% of outdoor kitchen owners cited lighting as the improvement that most changed how often they used the space. But there’s a real gap between string lights that look like a festival and string lights that look like considered outdoor kitchen decor. The difference is in bulb type, strand quality, and mounting method.
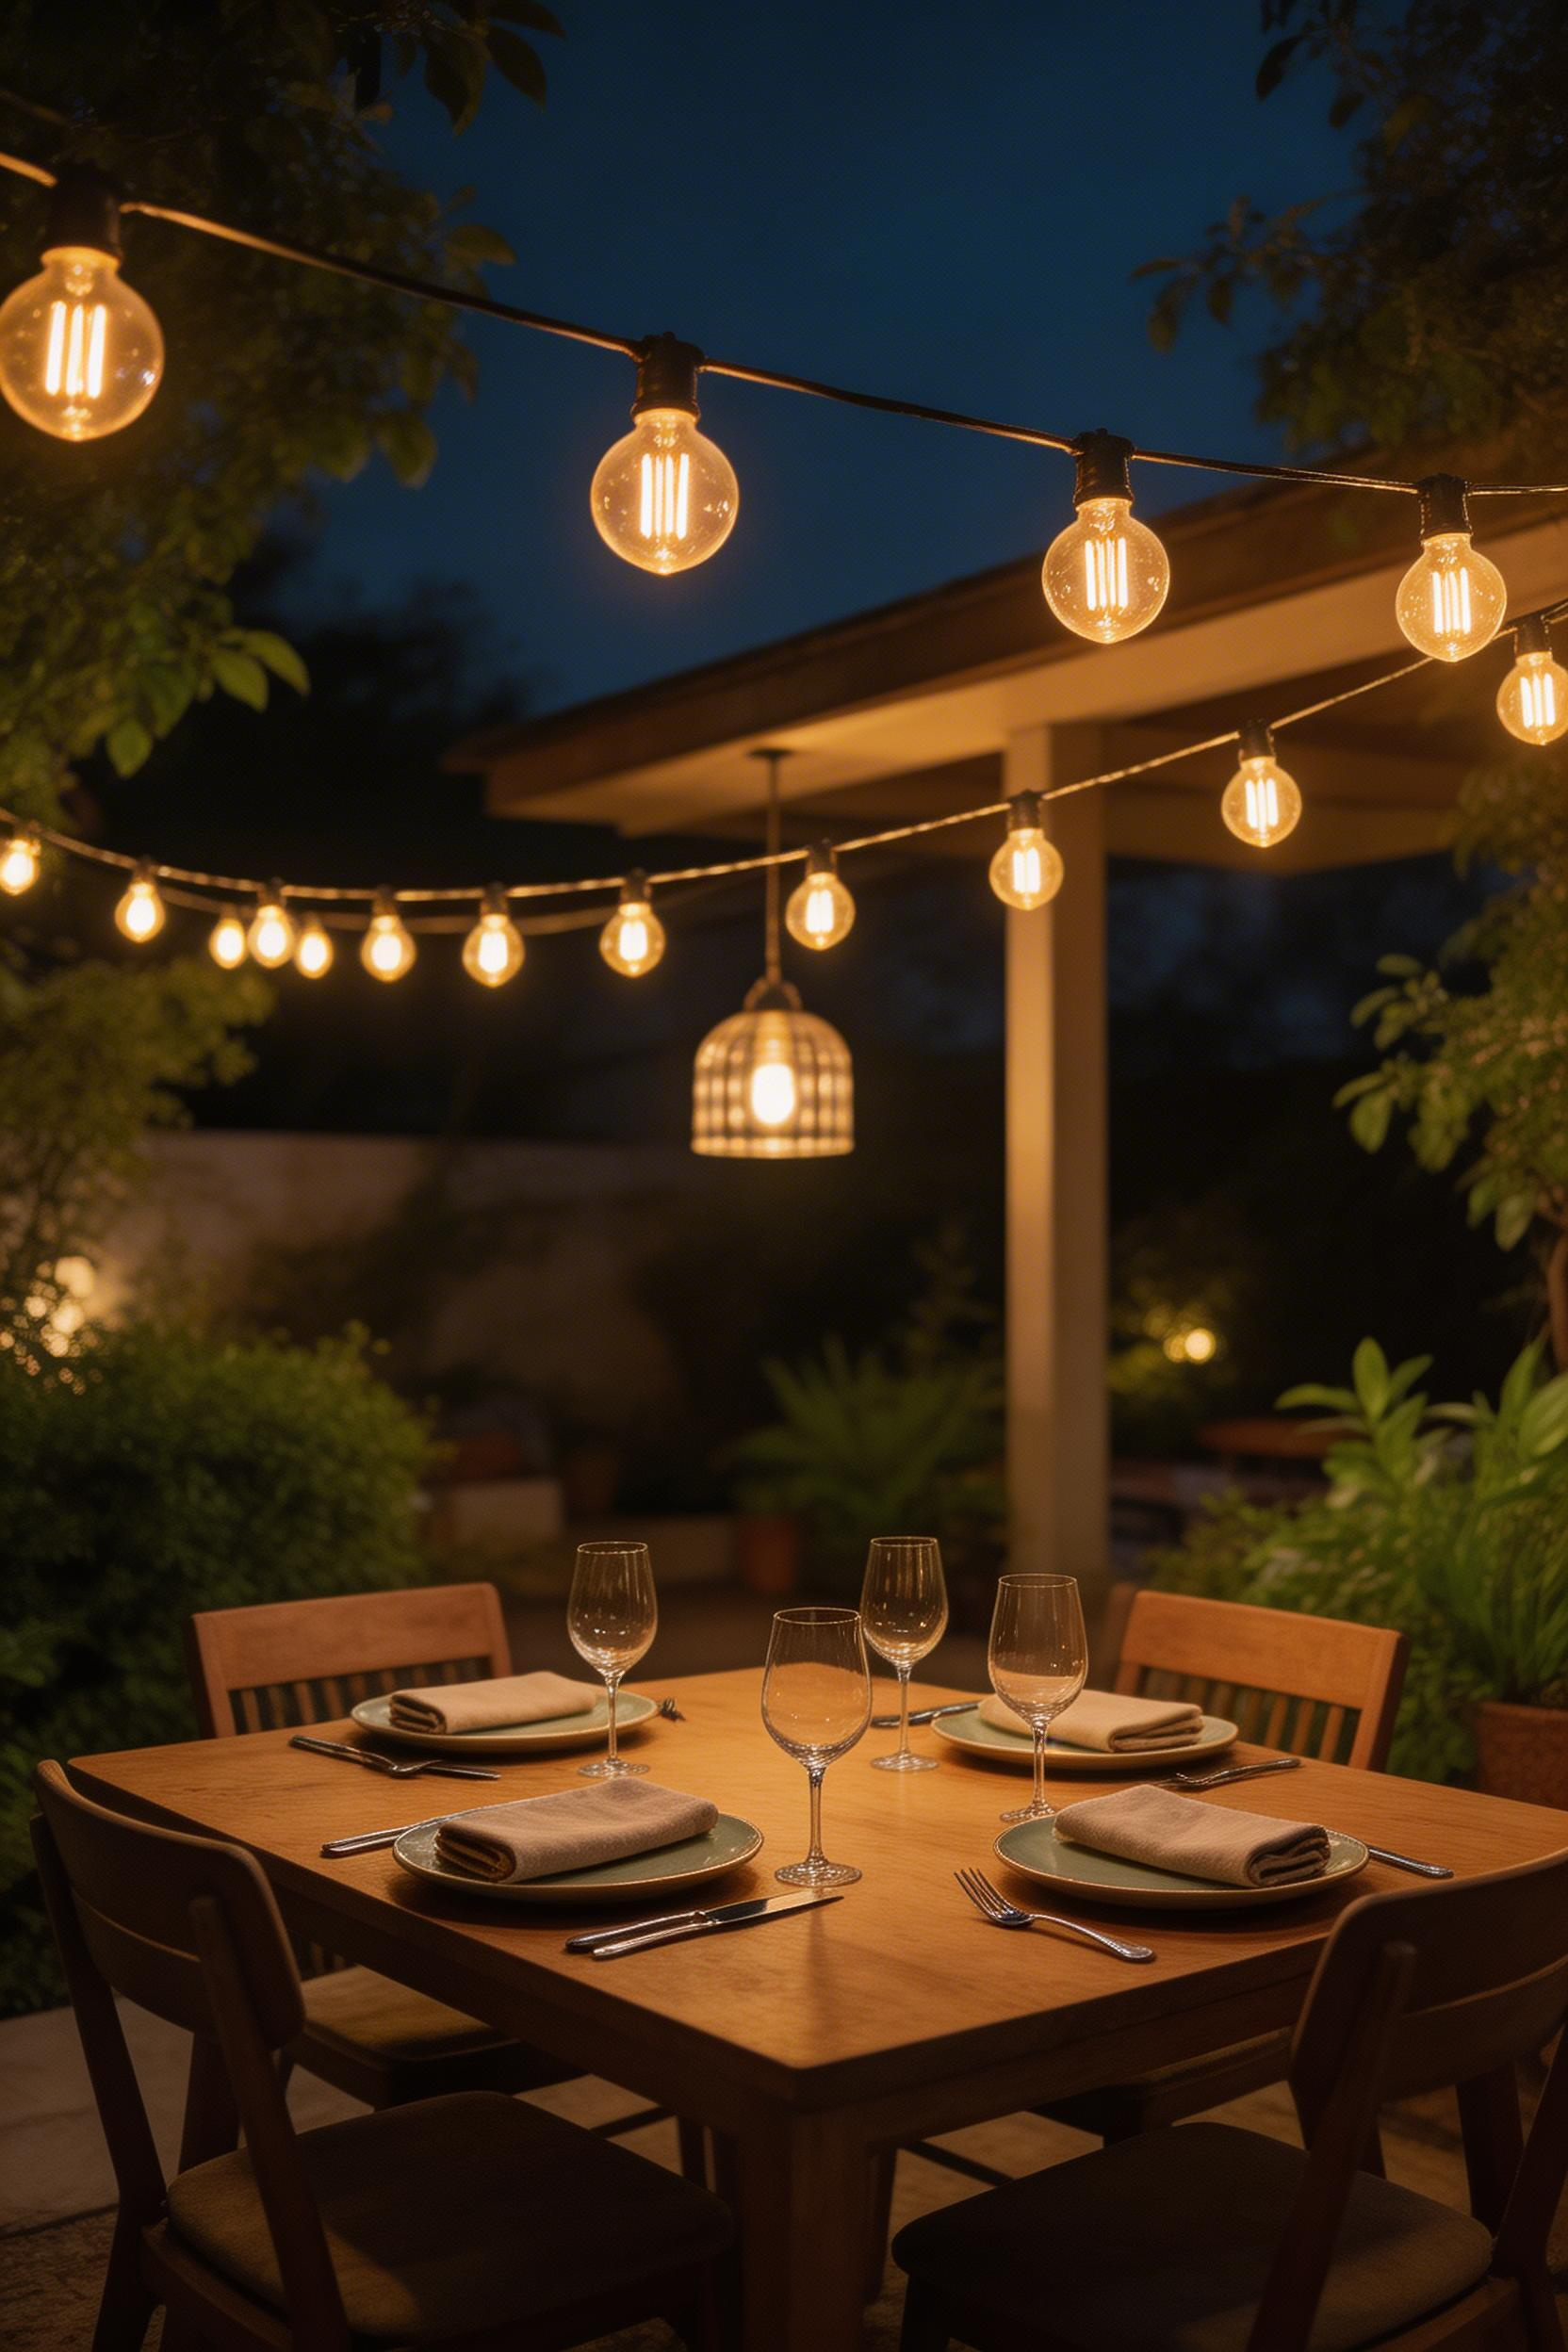
S14 Edison bulbs — the large two-inch filament-style bulb — on a heavy-duty commercial strand are the professional standard. They give a warm 2200K amber glow, are weather-rated, and last 15,000 hours or more. G40 globe bulbs on thinner strands are the consumer-grade alternative. They still look excellent, but the wire degrades faster with repeated season storage and reinstallation.
Mounting and Safety
For a 10×12-foot outdoor kitchen area, one strand criss-crossed at 18-inch intervals with bulbs every 12 inches gives full coverage without looking overcrowded. Tension wires between eye-bolts give the most professional result. Pergola beams give a built-in look. Clip mounts on umbrella arms offer the most flexibility. All string lights must connect to a GFCI-protected outdoor outlet — this is an NEC code requirement, not optional.
The Brightown Heavy Duty S14 48ft strand ($39–$59) is reliable and widely available. For smart dimming and colour temperature control, the Govee Smart Outdoor String Lights ($89) are worth the extra cost. Never run outdoor string lights from a permanent extension cord connection, however. The joining point is a moisture entry point and a fire risk. Budget $150–$250 for an electrician to install an outdoor outlet if there isn’t one within reach. It changes the space permanently.
12. Bold Cabinet Hardware and Grill Door Pulls
The hardware swap is the most undervalued refresh in outdoor kitchen decor. Standard outdoor kitchen cabinetry arrives with the most generic stainless pulls imaginable. Swapping them out is a 20-minute job. The cost is $40–$100. The result is worth considerably more than that.
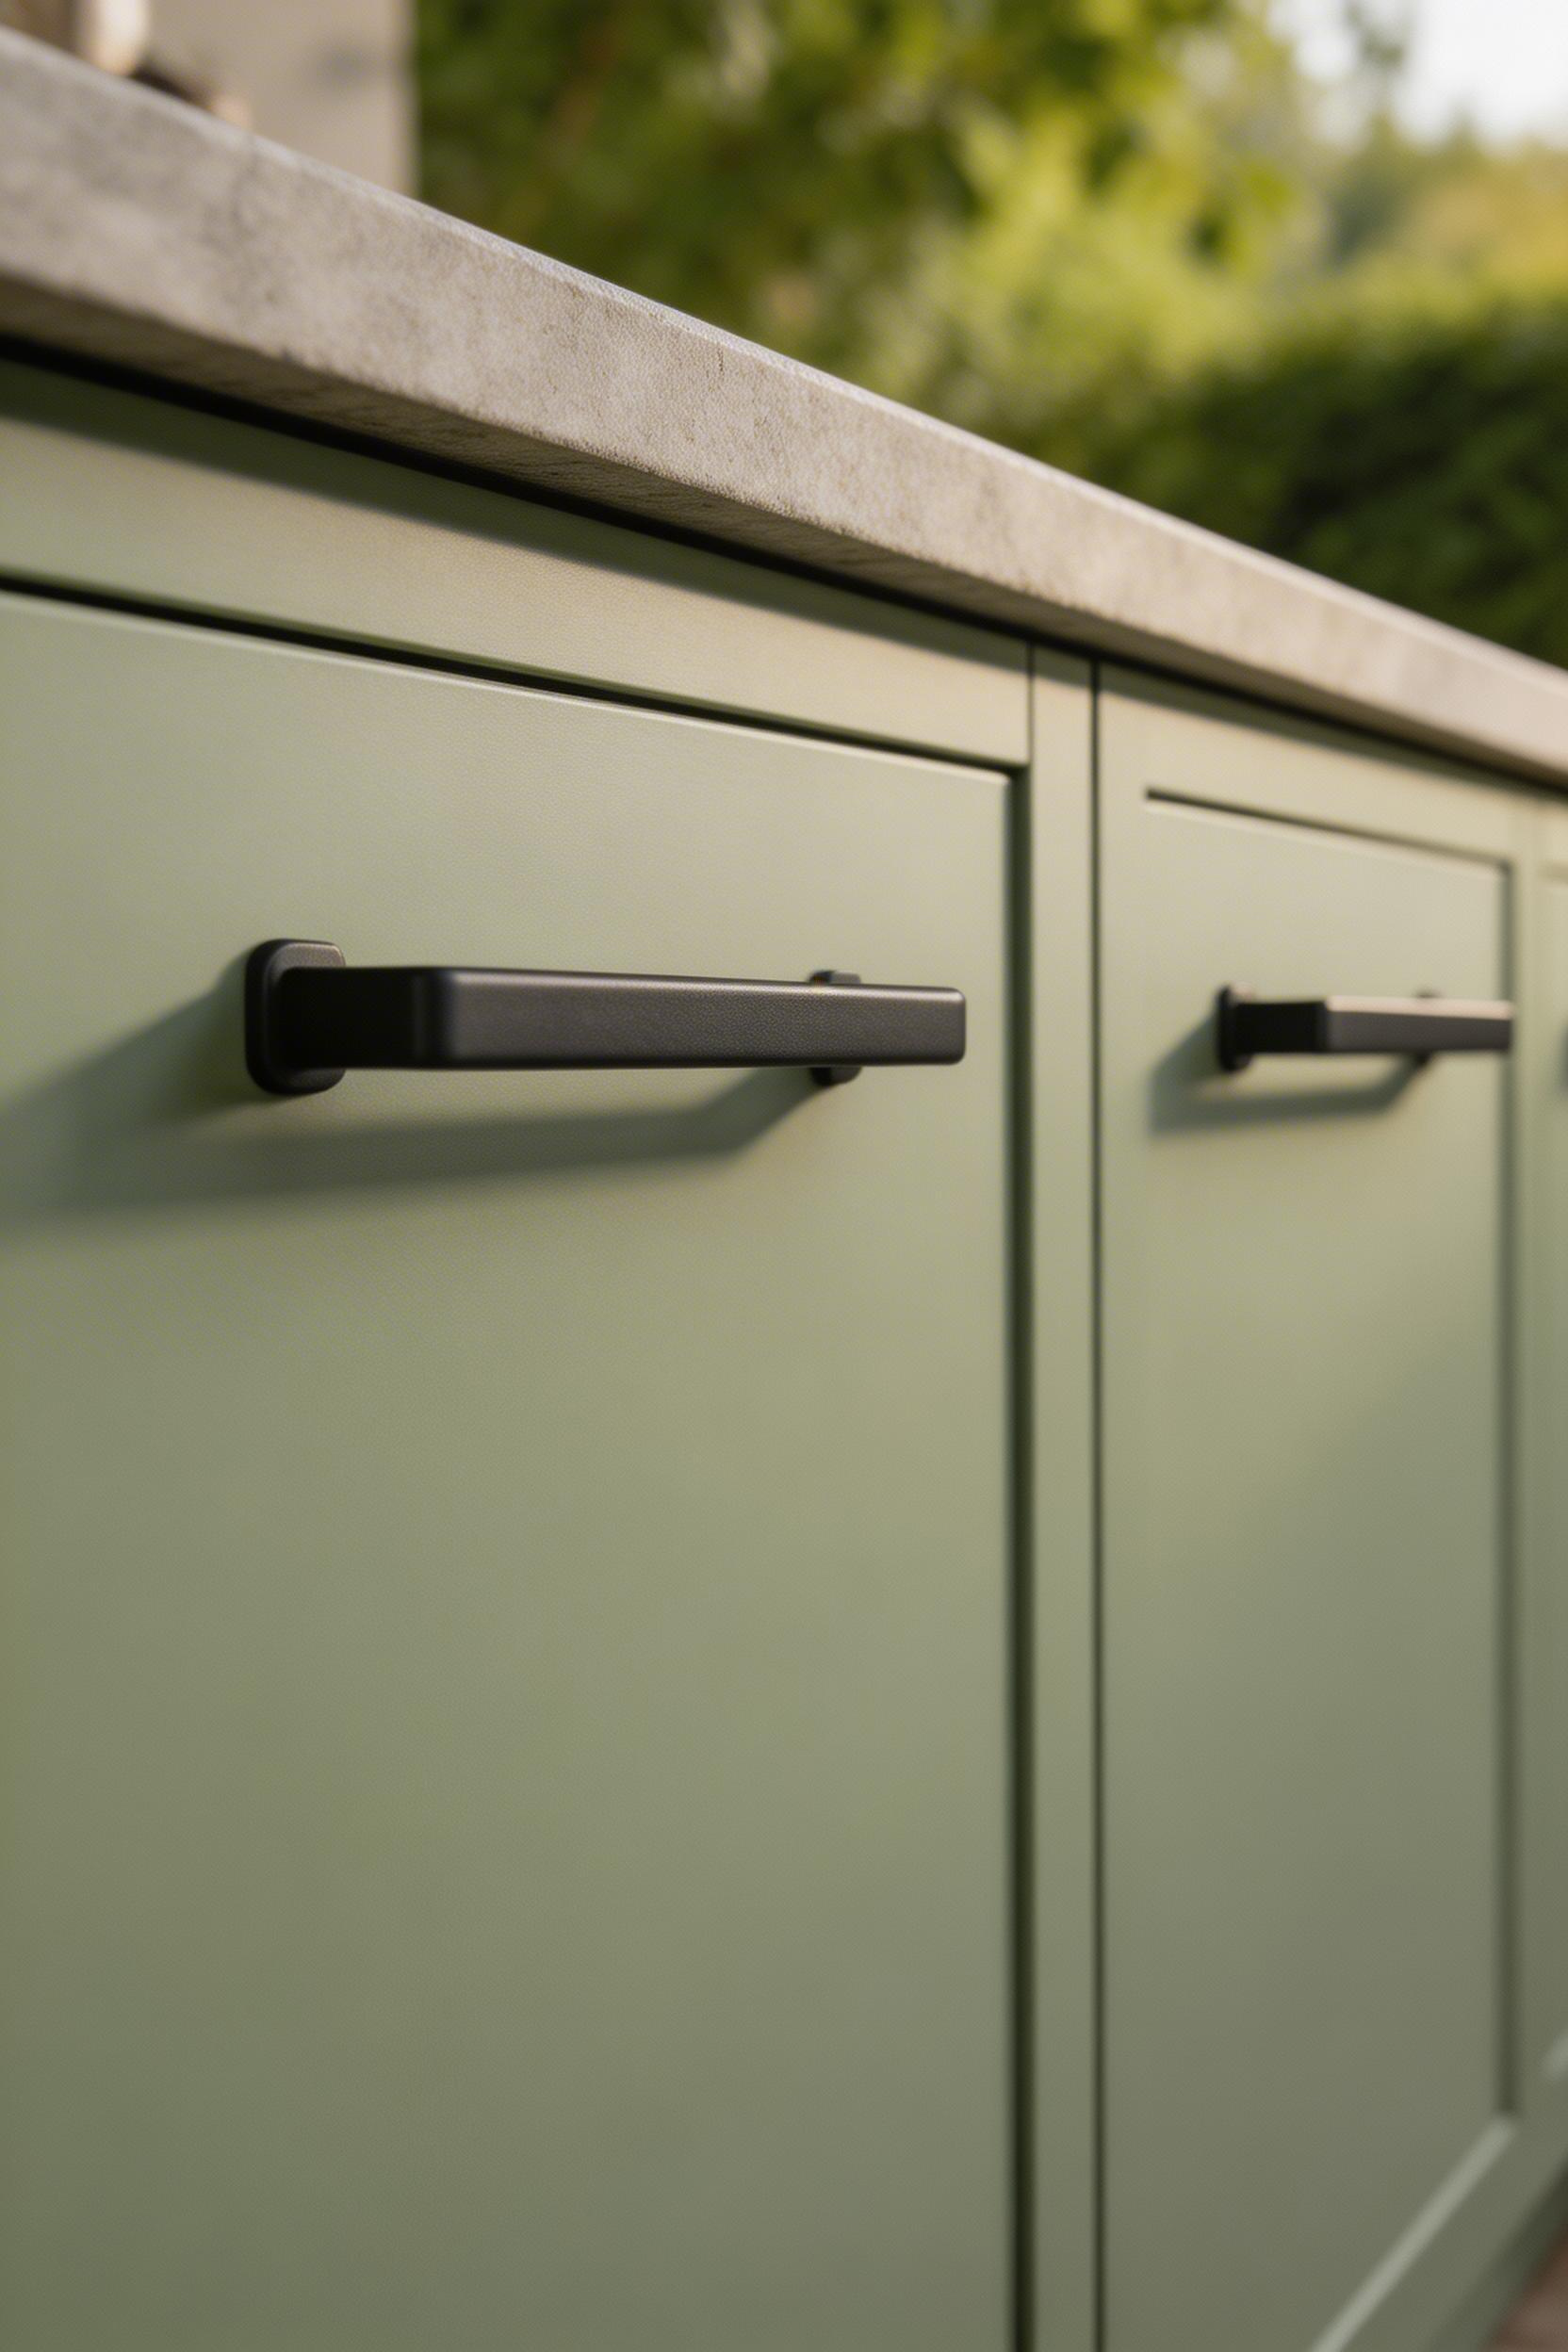
Marine-grade 316 stainless steel is essential for hardware in coastal environments. Standard 304 stainless — the indoor grade — shows surface rust within a year in salty air. In non-coastal settings, powder-coated steel hardware in matte black is the current dominant outdoor kitchen trend. Brass hardware used outdoors develops a natural patina over time. Many designers consider this an asset — it reads as heritage and coastal simultaneously.
Sizing and Consistency
Bar-style pulls in the 6–8-inch range work best on full-height grill access doors. Smaller cup pulls (1.5–2 inch) suit drawer fronts and smaller door panels. The Amerock 3-inch Marine Grade SS Cup Pull ($12 each) is a reliable choice for coastal applications. For matte black, the Cosmas 5-inch bar pull ($4.99 each) is an excellent budget option.
Pick one finish and use it everywhere — the grill knobs if they’re replaceable, any towel rings, and the outdoor faucet handle. Consistency reads as designed. Mixing reads as assembled from whatever was available. Use 10-32 machine screws rather than wood screws for mounting. Moisture expansion and contraction cycles strip wood screws from outdoor cabinetry over time.
13. Outdoor-Rated Bar Stools That Actually Look Good
There’s a persistent gap in outdoor kitchen decor between what looks good in a product photo and what survives a coastal summer. Bar stools sit right at the intersection of this problem. They’re both the most used seating in an outdoor kitchen and the piece most often bought on aesthetics alone and regretted on durability grounds.
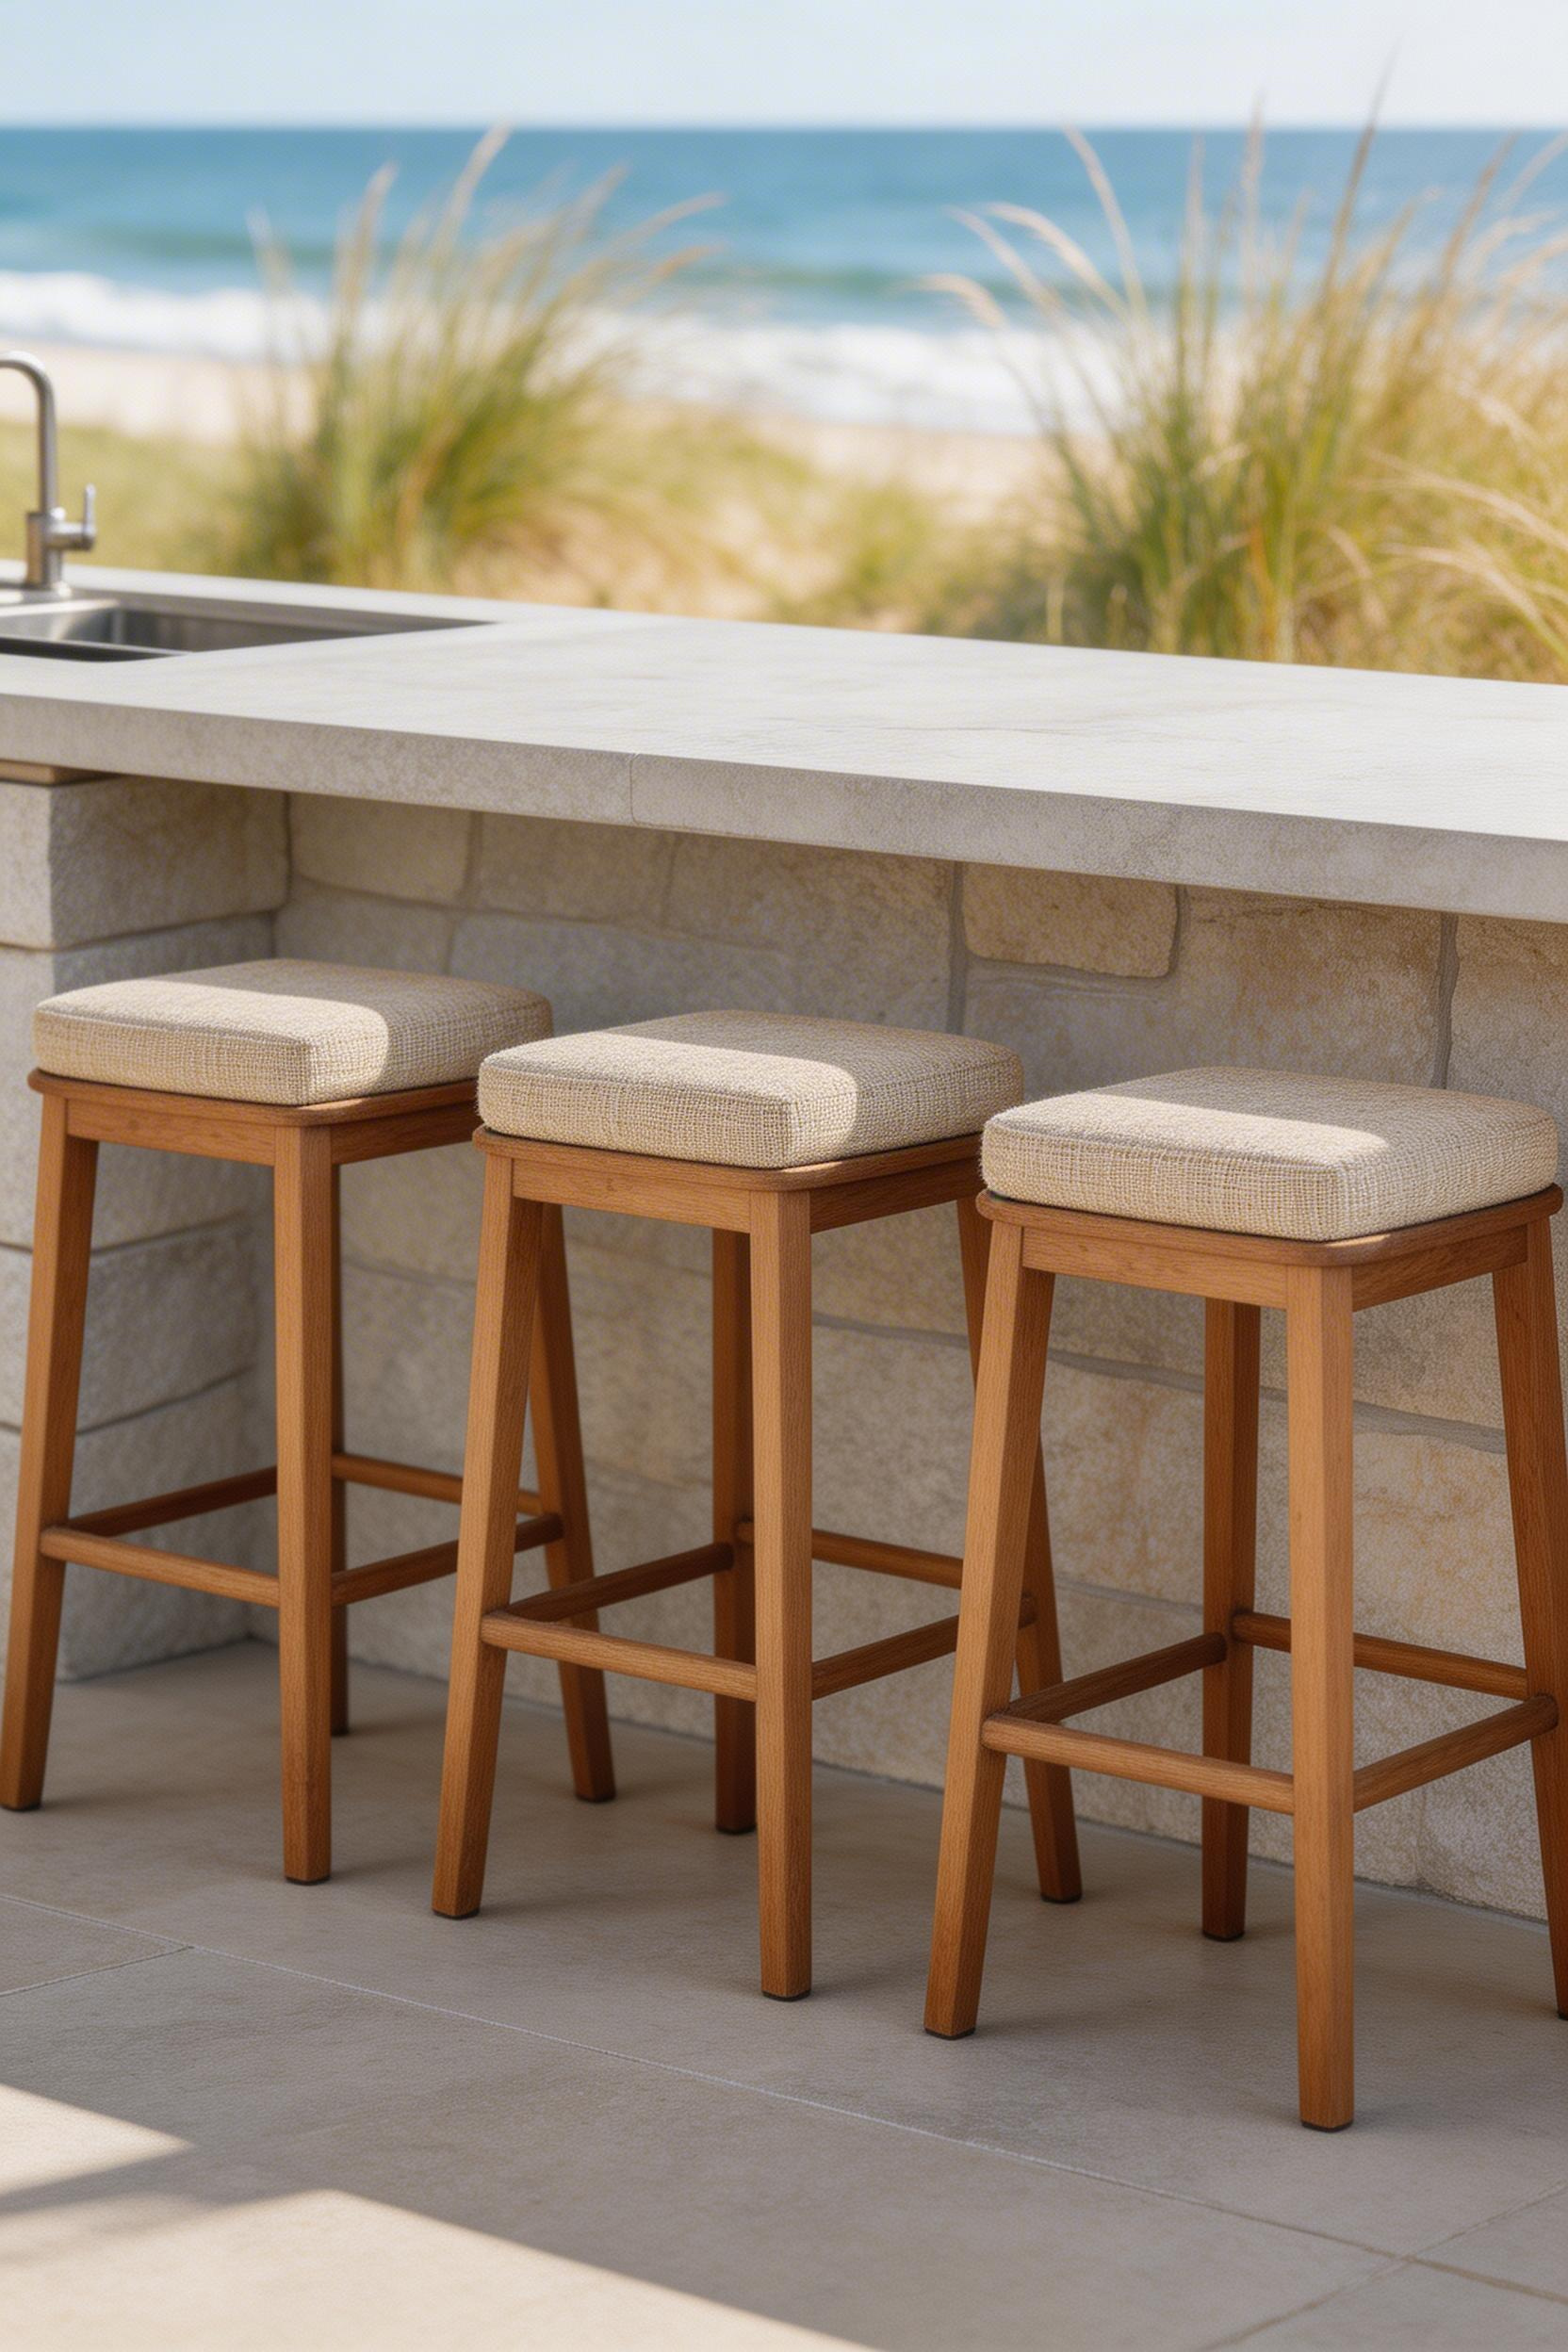
Counter-height stools (24–26-inch seat height) pair with standard island counters at 35–36 inches. Bar-height stools (28–30-inch seat height) pair with bar-top surfaces at 40–42 inches. Getting this wrong makes seating at the island uncomfortable enough that guests drift elsewhere. That defeats the social purpose of the outdoor kitchen entirely.
Material Choices That Last
Teak is still the benchmark — naturally oiled, rot-proof, and warmer-looking than any metal alternative. It patinas to silver rather than degrading. A 10-year lifecycle cost analysis consistently shows teak costing less than replacing cheaper furniture multiple times. The Teak Classics Counter Stool ($189–$249) is a solid entry-level option. Powder-coated aluminium is the best low-maintenance alternative. The Telescope Casual Marine Grade Polymer Stool ($219) is US-made, coastal-grade, and essentially indestructible.
For seat cushions, Sunbrella fabric genuinely resists mold, UV fade, and moisture absorption — standard outdoor fabric doesn’t. Also, check for a footrest before buying. Sitting on a stool without one for more than 20 minutes is genuinely uncomfortable. Your guests will find somewhere else to sit, which is the opposite of what you want. When choosing weather-resistant porch furniture for the broader outdoor space, the same material logic applies. For island spacing, allow 26–28 inches centre-to-centre between stools.
14. Windbreak and Privacy Screen as Outdoor Kitchen Decor
A windbreak serves an obvious functional purpose — comfortable cooking requires at least some control over the environment. But it also solves a harder aesthetic problem for the cooking zone: what to do with the blank wall or fence that forms the backdrop of the cooking zone. The right screen material turns a boundary into a feature.
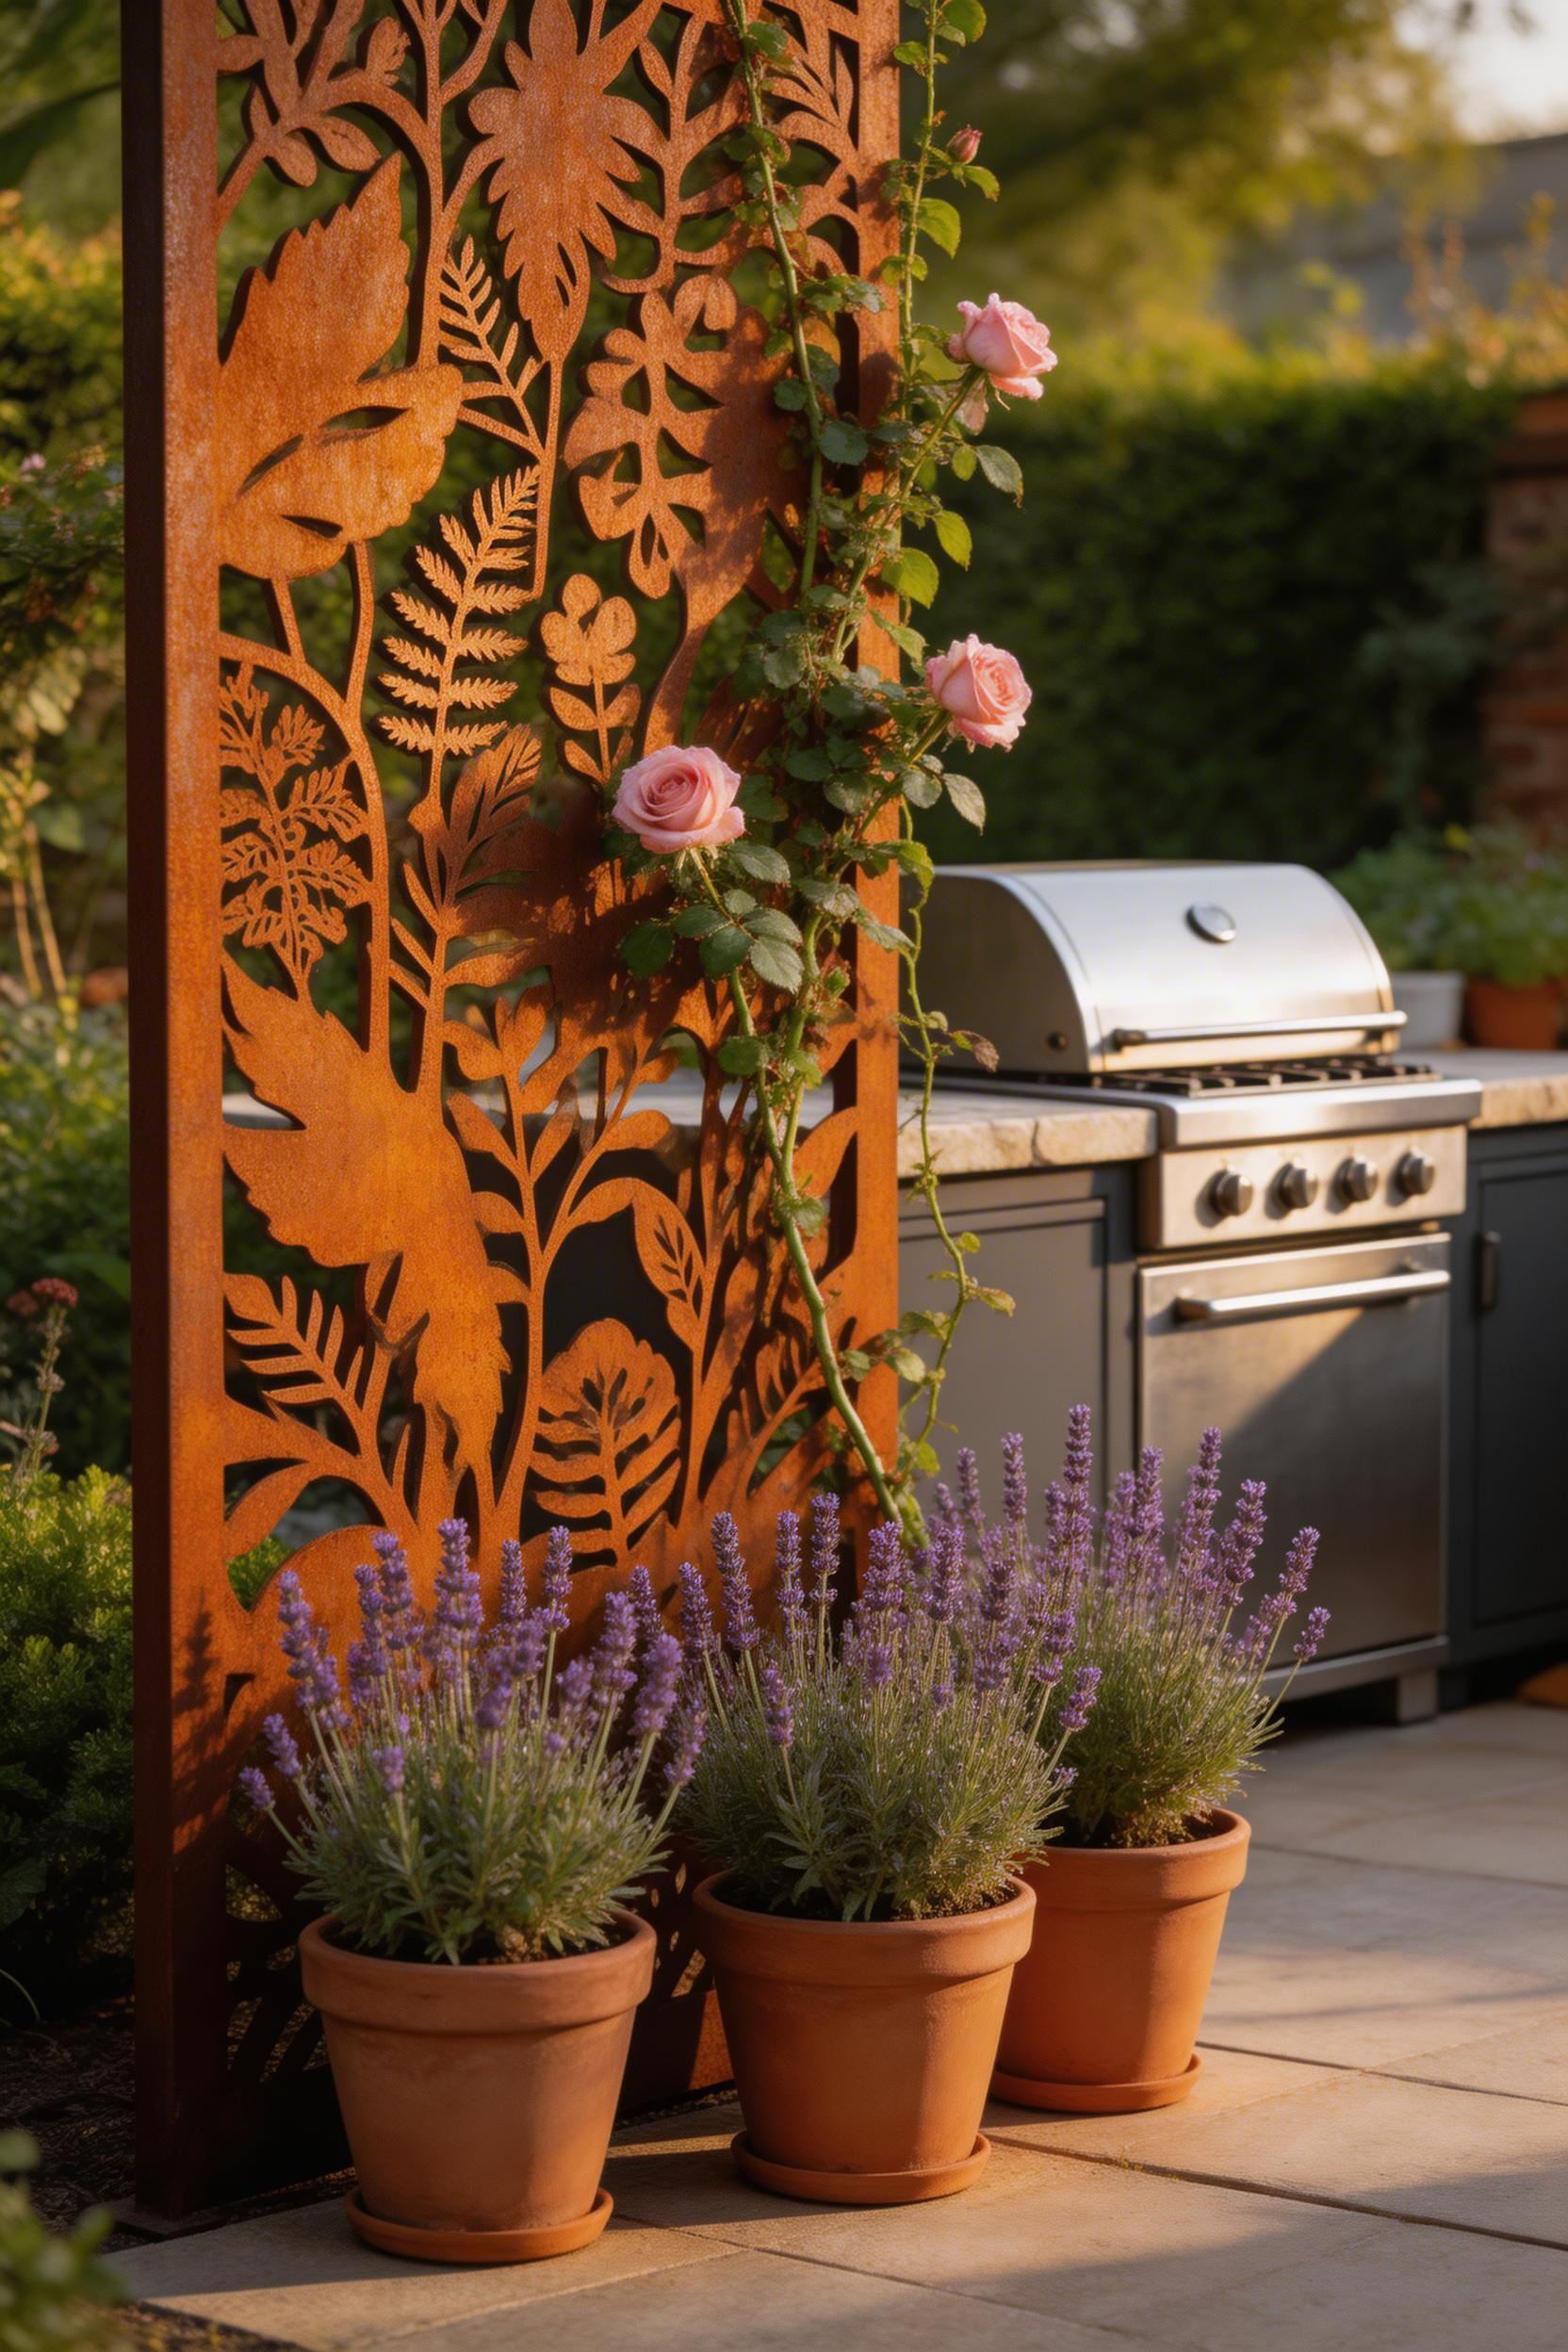
Corten steel laser-cut panels are the highest-impact option. They begin rusting within 6–12 weeks of installation and stabilise to a consistent amber-brown patina. This reads as intentional and considered, not neglected. Botanical and geometric patterns from specialist metal art suppliers cost $180–$450. Powder-coated aluminium screens are the low-maintenance alternative. They won’t develop the same patina, but they also never need maintenance. Cedar lattice and bamboo fencing are the most budget-friendly options. Both need staining or replacement every 3–5 years, however.
Placement and Wind Logic
The placement rule most people get wrong: orient the screen perpendicular to the prevailing wind, not parallel to the fence line. Research from the University of Minnesota Extension shows that perpendicular windbreaks reduce perceived wind speed by 60–75% within a distance of 10 times the screen height. For coastal properties, check wind load specifications before installing a solid 6-foot panel. Lattice screens are much safer than solid panels in high-wind zones.
Planting lavender, rosemary, or ornamental grass at the base of a screen integrates the structural element into the surrounding garden. For the broader outdoor space, combining privacy screening with backyard deck ideas often produces the most cohesive result overall.
15. Coordinated Outdoor Tableware and Textile Set
The table is the final piece of outdoor kitchen decor. A coherent set of tableware, linens, and textiles ties the dining zone together. It makes guests feel the space was designed for them rather than assembled from whatever was available. This is less about spending a lot and more about making intentional choices within a consistent palette.
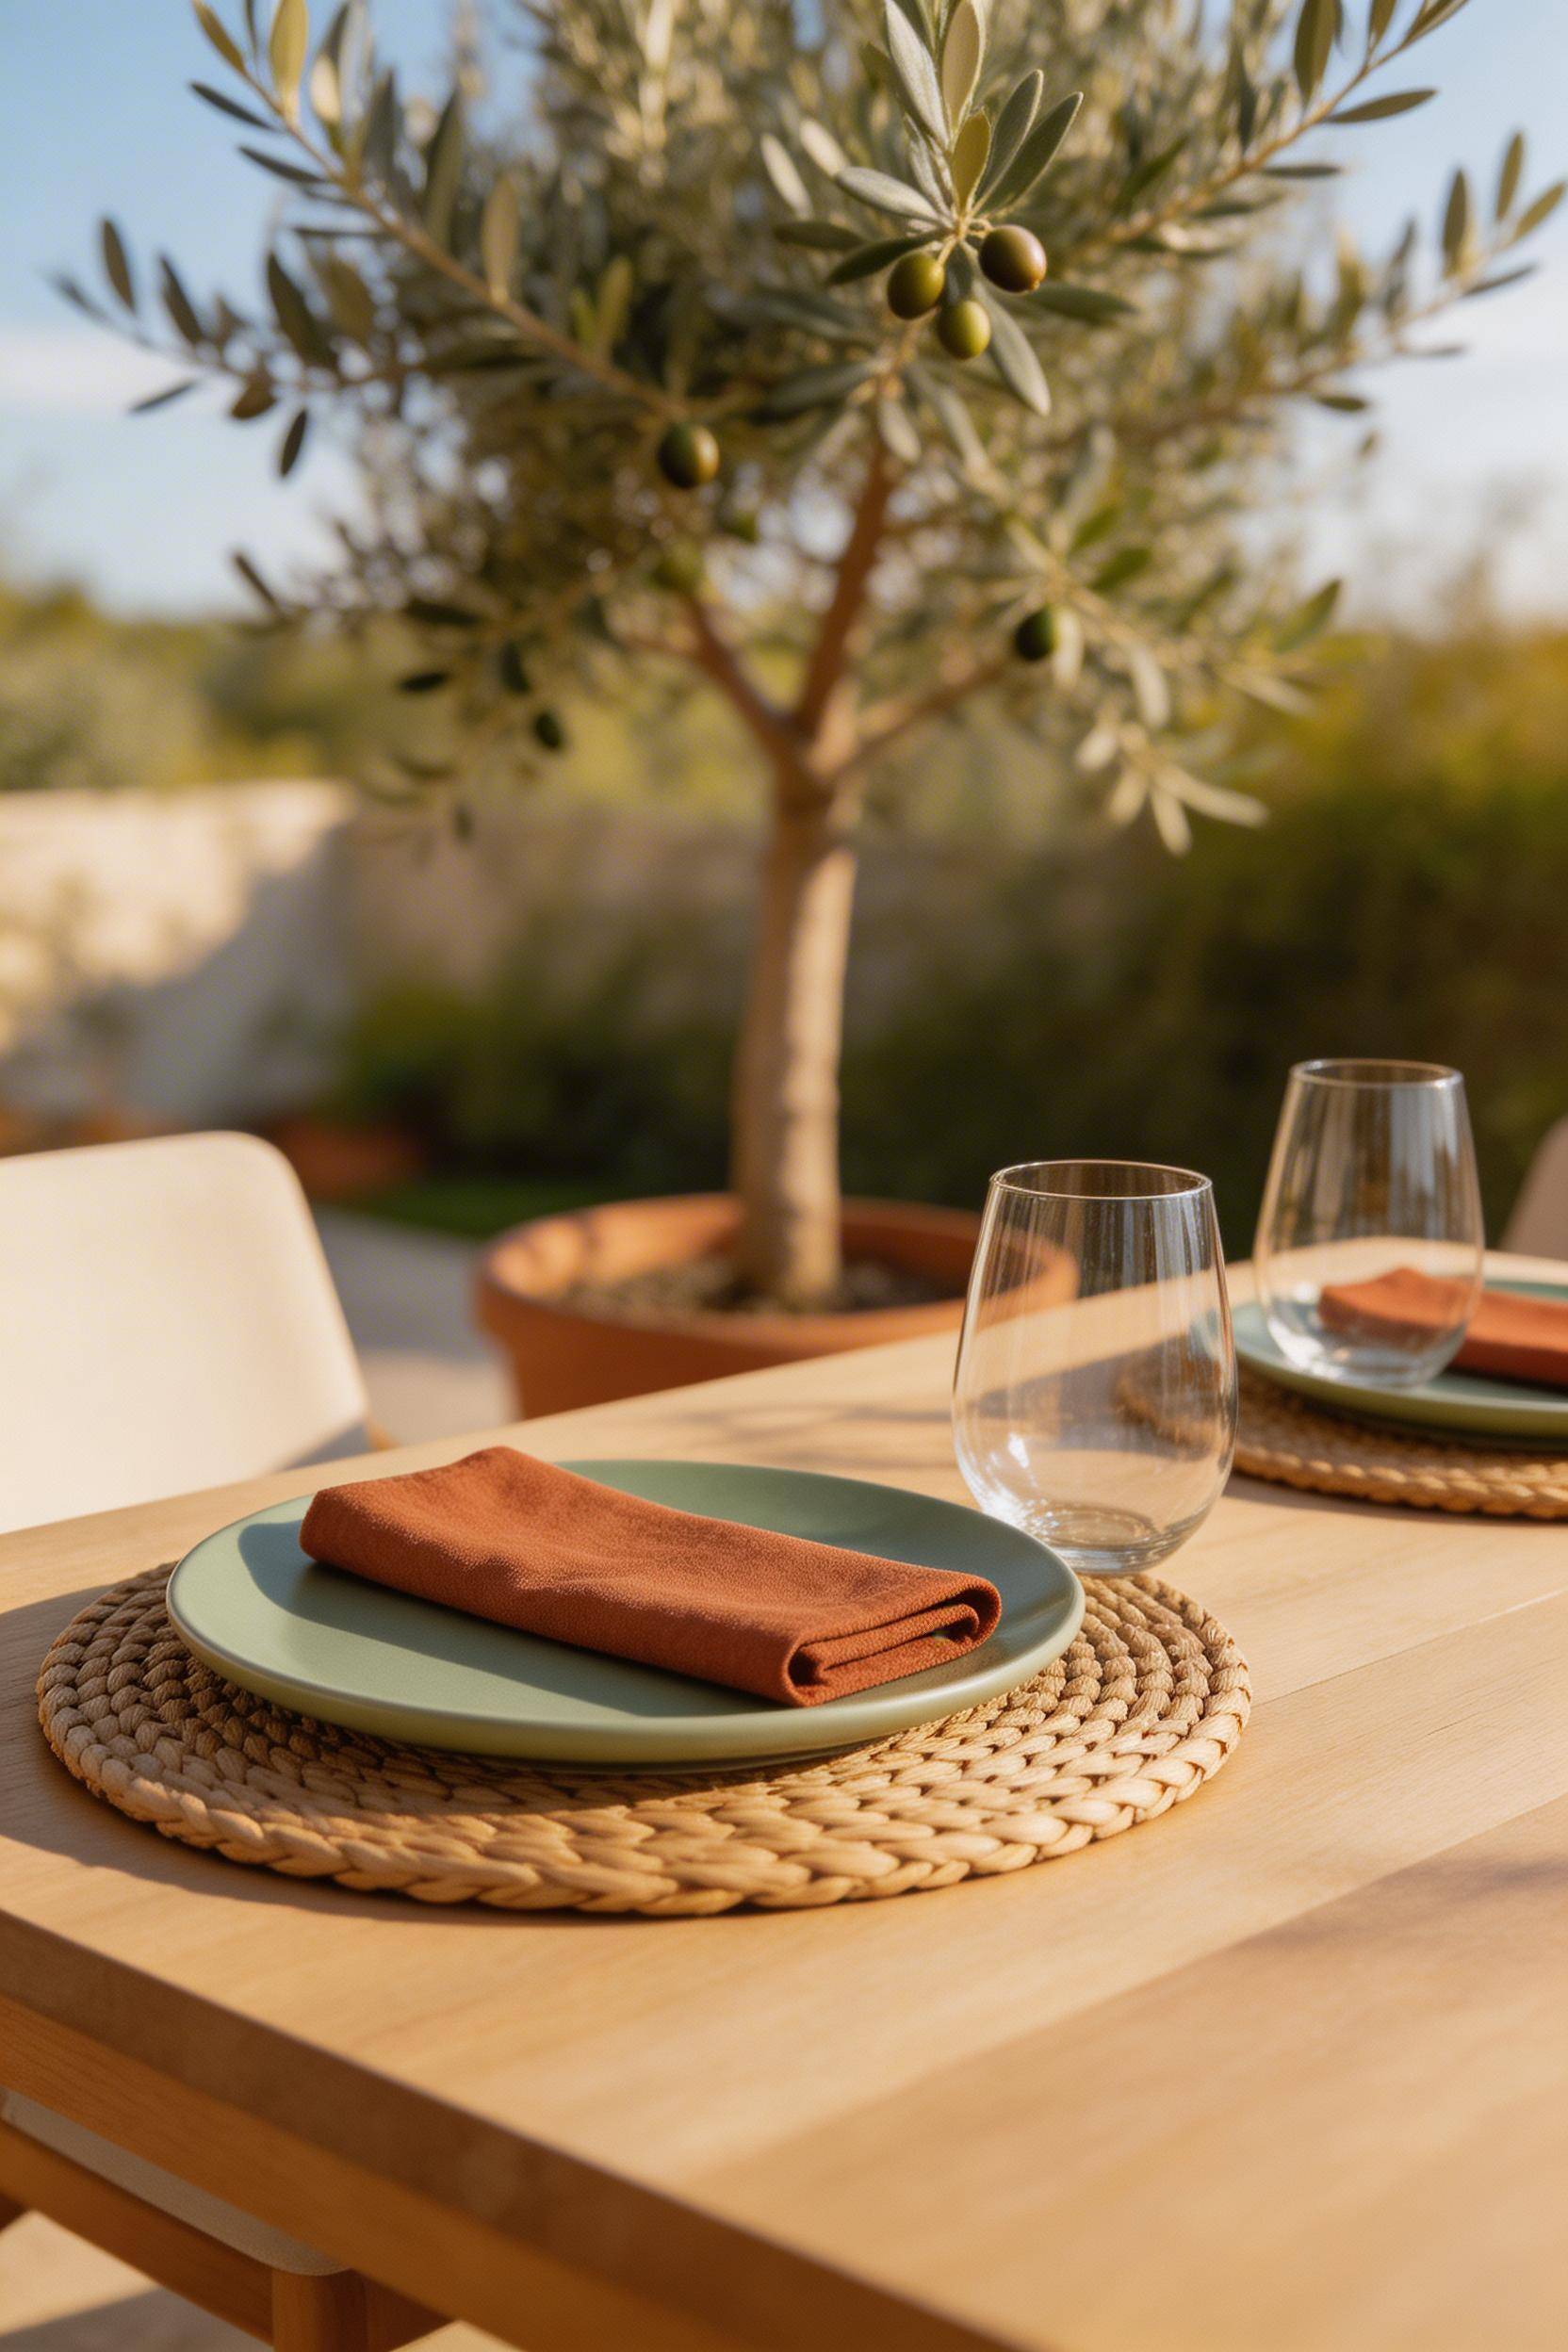
Melamine is the right choice for most outdoor table settings. It’s unbreakable, dishwasher safe, BPA-free in modern versions, and available in designs that convincingly mimic ceramic. The Gibson Home Terracotta Melamine Set (12-piece, $49) is a good entry point. Enamelware — steel with a vitreous enamel coating — is the premium alternative. It’s heavier, genuinely chip-resistant at the rim, and has a heritage look that suits coastal and rustic outdoor kitchen styles well. Crow Canyon Home Enamelware ($89 for 4 plates) has been making this style since the 1970s.
Textiles and the Single Most Useful Upgrade
Outdoor tablecloths should be 100% polyester or treated cotton. Linen is beautiful, but it stains permanently from outdoor use within a season. For a 72-inch rectangular table, use a 72×120 cloth. That gives an 8-inch drop on each long side and a 24-inch drop on the ends. Store outdoor napkins and cloths at 140°F+ wash cycles to kill mold spores from outdoor exposure.
The single most useful upgrade in this category: switch from paper to cloth napkins for outdoor entertaining. Even inexpensive cotton napkins in a matching colour make the table feel considered. They extend the coordinated look of the outdoor kitchen decor through every meal. Buy two sets so there’s always a clean rotation. Don’t be precious about staining them — that’s what the wash cycle is for.
Making Your Outdoor Kitchen Decor Work Year-Round
The ideas here range from structural decisions — a pergola, a tiled backsplash, a countertop edge profile — to details costing under $20, like hardware pulls and cloth napkins. The unifying principle is that each one makes the space feel more like a room and less like equipment on a patio.
Start with lighting if you haven’t already. Pendant lighting over the island and string lights overhead change how the space reads after dark. After dark is when most outdoor kitchen entertaining actually happens, so that investment pays for itself quickly. From there, the built-in herb garden and an outdoor rug cost under $200 combined. Yet they have an outsized visual impact on the daylight experience of the whole space.
The pergola is the single highest-impact investment if budget allows. It genuinely changes outdoor kitchen use patterns in ways no other individual change does. If the budget is tight, though, focus first on the hardware swap — the highest ROI per dollar in kitchen refreshes. Then add the bar cart, then the tableware set. None of these require structural changes, and all three can be done in a weekend.
The goal is an outdoor kitchen that earns its place in daily life — not a space you use six times in summer and ignore the rest of the year. With the right outdoor kitchen decor in place, that daily use tends to happen by itself.