Many homeowners believe small spaces require neutral colors and minimalism to appear larger. Unfortunately, this conservative approach often results in forgettable, sterile environments. The “Jewel Box Revelation” offers a compelling, luxurious alternative that fundamentally redefines the concept of bathroom art decor.
This design trend treats the powder room or guest bath as a precious, immersive vessel—crafting a true *sanctuary*. Instead of attempting to expand the space visually, this philosophy embraces cozy dimensions to create a rich, velvet-lined experience. True *opulence* relies on thoughtful, *curated* selections.
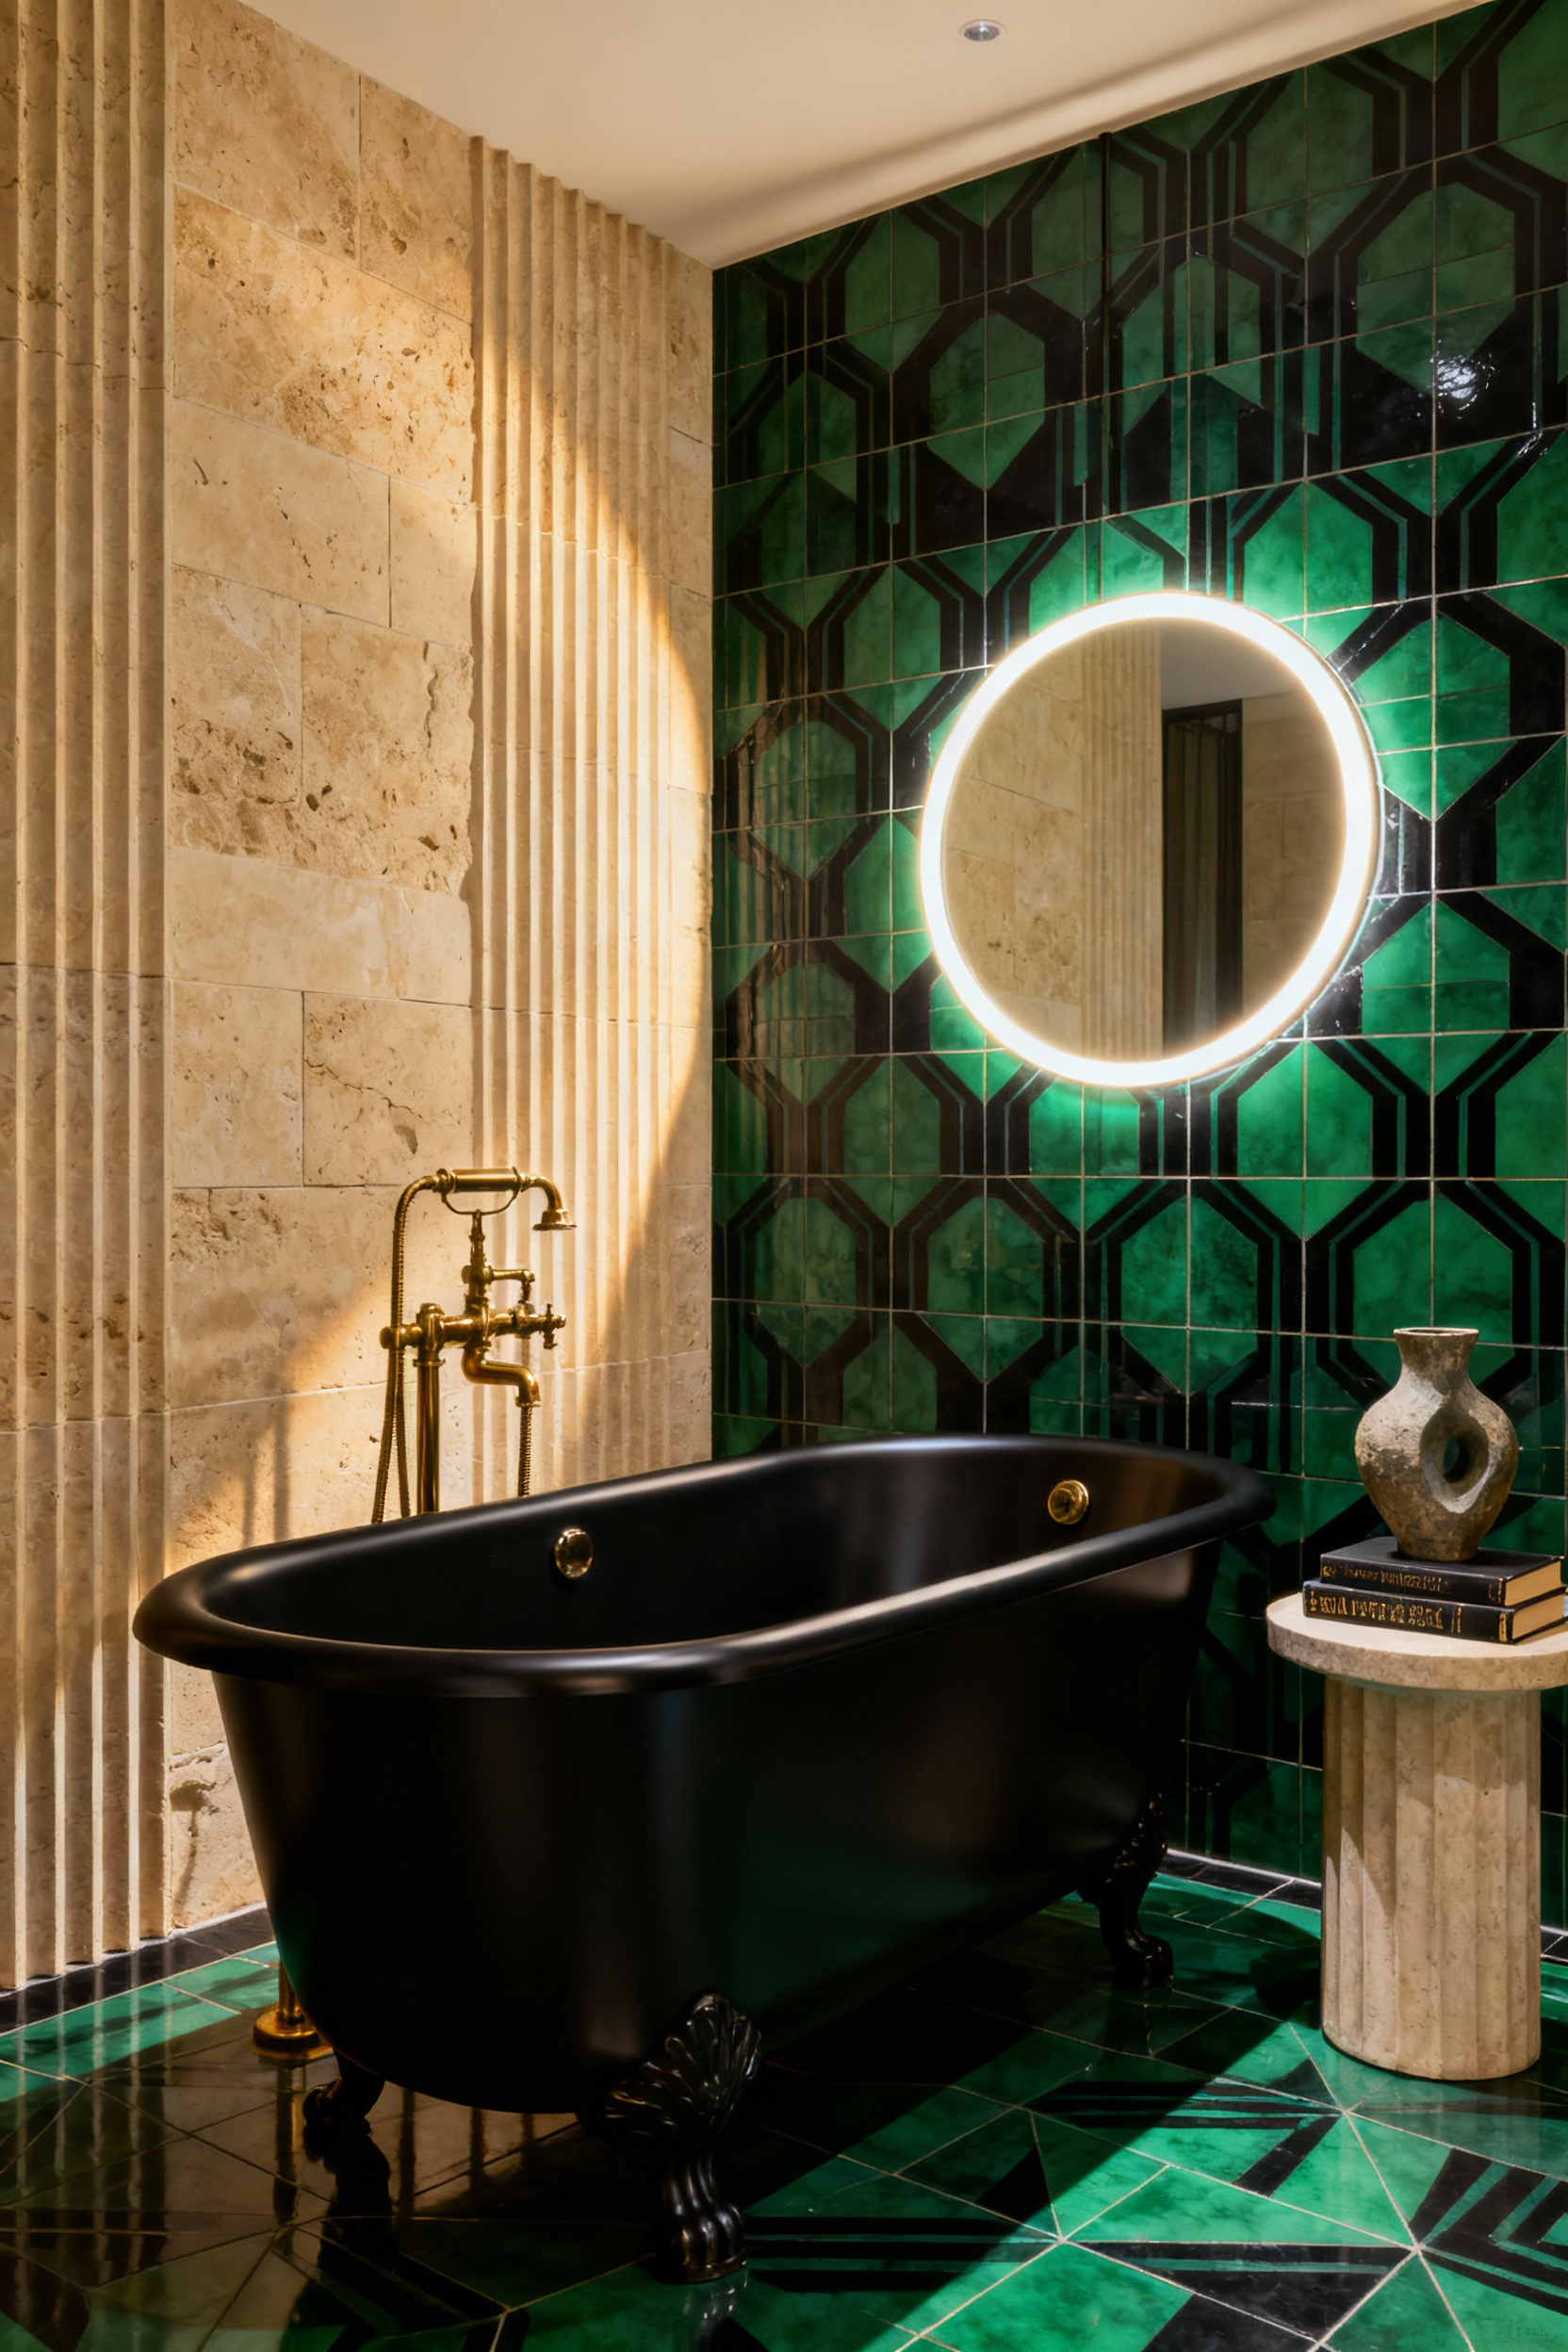
This strategy uses the limited footprint of a powder room as a creative advantage. These low-traffic areas serve as the perfect canvas for fearless experimentation with elements that might overwhelm a main living area. The aesthetic relies on a foundation of deep, saturated jewel tones, such as emerald, sapphire, or amber.
You then layer these colors with gleaming metallic accents. Gold, brass, and polished nickel fixtures act as the “gemstones” against the moody backdrop, providing immediate opulence and warmth.
True “art decor” in this context involves a curated layering of high-impact details rather than just hanging a picture on the wall. This guide reveals how to select statement hardware, ornate mirrors, and glamorous lighting to achieve maximum sophistication. We will define the methods to balance bold patterns with luxurious textures, ensuring your small space makes a massive stylistic impact.
You have mastered the marble and the fixtures, yet the room feels sterile: uncovering the ‘showroom trap’
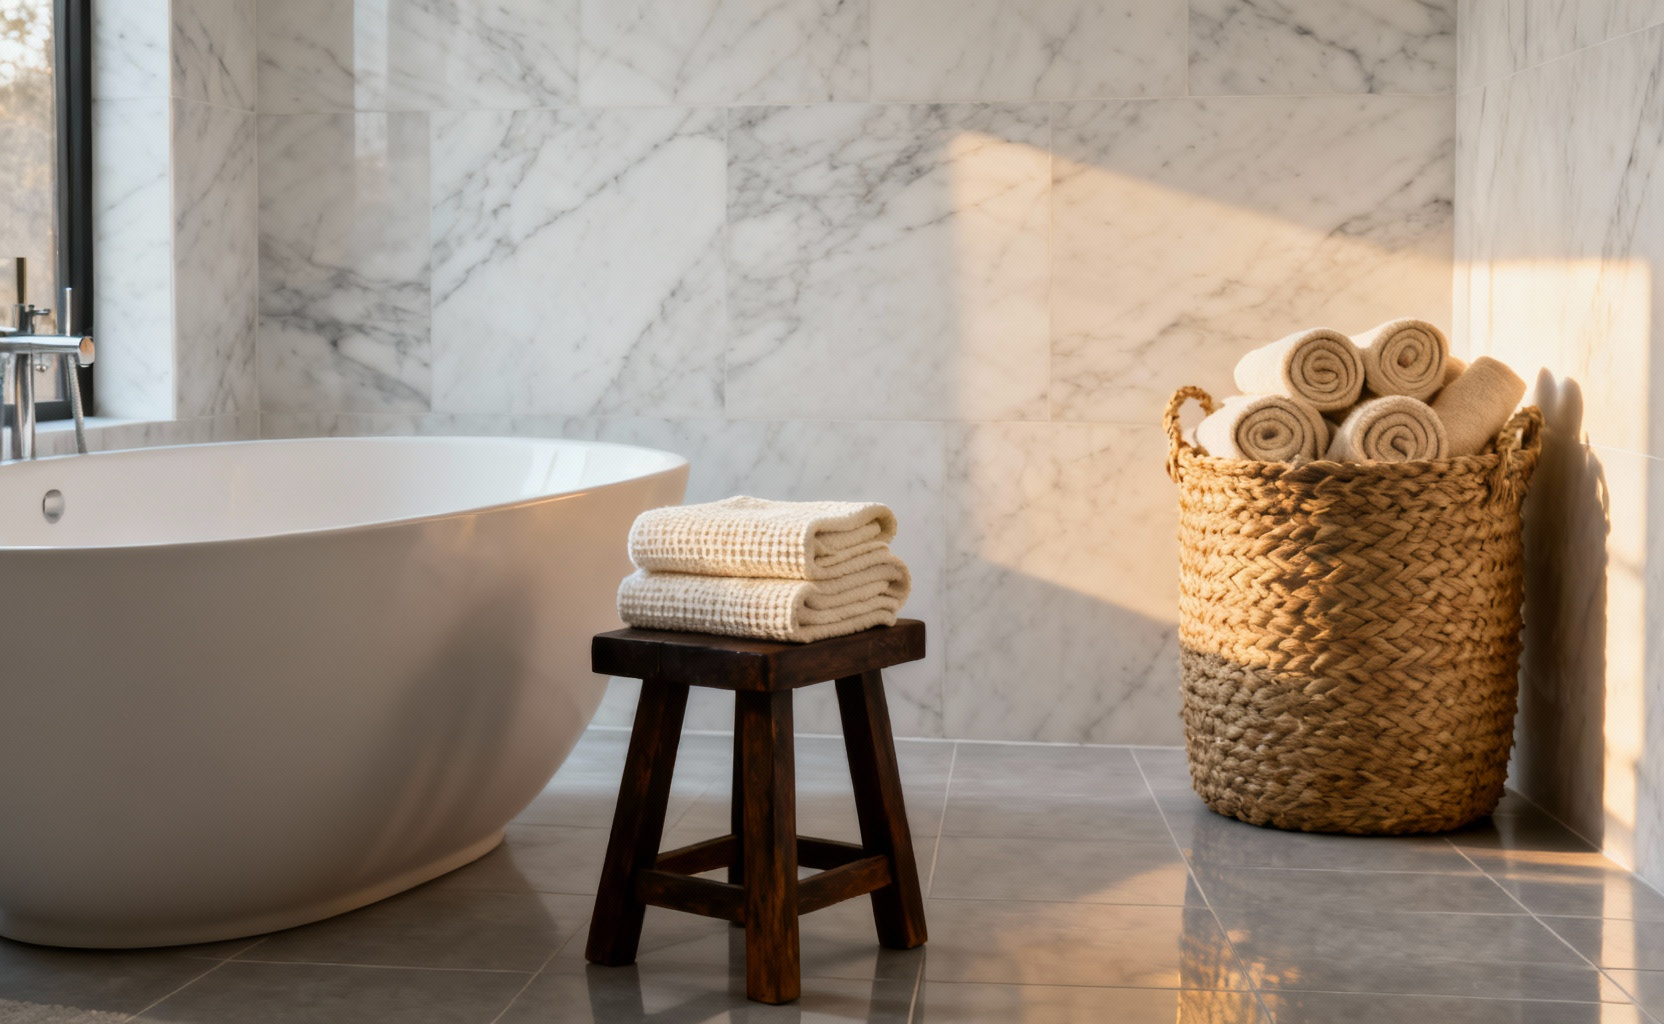
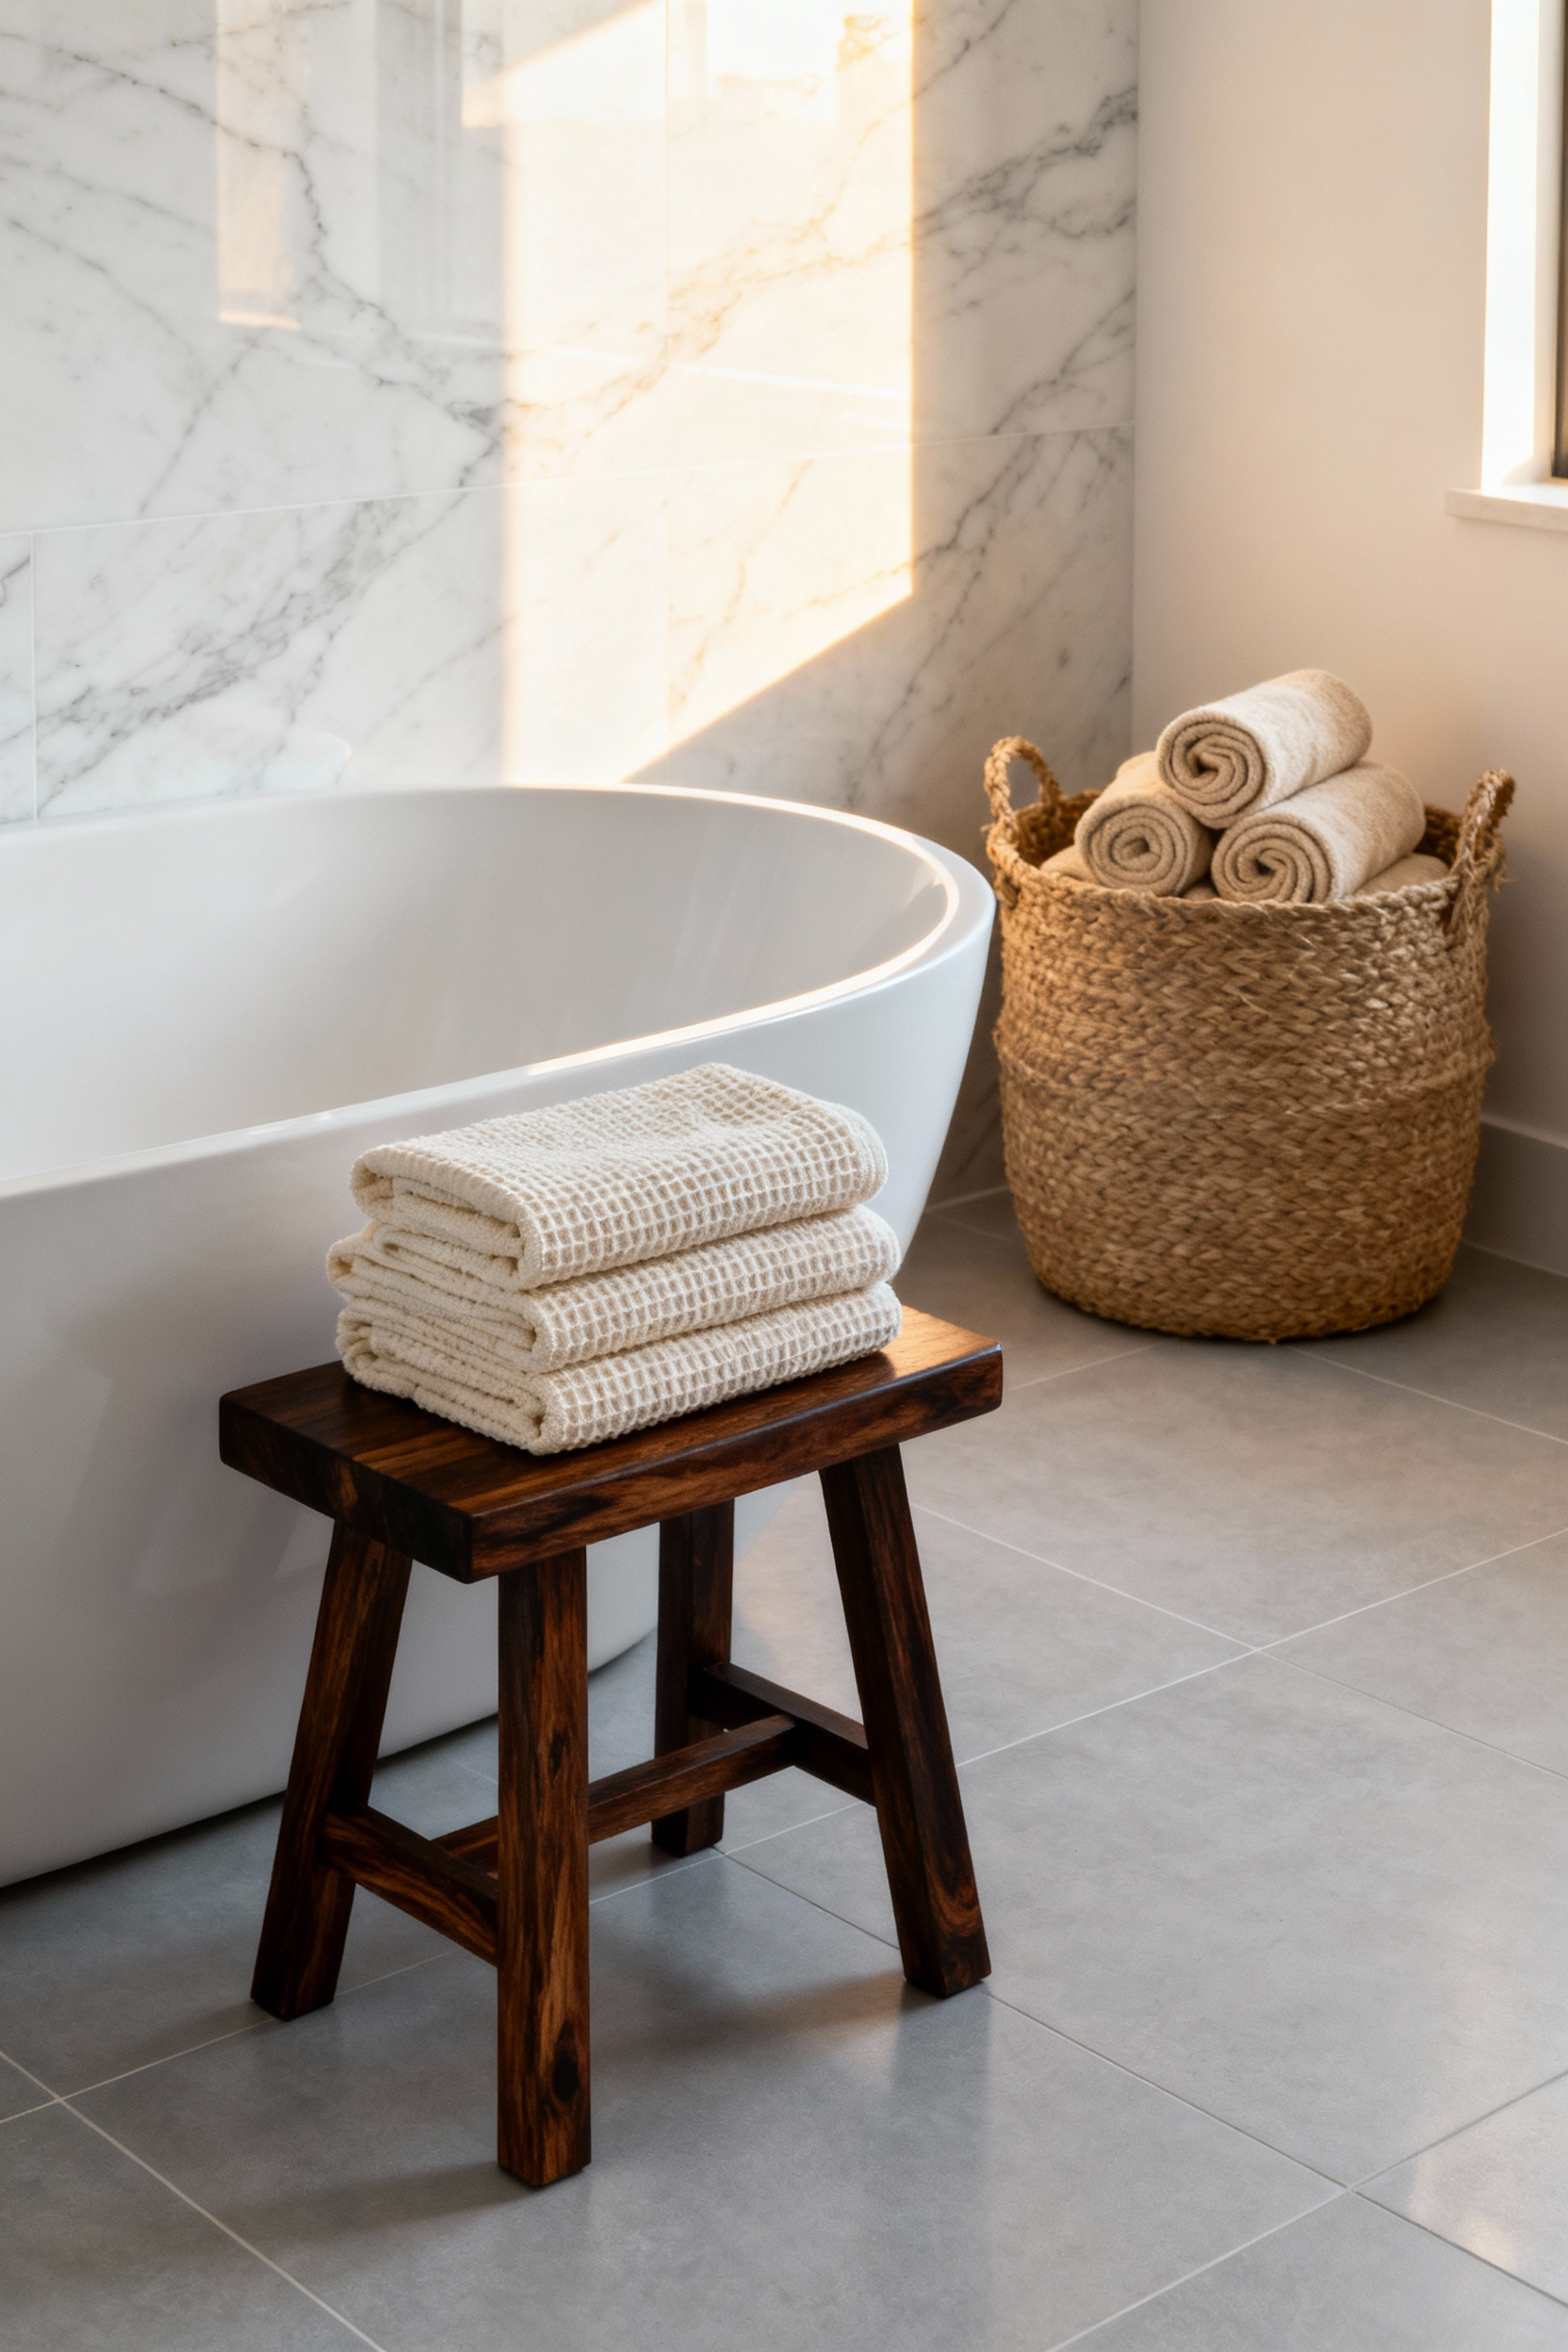
The “showroom trap” occurs when a bathroom relies entirely on hard, sleek surfaces like marble, tile, and glass. While these materials imply luxury, an abundance of cool-toned finishes creates a sterile environment that lacks emotional resonance.
To correct this, you must intentionally layer warm textures against the hard architectural elements. Introduce softness and depth by incorporating tactile decor, such as waffle-weave towels, woven baskets, or a wooden bath stool. These natural materials disrupt the harsh lines of stone and chrome, transforming a clinical space into one that feels lived-in and inviting.
A sterile look often stems from the absence of a defined color story beyond standard white and gray. You can infuse personality by hanging moisture-resistant artwork or applying patterned wallpaper to a feature area. Use these elements to dictate the palette for the rest of the room.
Select accessories, such as rugs and soap dispensers, that pull specific hues from the art or wallpaper pattern. This approach unifies the space and adds the visual contrast necessary to break the monotony of a monochromatic design.
Finally, balance the temperature of the room by offsetting cool stone with warmer tones and organic life. Stark white paint and chrome fixtures often contribute to a cold atmosphere; consider swapping hardware for brass or bronze and painting walls in creamy taupes or blushes. You may also consider intentional uses for white bathroom tiles to ensure warmth through texture.
To fully eliminate the “showroom” vibe, introduce a sense of history and vitality. Place potted plants like ferns to soften architectural edges, or repurpose an antique piece, such as a Moroccan side table, to replace standard storage. These choices inject character and ensure the room feels like a personal sanctuary rather than a display.
The secret isn’t in the tile selection—it represents the shift from functional space to immersive art installation
Treating a bathroom as an immersive art installation requires a fundamental shift in perspective. Tile transforms from a mere waterproof finish into a primary artistic medium that dictates the room’s sensory experience.
To achieve true immersion, extend your material choices beyond the standard four walls. Apply mosaics or bold patterns to the ceiling to draw the eye upward. This approach utilizes the full canvas of the room, creating an enveloping atmosphere that feels intentionally designed rather than purely functional.
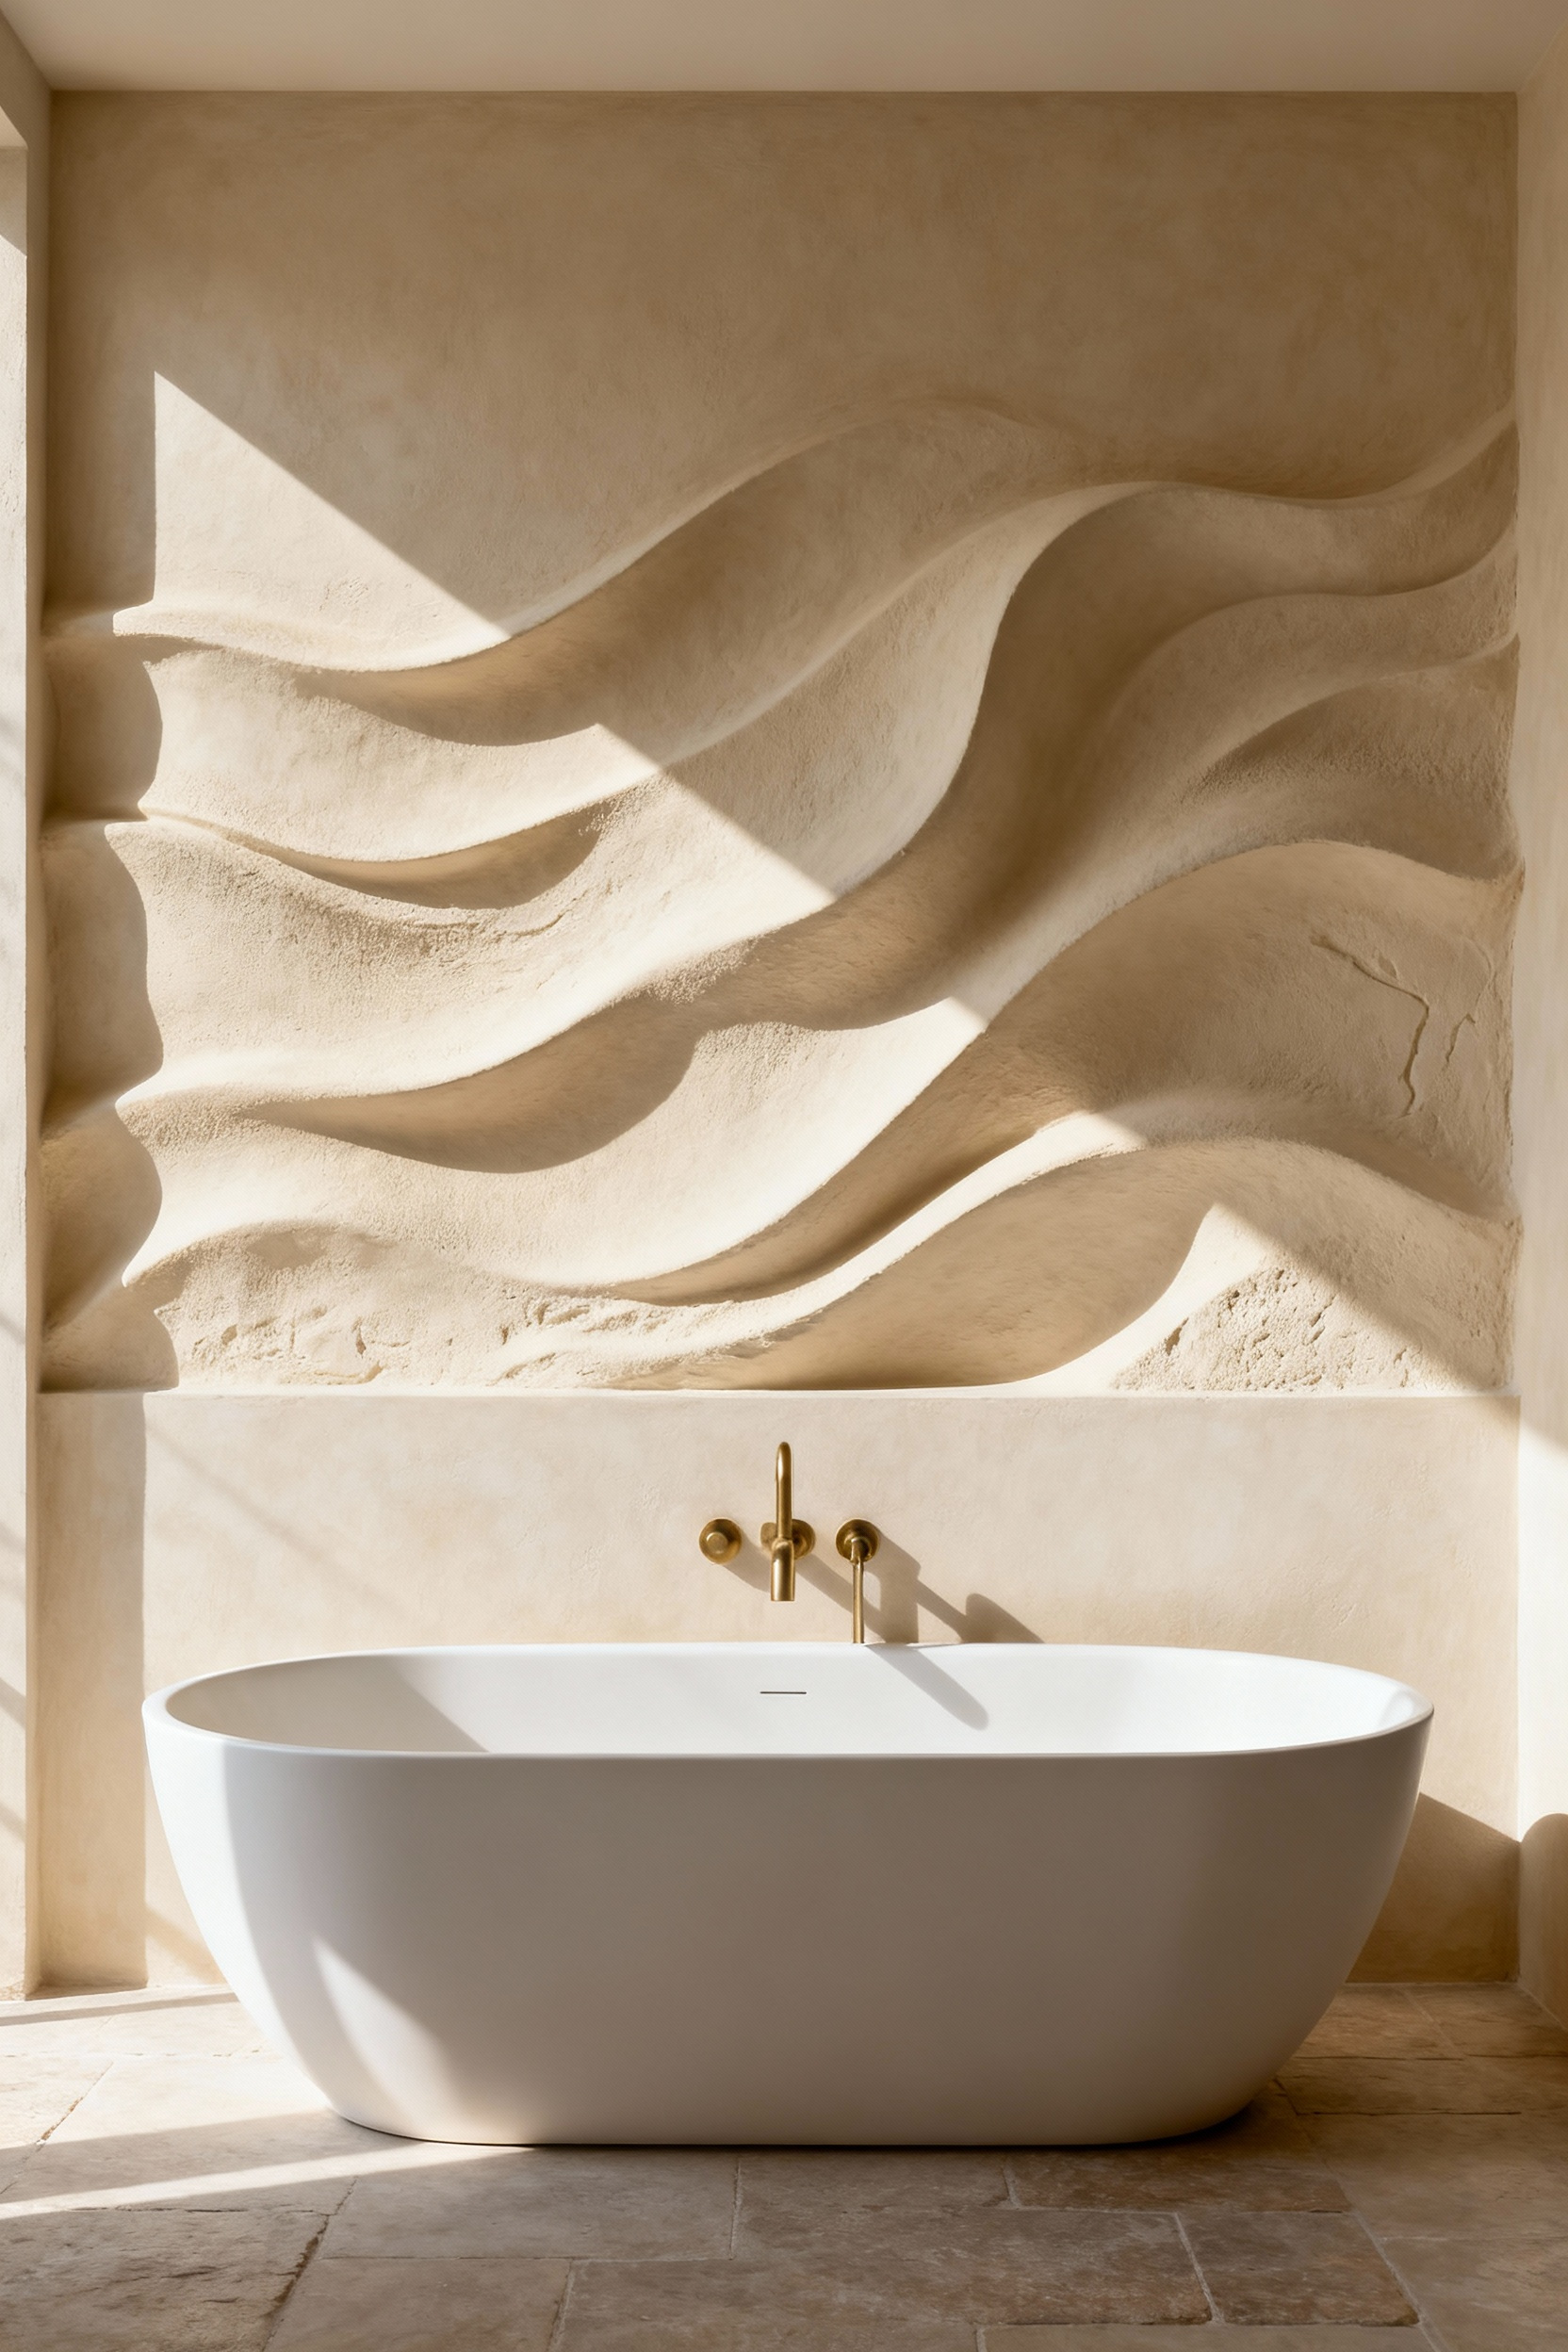
The selection of materials must prioritize tactile depth over flat, glossy surfaces. Incorporate fluted limestone, ribbed ceramics, or art tiles that showcase rugged imperfections. These textures invite touch and establish a quiet, luxurious feel. This tactile quality directly influences the emotional impact of the space. High-contrast patterns can generate energy for a metropolitan vibe, while soothing, earthy tones like terracotta and soft greens create a zen-like sanctuary.
Finally, prioritize narrative and cohesion to complete the installation. Select hand-painted tiles or specific motifs that tell a personal story, turning walls into a canvas of self-expression. Ensure that functional elements support this artistic vision. Choose sculptural plumbing fixtures and luminous hardware that stand as art pieces themselves. When every element contributes to the narrative, the boundary between utility and art dissolves.
Phase I: Defying Scale & Proportion
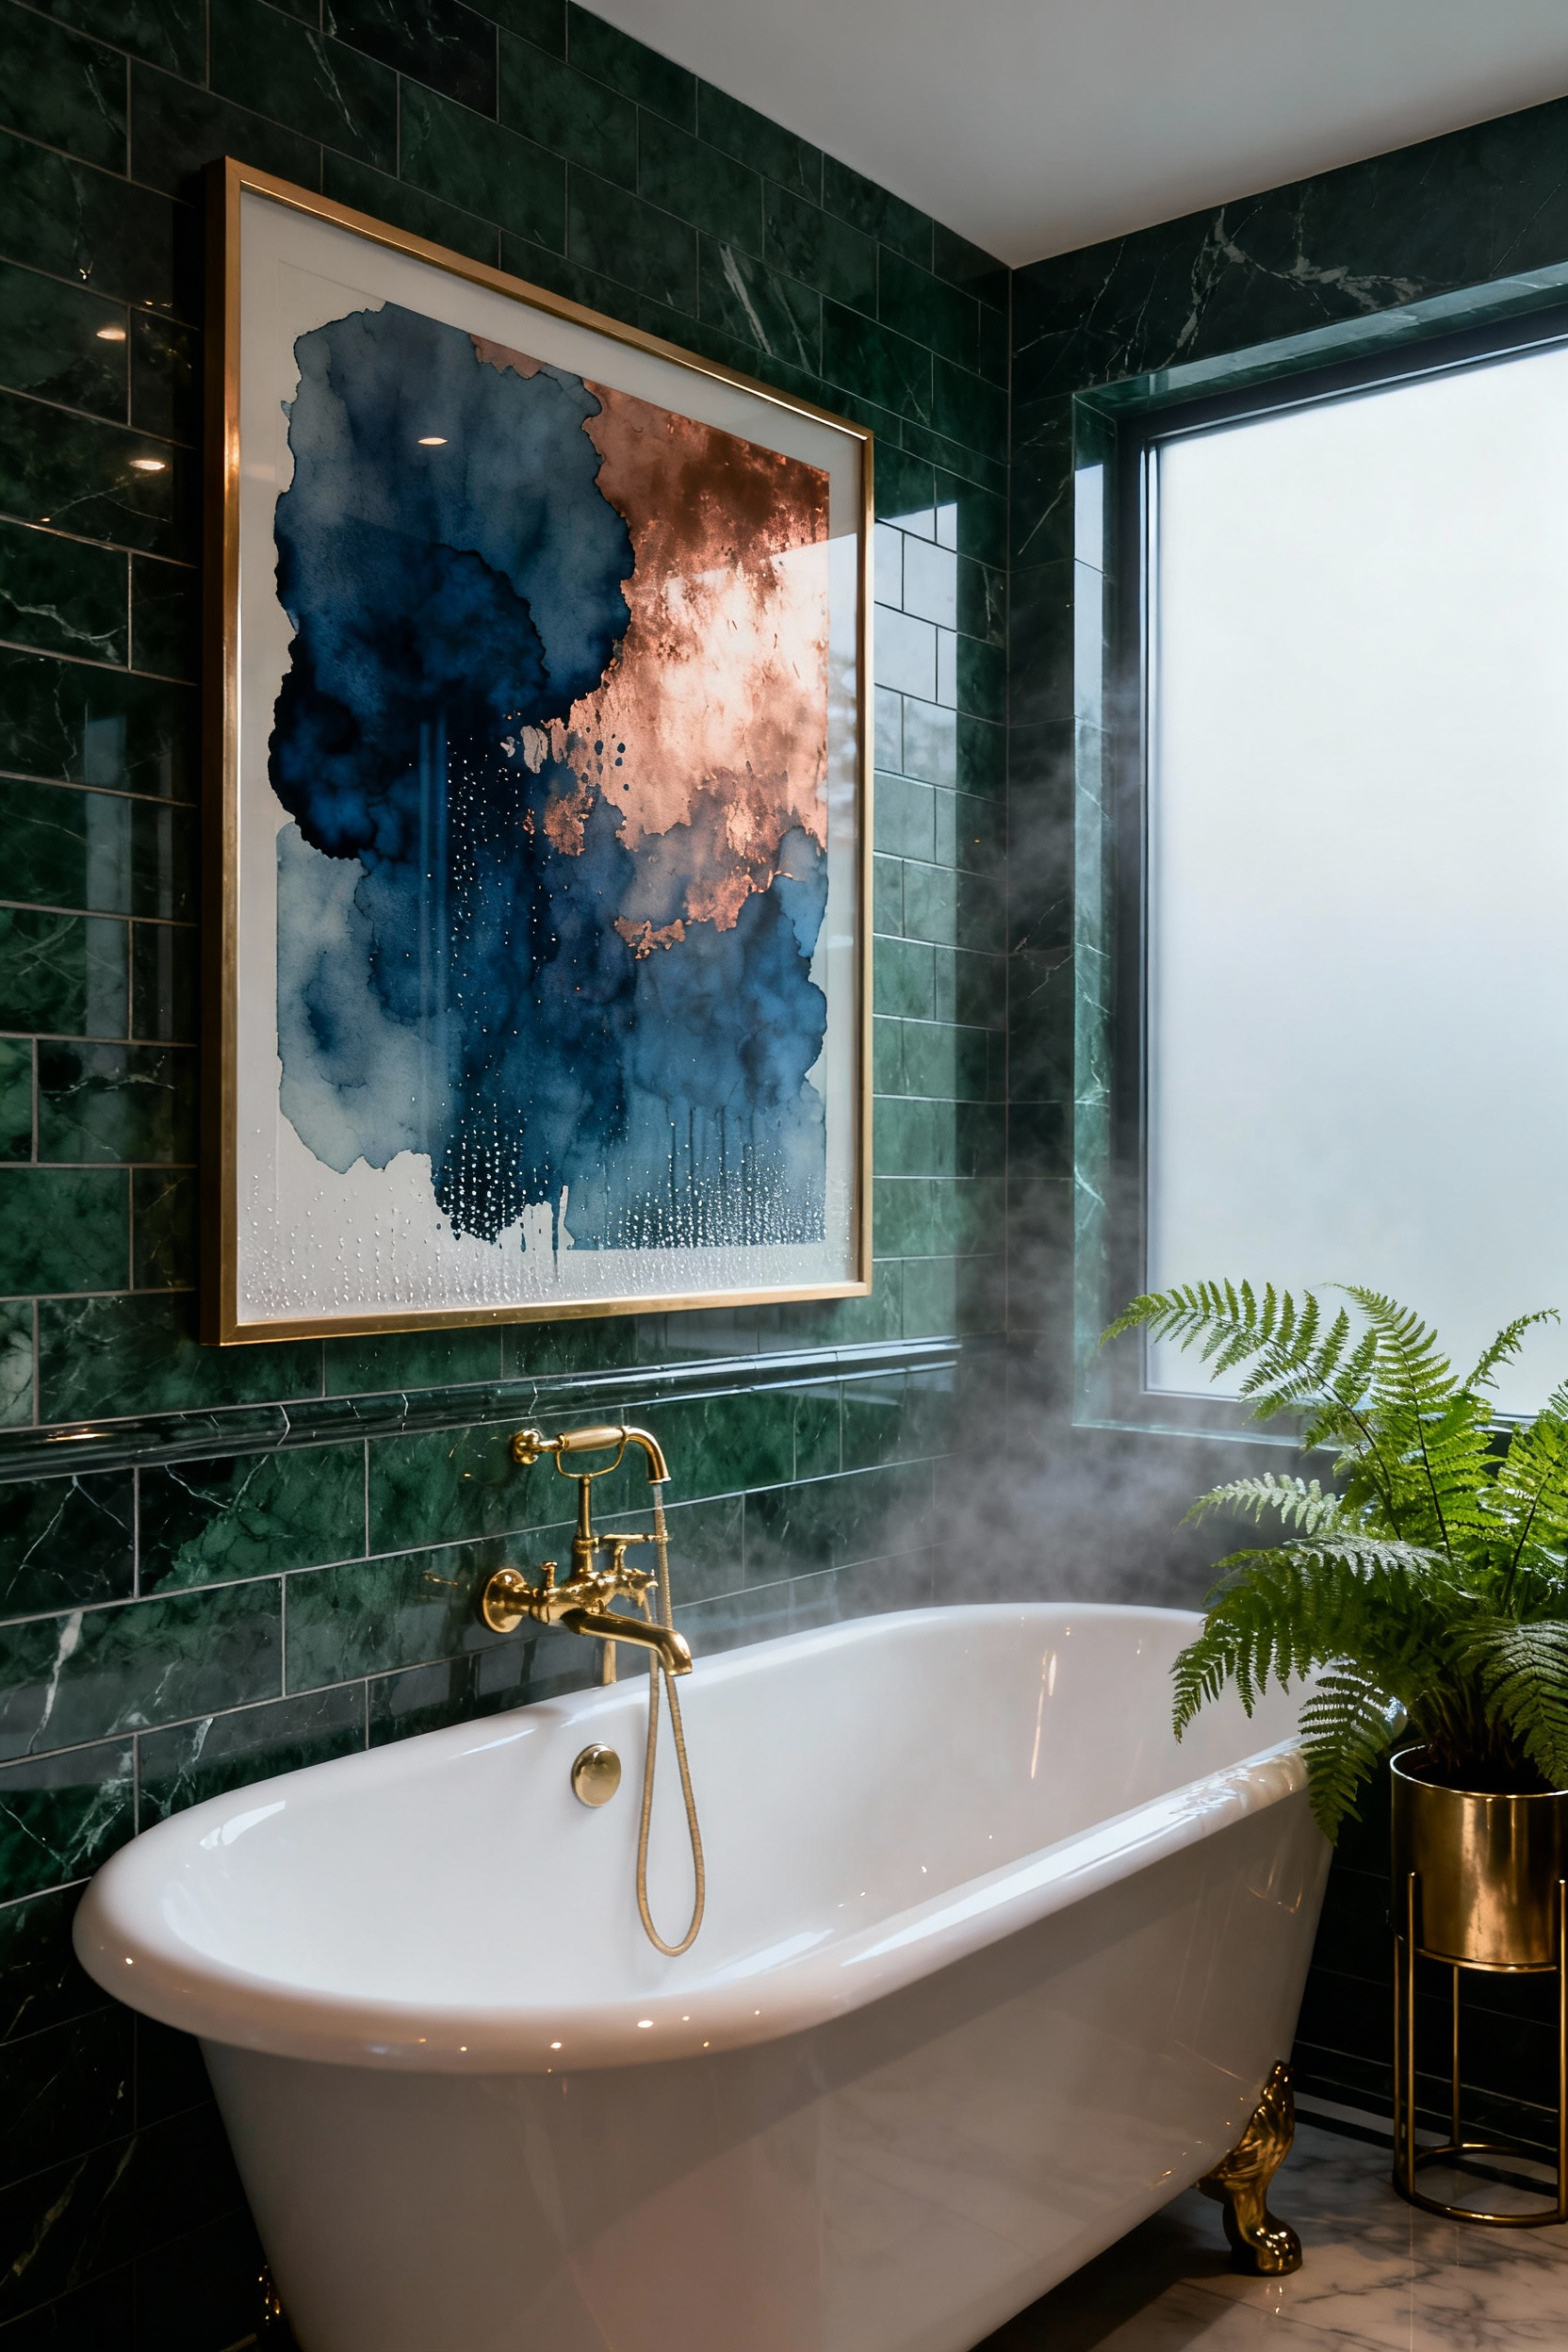
Transform a small bathroom into a curated destination by embracing oversized statement pieces. A single, massive canvas often feels counter-intuitive in a powder room, yet it effectively creates a “jewel box” effect.
Select abstract or graphic themes for this focal point to establish a bold aesthetic. These dynamic designs draw the eye inward, adding visual depth and distracting from the room’s limited footprint. The result is a space that feels grand and intentional rather than cramped.
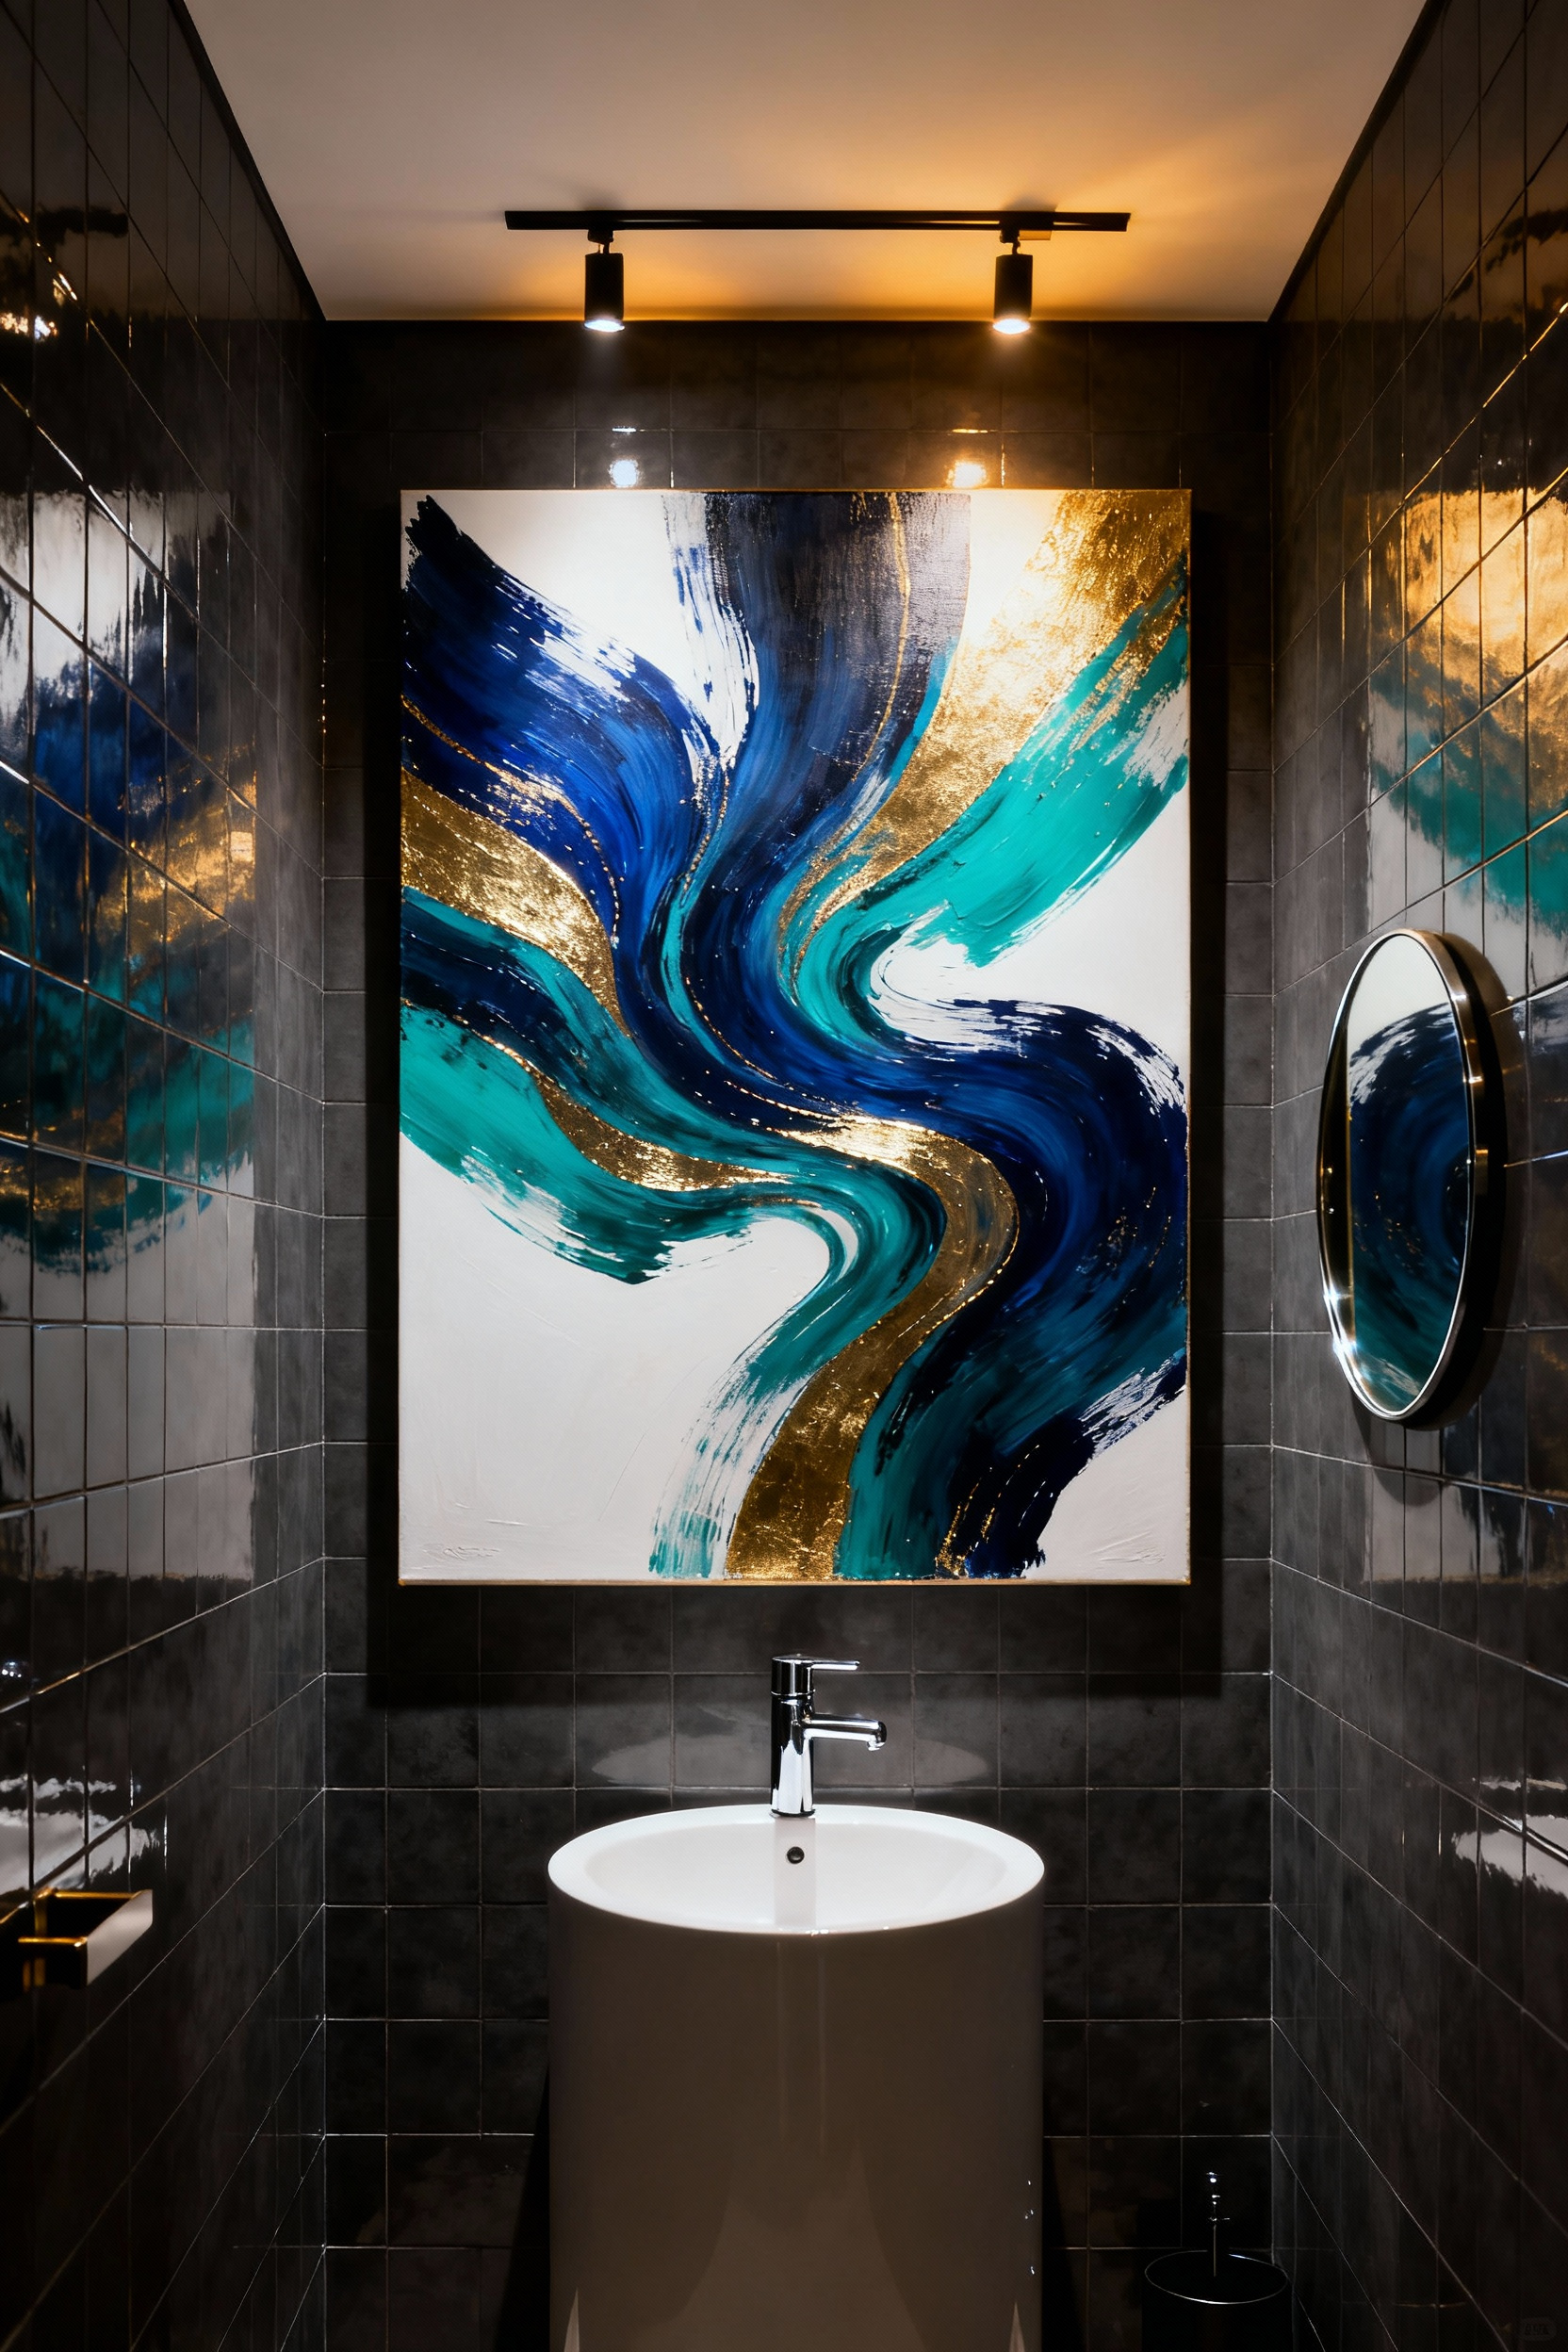
Precision prevents the design from feeling chaotic. Apply the “two-thirds rule” when selecting your statement piece to ensure balance. The artwork should measure no more than two-thirds the width of the wall section it occupies. This specific ratio maximizes visual impact while maintaining necessary negative space. It anchors the room without crossing the line into overwhelming clutter, proving that large scale can coexist with small square footage.
Leverage the room’s verticality to further defy scale. Hang the artwork slightly higher than standard eye level to draw the gaze upward, emphasizing the ceiling height. To amplify this effect, position the piece opposite a mirror or choose art with glass-front frames. These reflective surfaces bounce light around the room, enhancing the illusion of spaciousness and turning a utilitarian corner into a sophisticated gallery experience.
The Grand Gesture: Why oversized oil portraiture belongs in the smallest powder room
Creating a “jewel box” effect transforms a powder room from a mere utility space into an immersive experience. By installing an oversized oil portrait in such a compact area, you maximize visual impact through dramatic juxtaposition.
The formal, often serious nature of a historic or grand portrait creates a witty contrast against the room’s utilitarian function. This unexpected pairing instantly elevates the space, turning a necessary stop for guests into a sophisticated conversation piece.
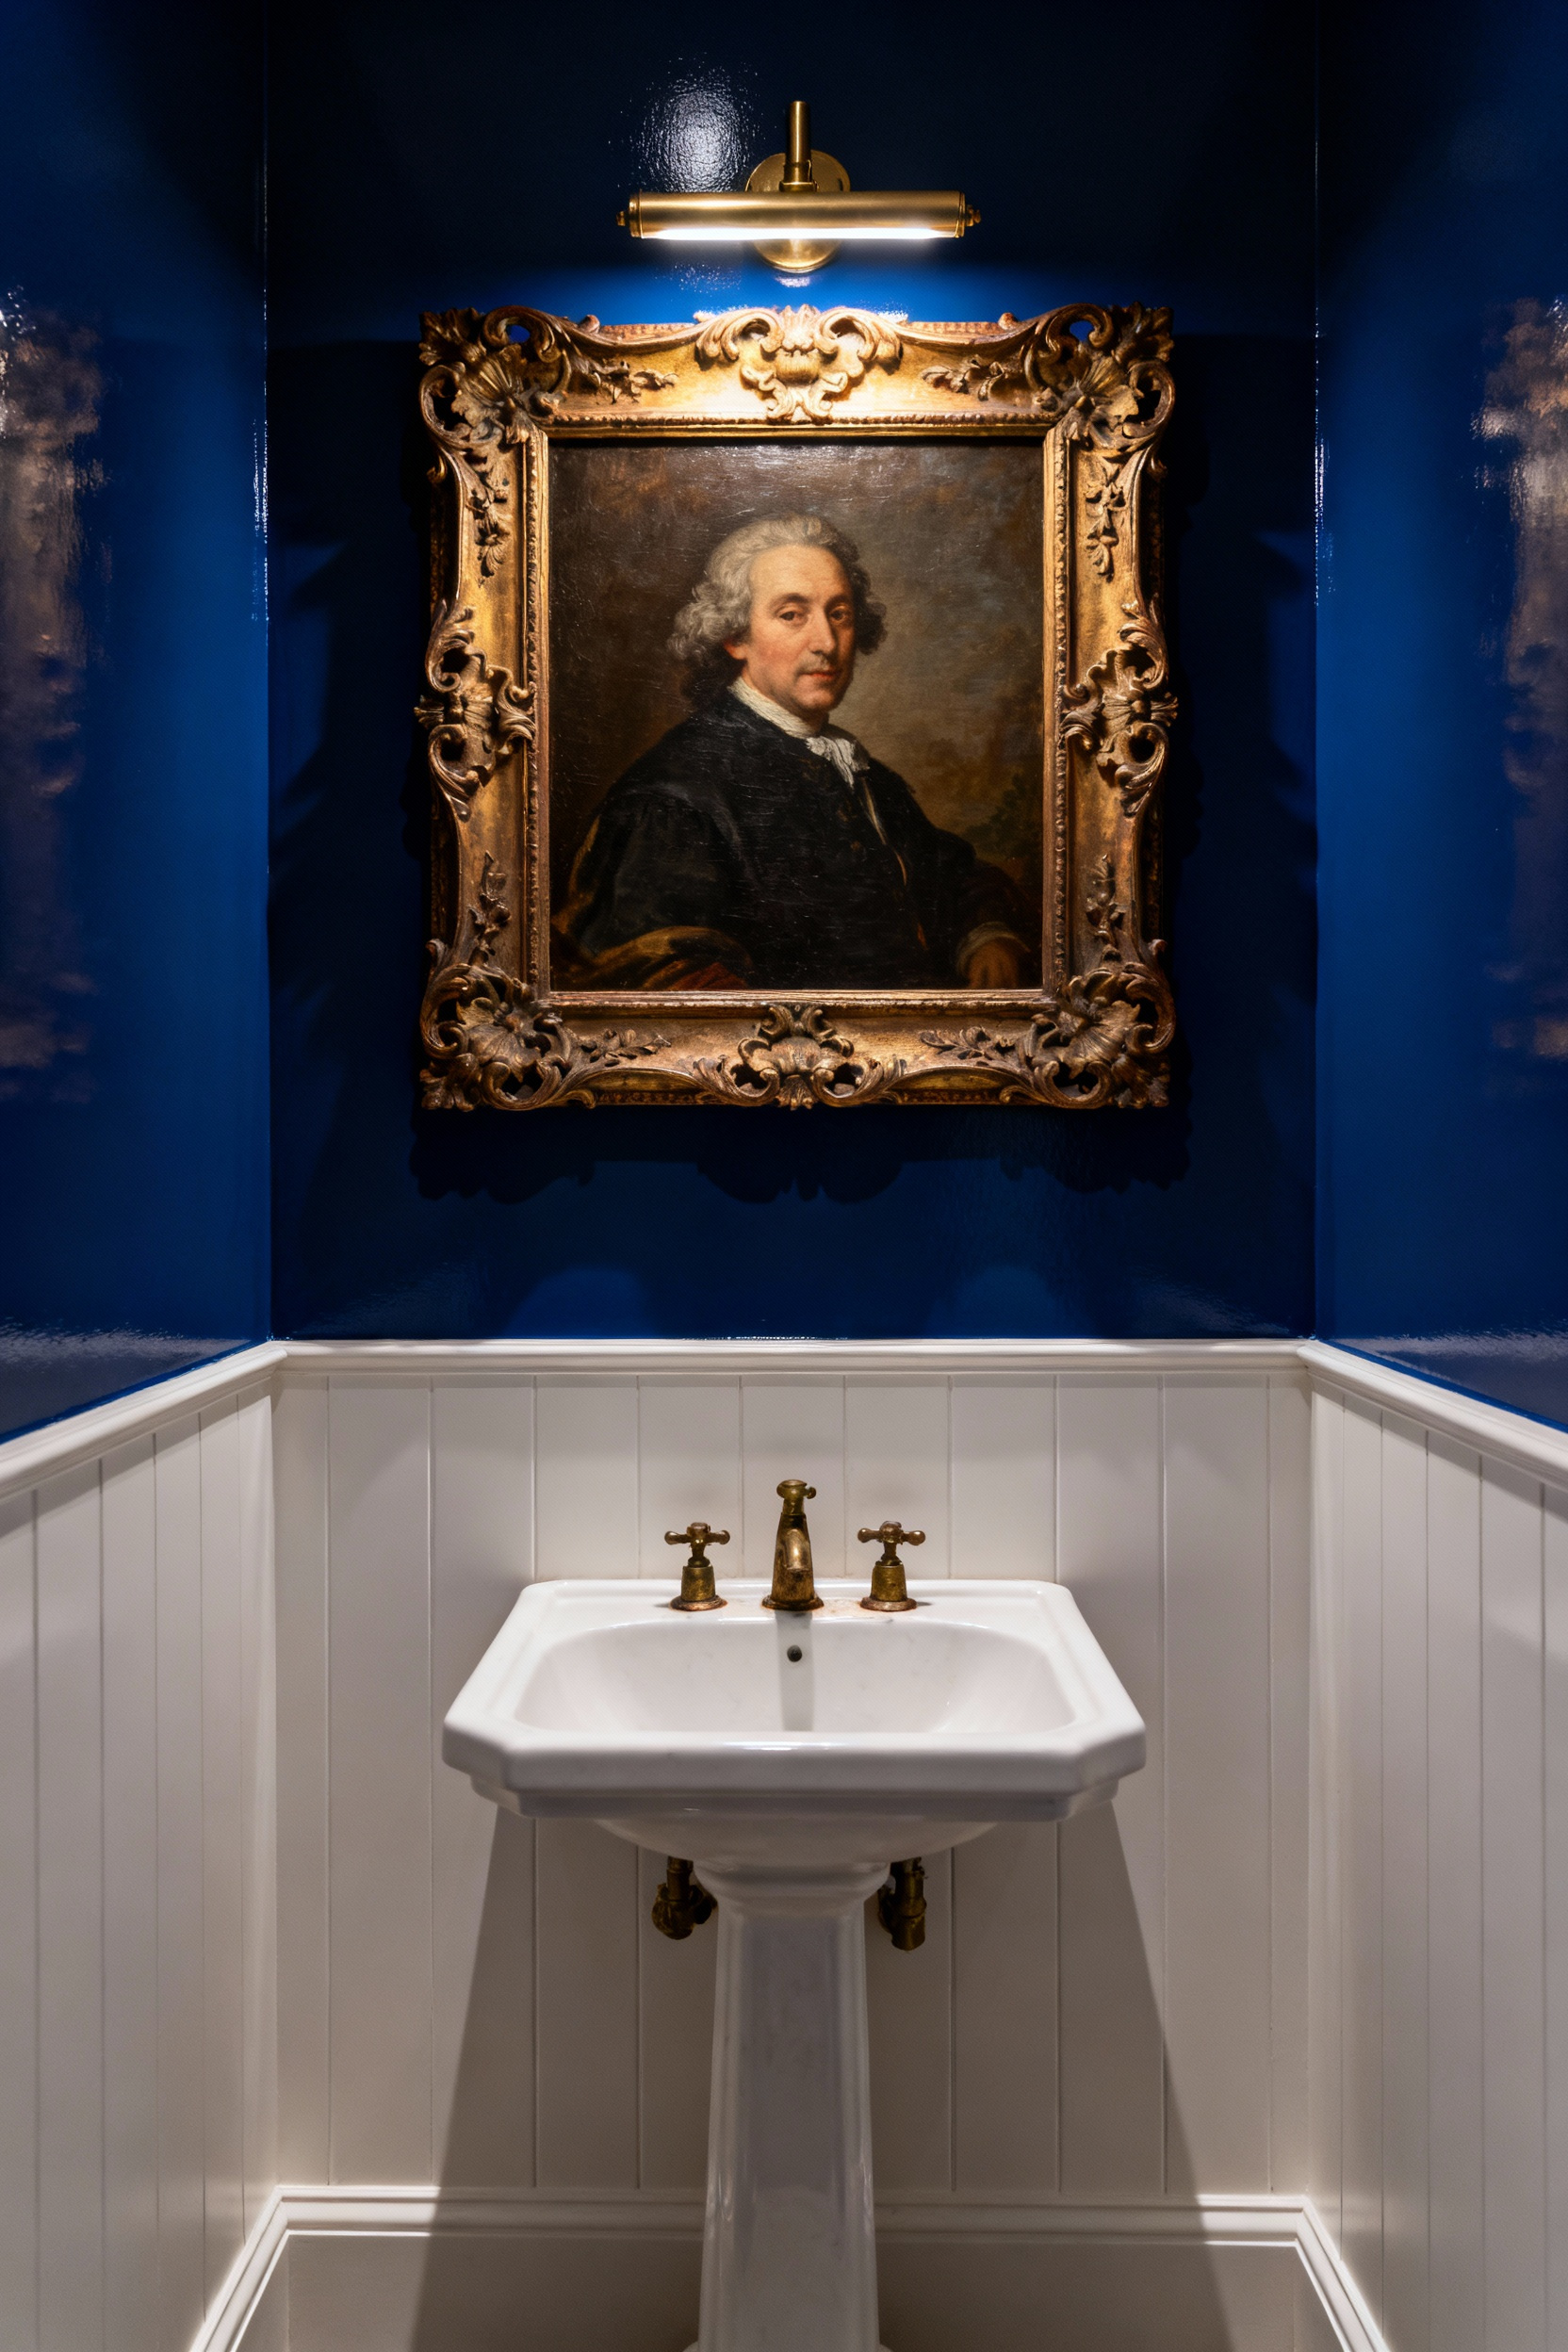
In limited square footage, a single monumental work outperforms a collection of smaller items. You should select a portrait where the scale dominates the vertical plane, ideally reaching near floor-to-ceiling dimensions while allowing for fixture clearance. This massive presence overrides the room’s physical constraints and guides the eye to a singular focal point. When the art visually envelopes the viewer, the small room feels intentional and gallery-like rather than cramped.
From a preservation standpoint, the powder room offers an optimal environment for this type of investment. Unlike full bathrooms, these half-baths generate minimal humidity, protecting distinct mediums like oil paint from moisture damage. To fully embrace the opulence, pair your statement piece with bold supporting elements:
- Saturated Backgrounds: Apply dark paint or rich, patterned wallpaper to anchor the artwork and blur the corners of the room.
- Metallic Fixtures: Use brass or gold hardware to catch the light and complement heavy, gilded frames.
- Dedicated Lighting: Install a picture light directly above the frame to ensure the portrait remains the undeniable hero of the space.
Immersive Murals: Treating the entire wall surface as a singular canvas
Transforming a bathroom requires viewing the entire space as a singular artistic opportunity. Large-scale murals blur architectural boundaries and visually expand smaller footprints.
To achieve total immersion, extend the design across multiple walls or incorporate the ceiling. This technique envelopes the viewer and turns a functional room into a luxury retreat. Nature scenes and deep perspectives work best to create this illusion of infinite space, effectively “wrapping” the room in a new environment.

Durability determines the longevity of this application. Humidity destroys traditional paper wall coverings quickly, leading to peeling and warping. You must select materials engineered for moisture resistance. Waterproof wall tiles offer high durability and luxurious texture. Alternatively, choose PVC polymer murals or high-quality, washable peel-and-stick coverings. These materials resist mildew and withstand daily steam, ensuring the art remains pristine.
Cohesion between the mural and the room’s permanent fixtures creates a polished aesthetic. The artwork should complement the hardware and finishes, rather than compete with them. Use the following guidelines to unify the design:
- Opulence: Pair faux-marble textures or complex, jewel-toned landscapes with gold or brass hardware.
- Tranquility: Match soft, abstract botanicals with chrome fixtures and neutral floor tiles.
- Drama: Anchor dark, moody jungle scenes with matte black accents and stone vanity tops.
The Fifth Wall: Elevating the gaze with hand-painted ceiling frescoes or wallpaper art
Transform the ceiling from a utilitarian surface into a dramatic design anchor. Treating this “fifth wall” as a canvas allows you to introduce maximalist details without overwhelming the room’s footprint.
In powder rooms or compact baths, shifting the focus upward prevents wall clutter while adding depth. Opt for celestial themes, such as cloud-filled skies, to visually expand vertical space and evoke a spa-like serenity. For a more enveloping experience, apply large-scale botanical prints or classical fresco styles to achieve a sophisticated “jewel-box” effect that draws the eye upward.
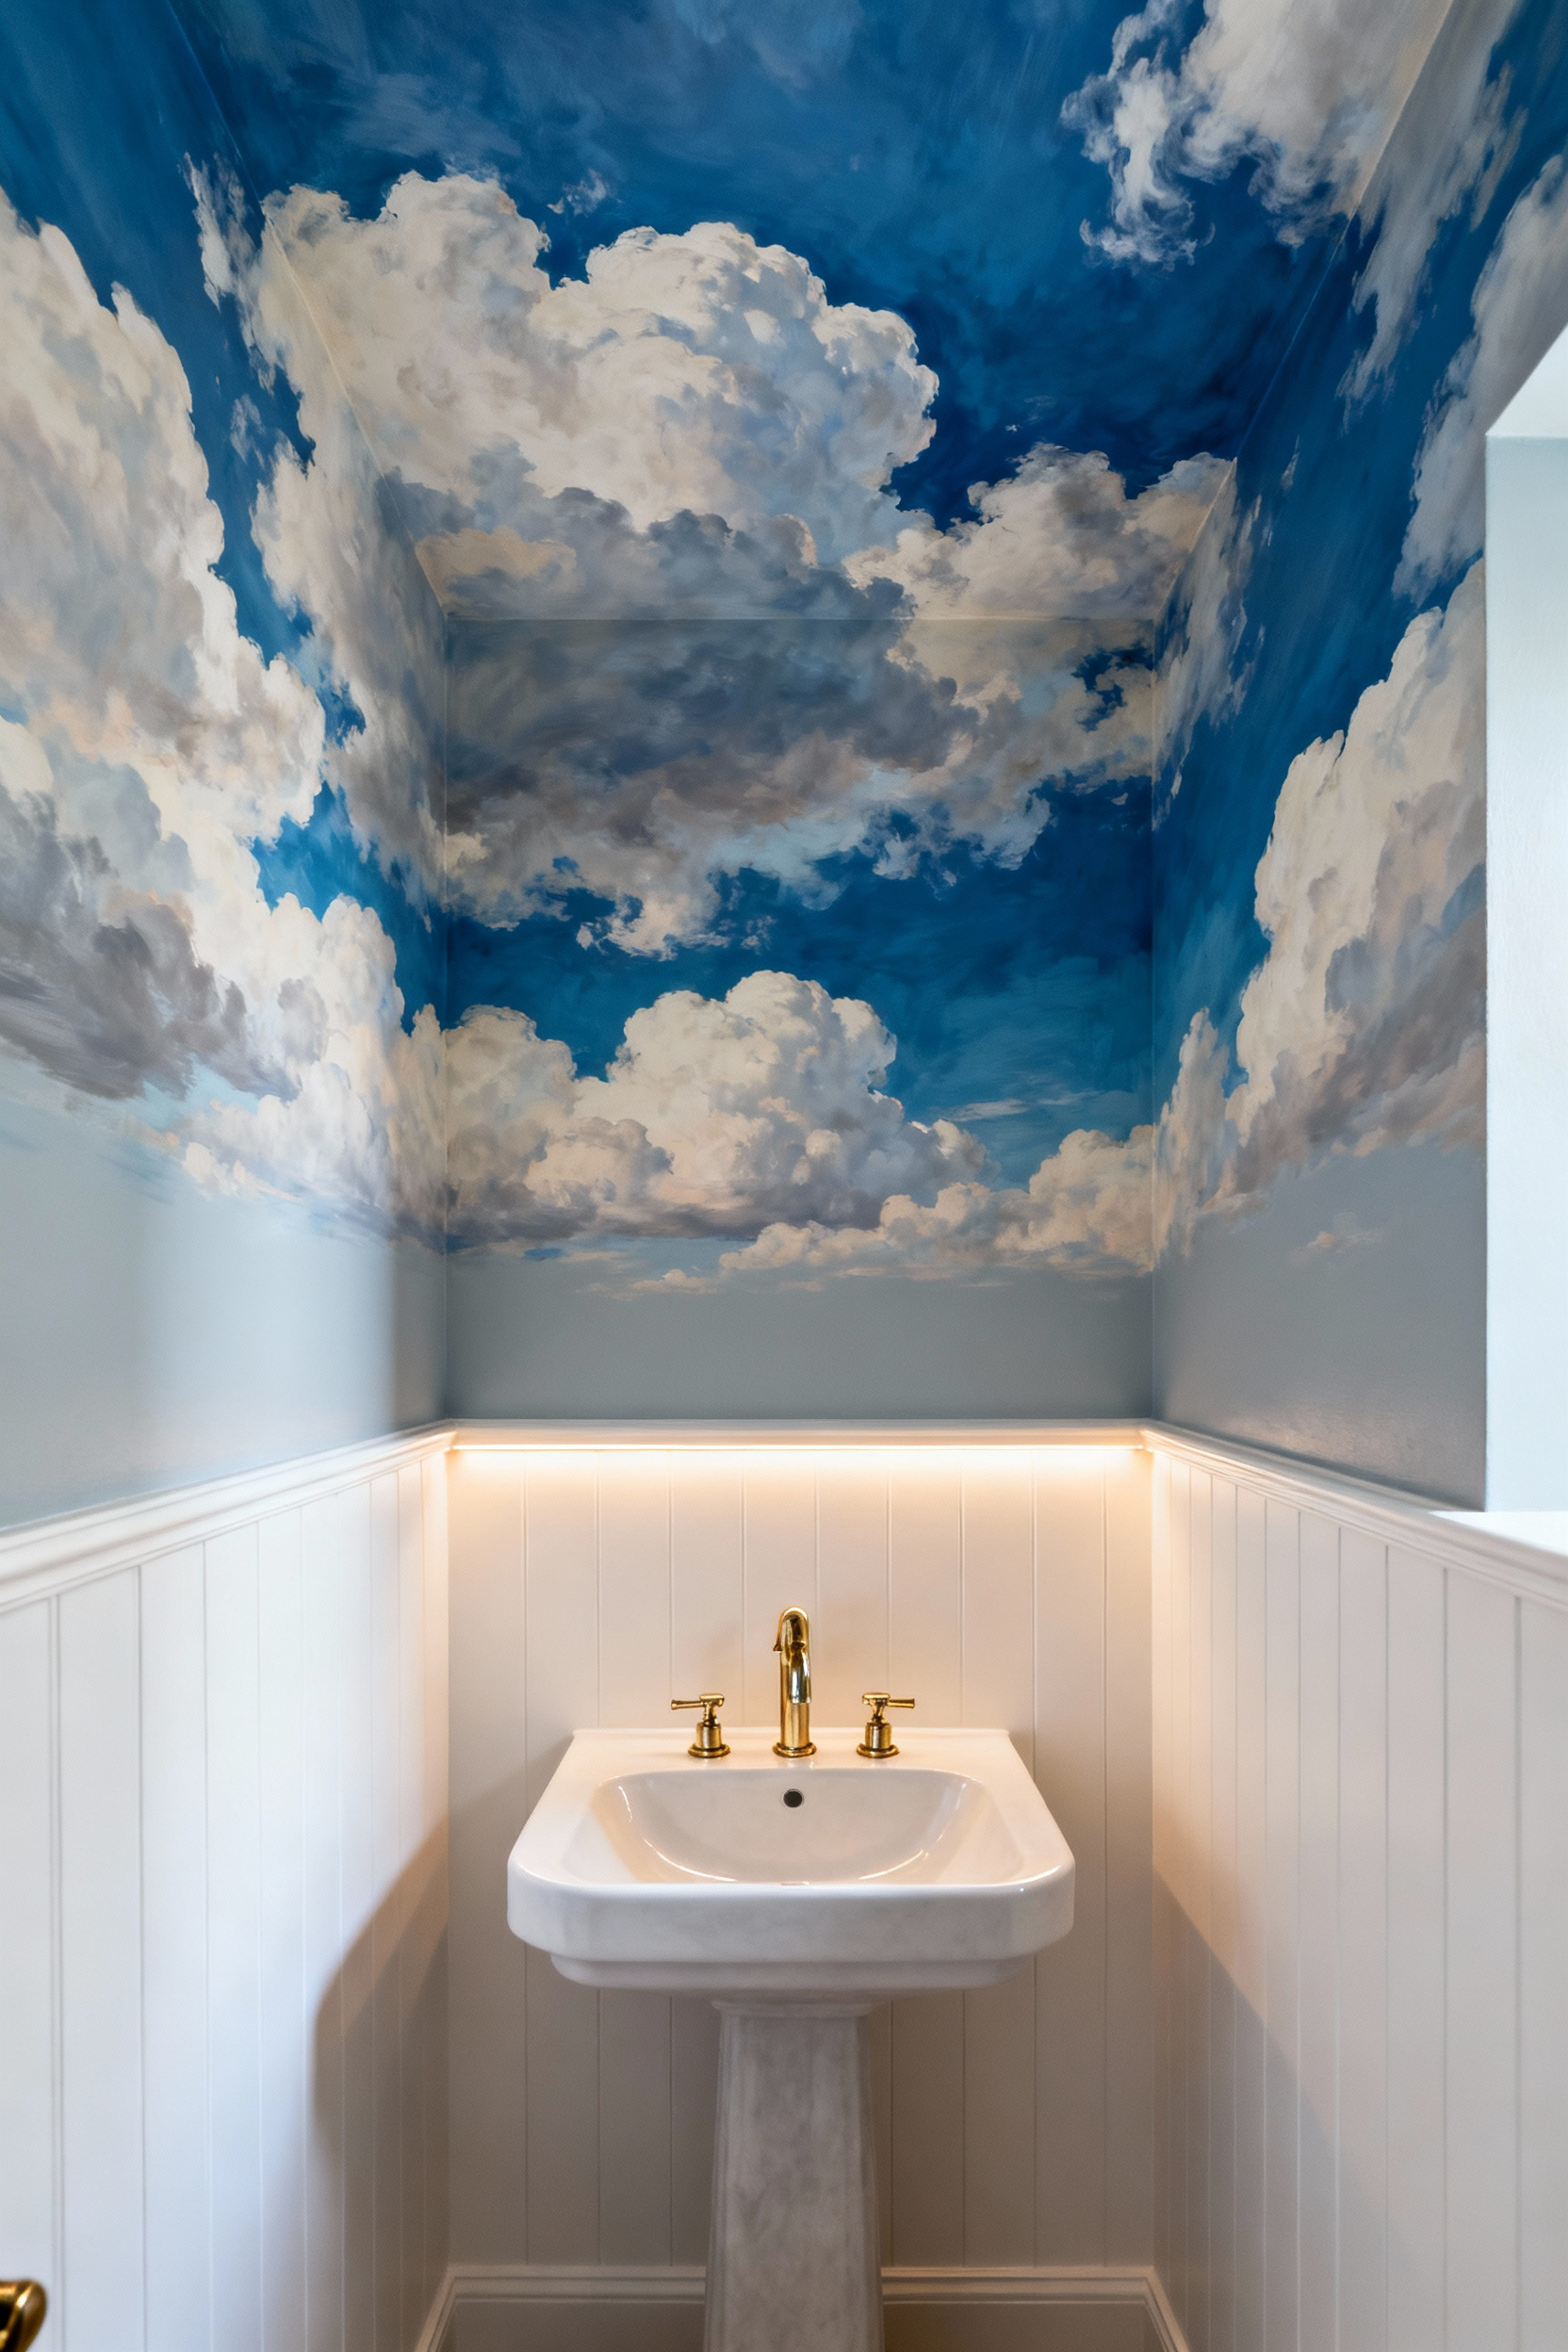
Durability determines the success of this design choice. High-humidity environments require materials capable of withstanding steam and condensation. When selecting wallpaper, prioritize waterproof, vinyl-coated, or heavy-grade murals designed specifically for bathrooms to avoid peeling.
For hand-painted frescoes, protection is mandatory. Seal the finished artwork with a non-yellowing, water-based archival matte varnish or a liquid laminate topcoat. This crucial step locks out moisture, prevents mold, and ensures your overhead masterpiece remains pristine.
Phase II: Materiality Beyond the Print
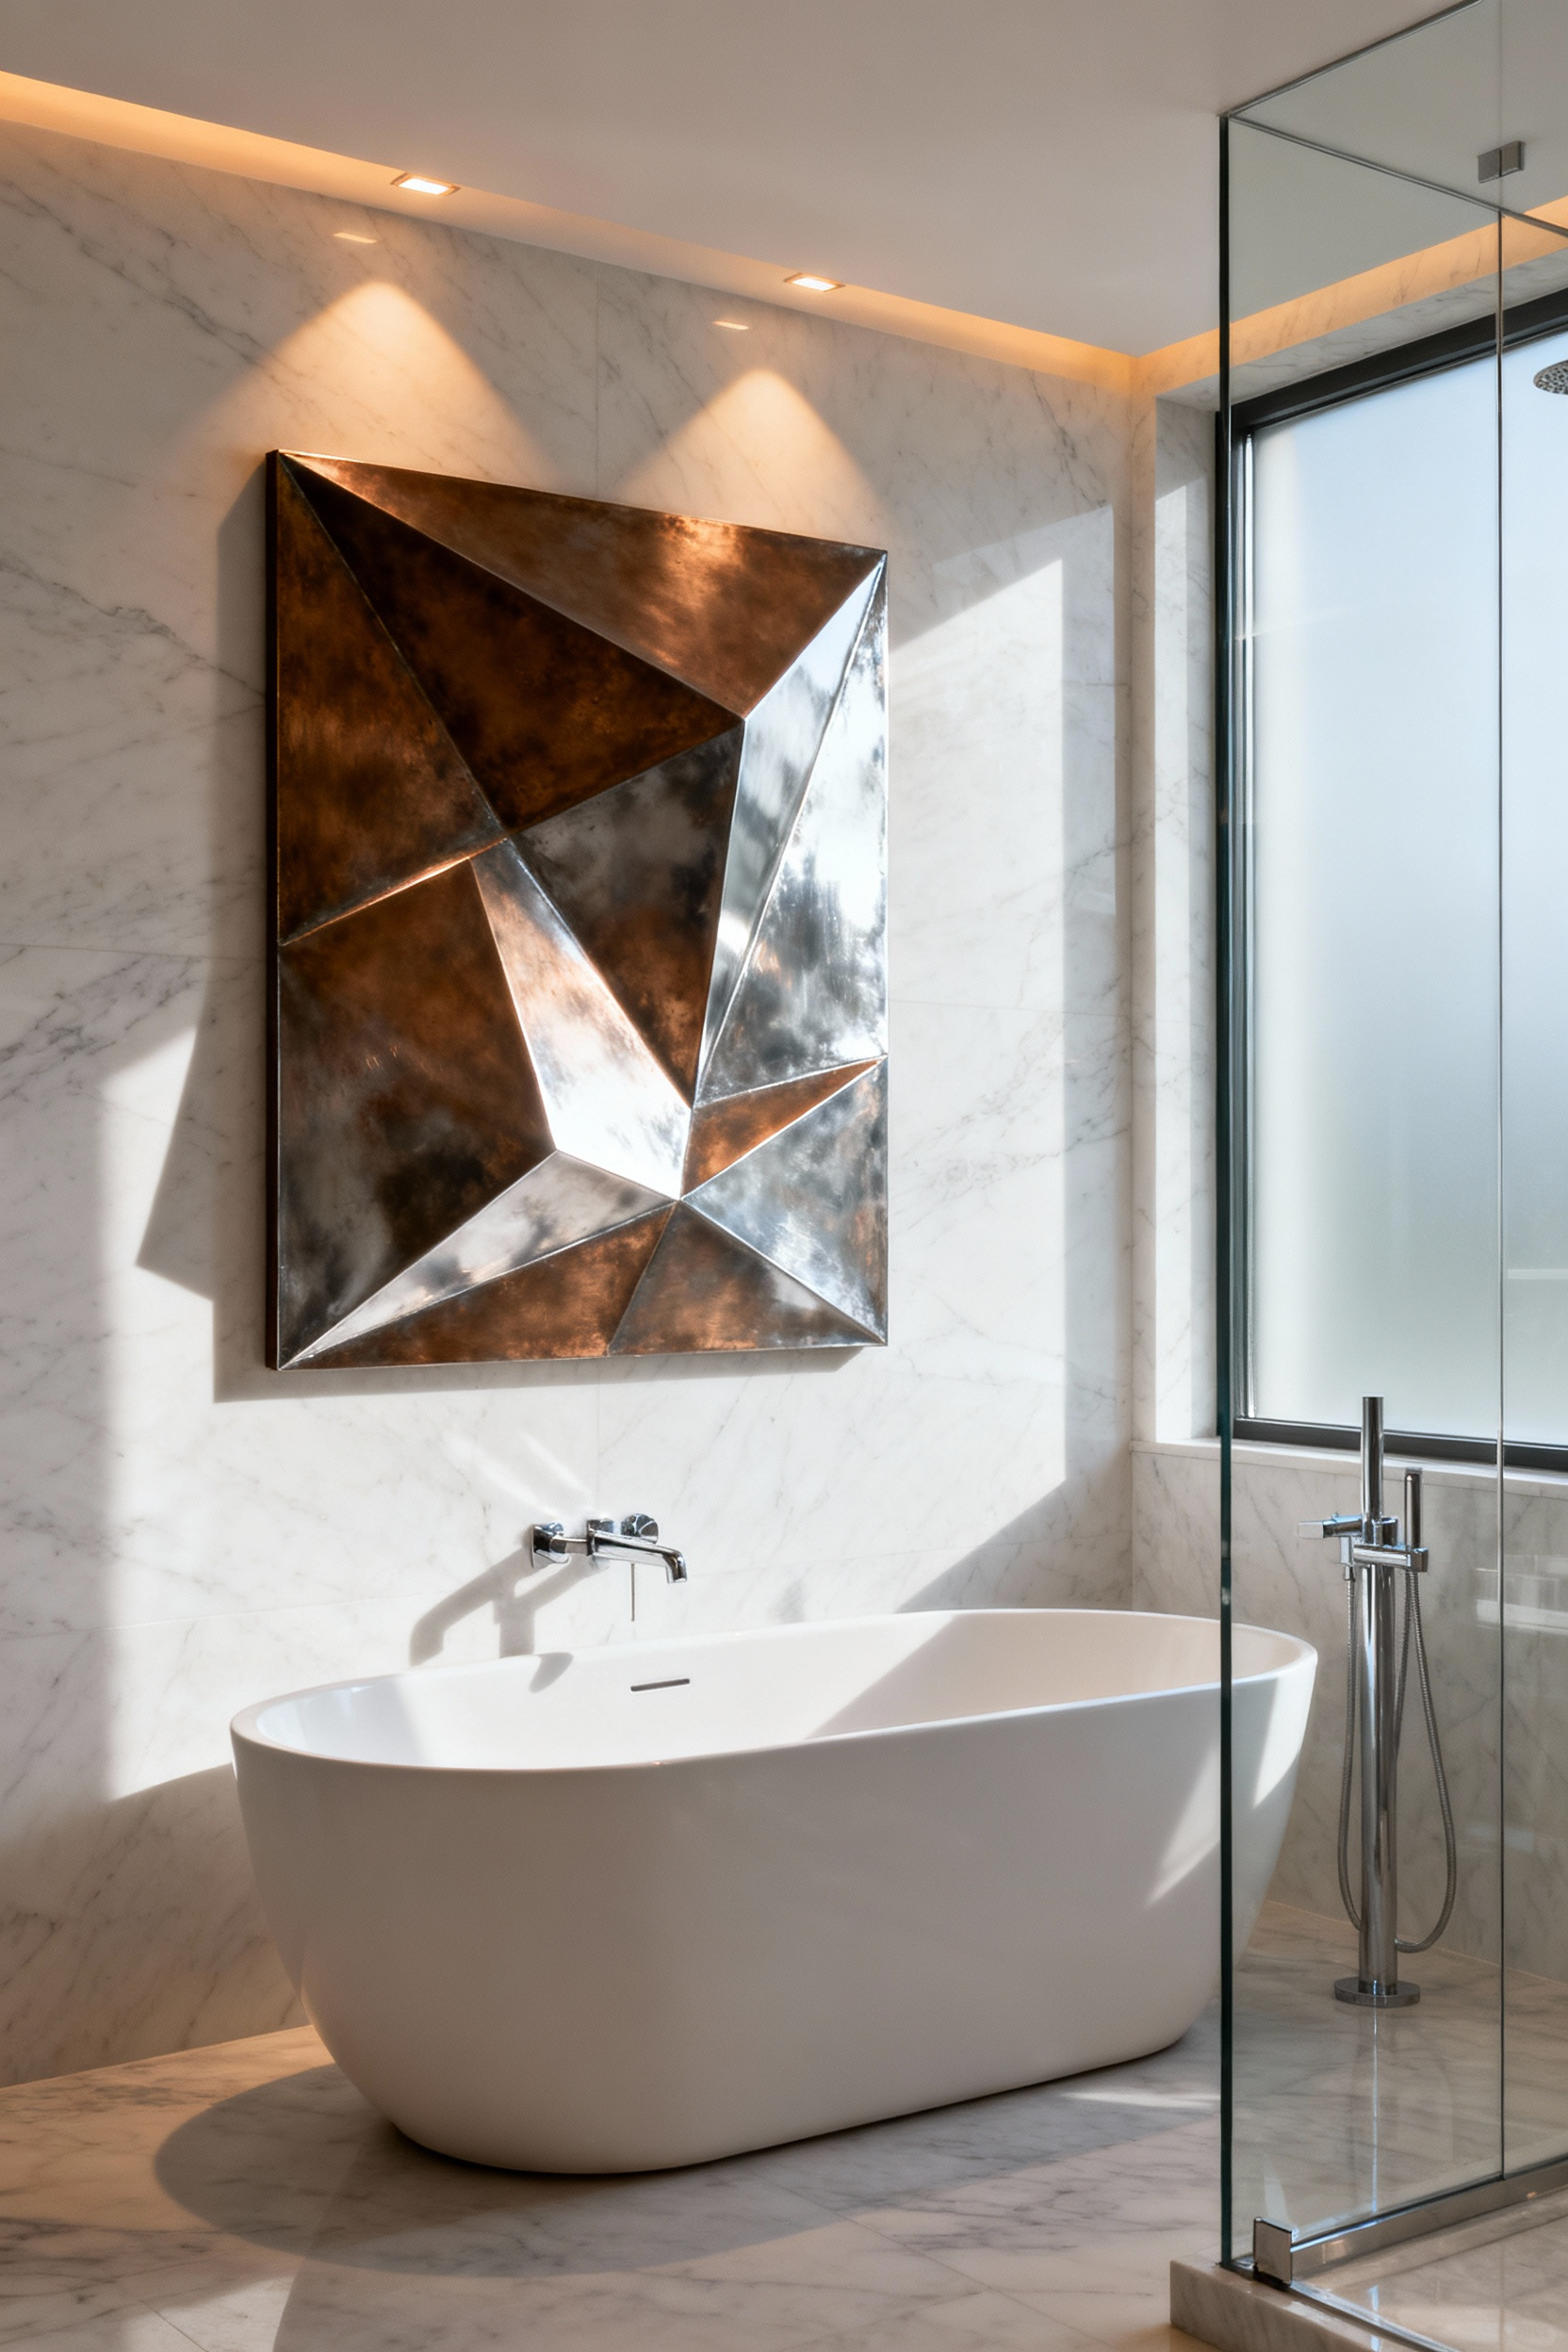
To truly elevate a bathroom, look beyond traditional framed paper or canvas, which remain vulnerable to humidity and temperature fluctuations. Instead, invest in non-porous, three-dimensional mediums that thrive in moisture-heavy environments while adding necessary texture.
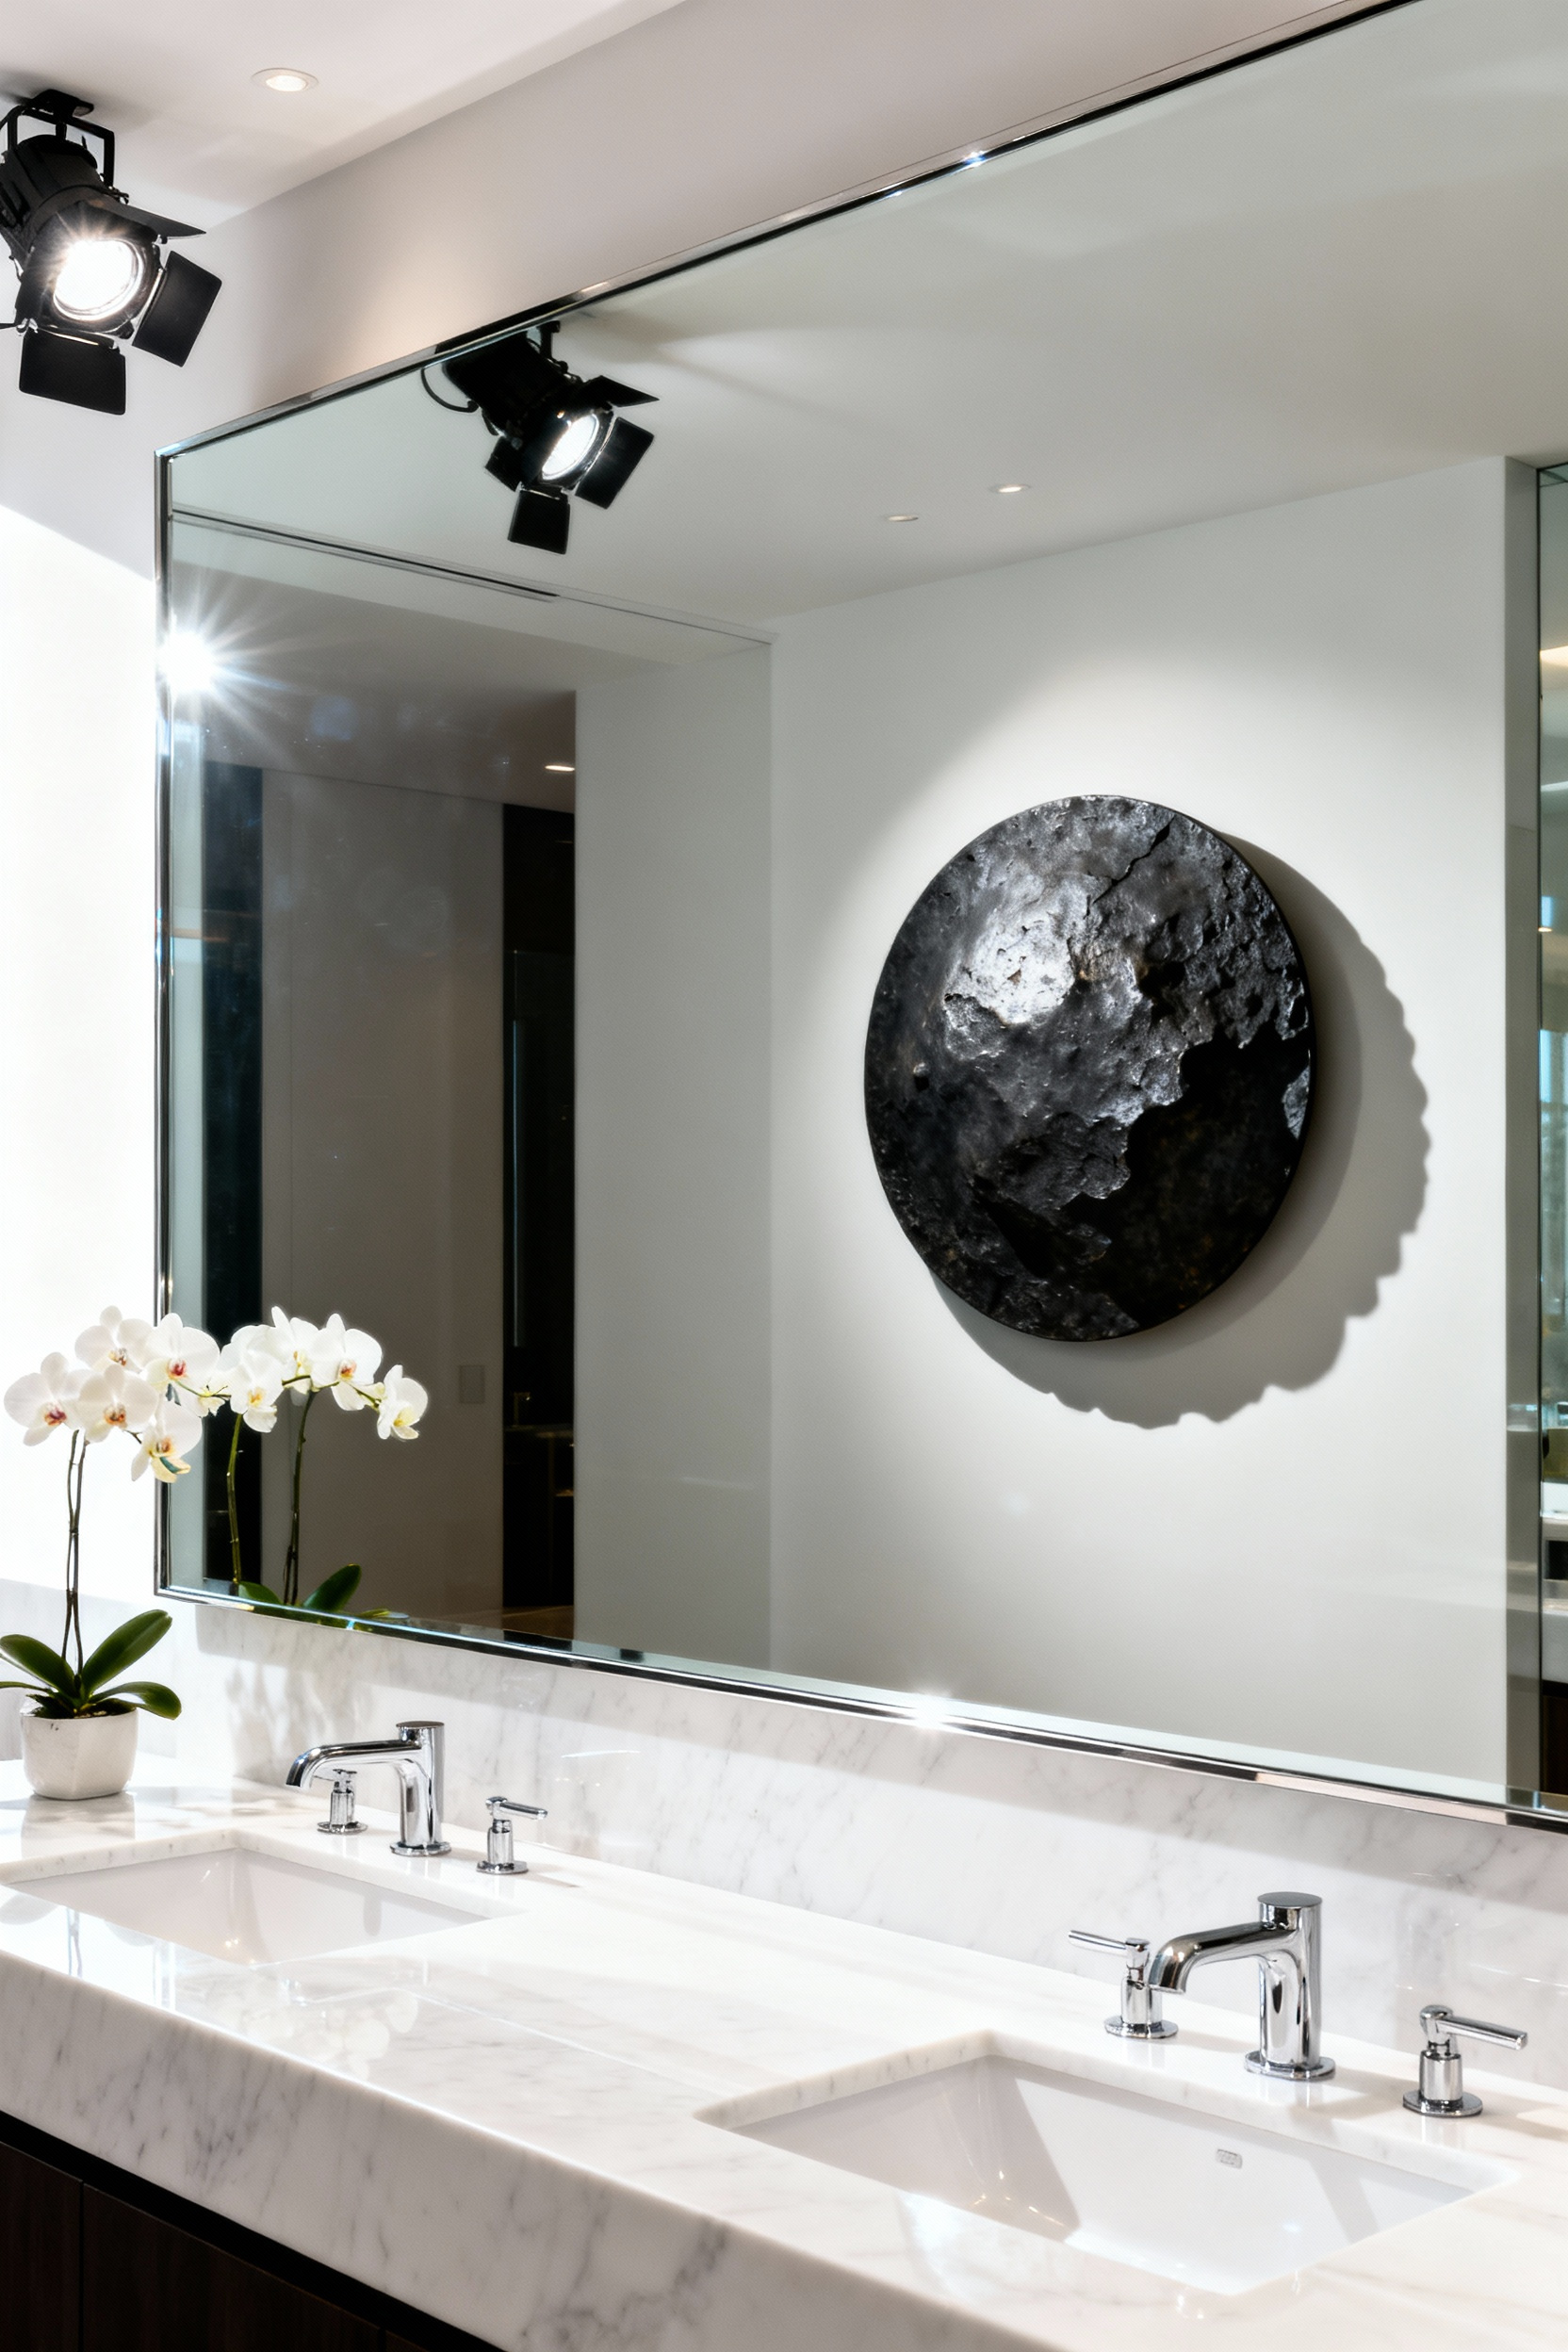
Materials such as metal, glass, acrylic, and resin offer durability and create dynamic visual interest through the interplay of light and shadow. A three-dimensional metal sculpture or relief piece, for instance, utilizes the room’s lighting to add depth that a flat print simply cannot achieve.
For a more integrated approach, consider the walls themselves as the canvas. Ceramic or artist-designed mosaic tiles are inherently waterproof and allow for the creation of custom graphic murals within shower niches or backsplashes. This method seamlessly blends high-design form with essential function.
If a specific flat image is required, High-Definition aluminum metal prints (HDMP) provide a superior solution. By infusing dyes directly into the metal, these prints offer a corrosion-resistant, easy-to-clean surface that maintains a sleek aesthetic without the need for delicate glazing or wood framing.
Finally, extend the design narrative off the walls by introducing freestanding sculptural objects. Placing tactile pieces made from ceramic, glass, stone, or natural elements like found driftwood on floating shelves adds three-dimensional complexity to the room. This layering of materials ensures the space feels curated and luxurious rather than sterile, effectively turning storage areas into opportunities for artistic expression.
Sculptural Reliefs: Integrating three-dimensional ceramic and plaster art for texture
Sculptural reliefs transform flat bathroom surfaces into immersive, tactile experiences. To ensure longevity in high-humidity environments, prioritize moisture-resistant materials over standard gypsum.
Use naturally waterproof compounds like Tadelakt or Venetian plaster for wall-integrated designs, or seal framed art pieces with an acrylic or urethane topcoat to prevent moisture damage. Contemporary applications favor soft, biomorphic forms or bold abstract patterns, allowing the physical texture to serve as the primary aesthetic statement rather than relying on traditional iconography.
True luxury lies in the deliberate use of contrast and illumination. Create a dynamic focal point by embedding smooth, glazed ceramic relief tiles into a matte, finely textured plaster field. This juxtaposition highlights the dimensional differences and finish of each medium.
Finally, position low-angle accent lighting, such as recessed spotlights or vertical sconces, to graze the art. This lighting technique casts shadows across the relief, dramatically emphasizing the contours and revealing the full depth of the installation.
The gilded frame revival: Why ornate, museum-quality framing elevates modern photography
Modern photography creates a striking visual impact when paired with heavy, ornate framing. This design strategy relies on high-low juxtaposition, combining the clean lines or abstract nature of contemporary art with the historic weight of a gilded “museum-quality” frame.
In a bathroom setting, this contrast instantly elevates the room from a utilitarian space to a chic, gallery-like environment. A large gold frame serves as a commanding focal point, adding necessary warmth and glamour, particularly when placed against dark wall colors or rich tile textures.

However, maintaining this opulent look in a humid environment requires specific material choices. Traditional wood frames expand and rot when exposed to steam, so you must opt for moisture-resistant alternatives. High-quality composites or metal frames with ornate finishes, such as gold leaf with bead detailing, offer the desired aesthetic without the risk of warping. Furthermore, always replace standard glass glazing with acrylic. Acrylic withstands temperature fluctuations, prevents moisture buildup inside the frame, and eliminates the safety hazard of shattered glass on a tiled floor.
To fully protect your investment, the artwork itself must be as durable as the frame. Paper-based prints absorb moisture and inevitably succumb to mold. Instead, choose modern photography printed on substrates designed for resilience:
- Metal Prints: These provide a sleek surface that is inherently waterproof and rust-proof.
- Sealed Canvas: A treated canvas resists humidity and maintains its structure without warping.
- Acrylic Face Mounting: This seals the print between layers of acrylic, making it impervious to steam.
Textile under glass: Preserving and displaying vintage silk scarves or tapestries in humid zones
Bringing the lush textures of vintage silk scarves or tapestries into a bathroom adds undeniable luxury, but high humidity poses a significant threat to delicate fibers. To mitigate this risk, prioritize displaying these pieces in a powder room or guest bathroom rather than a primary bath.
These spaces generally experience less steam and temperature fluctuation. Regardless of the specific location, ensure the room has excellent ventilation through a functional exhaust fan and position the artwork well away from direct splash zones to minimize moisture exposure.

Professional conservation framing determines the longevity of the piece. Avoid standard off-the-shelf frames completely. You must commission a professionally sealed package that includes a moisture barrier backing to block ambient dampness from penetrating the enclosure.
Inside the frame, use only acid-free archival components. Most importantly, require the installation of spacers or a thick mat. This creates a critical 3/8-inch air gap between the textile and the glazing, preventing condensation from contacting the fabric and causing irreversible mold damage or tide lines.
Select materials designed to withstand the environment and protect the art. Opt for UV-filtering acrylic (Plexiglas) instead of traditional glass. Acrylic is lighter, shatter-resistant, and shields the vibrant dyes of silk and wool from fading under artificial or natural light. Finally, secure the frame using rust-resistant hardware. By adhering to these strict preservation standards, you can safely introduce the opulent patterns of vintage textiles into your bathroom design without sacrificing their condition.
Functional Sculpture: When artisanal lighting fixtures double as primary art pieces
Transform the bathroom environment by treating lighting fixtures as functional sculpture rather than mere utility. Select handcrafted pieces composed of high-end materials like alabaster, natural onyx, kiln-fired ceramic, or hand-blown glass.
These materials inherently display unique character through natural veining, texture, and asymmetric shapes. When you prioritize these *artisanal* elements, the fixture transcends its role as a light source and reads as a primary art piece, adding a layer of opulent texture to the room.

Elevate the vanity area by replacing conventional light bars with sculptural wall sconces or asymmetrical hanging pendants. Flank the mirror with these statement pieces at eye level to create a vertical gallery effect. For the best visual impact, choose designs that diffuse light through forms like glowing orbs or ceramic half-spheres. This placement provides flattering, shadow-free illumination while allowing the fixture to serve as a striking decorative accent.
Successful design requires a layered lighting strategy to balance high-concept aesthetics with daily needs. While the artisanal fixture functions as your “Illuminated Art,” you must pair it with discreet, powerful task lighting. Integrate backlit mirrors or hidden LED cove lighting to handle practical grooming tasks effectively. This combination ensures the space remains functional for daily routines while preserving the ambiance of a curated, luxurious sanctuary.
Phase III: The Curated Chaos (Layout & Composition)
True maximalism requires a foundational structure to prevent visual clutter. Begin by analyzing the geometry of the wall space. A harmonious look echoes the shape of the area you are decorating; for example, use a horizontal arrangement to match the width above a towel bar.
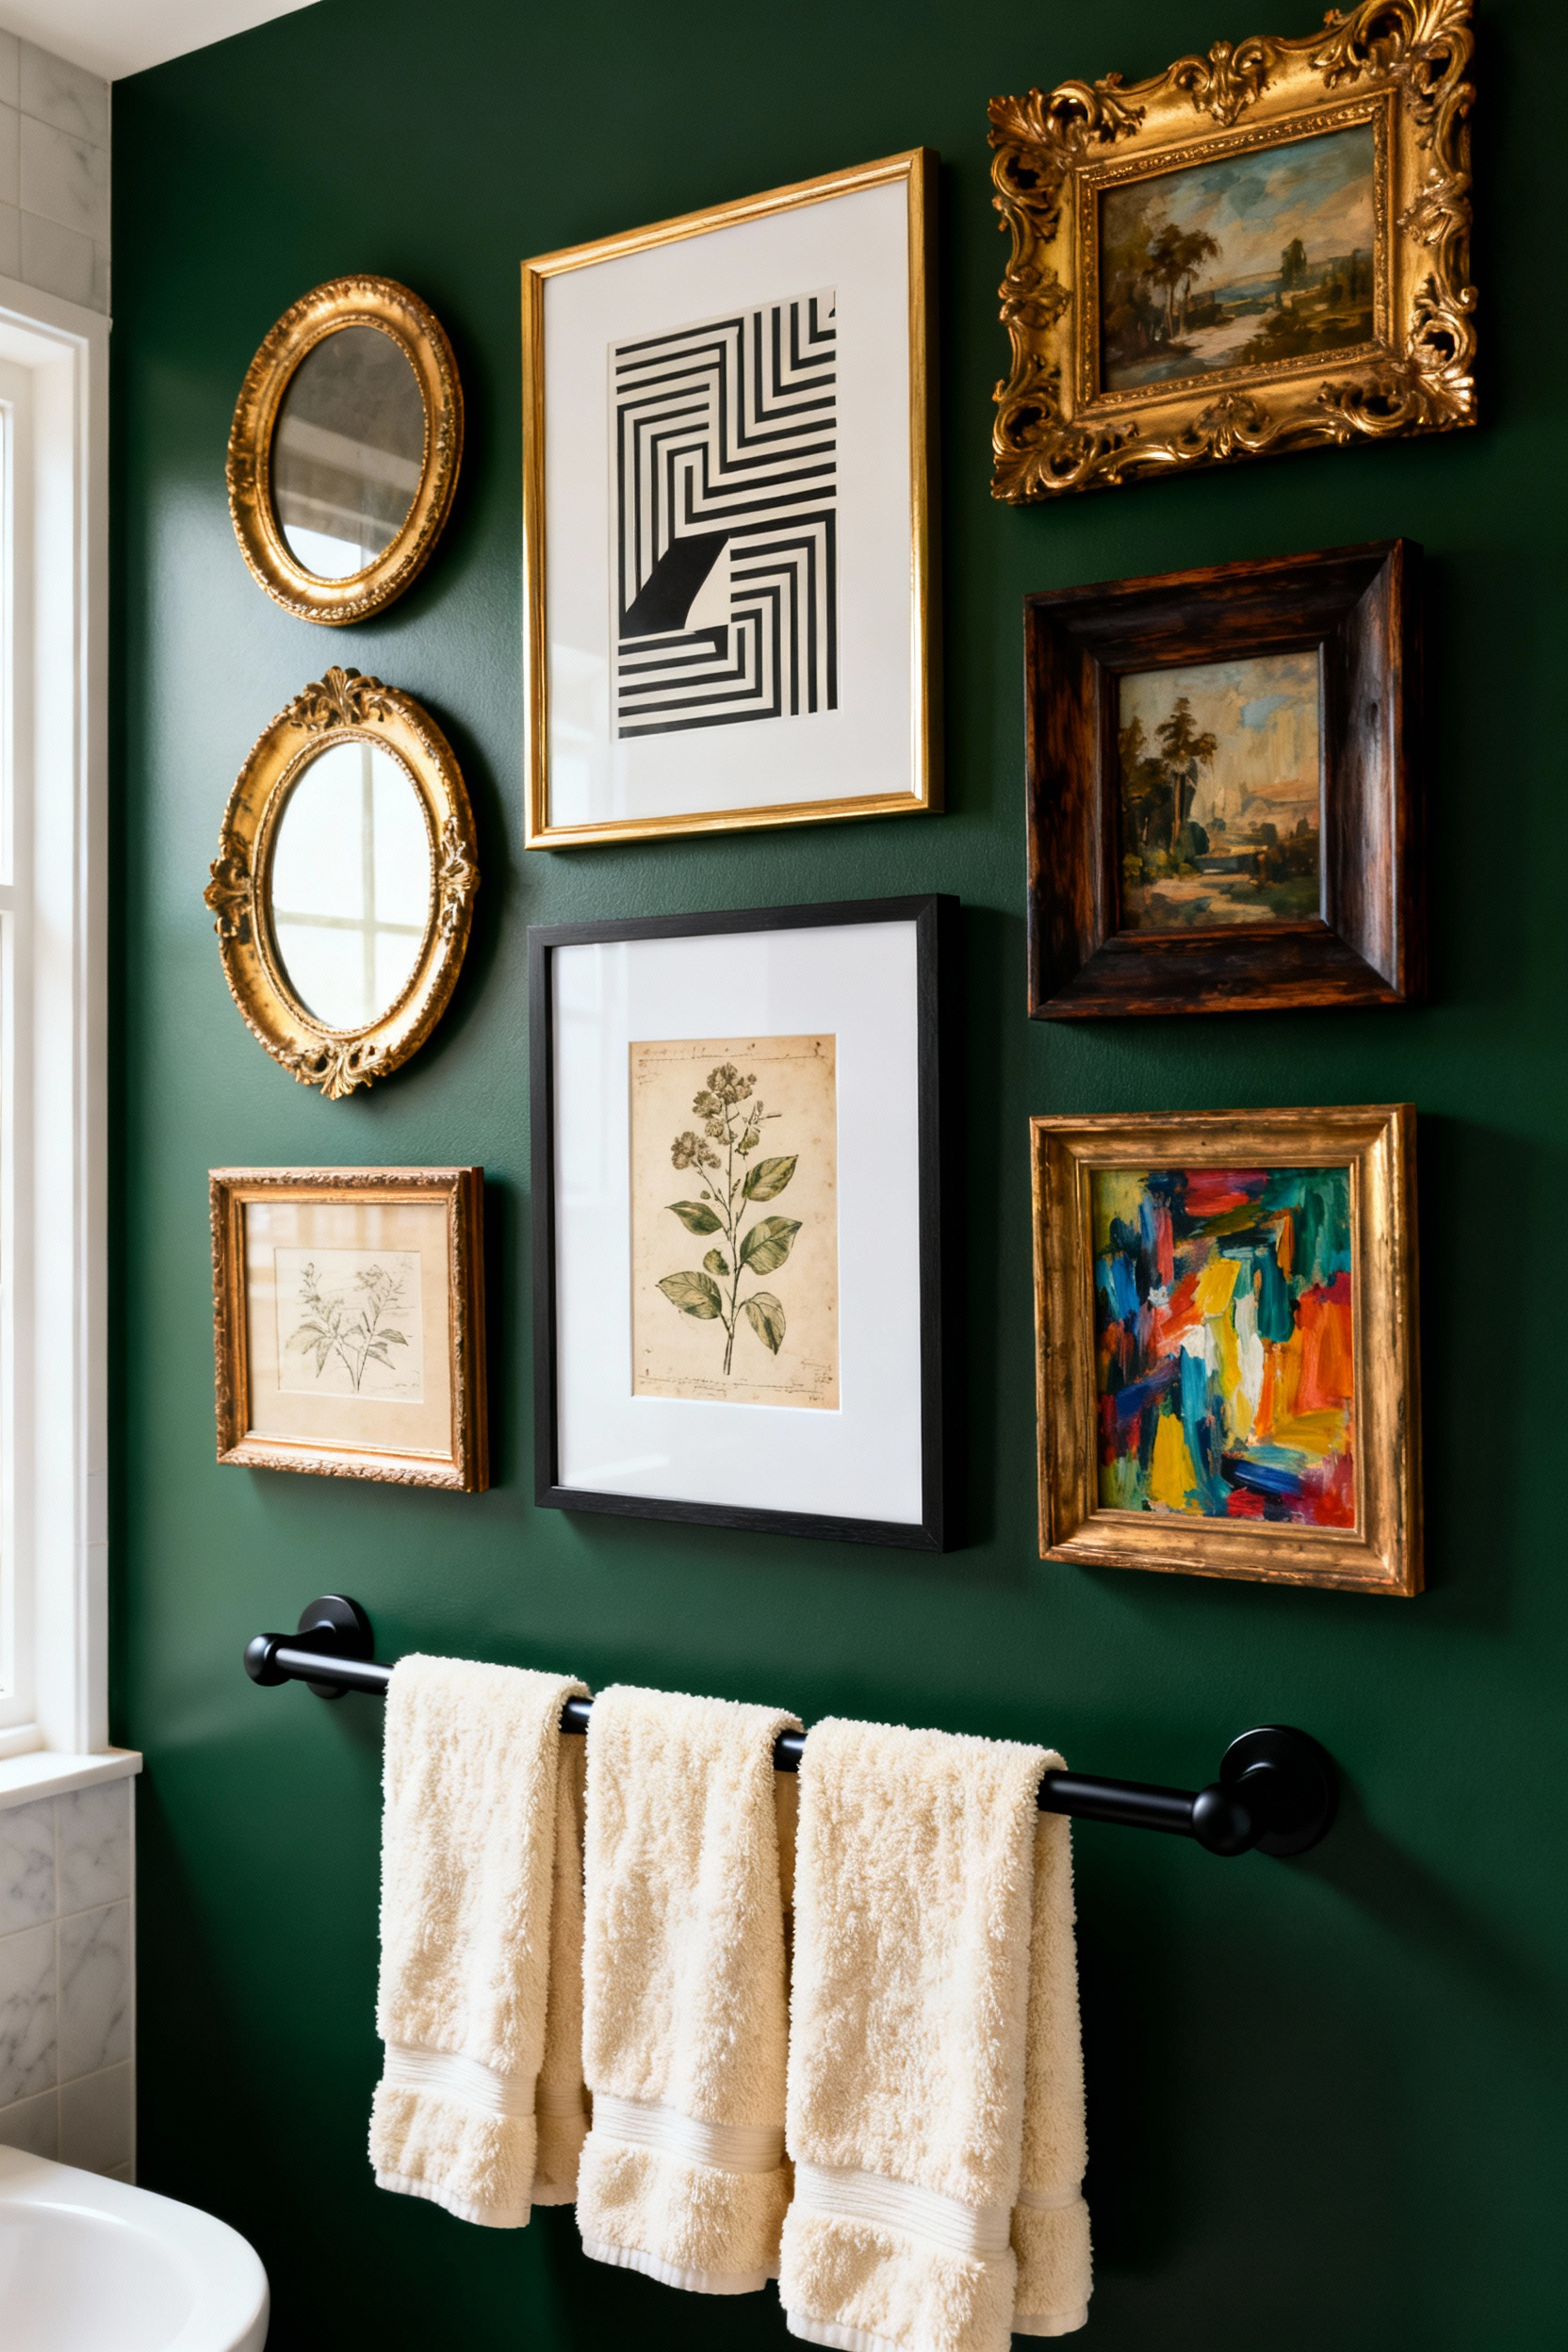
Once you determine the orientation, embrace a salon-style gallery wall to establish a focal point. Mix artwork of differing sizes, shapes, and frame styles in a non-linear layout. This approach layers the visual experience, creating a dynamic, collected atmosphere that feels sophisticated rather than accidental.
In smaller or narrower zones, such as the space above a toilet, manipulate perspective by stacking art vertically. Placing two smaller prints one above the other draws the eye upward, making the ceiling feel higher and the area feel intentionally styled.
To fully embrace a luxurious, textured aesthetic, break the flat plane of the wall by integrating 3D elements. Incorporate floating shelves amidst your framed pieces to display sculptural objects, candles, or potted plants. This blend of traditional art and dimensional decor adds depth and cements the “curated” feel of the composition.
The Floor-to-Ceiling Gallery: Breaking the rules of negative space for maximum impact
Transforming a compact bathroom into an immersive jewel box requires abandoning the traditional safety of negative space. By extending artwork across the entire vertical plane, you eliminate empty voids and distract the eye from the room’s modest dimensions.
This maximalist strategy creates depth and makes the space feel intimate rather than claustrophobic. Avoid rigid grids in favor of a free-form layout that mixes print subjects, sizes, and eclectic frames. This layered approach emphasizes a personal, collected narrative over a sterile, coordinated look.
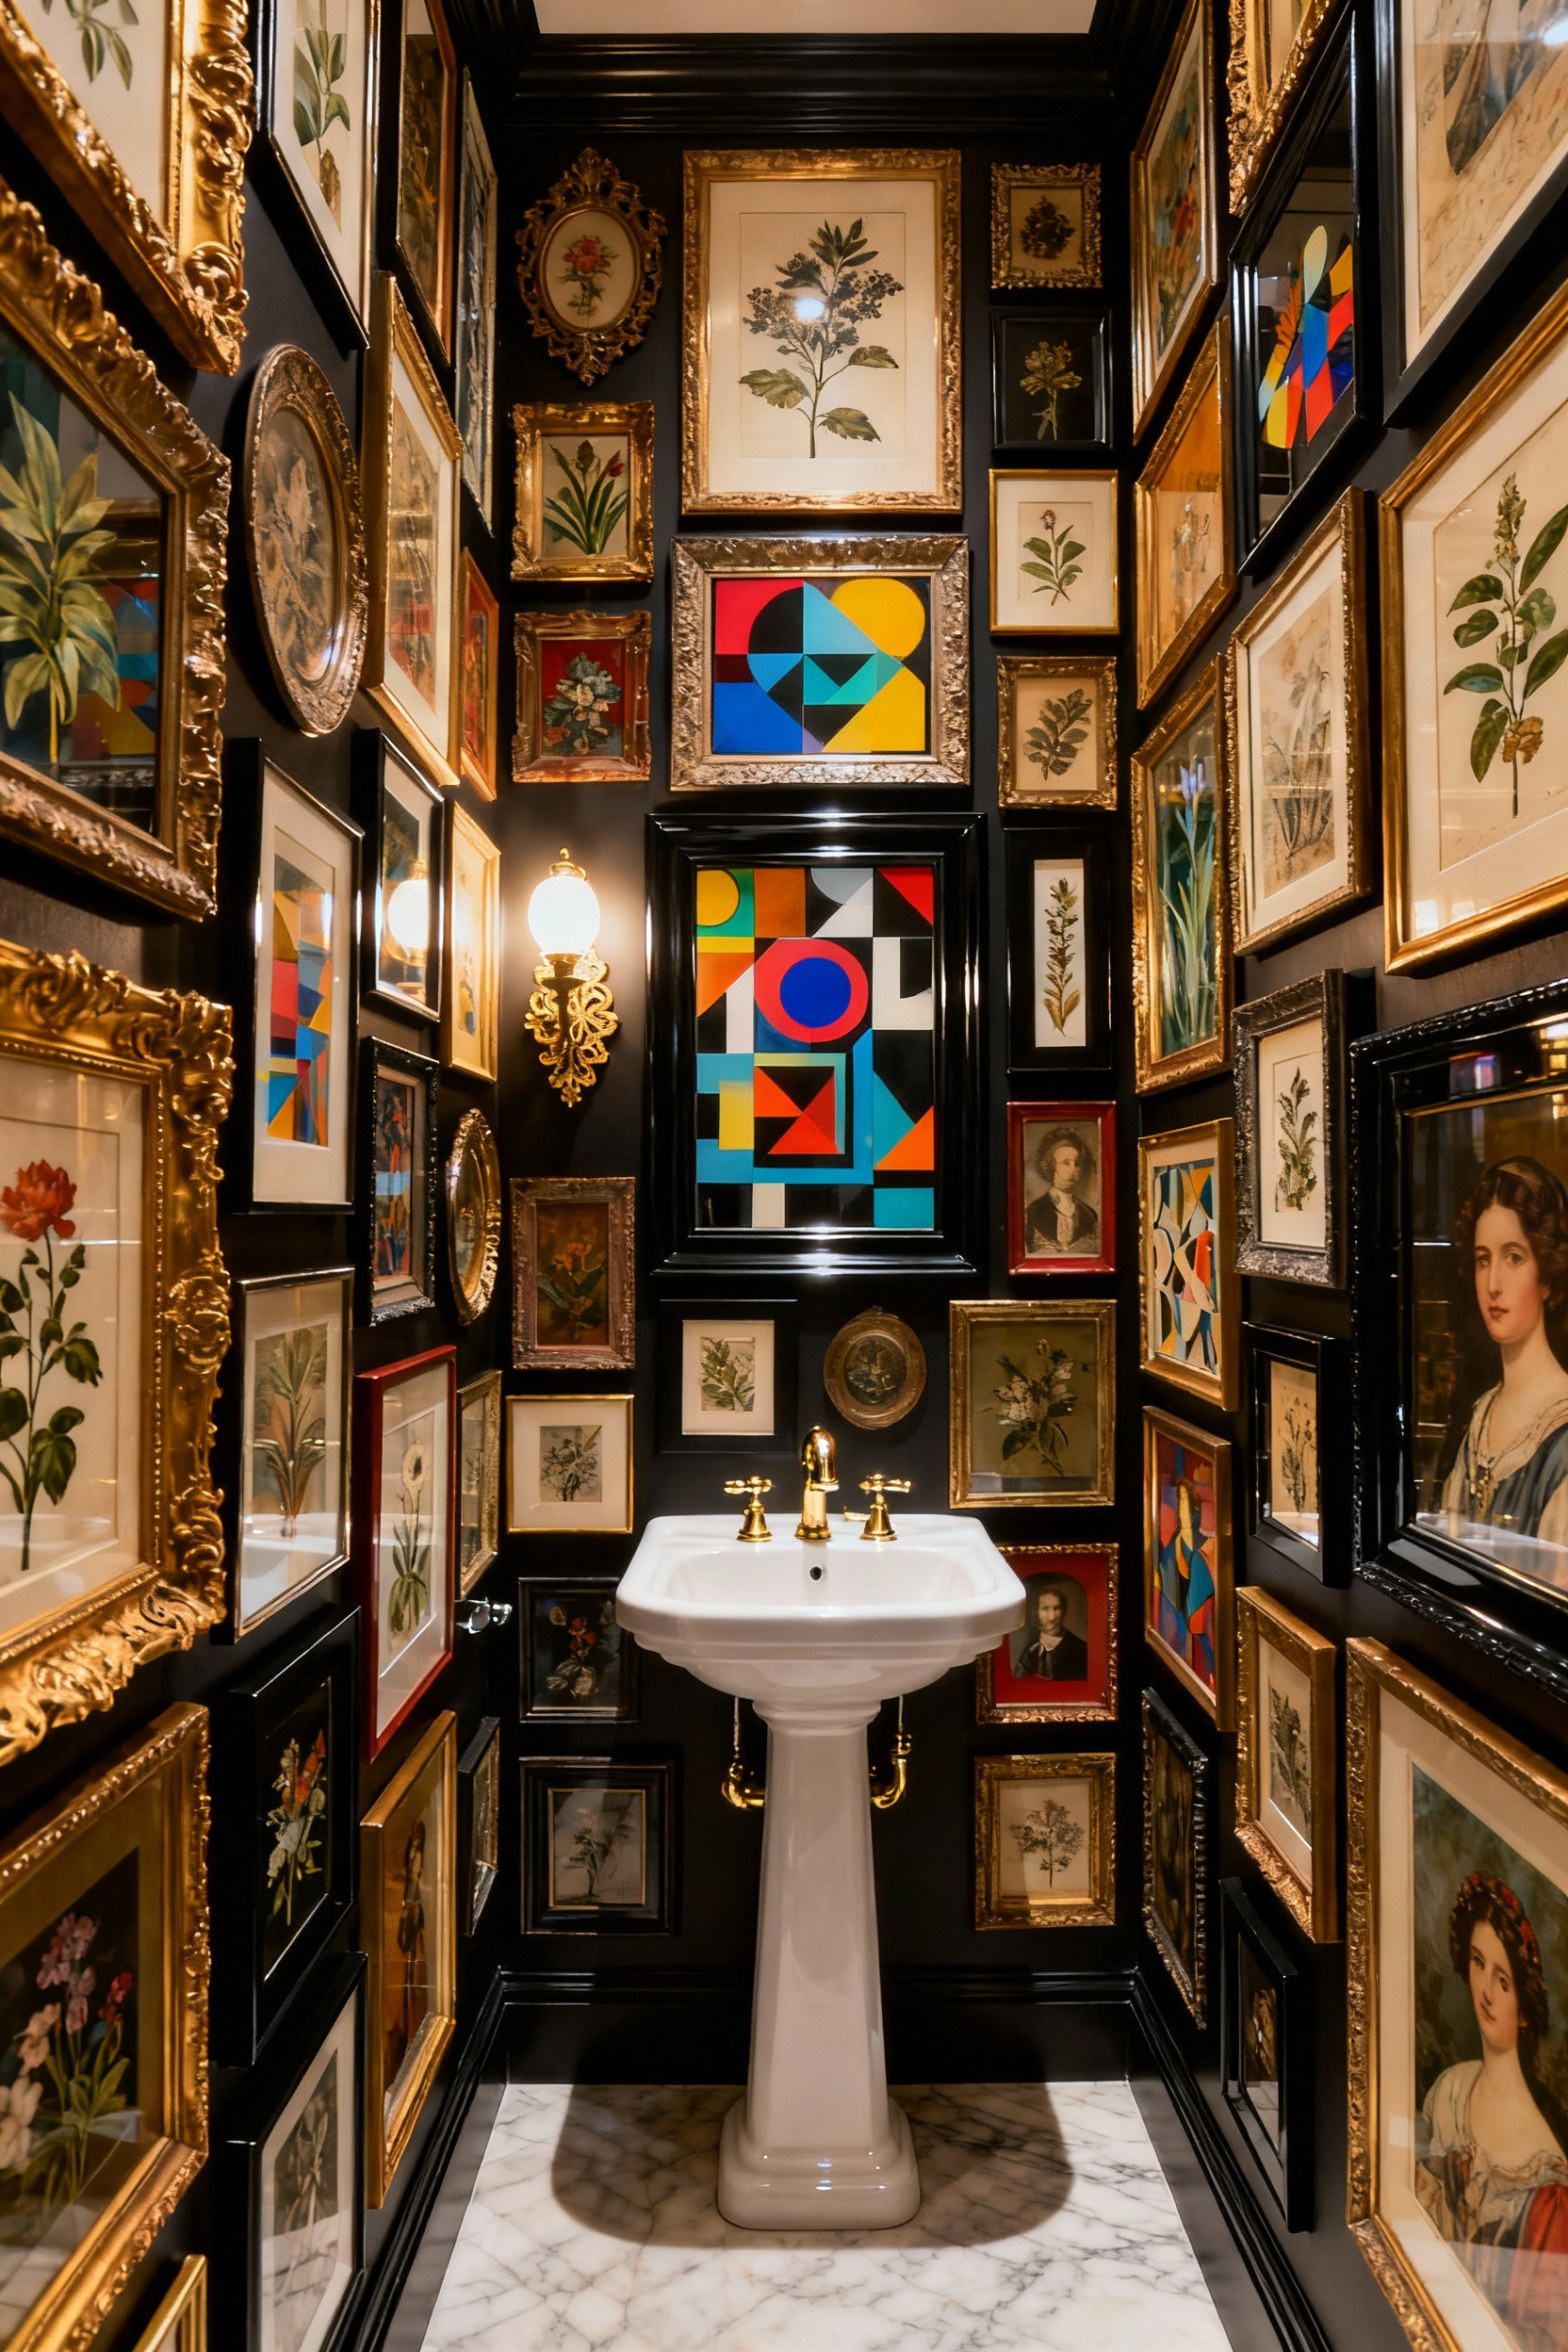
To achieve true floor-to-ceiling impact, utilize the often-ignored space immediately above the baseboard. Place larger pieces or secondary prints in this low zone to anchor the arrangement and draw the eye downward. While the layout remains organic, maintain visual cohesion by introducing a single unifying element. Select a consistent frame finish, such as matte black or gold, or ensure the artwork shares a subtle color palette. This connects the disparate pieces and prevents the high-volume display from becoming visually overwhelming.
Functionality must accompany this aesthetic density in high-moisture environments. Standard canvas and paper warp easily in bathrooms, so prioritize durable materials like metal, acrylic, treated wood, or ceramic. If you choose framed paper prints, ensure the room possesses excellent ventilation to mitigate damage. Consider using non-glare, non-glass coverings to prevent trapped condensation and preserve the integrity of the collection.
The ‘Lean’ Technique: Layering art on vanity backsplashes and floating shelves for depth
The “Lean” technique transforms a standard vanity backsplash or floating shelf into an effortless, multi-dimensional display. To begin, place your largest framed art piece or mirror directly against the wall. This primary “leaner” acts as an anchor for the arrangement.
Once positioned, layer smaller decorative objects—such as candles, ribbed ceramics, or sculptural vessels—directly in front of the frame. This physical layering builds immediate visual depth, effectively breaking up flat wall space and adding a sense of luxury to the bathroom.
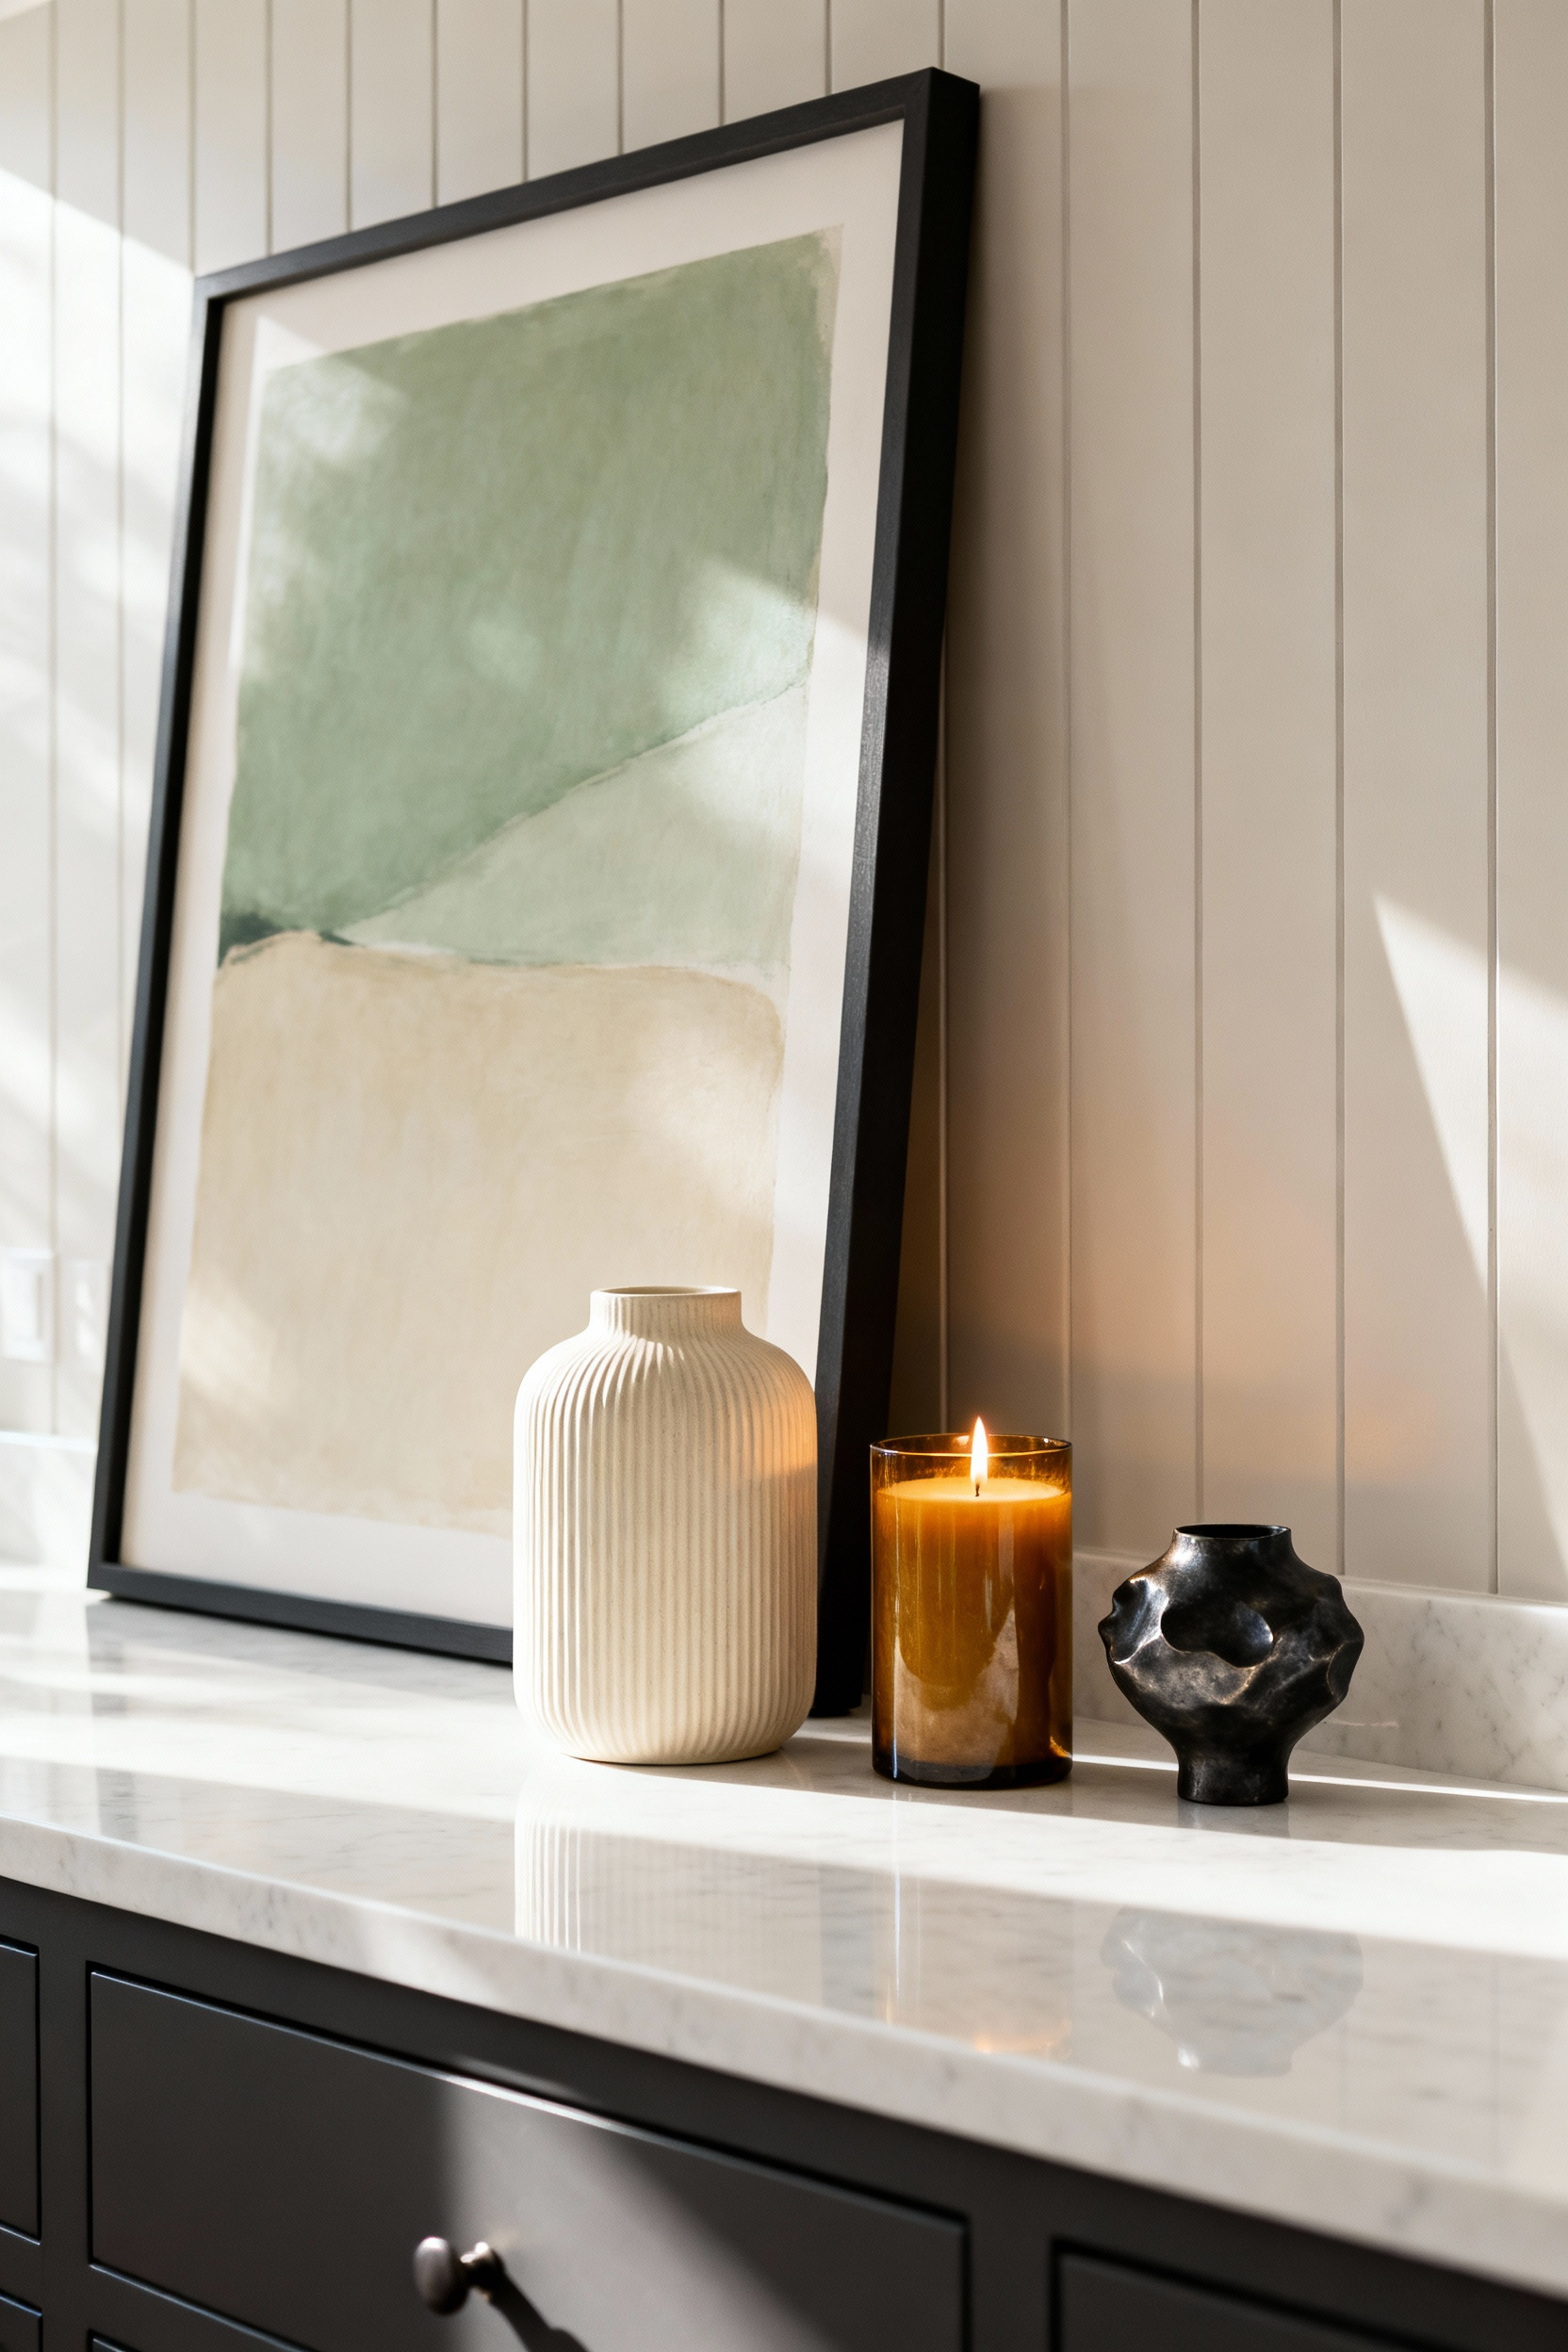
For a professionally styled look, apply the Rule of Odds and vary the scale of your accessories. Group your layered items in odd numbers, such as distinct clusters of three. Ensure these pieces feature a variety of heights and widths to draw the eye up and down the vignette. This dynamic approach prevents the display from looking static or one-dimensional. By intentionally mixing sizes and textures, you create a curated scene that feels abundant and personality-rich rather than cluttered.
Finally, ground the aesthetic by integrating functional pieces into the design. Mix your decorative art and signs with bathroom essentials stored in stylish containers. For example, place glass canisters filled with cotton balls or a stack of rolled towels alongside your framed art. This strategy keeps the look intentional and ensures the space remains usable. Blending artistic elements with daily necessities prevents the arrangement from seeming haphazard and maximizes the utility of your surfaces.
Mirror-on-Mirror Layering: Mounting small art pieces directly onto large vanity mirrors
Transform a standard vanity into a multidimensional focal point by layering art directly onto the glass. This technique breaks the visual monotony of a large mirror and adds an unexpected layer of luxury.
To maximize the effect, create a high-contrast pairing. Mount a round, textured piece against a sleek, rectangular surface, or place a dark, metallic frame against a frameless background. This approach turns a utilitarian fixture into a dynamic canvas.
Proper installation is essential to prevent damage to the underlying mirror. Avoid traditional glues or solvents, as they chemically react with the silver backing and cause unsightly “delamination” or black spots. Instead, secure permanent installations with a non-solvent-based adhesive like mirror mastic or silicone. For lightweight pieces or rental properties, high-quality, double-sided mounting tape offers a secure hold without permanent commitment. Always verify the tape’s weight rating and humidity resistance before application.
Functionality and durability remain paramount in a wet environment. Since bathrooms generate significant moisture, choose art made from humidity-proof materials like metal, acrylic, or sealed canvas to prevent warping and rust. Furthermore, strategic placement is key. Position the artwork off-center or in a lower corner. This adds decorative flair without obstructing the main viewing area required for daily grooming.
Era Collision: The sophistication of mixing Renaissance reproductions with bold Pop Art
The “Era Collision” aesthetic thrives on witty cultural commentary, making it an exceptionally engaging choice for the intimate setting of a bathroom. This style often centers on the “altered masterpiece” trend, where Renaissance figures are disrupted by Pop Art elements like graffiti, neon accents, or anachronistic objects such as modern toiletries.
This juxtaposition transforms a traditional portrait into an ironic focal point, instantly injecting personality and humor into a utilitarian space. By merging historical grandeur with modern irreverence, you create a bathroom environment that feels both luxurious and self-aware.
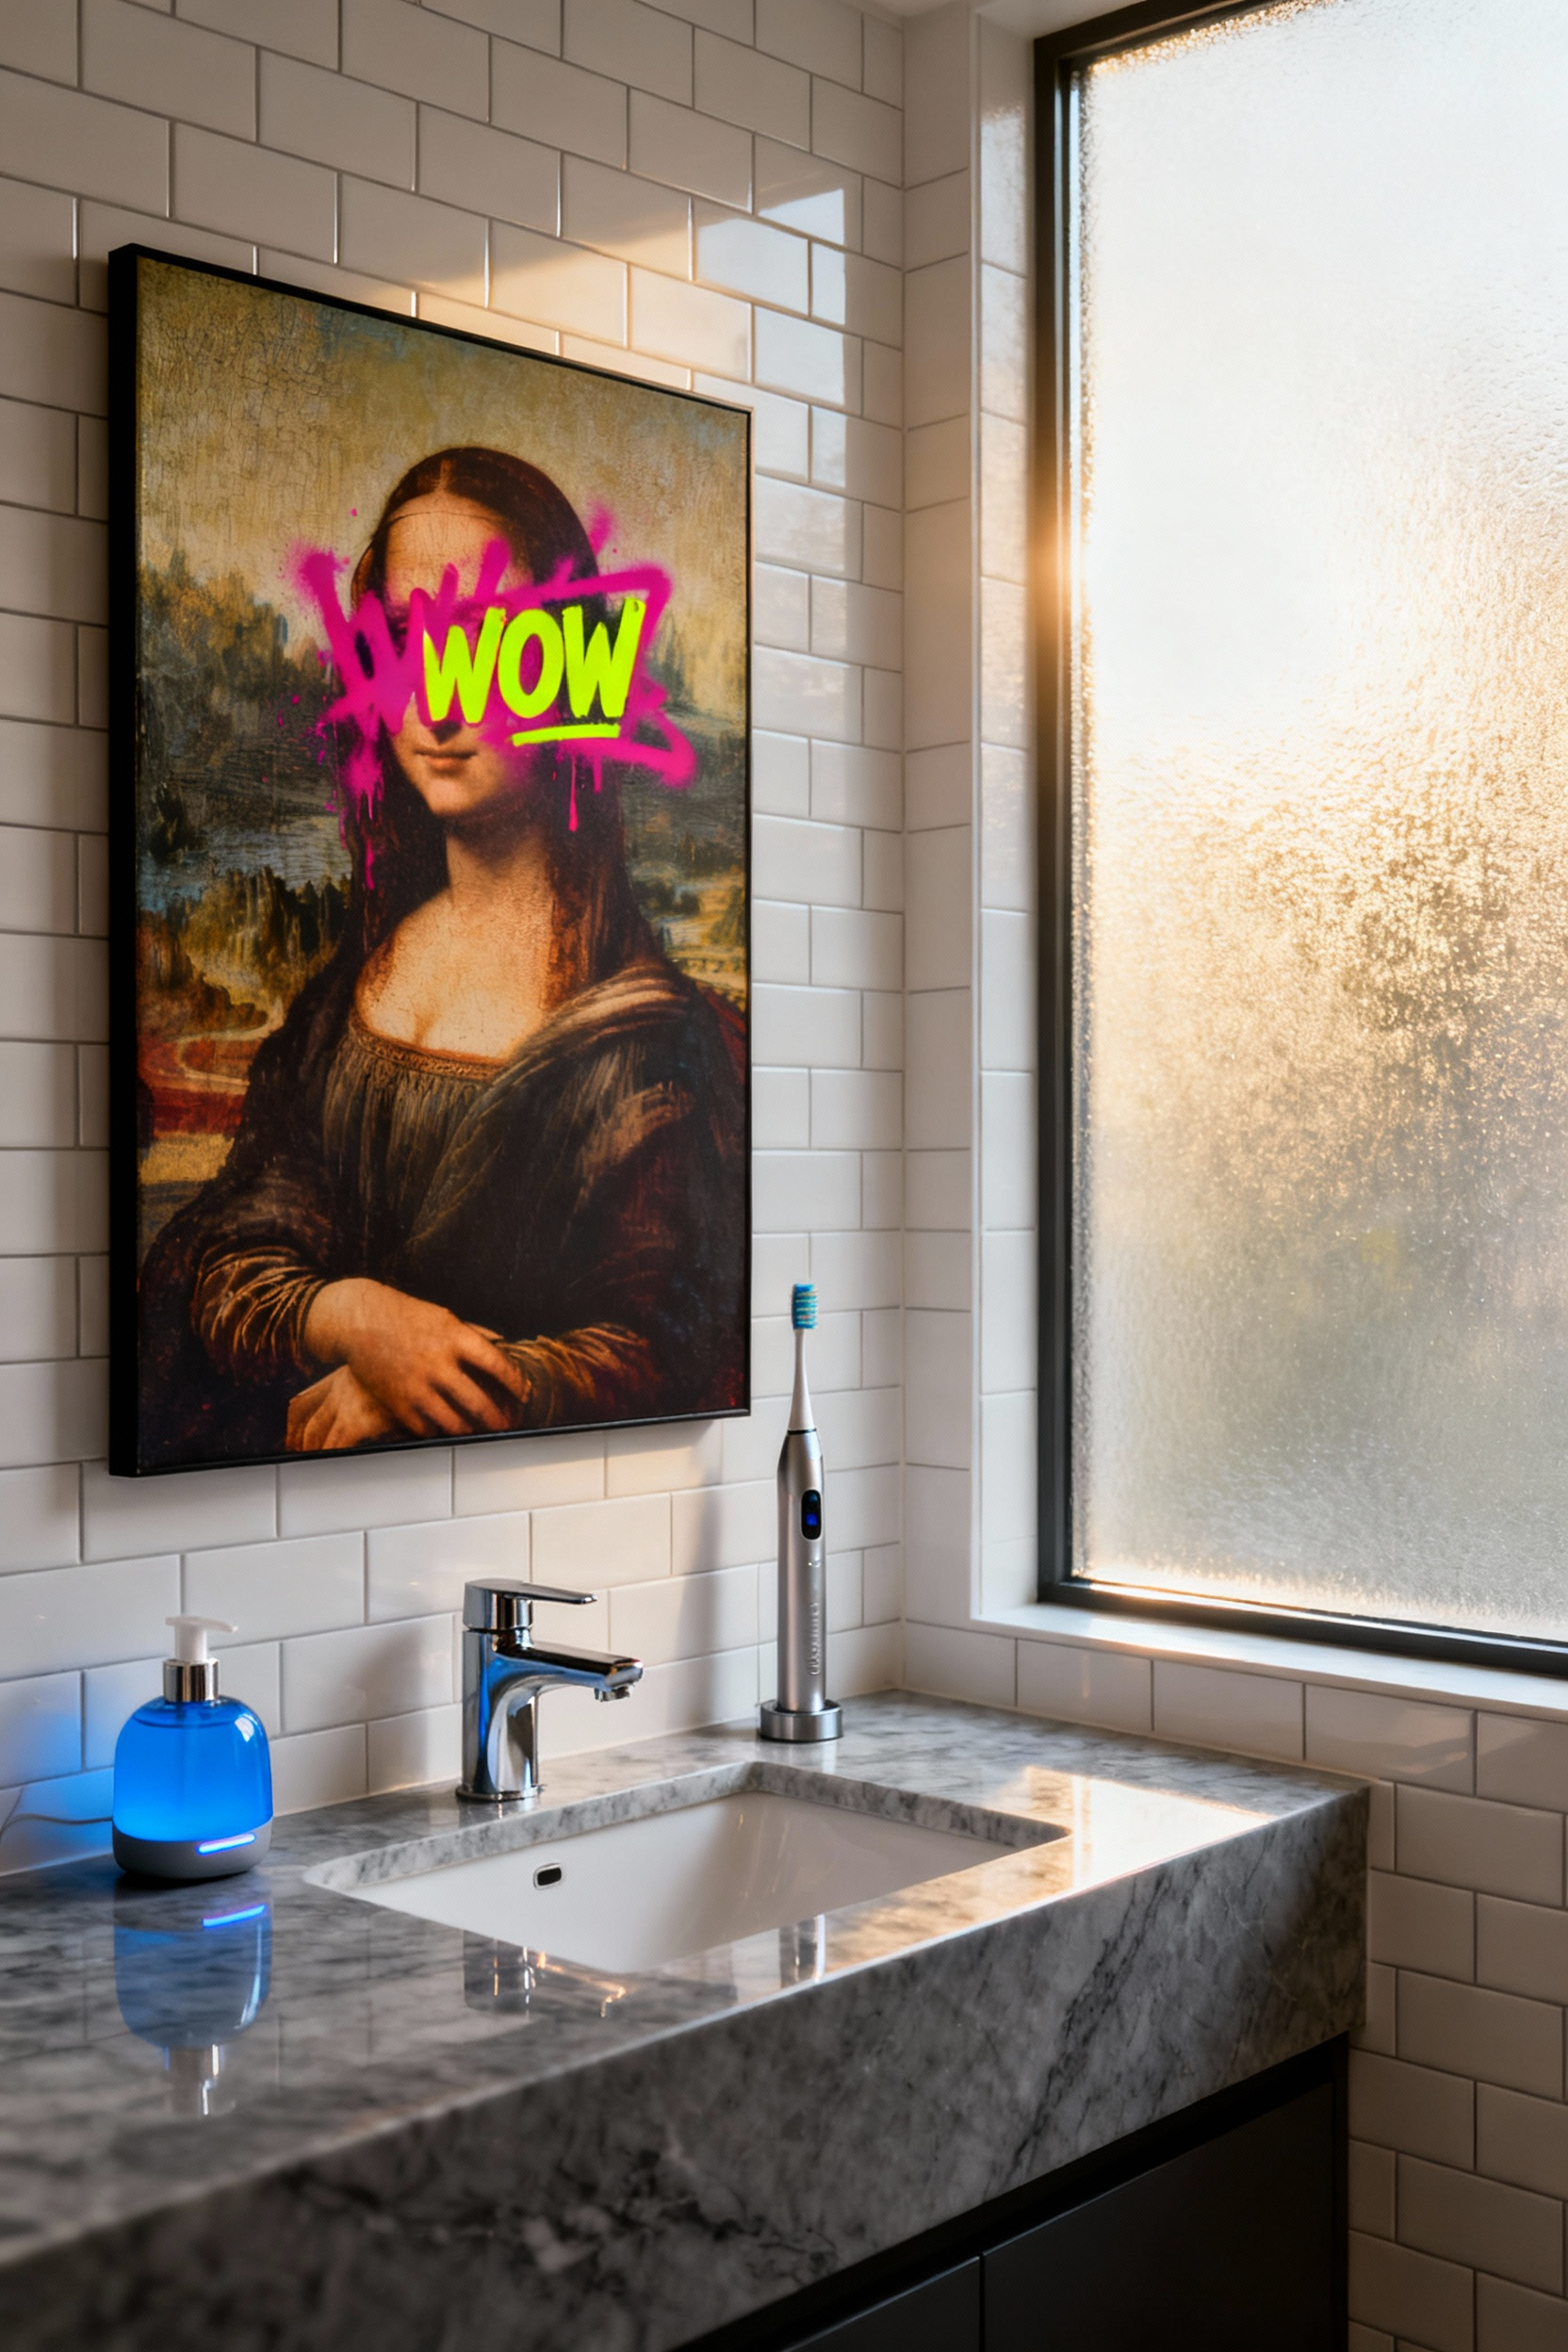
To execute this bold mix without creating visual chaos, you must establish a sense of intentionality through color and framing. Create a visual bridge by selecting Pop Art pieces that capture a dominant hue from your classical reproduction, such as a shared touch of gold or a deep earthy tone.
Additionally, use consistent framing to unify the disparate styles. Housing a graphic, modern print and a classical oil reproduction in identical frames—whether sleek black or ornate gold—ensures the diverse collection reads as a curated gallery rather than a random assortment.
Proper scale is the final component in mastering this look, particularly in smaller bathroom footprints. Rather than cluttering walls with many small pieces, anchor the room with one large-scale canvas of an altered figure to dominate the space. Keep vanity items and towels minimalist to let this art shine. For those willing to embrace maximum impact in a confined area, a powder room offers the perfect opportunity to install graphic wallpaper featuring a repeating altered motif. This allows the design to envelop the viewer completely without overwhelming the serenity required in a larger master bath.
Phase IV: Unconventional Placement & Protection
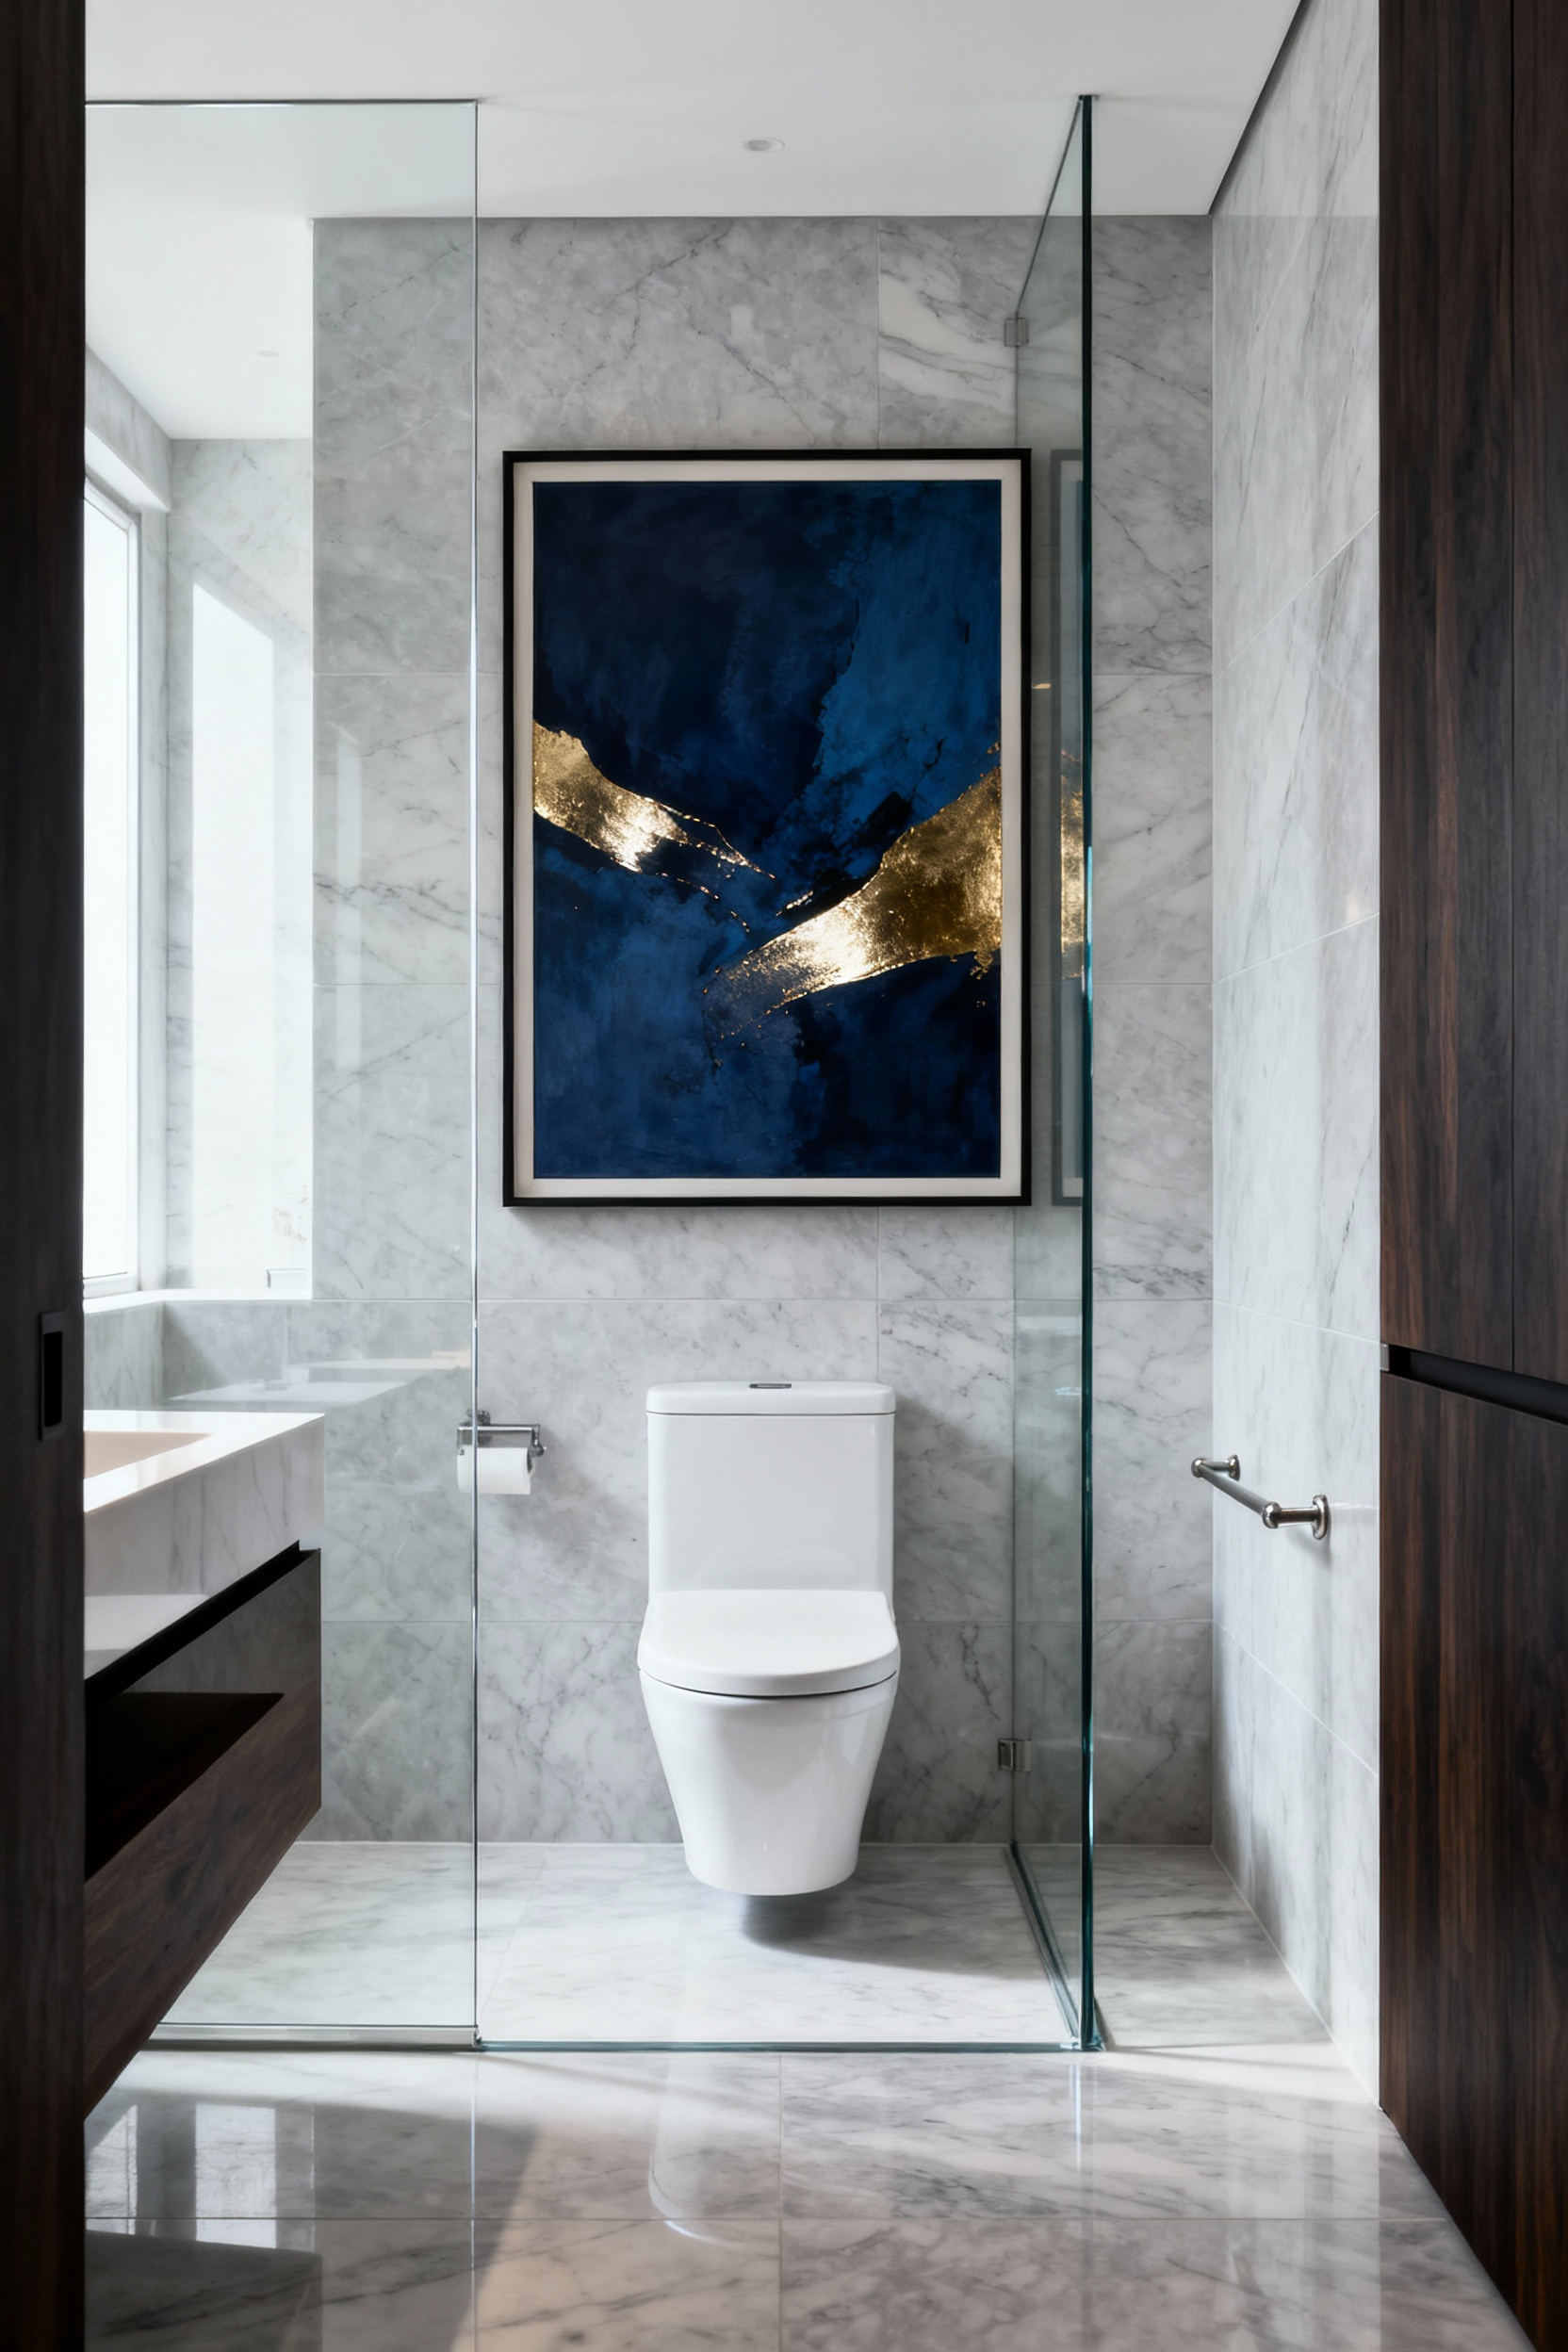
Protecting art in a bathroom begins with strategic placement to minimize direct water exposure. Identify “dry” zones for installation, such as the space above the toilet, the wall opposite the vanity mirror, or the area above a towel rack. These locations significantly reduce the risk of damage from splashes and condensation.
To further control the environment, consistently operate an exhaust fan or open a window during and after use. This lowers ambient humidity, preventing the warping and mold growth that often threaten delicate pieces.
For the artwork itself, select durable, non-porous materials engineered for high-humidity environments. Metal prints on aluminum or acrylic prints face-mounted to plexiglass serve as the gold standard because they withstand moisture without fading or absorbing water.
If you prefer traditional framing, avoid wood, which expands and contracts with temperature fluctuations. Instead, use metal or high-quality plastic frames and replace standard glass with acrylic glazing. For valuable paper art, employ professional encapsulation to create a complete moisture barrier.
You can also bypass moisture risks entirely by expanding your definition of art to include naturally water-resistant objects. This approach allows you to introduce texture and luxury without maintenance concerns. Consider these durable alternatives:
- Decorative Ceramics: Arrange ceramic plates or tiles to create a striking gallery wall.
- Sculptural Elements: Install three-dimensional objects made of glass or treated metal.
- Architectural Features: Use patterned tile murals to establish a permanent, waterproof focal point.
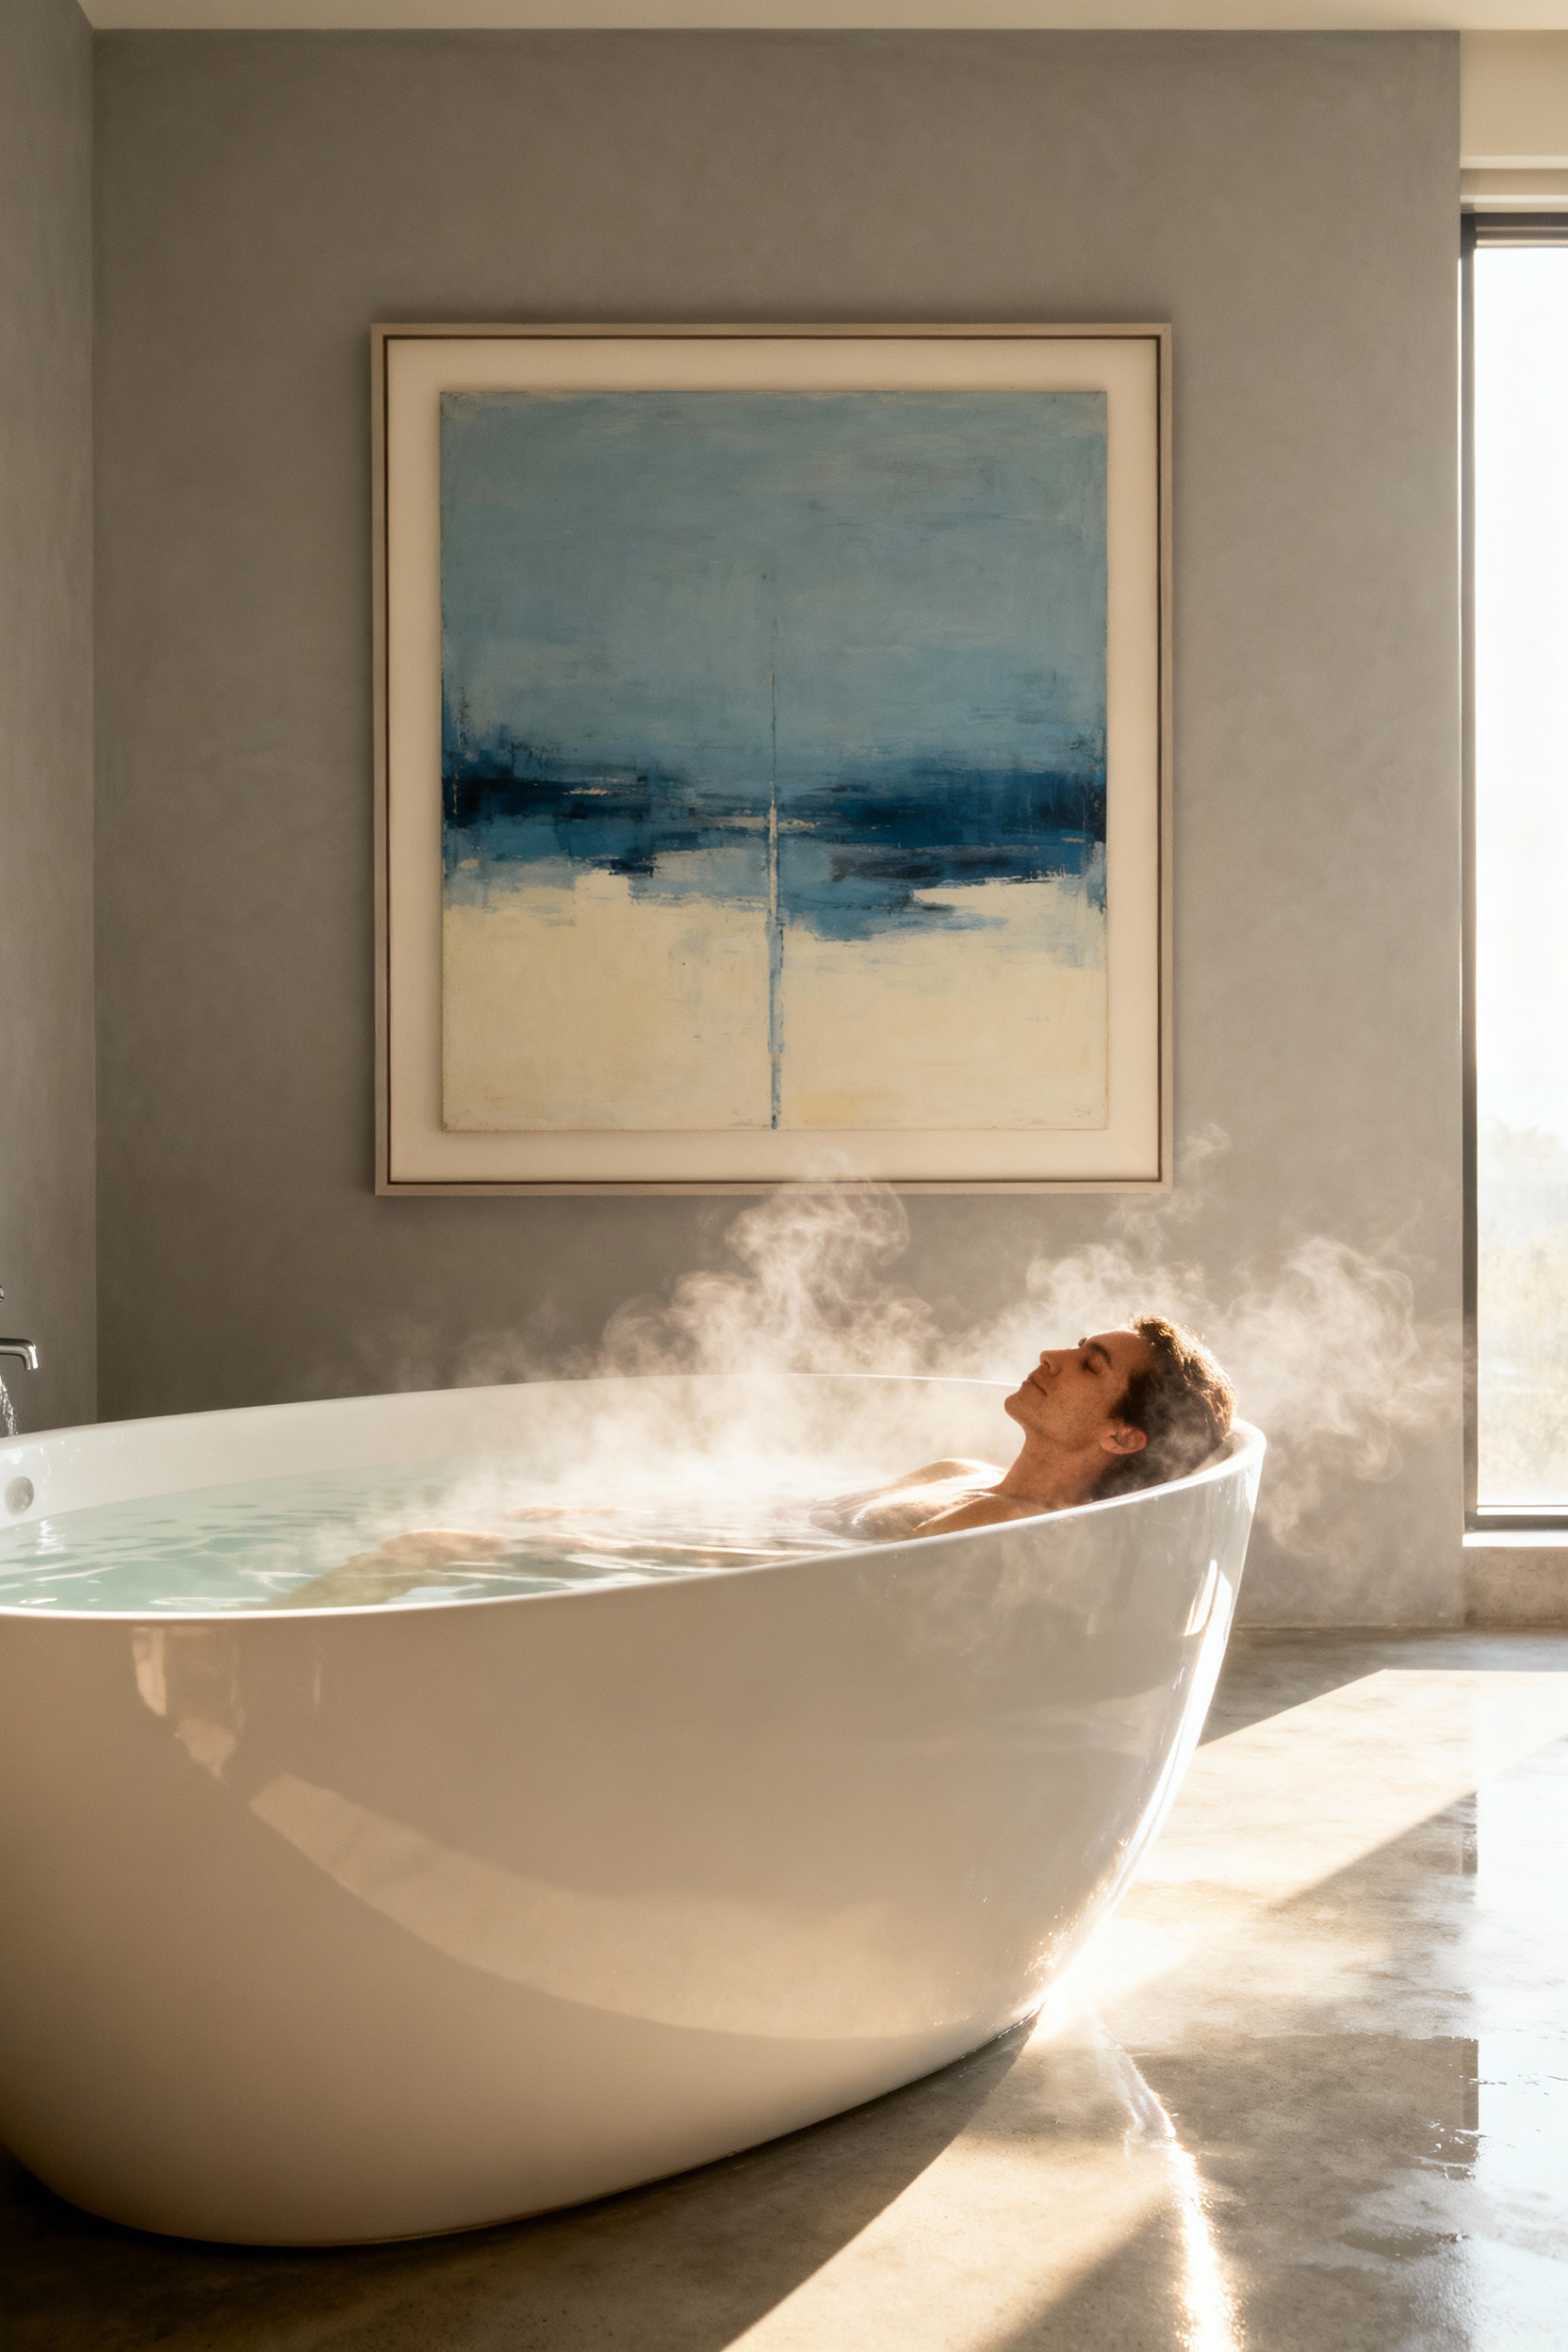
The Bathtub Eye-Level: Hanging art low to cultivate a contemplative soaking experience
Traditional gallery rules dictate hanging artwork at a standing eye level, typically 60 to 66 inches from the floor. However, this convention fails the bather.
To cultivate a truly contemplative soaking experience, you must lower the sightline. Position the center of the artwork significantly lower than standard height so it aligns directly with your gaze while reclining. This intentional placement creates an intimate focal point and prevents neck strain, allowing the viewer to fully engage with the piece during a soak.
Bathroom environments present unique challenges regarding moisture and installation. Prioritize humidity-proof materials to protect your investment from rising steam and accidental splashing. Metal prints, acrylic art, or framed pieces with sealed backs and plexiglass offer necessary durability without sacrificing style.
For a flexible, non-permanent approach, consider leaning framed pieces on a bathtub ledge or a floating shelf installed just above the rim. This method allows for easy rotation of art and eliminates the need to drill into tiled surfaces.
Visual balance and subject matter are critical for finalizing the mood. Select calming themes, such as landscapes, nature-inspired prints, or abstract works in soothing colors, to enhance a meditative state. Furthermore, ensure the artwork scales appropriately to the fixture. A single statement piece or a curated gallery grouping should span approximately two-thirds of the bathtub’s width. This proportion anchors the vignette and ensures the arrangement feels deliberate rather than an afterthought.
The Moisture Myth: Expert strategies for hermetic sealing and acrylic glazing to protect investments
One of the most persistent misconceptions in art preservation is the necessity of a “hermetic” or airtight seal. While it seems logical to block out humidity entirely, this approach often endangers the artwork.
Art materials need to breathe; a completely impermeable seal traps microscopic amounts of moisture inside the frame. With no escape route, this trapped air leads to condensation, warping, and eventual mold growth. Effective protection relies on controlled barriers rather than total isolation.
To safeguard your investment, prioritize material science and proper spacing mechanics. Replace standard glass with high-quality acrylic glazing, such as Plexiglas. Acrylic acts as a superior thermal insulator, which significantly reduces the likelihood of condensation forming on the surface.
Furthermore, you must utilize acid-free matting to create an essential air gap between the artwork and the acrylic. This cushion prevents the piece from adhering to the glazing and allows for safe air circulation. Ensure your framer uses moisture-resistant materials, such as aluminum or treated wood, paired with a professional moisture-barrier backing.
Ultimately, the integrity of the frame is secondary to environmental management. The most robust defense against humidity damage is consistent climate control. Always run an exhaust fan for 30 to 60 minutes after a shower to forcibly remove moisture from the room. If a specific piece is exceptionally valuable or delicate, avoid placing it in high-humidity zones entirely. Instead, opt for inherently non-porous alternatives, such as direct-to-acrylic or metal prints, which offer the visual impact of fine art without the vulnerability to moisture.
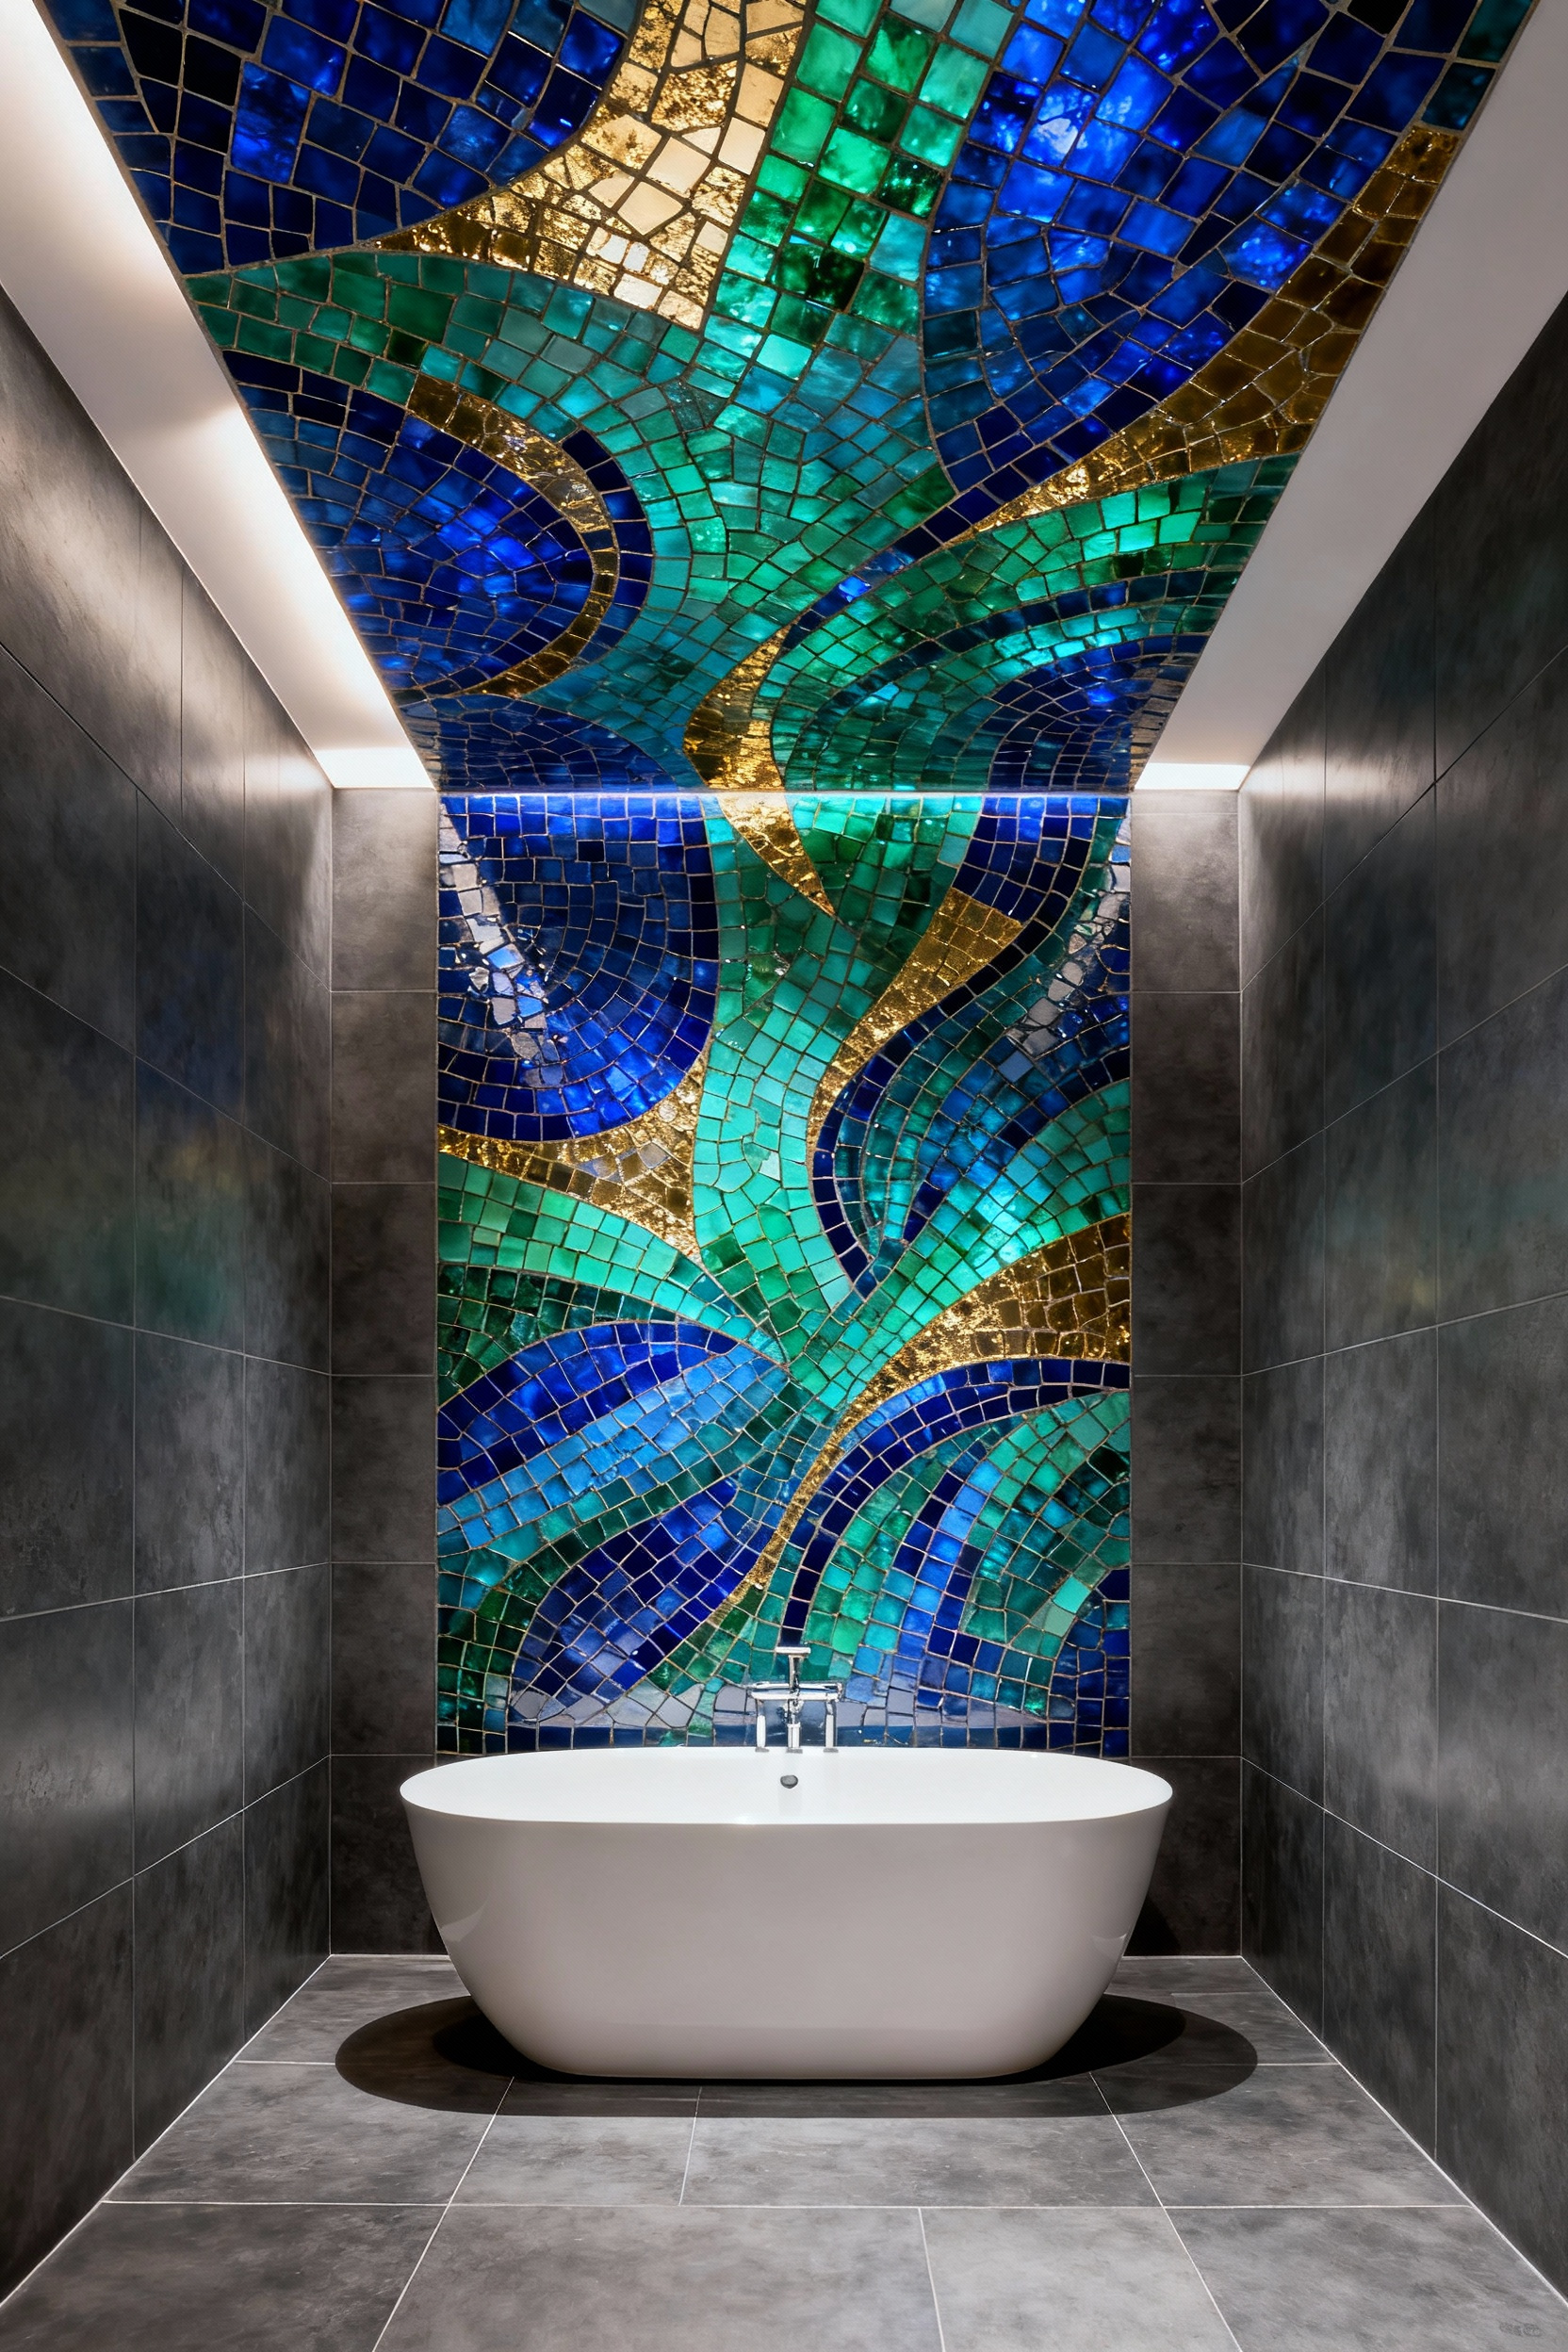
The Unexpected Niche: utilizing shower niches for waterproof sculpture or mosaic art
Treat the recessed shower shelf not merely as utility storage, but as a built-in shadow box for permanent display. This space offers a prime opportunity to create a “jewelry box” effect by installing an intricate mosaic mural on the back wall.
Contrasting geometric, botanical, or abstract patterns against the main shower tile turns the niche into a deliberate focal point. If you choose to incorporate fixed sculptures or 3D reliefs, ensure the form does not create ledges where water can pool. Secure these heavier elements with high-strength epoxy or specialized thin-set to guarantee structural integrity within the wet environment.
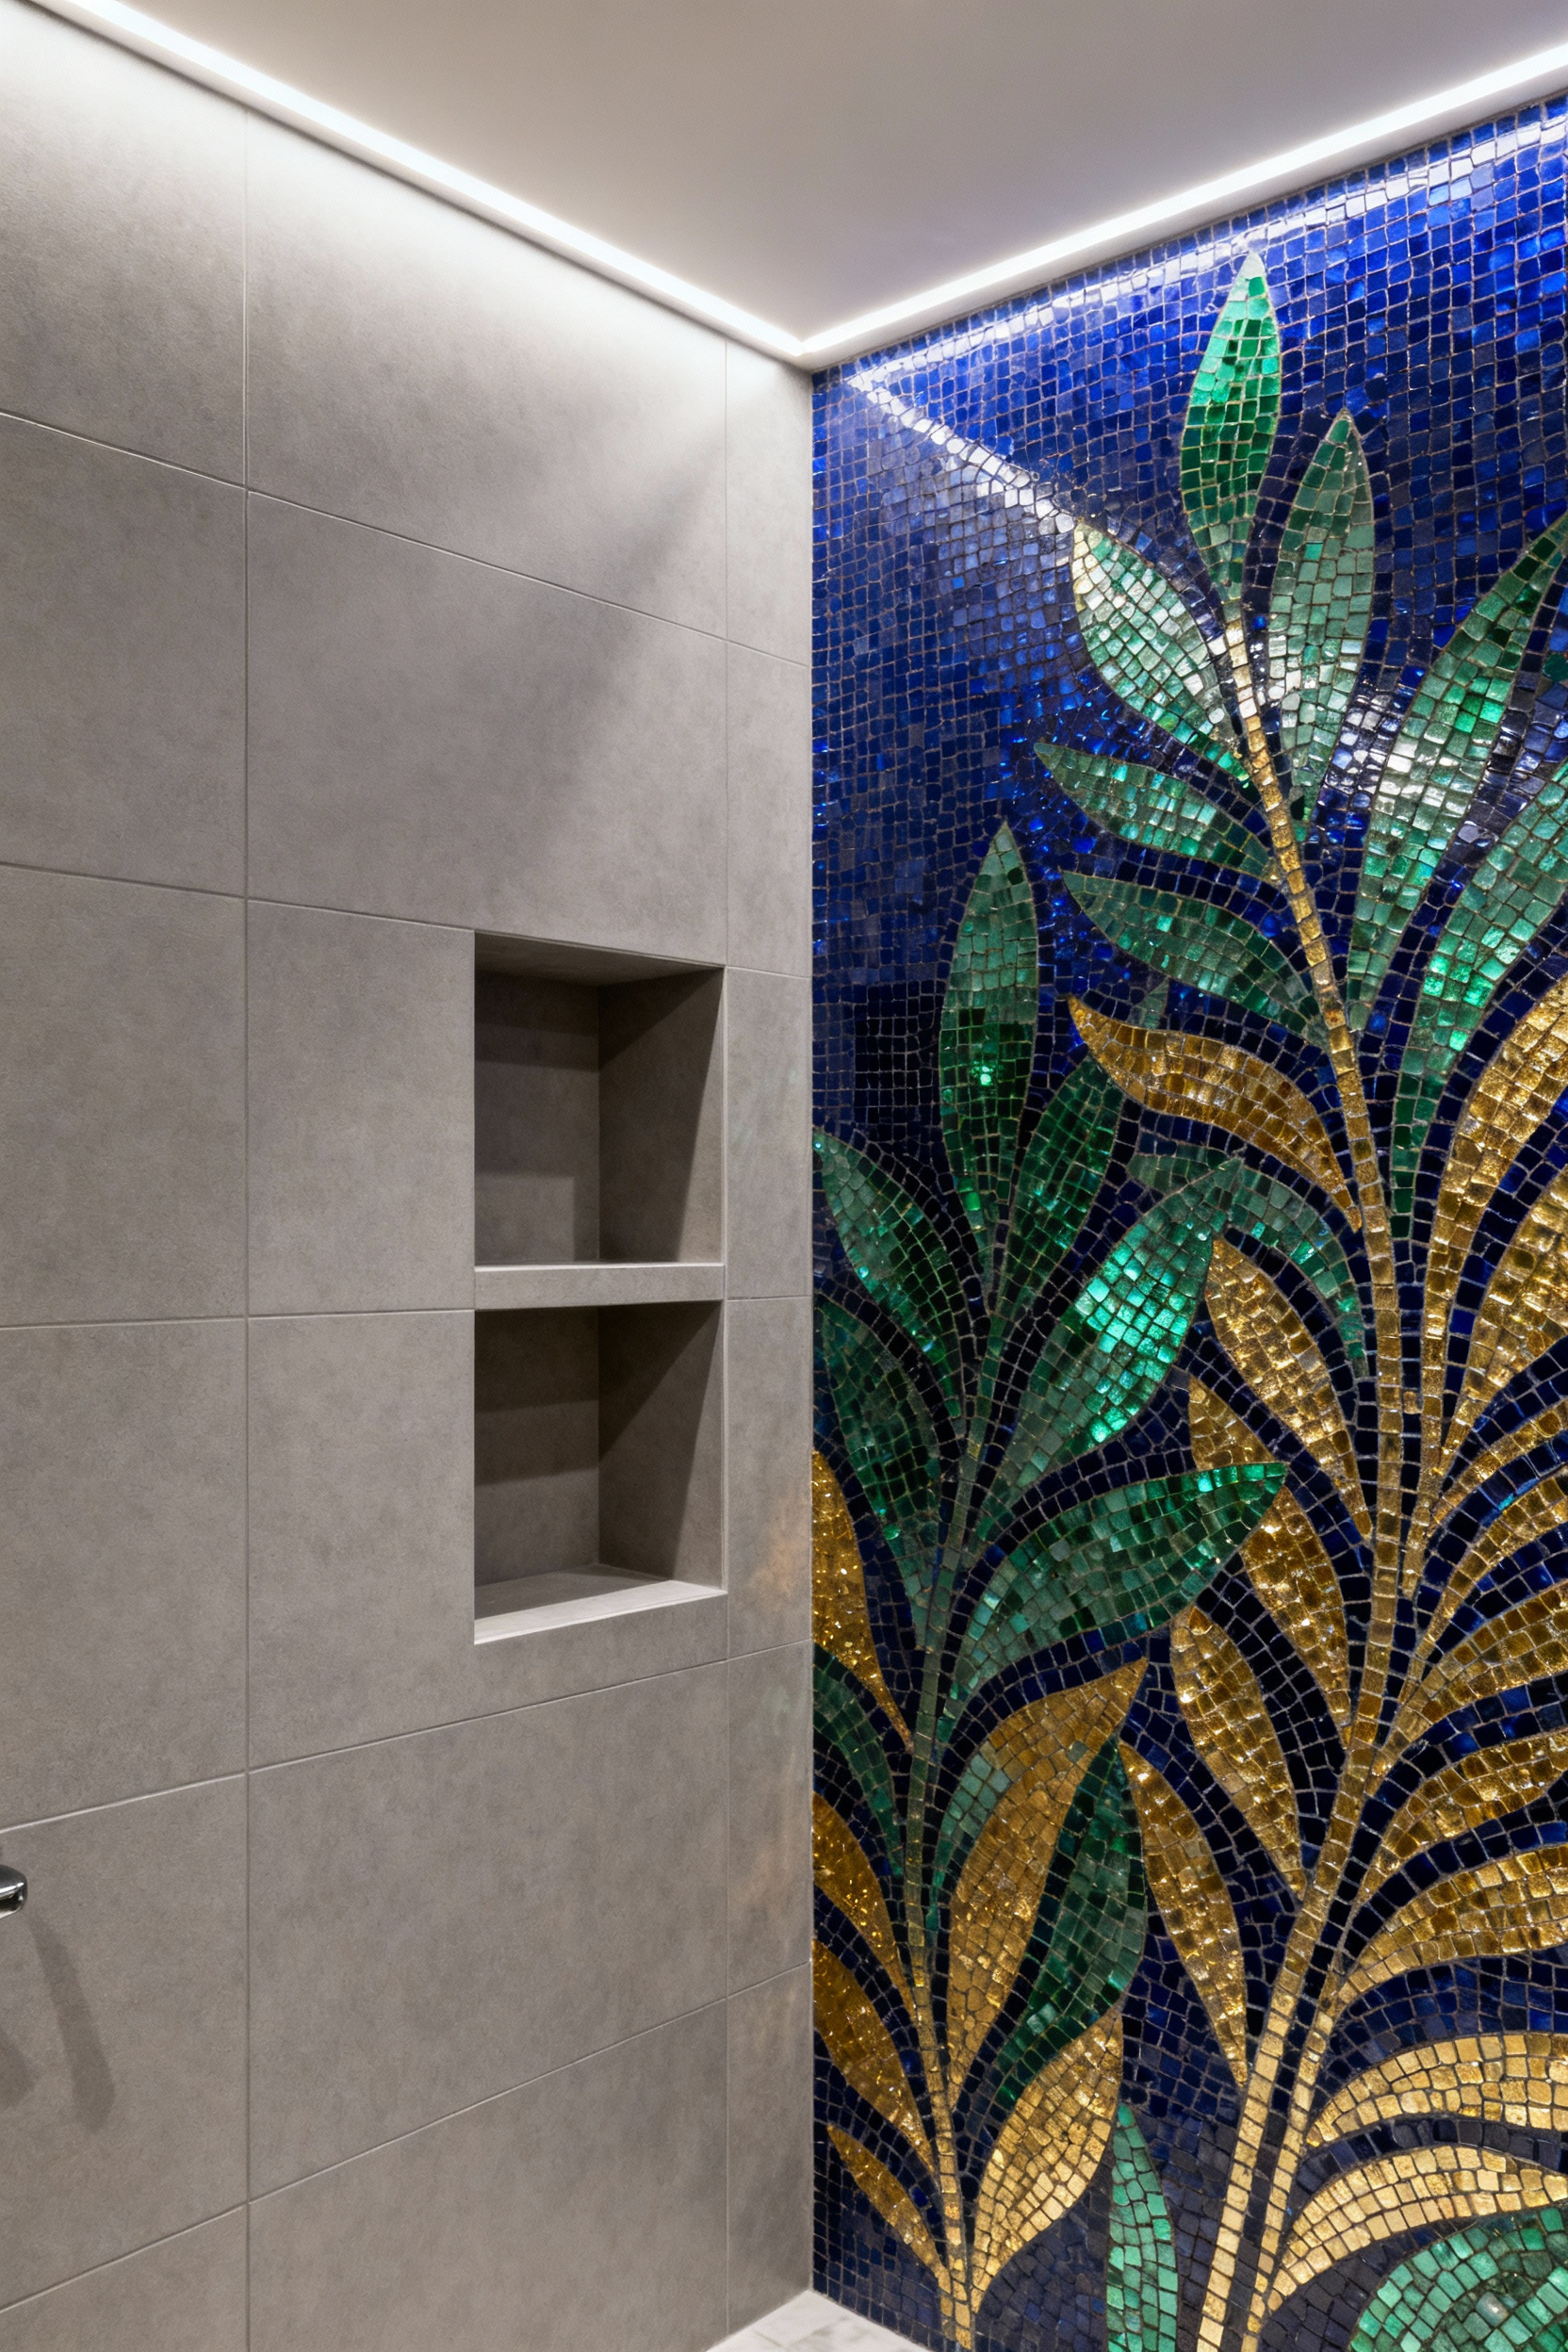
Material selection and lighting are critical for visualizing this concept safely. Construct the art from non-porous or sealed materials, such as glass mosaic tiles, porcelain, or sealed marble, to withstand daily moisture.
To ensure these materials shine, integrate waterproof LED strip lighting or spotlights directly within the recess. This illumination is essential for highlighting the texture and depth of the art, preventing it from being lost in shadow and establishing a dramatic, spa-like ambiance.
Proper installation mechanics protect both the art and the home. The niche requires a complete waterproof membrane and specific thin-set mortar to prevent moisture penetration into the wall cavity. A vital, often overlooked detail is the bottom sill; tile this surface with a slight pitch toward the shower drain. This slope ensures water flows away rather than accumulating around the art, preserving the grout lines and sealant for the long term.
Conclusion: From Water Closet to Private Gallery
The bathroom has evolved beyond a strictly utilitarian zone; it is now a canvas for personal expression. By integrating moisture-resistant photography, dramatic chandeliers, and bespoke murals, you elevate a functional nook into a curated sanctuary. This approach rejects the safety of neutral minimalism in favor of immersive luxury. Every surface, from the water closet walls to the area above the vanity, demands the same thoughtful attention as a formal living room.
Looking forward, this shift allows your home to tell a cohesive, opulent story in every square foot. A private gallery creates a daily ritual of beauty that standard designs cannot match. To fully realize this potential, fearless curation is key, especially in executing sophisticated bathroom art decor. Commit to confident layers of color and texture to ensure your home reflects your unique identity. Install a humidity-proof statement piece to anchor the room, then build your gallery around it.
Synthesizing bold choices to create a space that celebrates personality over pure utility
To elevate a bathroom beyond its functional role, you must treat the enclosure itself as a large-scale canvas. Replace subtle neutrals with dramatic surface treatments, such as moisture-rated wallpaper, oversized geometric tiles, or statement walls featuring fluted stone finishes. These choices prioritize visual depth and tactile experience over simple cleanability, instantly setting a luxurious tone.
To further shift the room’s identity from a utility space to a curated retreat, hang framed personal collections or vintage photographs. Bringing “real” art into this environment adds an unexpected layer of intimacy and personality usually reserved for living areas.
Select fixtures that serve as sculptural focal points rather than standard functional pieces. Treat mirrors, vanities, and lighting as the room’s jewelry by opting for asymmetrical shapes, artisan-blown glass, or unique silhouettes like curved vanities.
Finally, blur the lines between the bath and the rest of the home by introducing furnishings that encourage lingering. Placing a comfortable chair or a vintage upholstered bench in the space transforms the bathroom into a destination designed for pause and pleasure.
Frequently Asked Questions (FAQ)
To protect framed art, avoid wood frames and standard glass. Instead, use metal or high-quality composite frames, and replace the glazing with acrylic (Plexiglas) for superior moisture resistance. Ensure the back of the frame is professionally sealed with a moisture barrier and use an acid-free matting/spacer to create an air gap that prevents condensation from touching the artwork. Always run an exhaust fan for 30–60 minutes after showering. In small powder rooms, maximize impact by creating a “jewel box” effect. Anchor the room with a single, oversized statement piece—such as an oil portrait or abstract canvas—hung above the sink or toilet. This oversized element defies the room’s modest scale. Alternatively, use a floor-to-ceiling gallery wall to create an enveloping, immersive experience. For luxury bathroom decor, prioritize non-porous materials that are inherently humidity-proof. Excellent choices include HD aluminum metal prints, acrylic face-mounted prints, ceramic or glass mosaic tiles, and three-dimensional sculptures made of treated metal, glass, or natural stone (like onyx or sealed marble).How do you protect framed art from moisture in a high-humidity bathroom?
Where should art be placed in a small powder room for maximum impact?
What non-porous materials are best for luxury bathroom art decor?