
The traditional farmhouse kitchen has evolved dramatically. Today, the modern farmhouse kitchen has transformed from a smoke-filled survival station to a sun-drenched open-concept sanctuary, yet the soul of the space remains rooted in utility. I recently restored a mid-century space by replacing sterile laminate with reclaimed oak beams salvaged from a collapsing barn; stripping back the layers to reveal that raw, honest grain reminded me why we crave this aesthetic. It isn’t about mimicking a look; rather, it is about prioritizing sustainability and “honest” materials like thick stone and weathered wood that age gracefully rather than expire.
To successfully marry 300 years of history with contemporary needs, you must balance the architectural shift toward openness with distinct historical anchors. Here is how I ground a modern sanctuary in tradition:
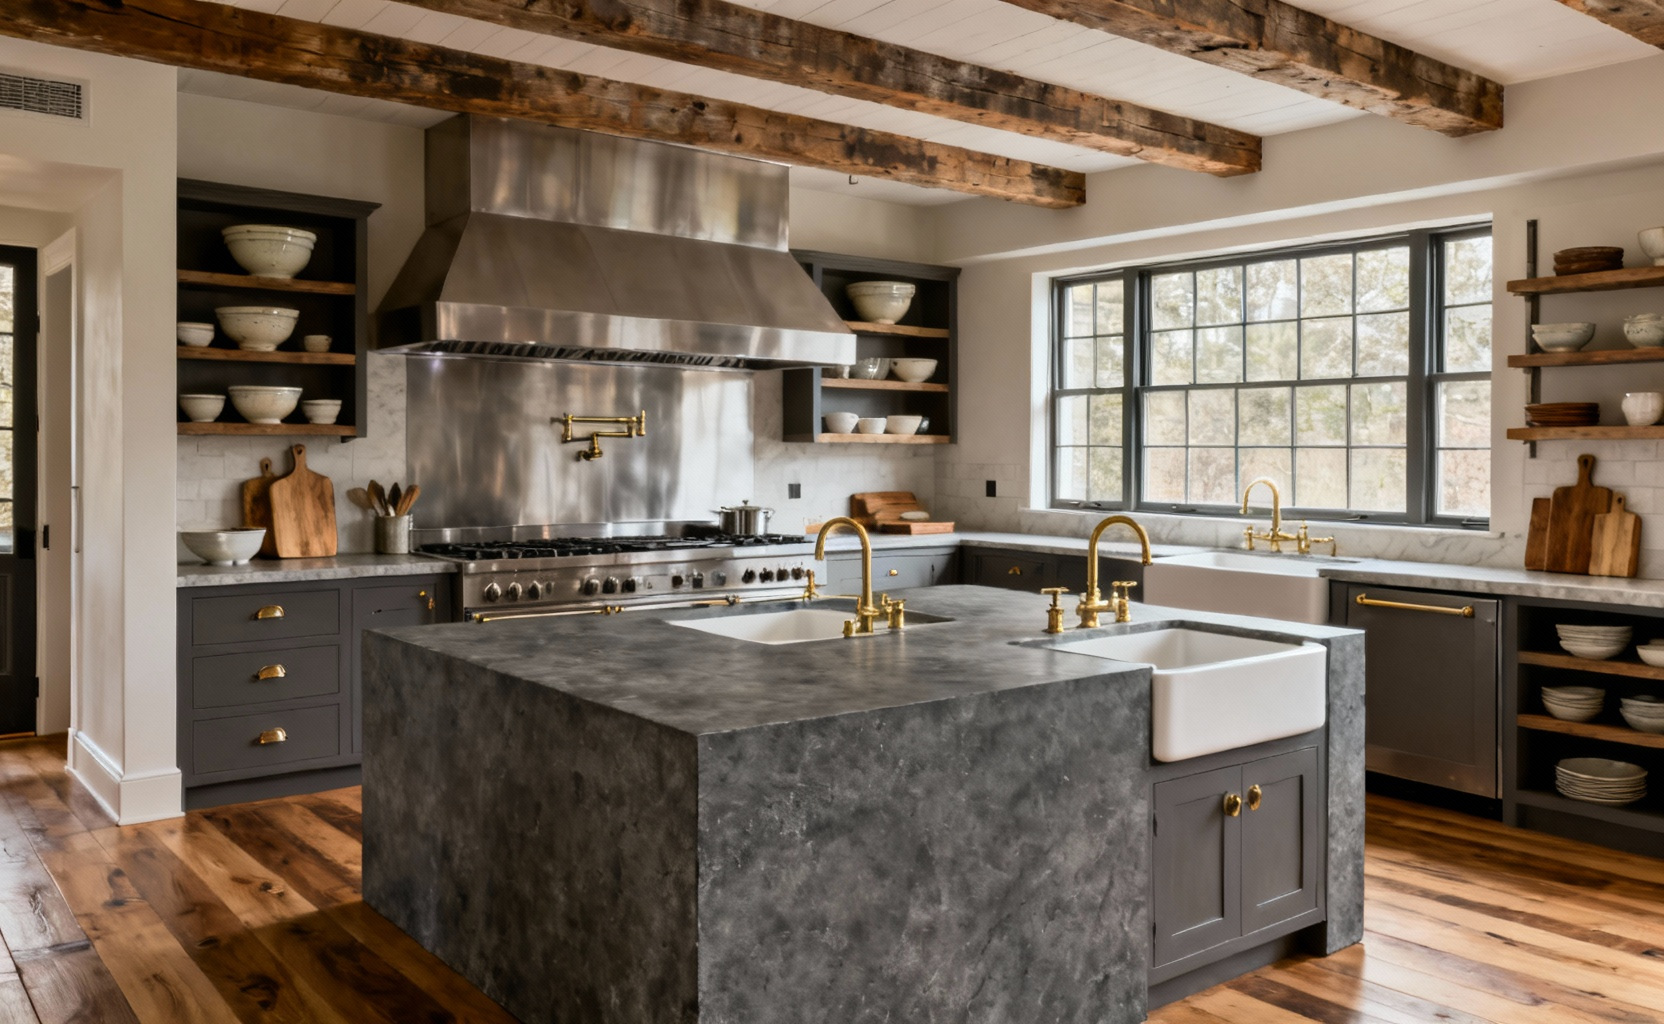
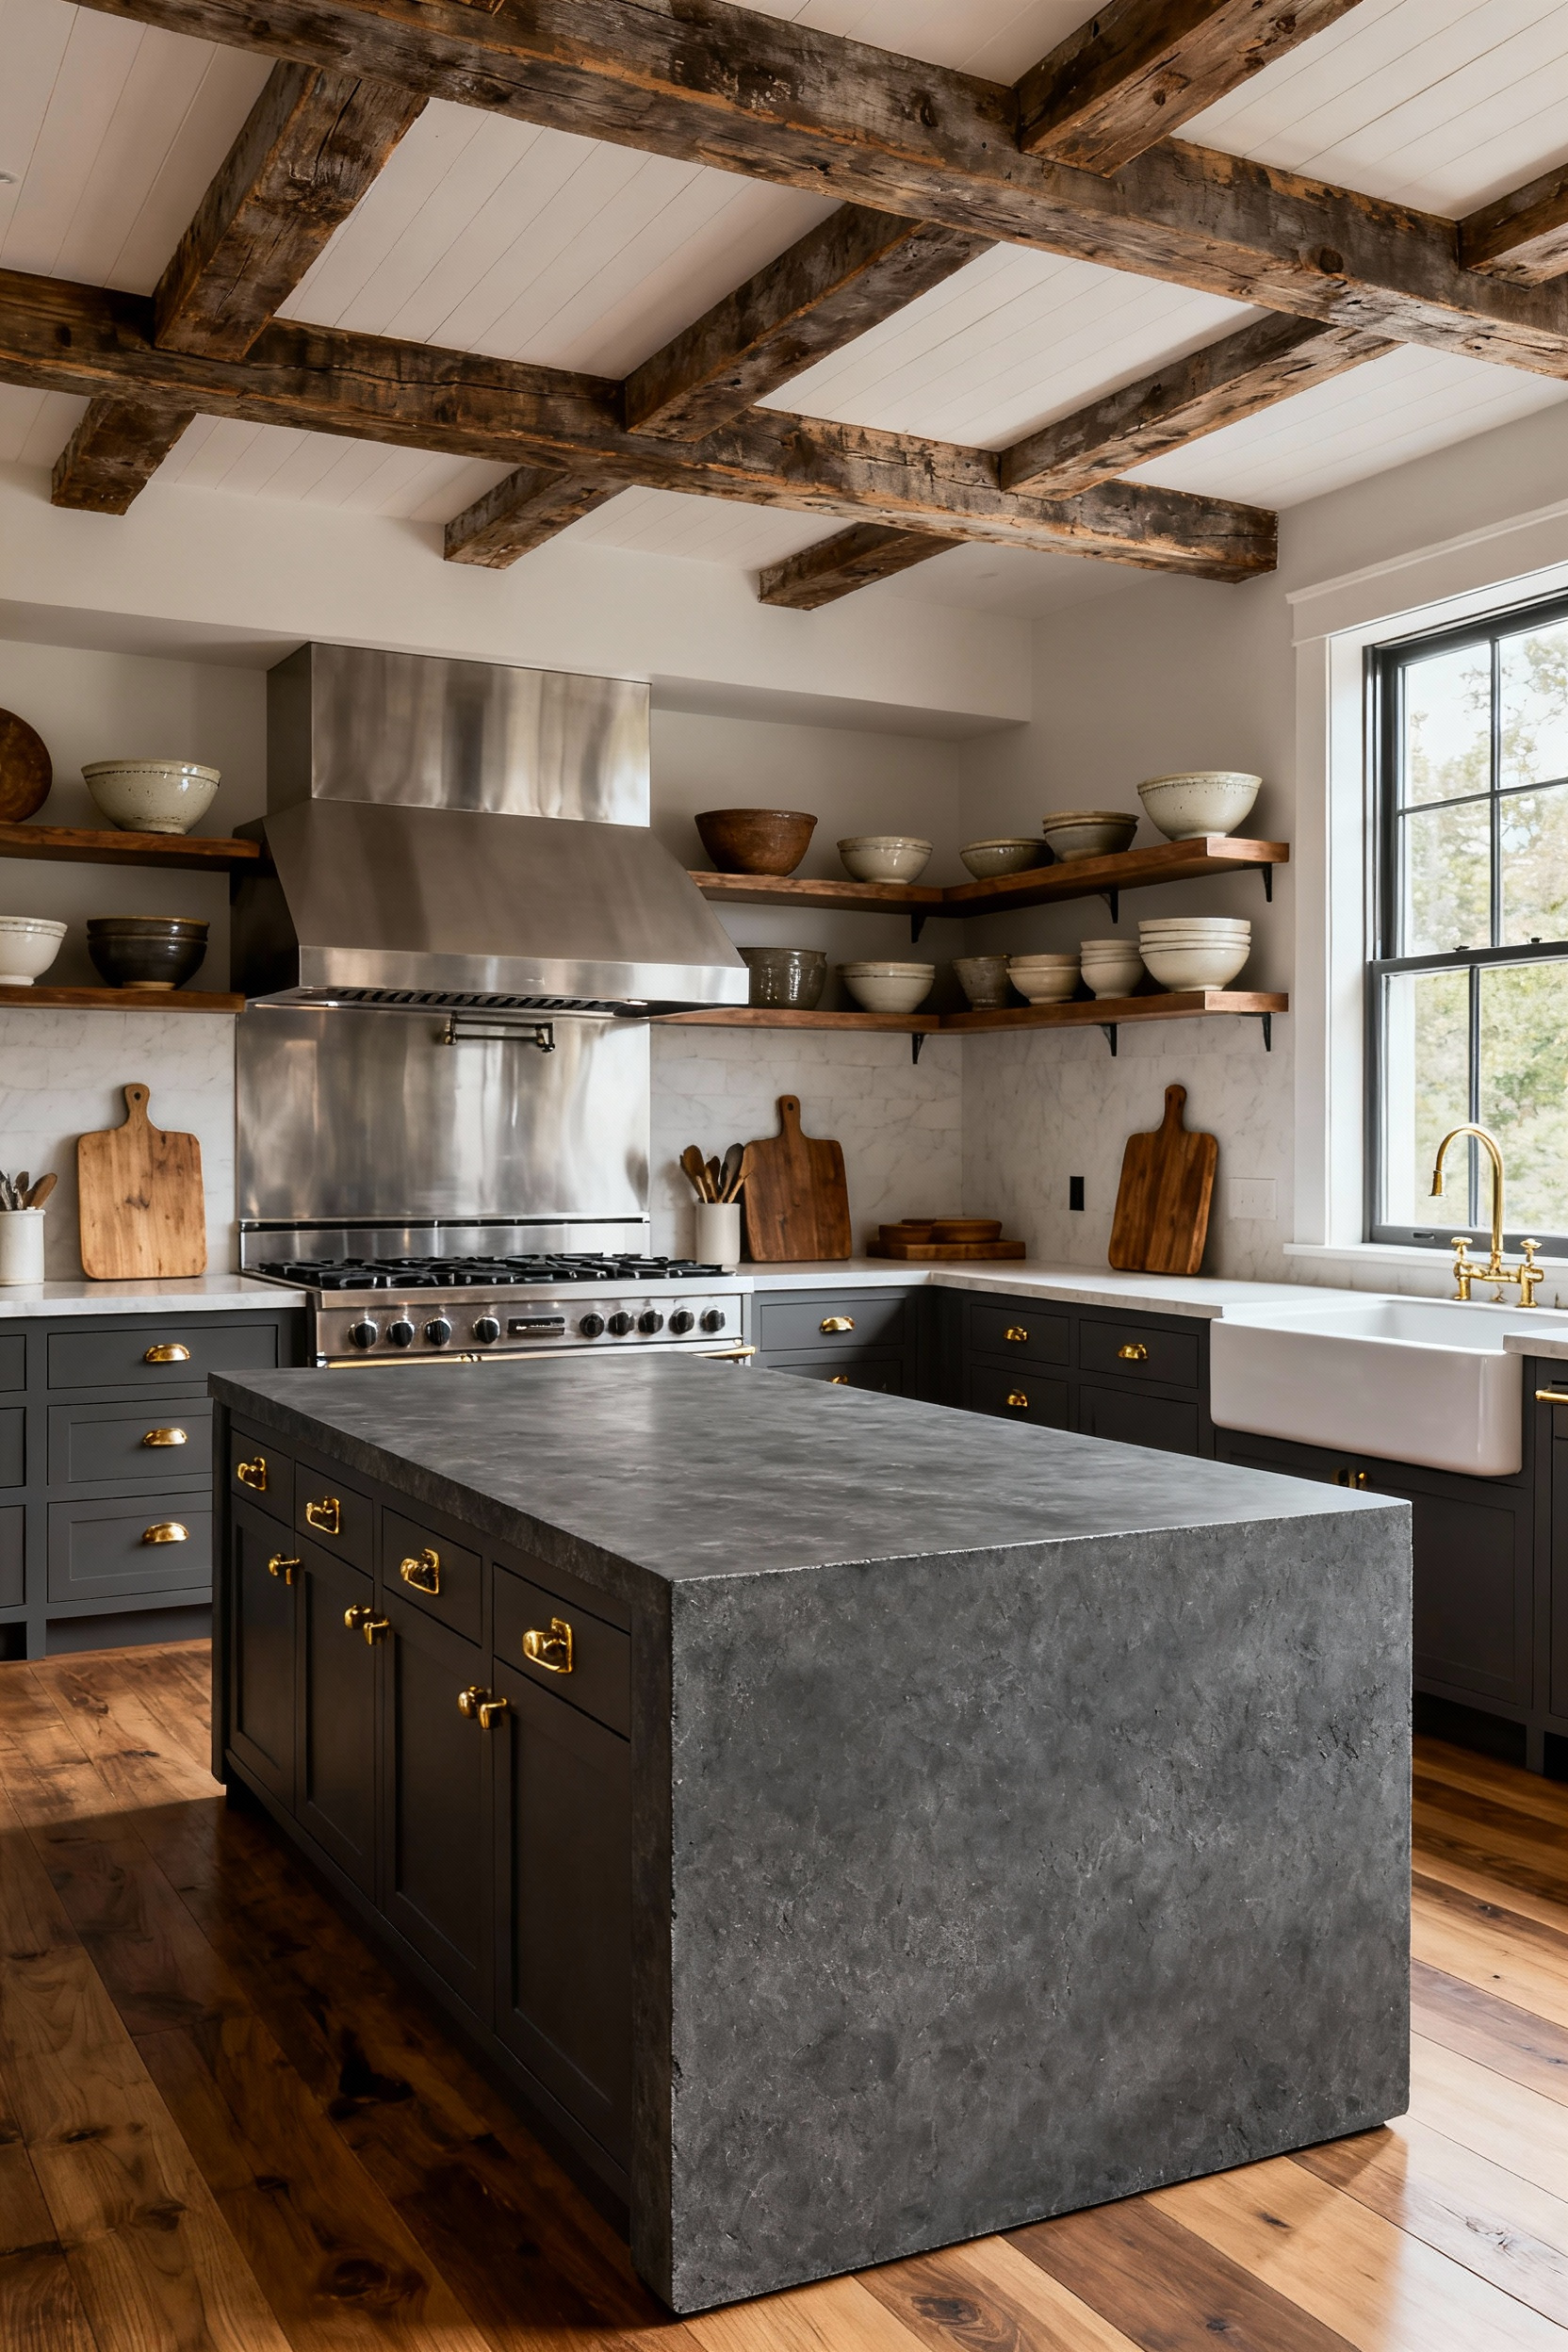
* The Apron Sink Mandate: Install a deep, apron-front fireclay sink as your primary historical focal point. This directly mimics 18th-century gravity-fed utility sinks and adds instant authenticity.
* The Island as Hearth: Since we no longer crowd around a fireplace for warmth, use an expansive central island to recreate that gravitational pull. It should serve as the communal “hearth” for food prep, casual dining, and social connection.
1. The Modern Farmhouse Kitchen: Prioritizing Utility Over Ornamentation
In my years of restoring vintage spaces, I’ve found that the most timeless rooms are the ones built to be used, not just admired. The true spirit of a farmhouse kitchen isn’t found in decorative trinkets, but in its role as a high-performance engine for the home. Sophisticated modern designs honor this utilitarian heritage by selecting hardworking, sustainable materials that age gracefully rather than delicate finishes that demand constant babying. I always encourage clients to choose honed or leathered stone surfaces; much like a well-loved butcher block I once salvaged from a 1940s bakery, these matte finishes hide etching and wear, allowing the surface to develop a rich story and patina over time rather than looking “damaged.”
To achieve this blend of nostalgic warmth and modern efficiency, the goal is to reduce visual noise so the craftsmanship can shine. By prioritizing “quiet utility,” you allow the architecture and vintage accents to take center stage while the heavy lifting happens behind the scenes. Focus on these three areas to ensure your layout works as hard as you do:
- Panel Your Power: Camouflage professional-grade column refrigerators and dishwashers behind custom cabinetry to maintain seamless, furniture-like sightlines.
- Evolved Work Zones: Move beyond the simple triangle by establishing dual prep and cleanup zones (such as a dedicated prep sink separate from the main wash area), allowing multiple cooks to work in harmony without crossing paths.
- Invisible Storage: Utilize deep drawers for dishware and integrated appliance garages to keep modern gadgets accessible but completely hidden, preserving the unblemished, historical aesthetic of the room.
2. Architectural Bones: Exposing and restoring original timber beams for structural storytelling
Unearthing original timber beams is like finding buried treasure in your own ceiling; it is the ultimate act of sustainable design, repurposing existing materials to anchor a room with history. However, before you start designing around that rustic charm, you must prioritize structural verification. I once worked on a mid-century conversion where a gorgeous overhead beam was actually riddled with old insect damage—we saved it with internal steel reinforcement, but only because an engineer caught it early. Once the structure is sound, resist the urge to go dark. To maintain the “modern” aspect of the Modern Farmhouse style, apply matte sealants, natural oils, or a subtle limewash. This protects the wood while maintaining the airy, light-reflecting palette essential to the style.
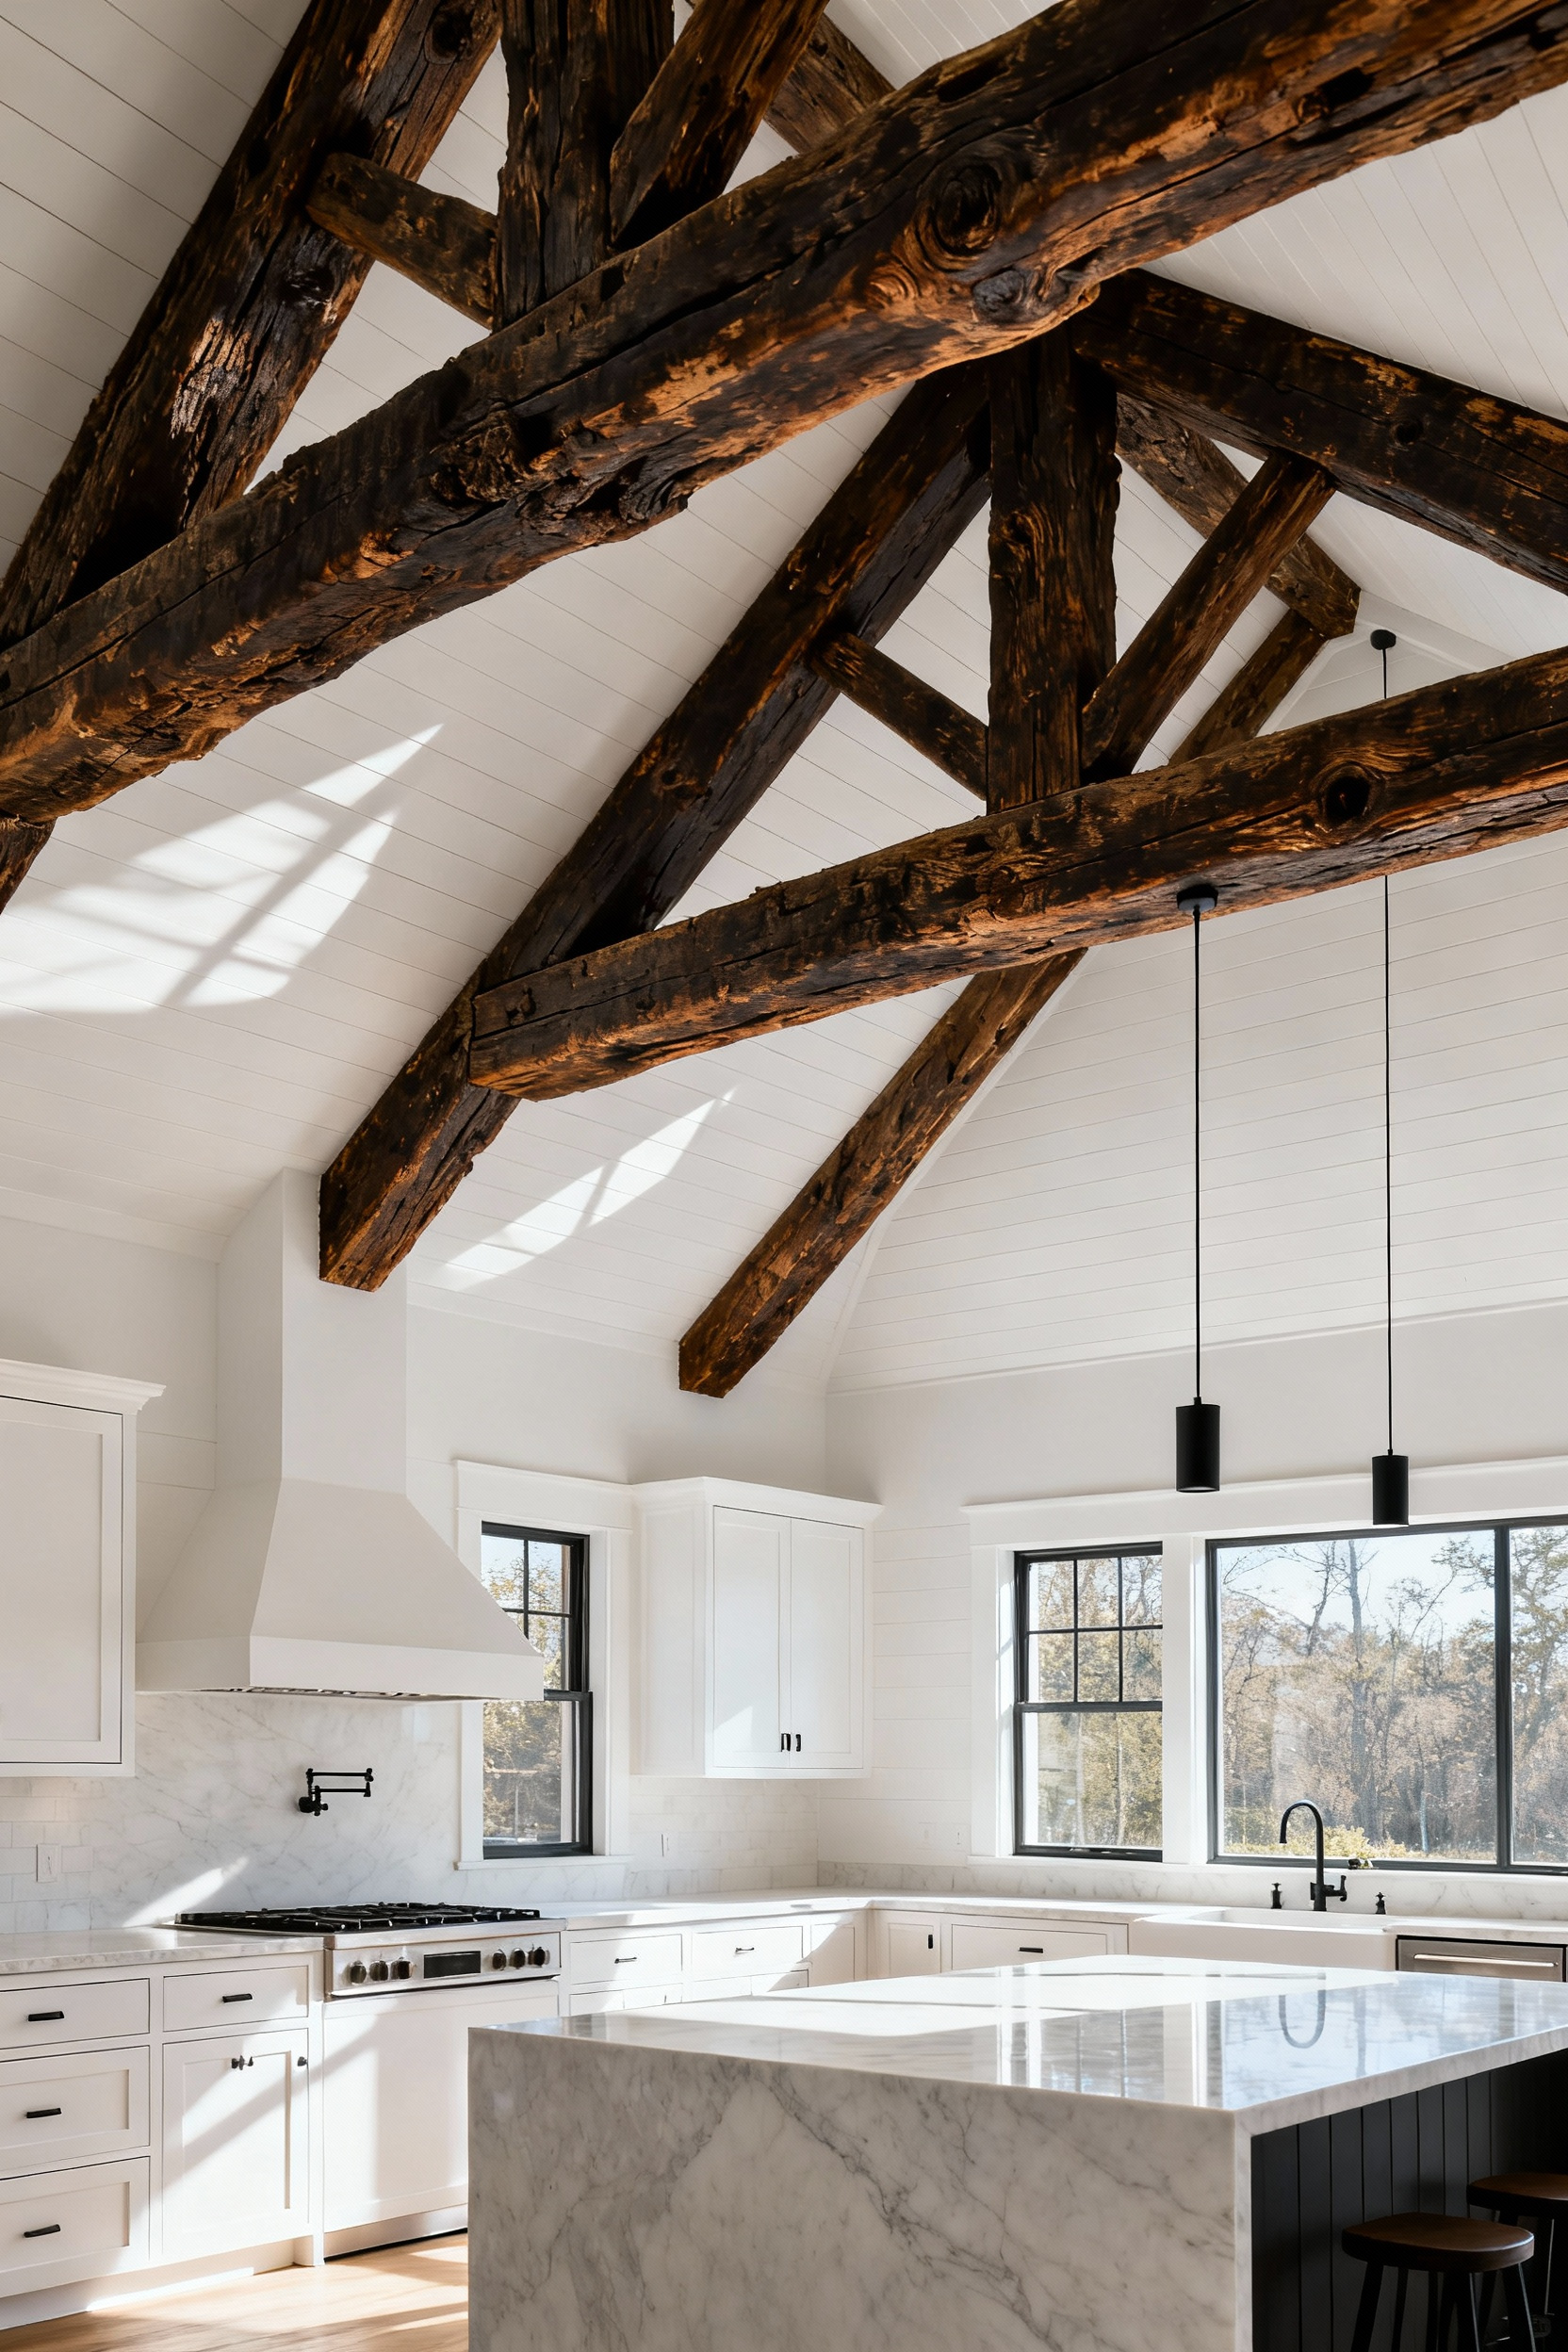
To truly make these historical bones work for contemporary living, treat them as functional infrastructure rather than just decoration. I love routing electrical conduits through the center of a beam to drop pendant lights directly over an island without visible wires, or tucking LED strips on top for an invisible, ambient glow. Finally, remember that the goal is “structural storytelling,” not perfection. Avoid filling every crack with smooth wood filler, which kills the authenticity. Instead, embrace a minimal restoration approach:
* Preserve the Patina: Keep axe marks and natural greying to honor the wood’s age.
* Chink, Don’t Fill: Use matching reclaimed wood or textured natural fillers for large gaps.
* Clean Gently: Remove grime without stripping the wood’s original character.
3. The Tactile Foundation: Choosing ‘living finishes’ like unlacquered brass and soapstone that patina with time
In a world obsessed with factory-sealed perfection, I always encourage homeowners to embrace materials that tell a story. Choosing “living finishes” is a sustainable commitment to longevity, allowing surfaces to evolve rather than requiring replacement at the first sign of wear. Start by integrating unlacquered brass on high-touch zones like faucets and cabinet pulls. The natural oils from your hands will accelerate oxidation in these specific areas, creating a warm, living patina that beautifully disrupts the sterile chill of typical modern farmhouse whites. It is a design choice that literally captures the life lived in the room, turning a simple handle into a testament to your home’s history.
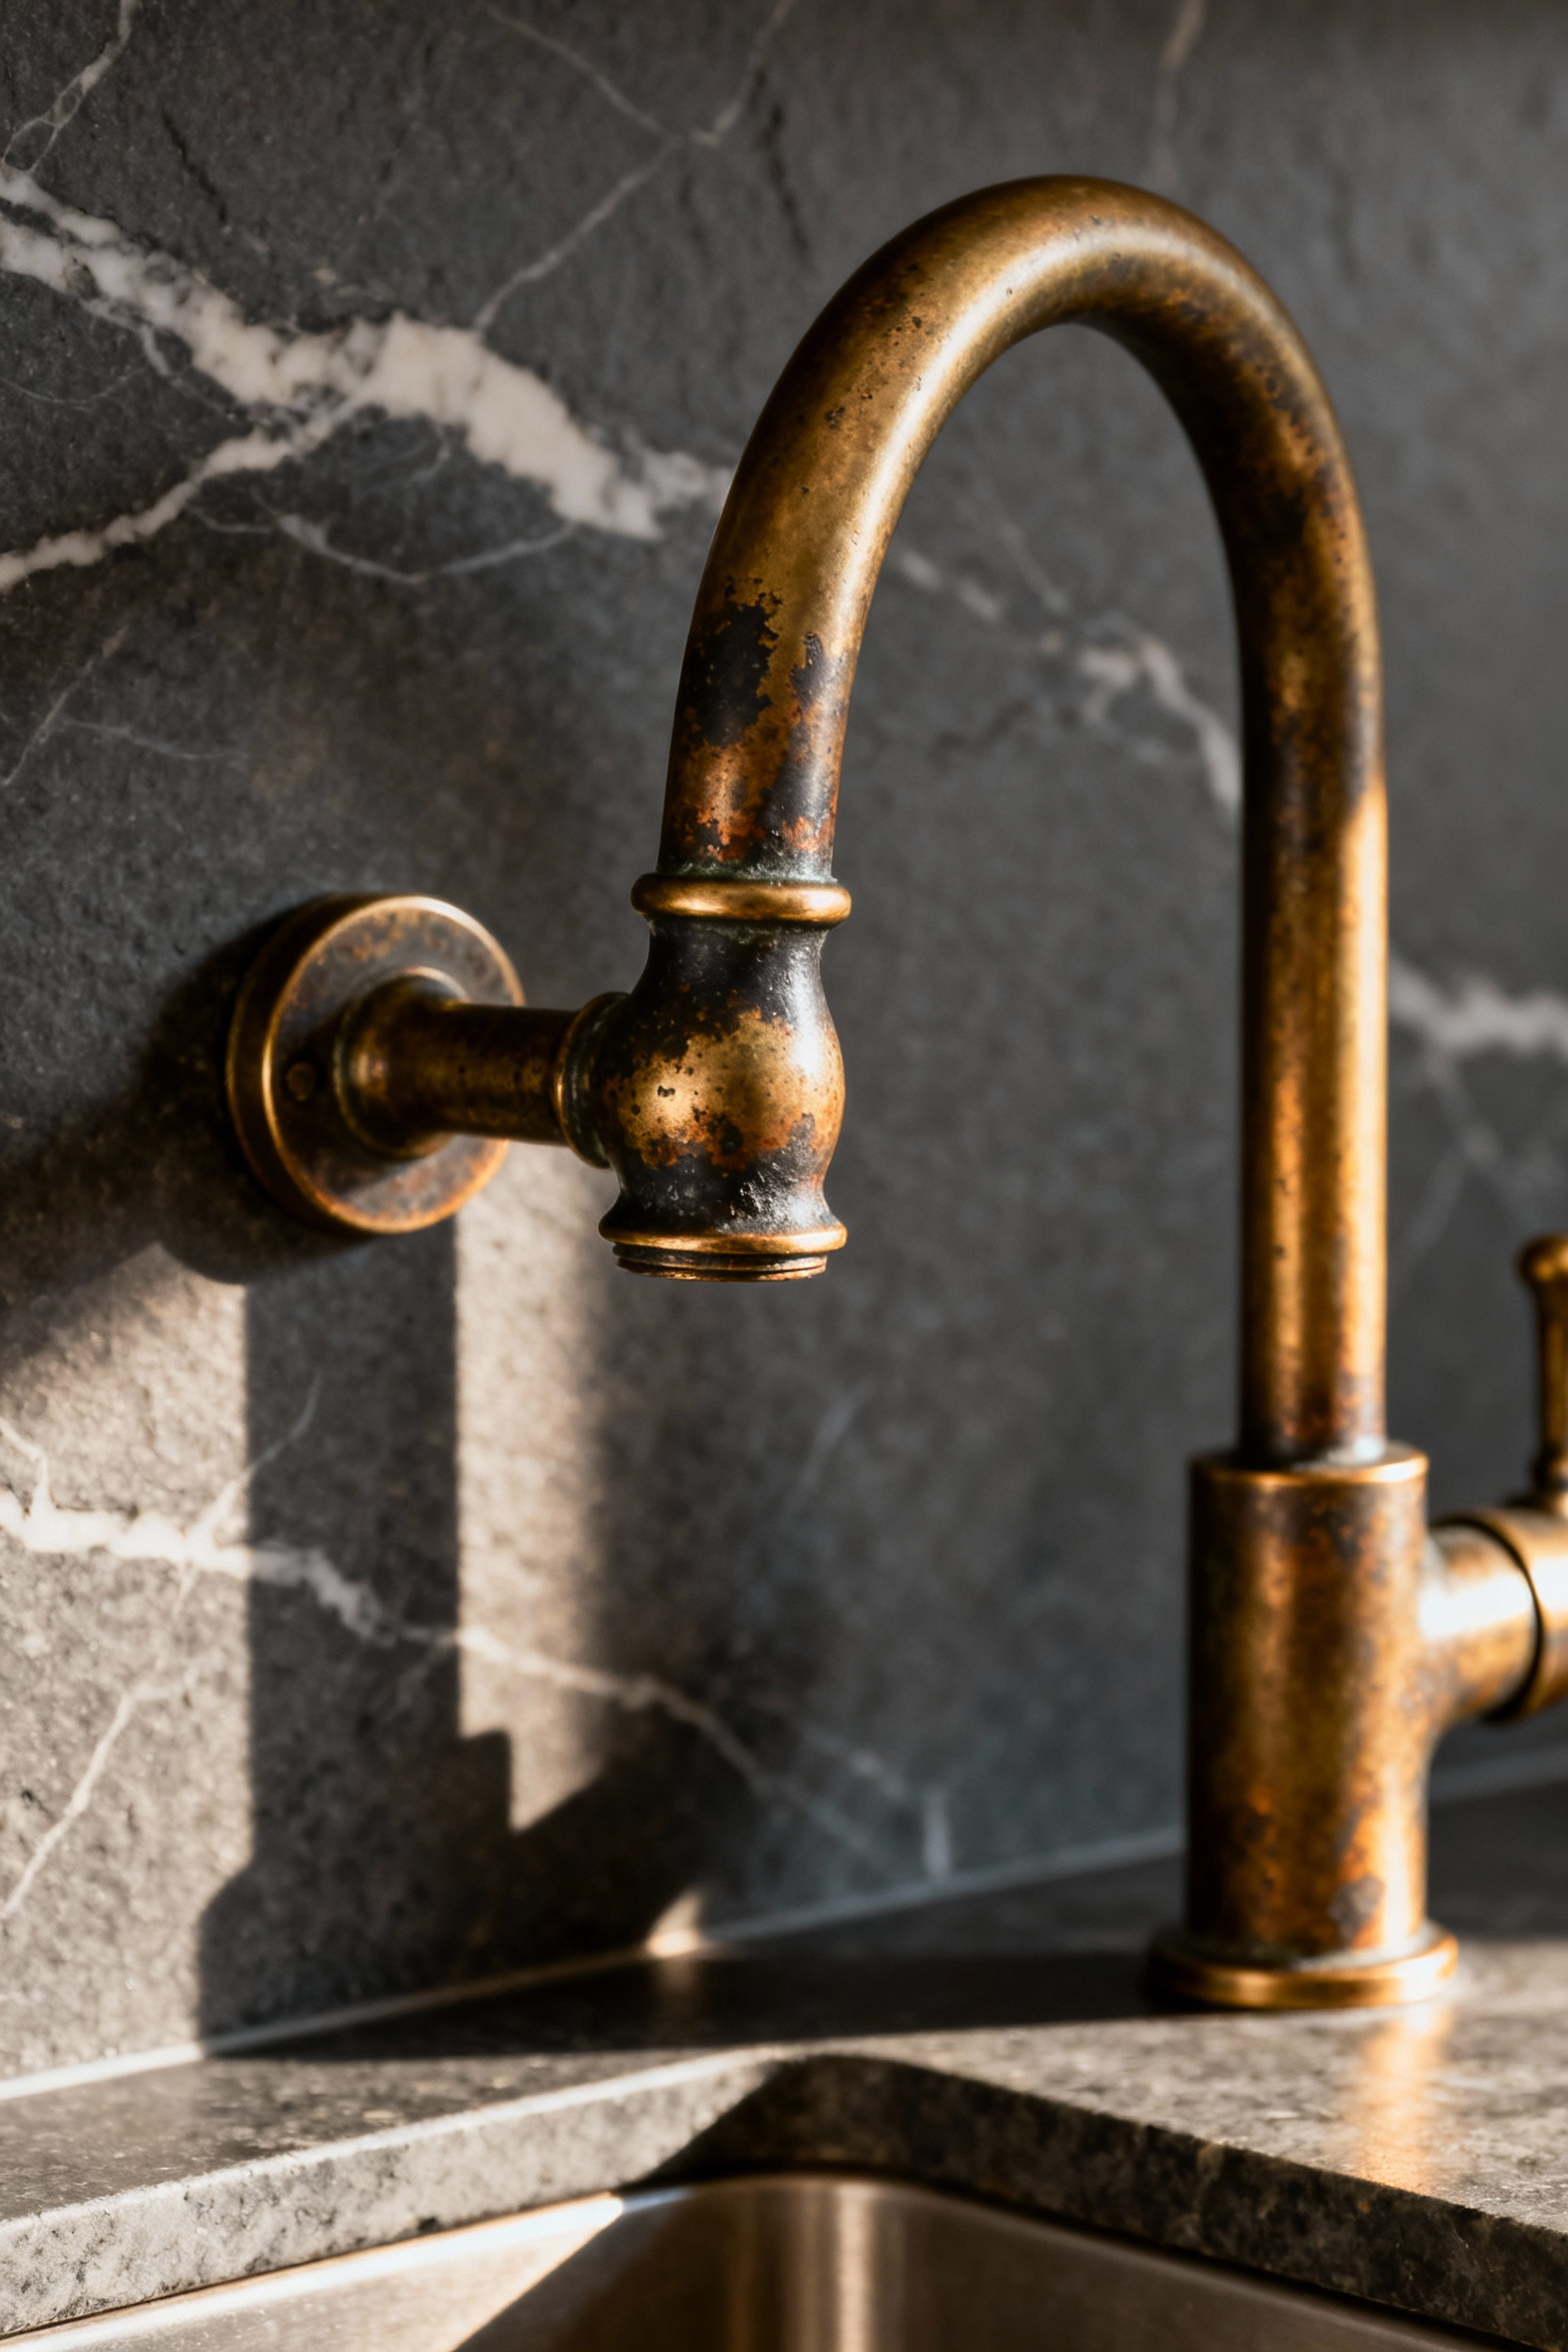
For the countertops or farmhouse sink, soapstone offers a velvet-like tactility that cold granite simply cannot match. It provides a necessary rough-hewn contrast to sleek professional appliances, bridging the gap between nostalgic charm and high-tech efficiency. As a restorer, I love that soapstone gives you complete control over its narrative through simple maintenance choices:
* The Natural Route: Leave the stone untreated to let lemon spills and daily wear create a light-grey, variegated map of your culinary adventures.
* The Uniform Look: Periodically apply mineral oil to accelerate the patina, turning the stone a deep, dark charcoal that instantly masks minor scratches.
By welcoming these shifting textures, you aren’t just designing a kitchen; you are cultivating a resourceful space that gets better with age.
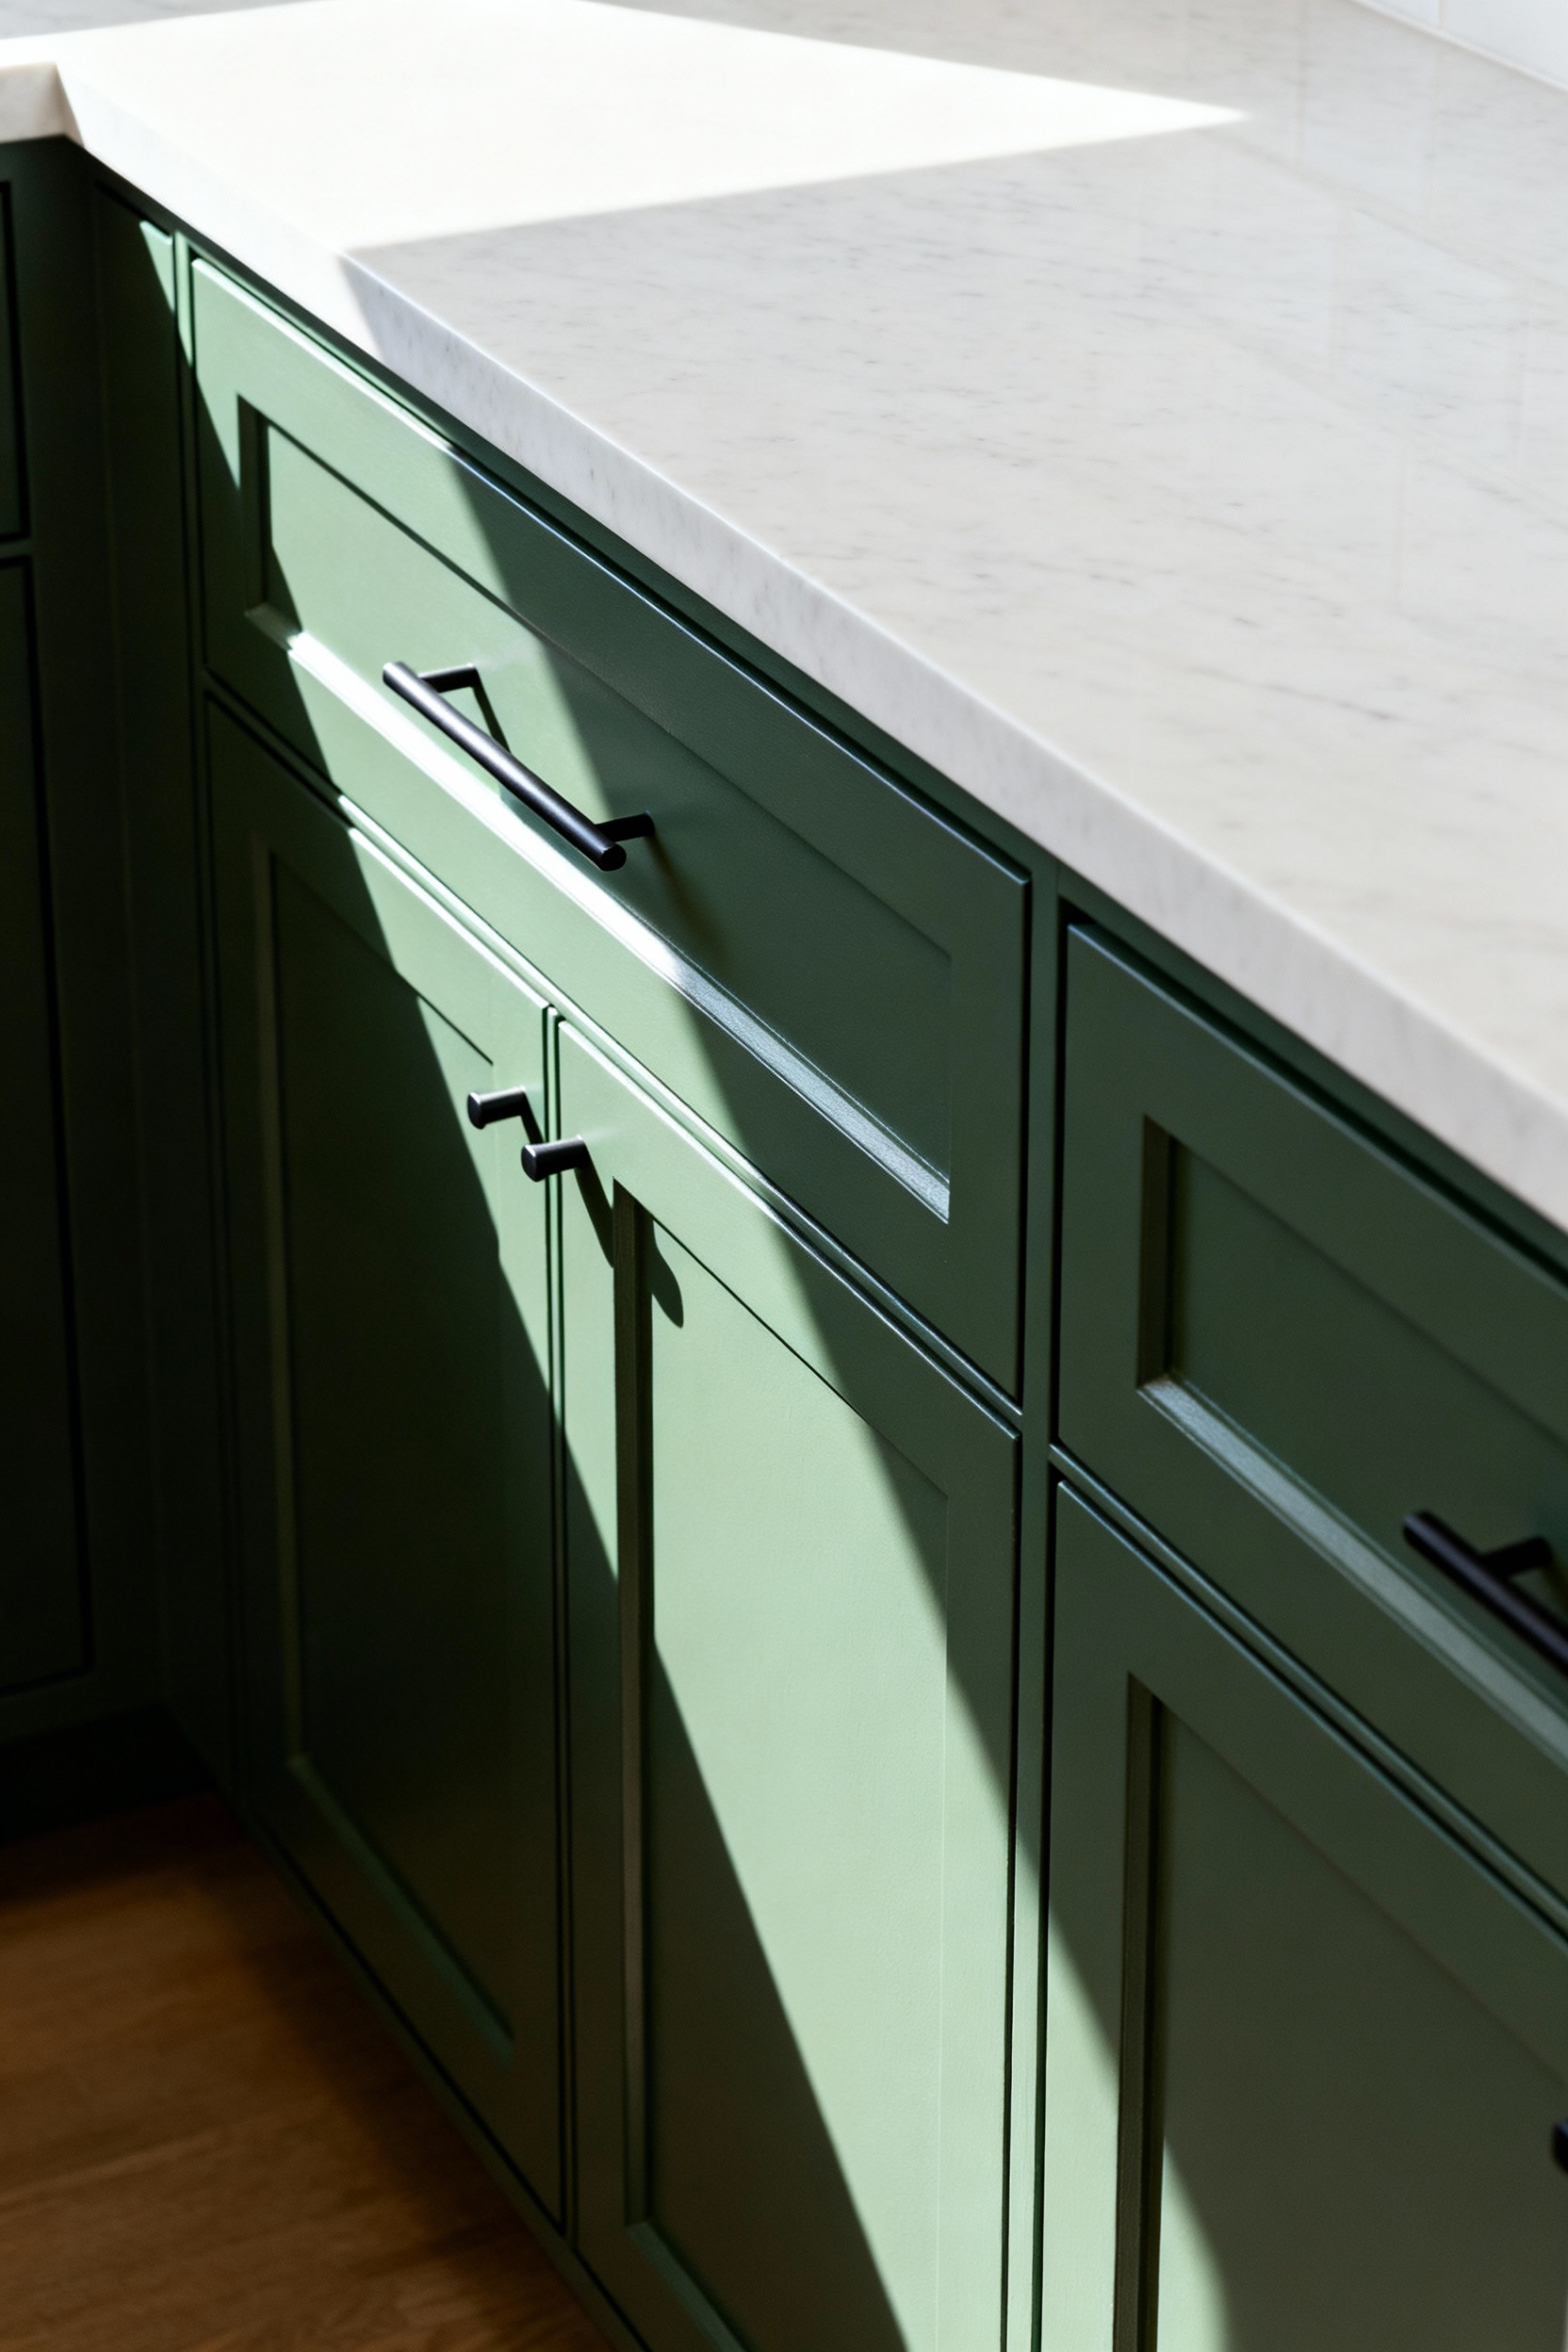
4. Shaker Style Reimagined: Updating classic joinery with slim rails and contemporary color palettes
There is something undeniably comforting about the honest utility of Shaker joinery; it is a testament to craftsmanship that has survived centuries. However, to keep this classic look from feeling stuck in a past “farmhouse” trend, we are refining the proportions to honor the past while embracing the future. By shaving the traditional stile and rail width down to a svelte 1.5 to 2 inches, we create a “Skinny Shaker” profile that feels lighter and sharper. This subtle reduction eliminates visual bulk, allowing the structural beauty to shine without overwhelming the space—a principle I often apply when restoring mid-century pieces where clean lines are paramount.
To truly bridge the gap between heritage charm and modern sustainability, I encourage moving away from bright white lacquers and toward finishes that celebrate natural materials or ground the space. Use these updates to curate a kitchen that feels both soulful and current:
* Celebrate the Grain: Opt for quarter-sawn white oak or walnut with a straight, quiet grain. This adds organic warmth without the rustic “knotty” look found in older cabinetry.
* Go Matte and Moody: If painting, choose deep, earthy neutrals like charcoal, muted forest green, or “greige” in a matte finish to pair beautifully with natural stone.
* Silence the Hardware: Let the refined joinery speak by using thin edge pulls or push-to-open latches, keeping the visual profile uninterrupted and sleek.
5. The Anti-Fitted Kitchen: Incorporating freestanding furniture islands to break the monotony of built-ins
There is a certain sterility to wall-to-wall cabinetry that feels disconnected from the heart of a home. I remember stumbling upon a battered oak draper’s table at a salvage yard; its scars and ink stains told a century of stories. Dragging it into a client’s sleek, modern kitchen didn’t just add counter space—it instantly grounded the room with soul, proving that perfection is often the enemy of character. By swapping a monolithic built-in island for a freestanding furniture piece, you disrupt the showroom uniformity and reintroduce the sustainable, resourceful spirit of a true working farmhouse.
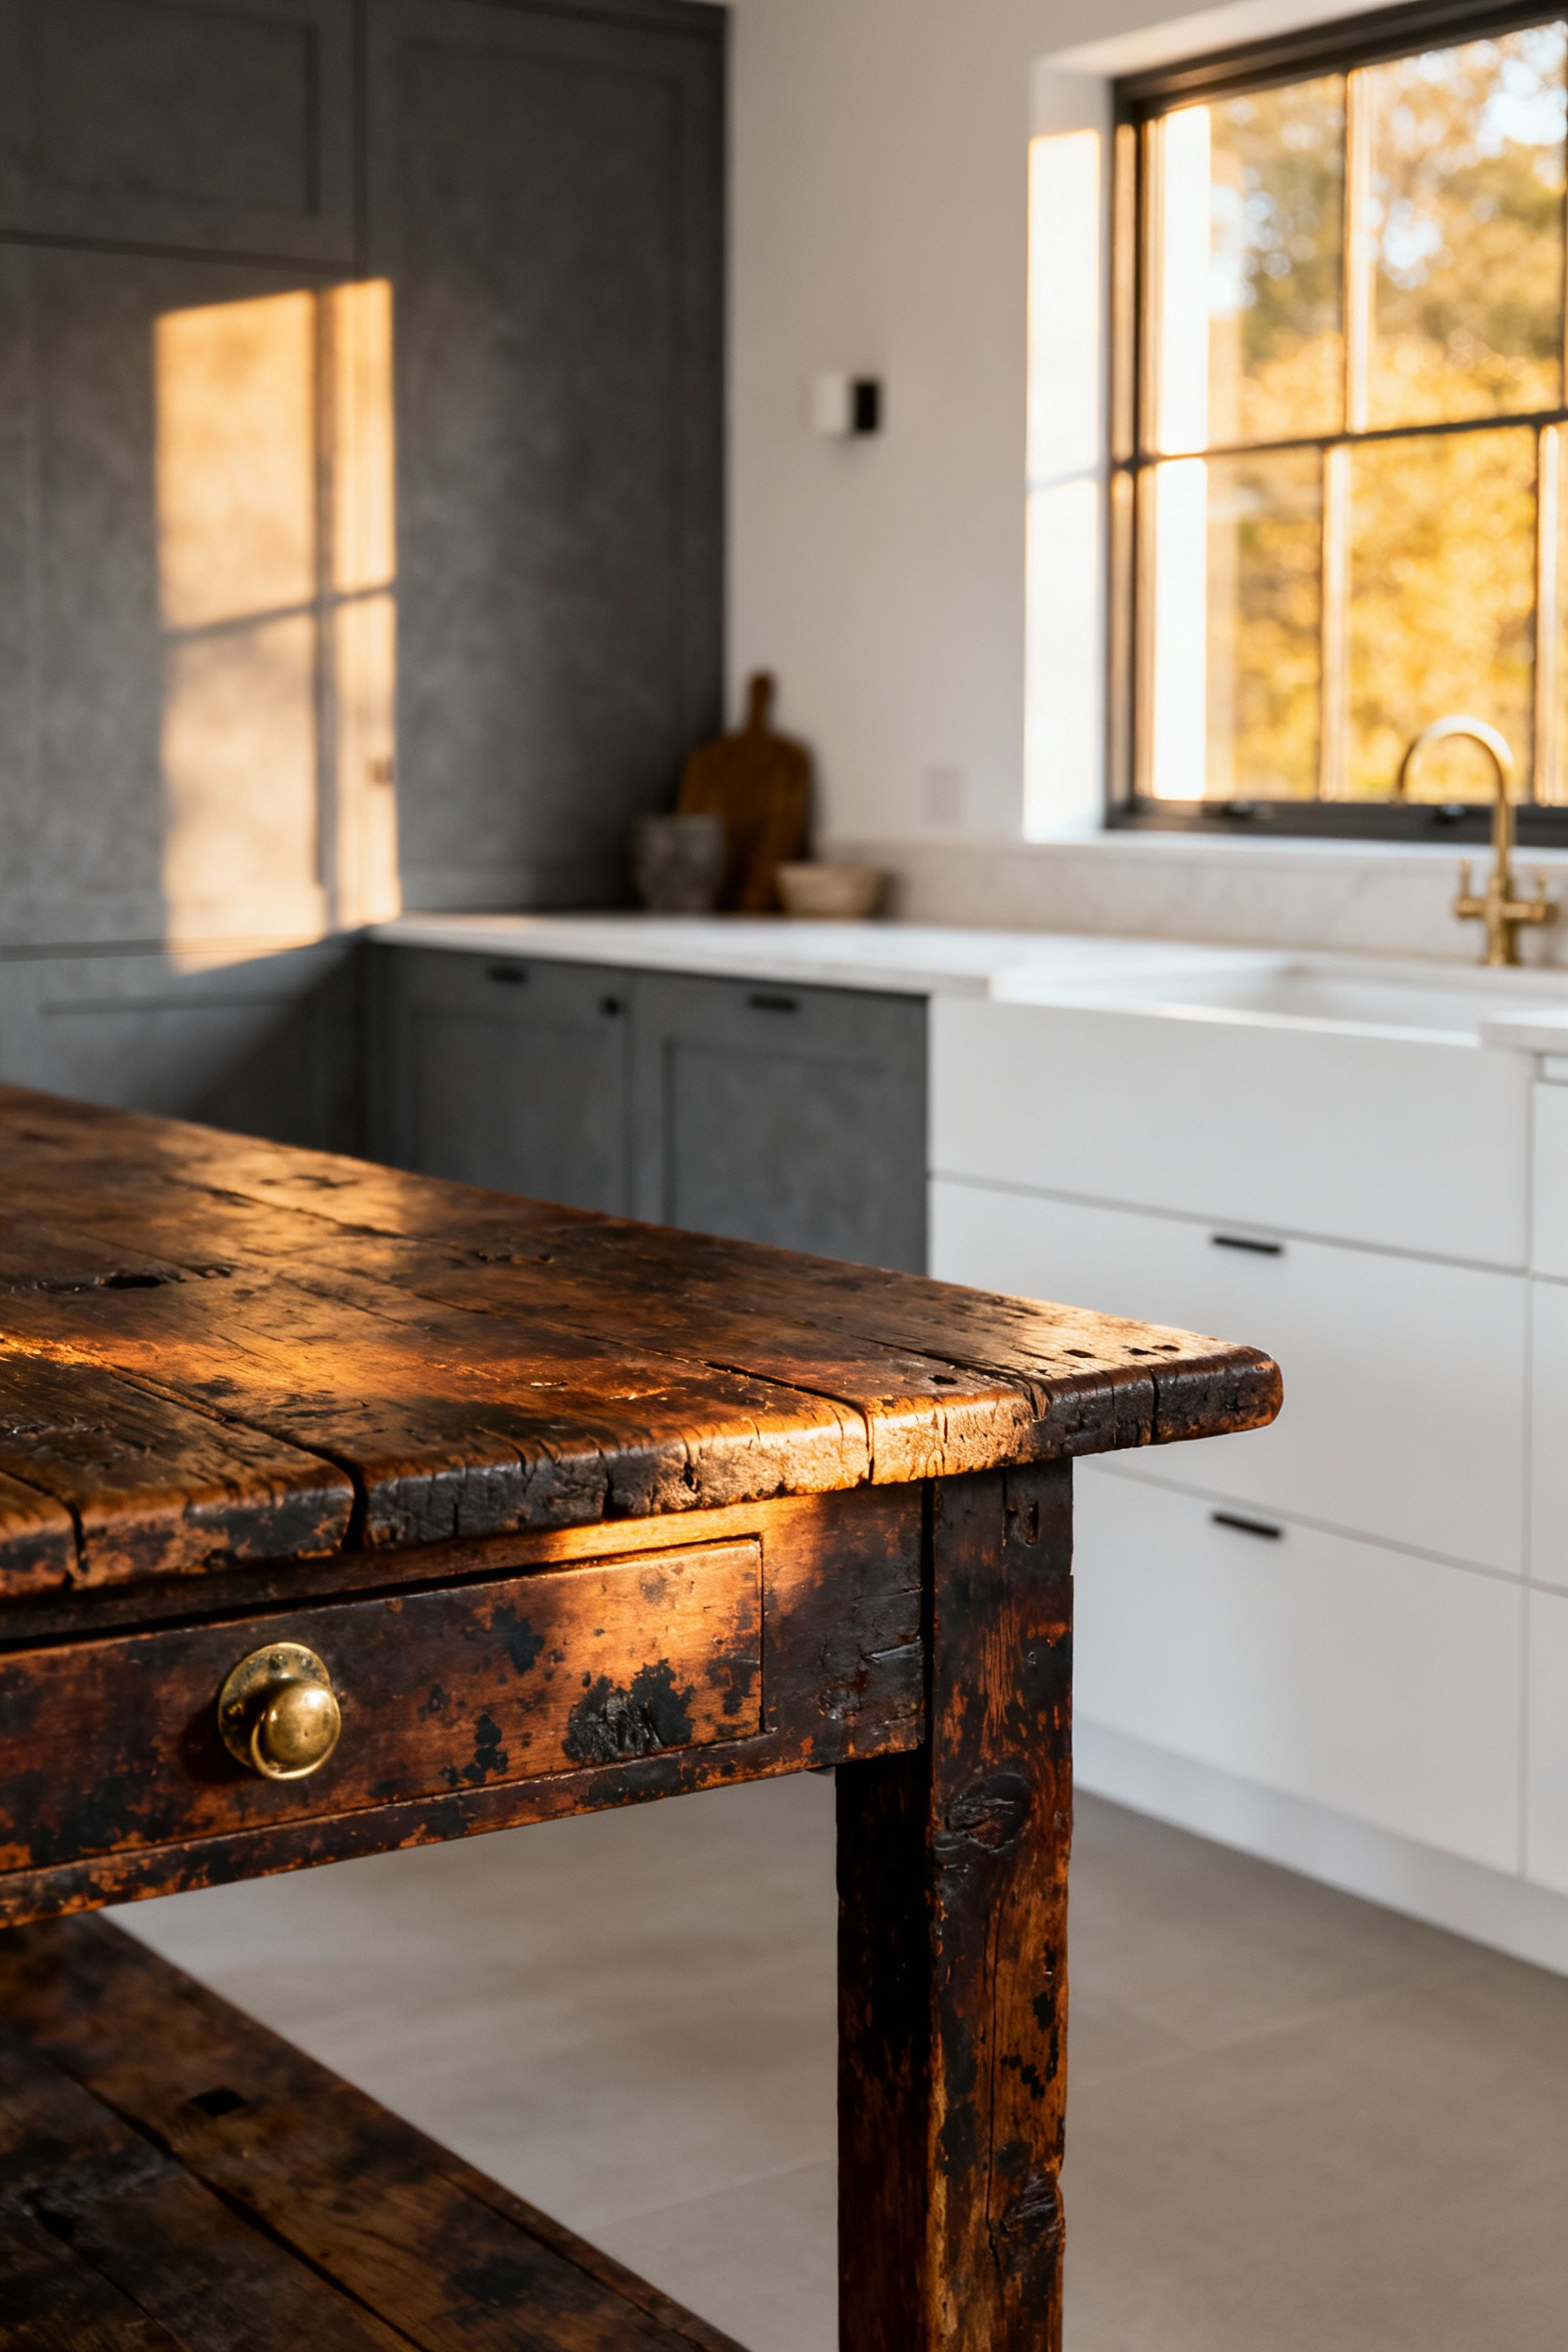
To master the “anti-fitted” aesthetic, treat your island as a distinct character rather than an extension of the architecture. Look for vintage workbenches or prep tables that prioritize visual lightness and utilitarian function over hidden storage:
- Ditch the Plinth: Select pieces with turned legs, tapered feet, or industrial metal frames rather than solid bases to maximize negative space and keep the room feeling airy.
- Embrace High Contrast: Create a focal point by juxtaposing light perimeter cabinets with a deep, saturated color (like navy or forest green) or the warmth of raw, reclaimed timber.
- Prioritize Utility Surfaces: Top your find with thick butcher block, honed soapstone, or even hammered zinc to signal that this is a workbench for creation, not just a display piece.
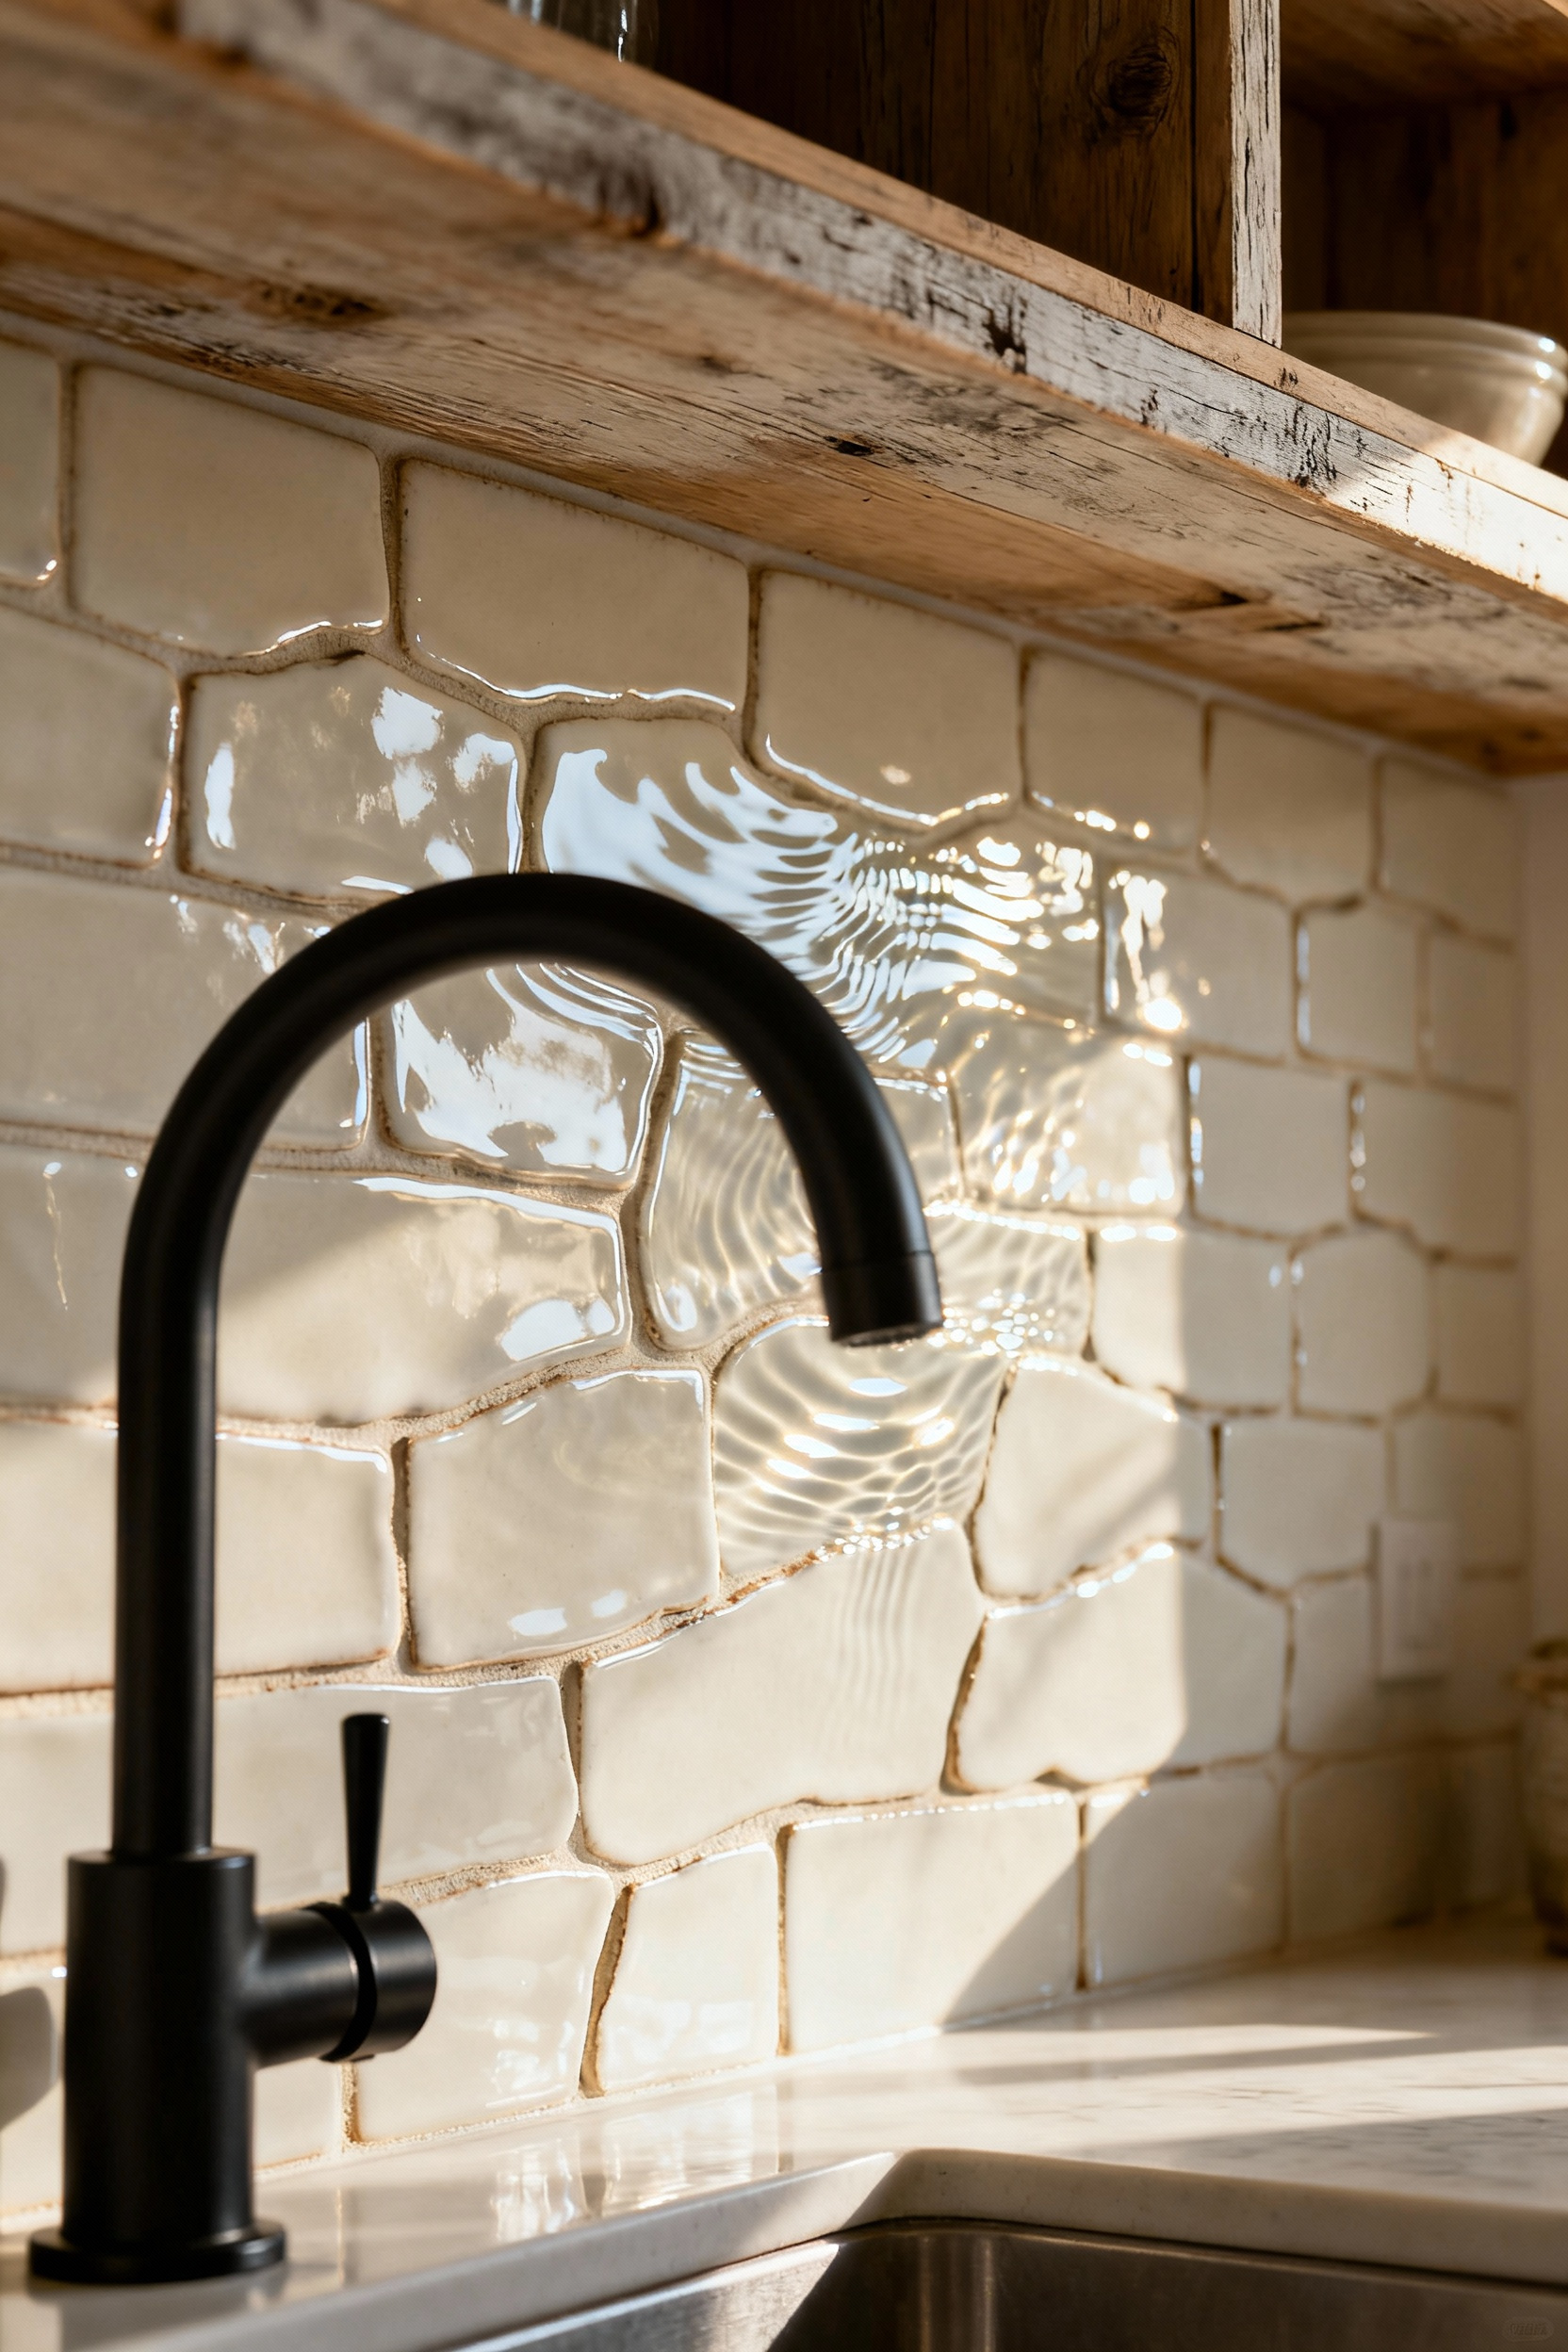
6. Beyond Subway Tile: Utilizing handmade Zellige or terracotta to introduce organic irregularity
While crisp subway tile is a safe standard, there is something deeply soulful about materials that bear the maker’s mark. I often remind my restoration clients that true sustainability lies in choosing materials that age with dignity, developing a patina rather than just wearing out. Handmade Zellige tiles are the ultimate treasure in this regard; their irregular, glossy surfaces catch natural light in a way factory-made ceramics simply cannot, adding a shimmering, water-like depth to your kitchen. To maintain a modern silhouette while embracing this historic craft, stick to a monochromatic palette of creams or soft grays—this allows the organic texture to act as the focal point without overwhelming the clean lines of your cabinetry.
If you crave an earthier foundation, terracotta introduces a grounded warmth reminiscent of timeless European kitchens, but it requires a careful hand to avoid looking dated. I recommend using matte, sealed terracotta in unexpected, oversized shapes—like large hexagons or squares—reserved for statement areas like a butler’s pantry floor or a range alcove. To ensure these rustic elements feel sophisticated rather than chaotic, follow these installation guidelines:
* Blur the Lines: Dye your grout to match the tile color exactly. This creates a seamless surface where the rugged edges are the star, not the grid lines.
* Select for Shape: Avoid small, busy mosaics. Larger formats modernize the material and bridge the gap between rustic charm and contemporary farmhouse chic.
7. The Apron-Front Sink: Sourcing authentic fireclay or vintage cast iron for historical accuracy
There is nothing quite like the soul of a rescued cast iron sink; it is a heavyweight champion of sustainability that keeps superior materials out of the landfill and anchors your kitchen in history. When you are out salvage hunting, remember that authentic vintage cast iron is incredibly dense—if you can lift it easily, it is likely a stamped steel or acrylic imposter. However, if you opt for new fireclay to achieve that pristine, unblemished white, you must demand a triple-glaze finish. This high-temperature firing creates a non-porous shield against the coffee stains and heavy pot chips that often plague lesser reproductions, ensuring your investment survives daily use.
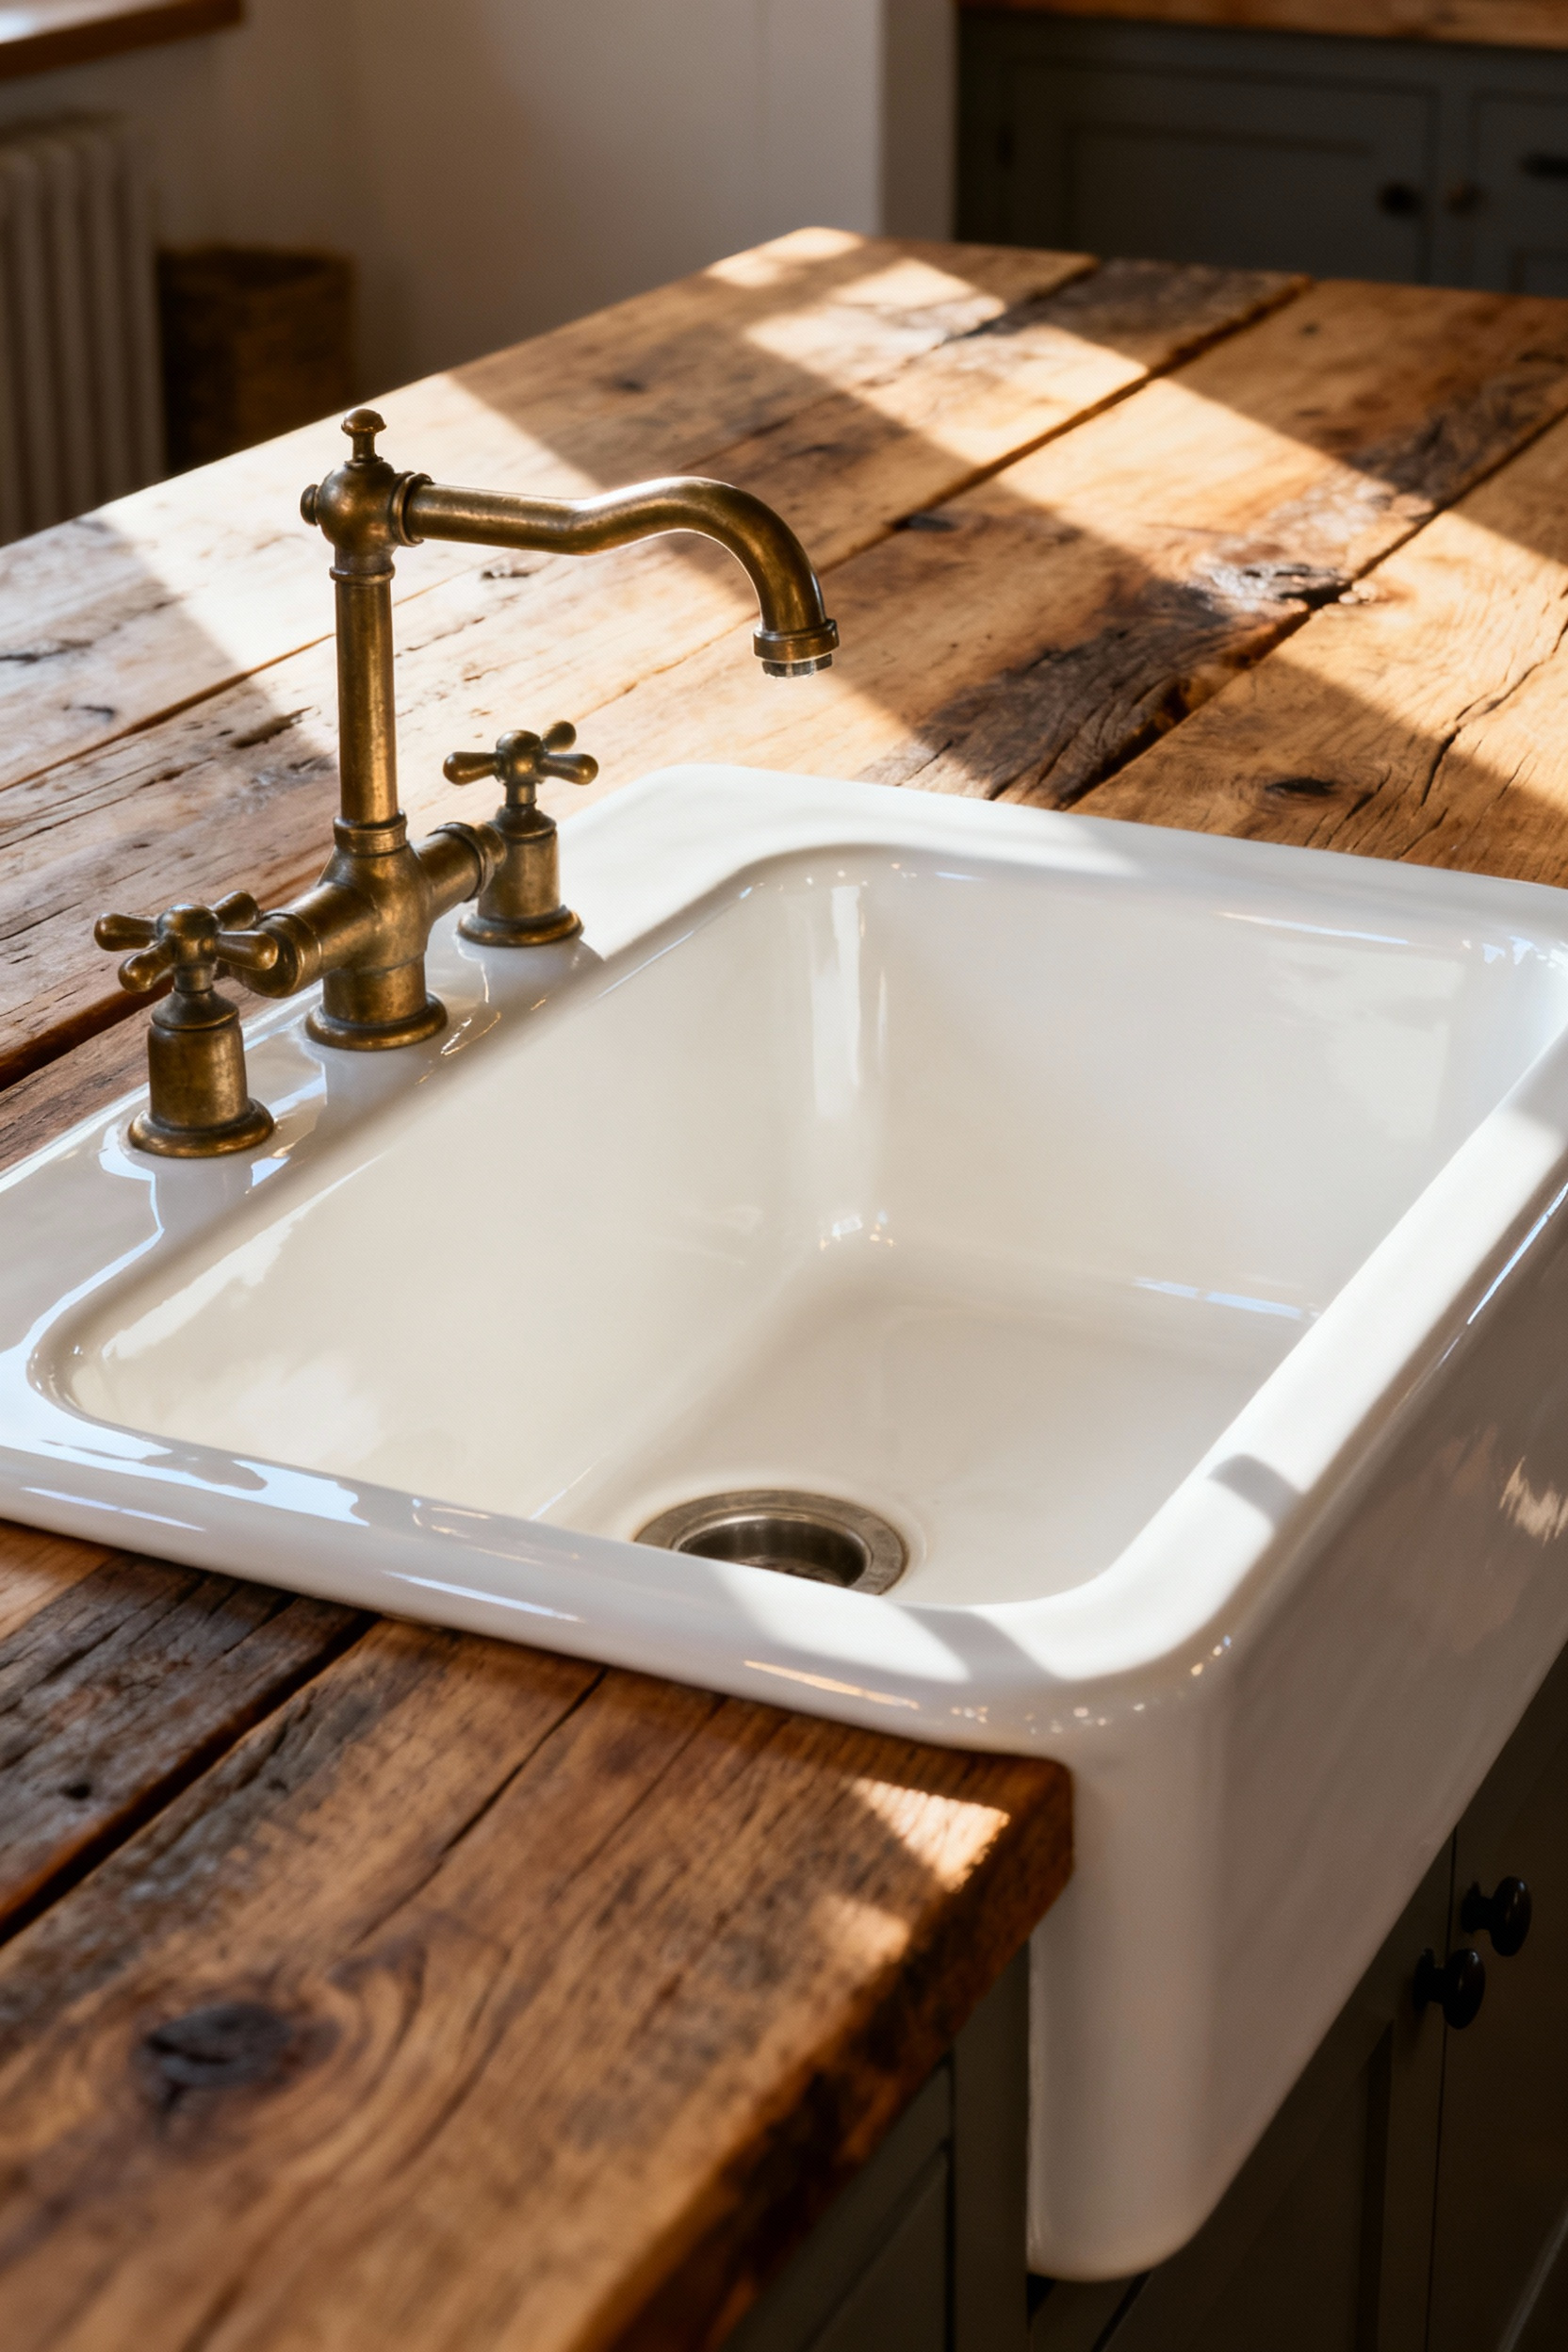
Once you have secured your centerpiece, the installation details define the era. I once had to hurriedly reinforce a standard base cabinet to support a 150-pound salvage find, a vivid reminder that structural reinforcement is non-negotiable for these authentic heavyweights. To nail that balance between historical ruggedness and modern polish, keep these specific design cues in mind:
- The Silhouette: Seek a thick, straight-sided apron (3/4″ to 1″) with a zero reveal to sit flush with your cabinetry, avoiding the overly curved edges of transitional styles.
- The Versatility: Look for reversible fireclay models that feature a plain flat front on one side and a fluted texture on the other, allowing you to decide between sleek or decorative right before installation.
8. Mixed Metal Mastery: Moving away from the ‘suite’ look by blending iron, brass, and polished nickel
Ditch the “fast furniture” mentality of factory-matched hardware suites; a home should feel collected over time, not unboxed in a single afternoon. Embracing mixed metals is one of the most sustainable design moves you can make because it liberates you from a single finish, allowing you to integrate that salvaged mid-century brass pendant or those reclaimed iron brackets without worrying if they clash with a new faucet. This approach creates a curated, layered depth that feels authentic and lived-in, transforming a sterile space into one with soul and history.

To achieve this “curated chaos” without it looking messy, I recommend following a strict 60/30/10 formula that assigns specific roles to each material based on its texture and function:
- 60% Iron or Matte Black: Let the rougher, matte textures handle the heavy lifting. Use iron for grounding, structural elements like shelf brackets, range hood straps, and the majority of your cabinet pulls.
- 30% Polished Nickel: Assign this clean, reflective finish to the “workhorses” of the room—specifically plumbing fixtures and pot fillers—where durability and hygiene are paramount.
- 10% Aged or Lacquered Brass: Treat brass like vintage jewelry. Use it sparingly on focal points like island lighting or toe-kick accents to inject warmth and a touch of luxury against the stark iron.
9. Statement Ventilation: Replacing stainless steel hoods with plaster or shiplap-clad architectural features
There is a distinct romance in trading the cold, industrial hum of stainless steel for the organic warmth of hand-troweled plaster or painted shiplap. In my restoration projects, I view the range hood not as a mere appliance, but as the hearth of the home—a place that demands soul, not just shine. By treating the hood as a monolithic architectural feature that extends fully to the ceiling, you ground the room and introduce a tactile quality that glossy subway tiles simply can’t compete with. Whether you opt for the earthy depth of a Roman clay finish or the clean lines of wood cladding painted to match your trim, the goal is to create a focal point that feels timeless and built-in, rather than bought-and-placed.
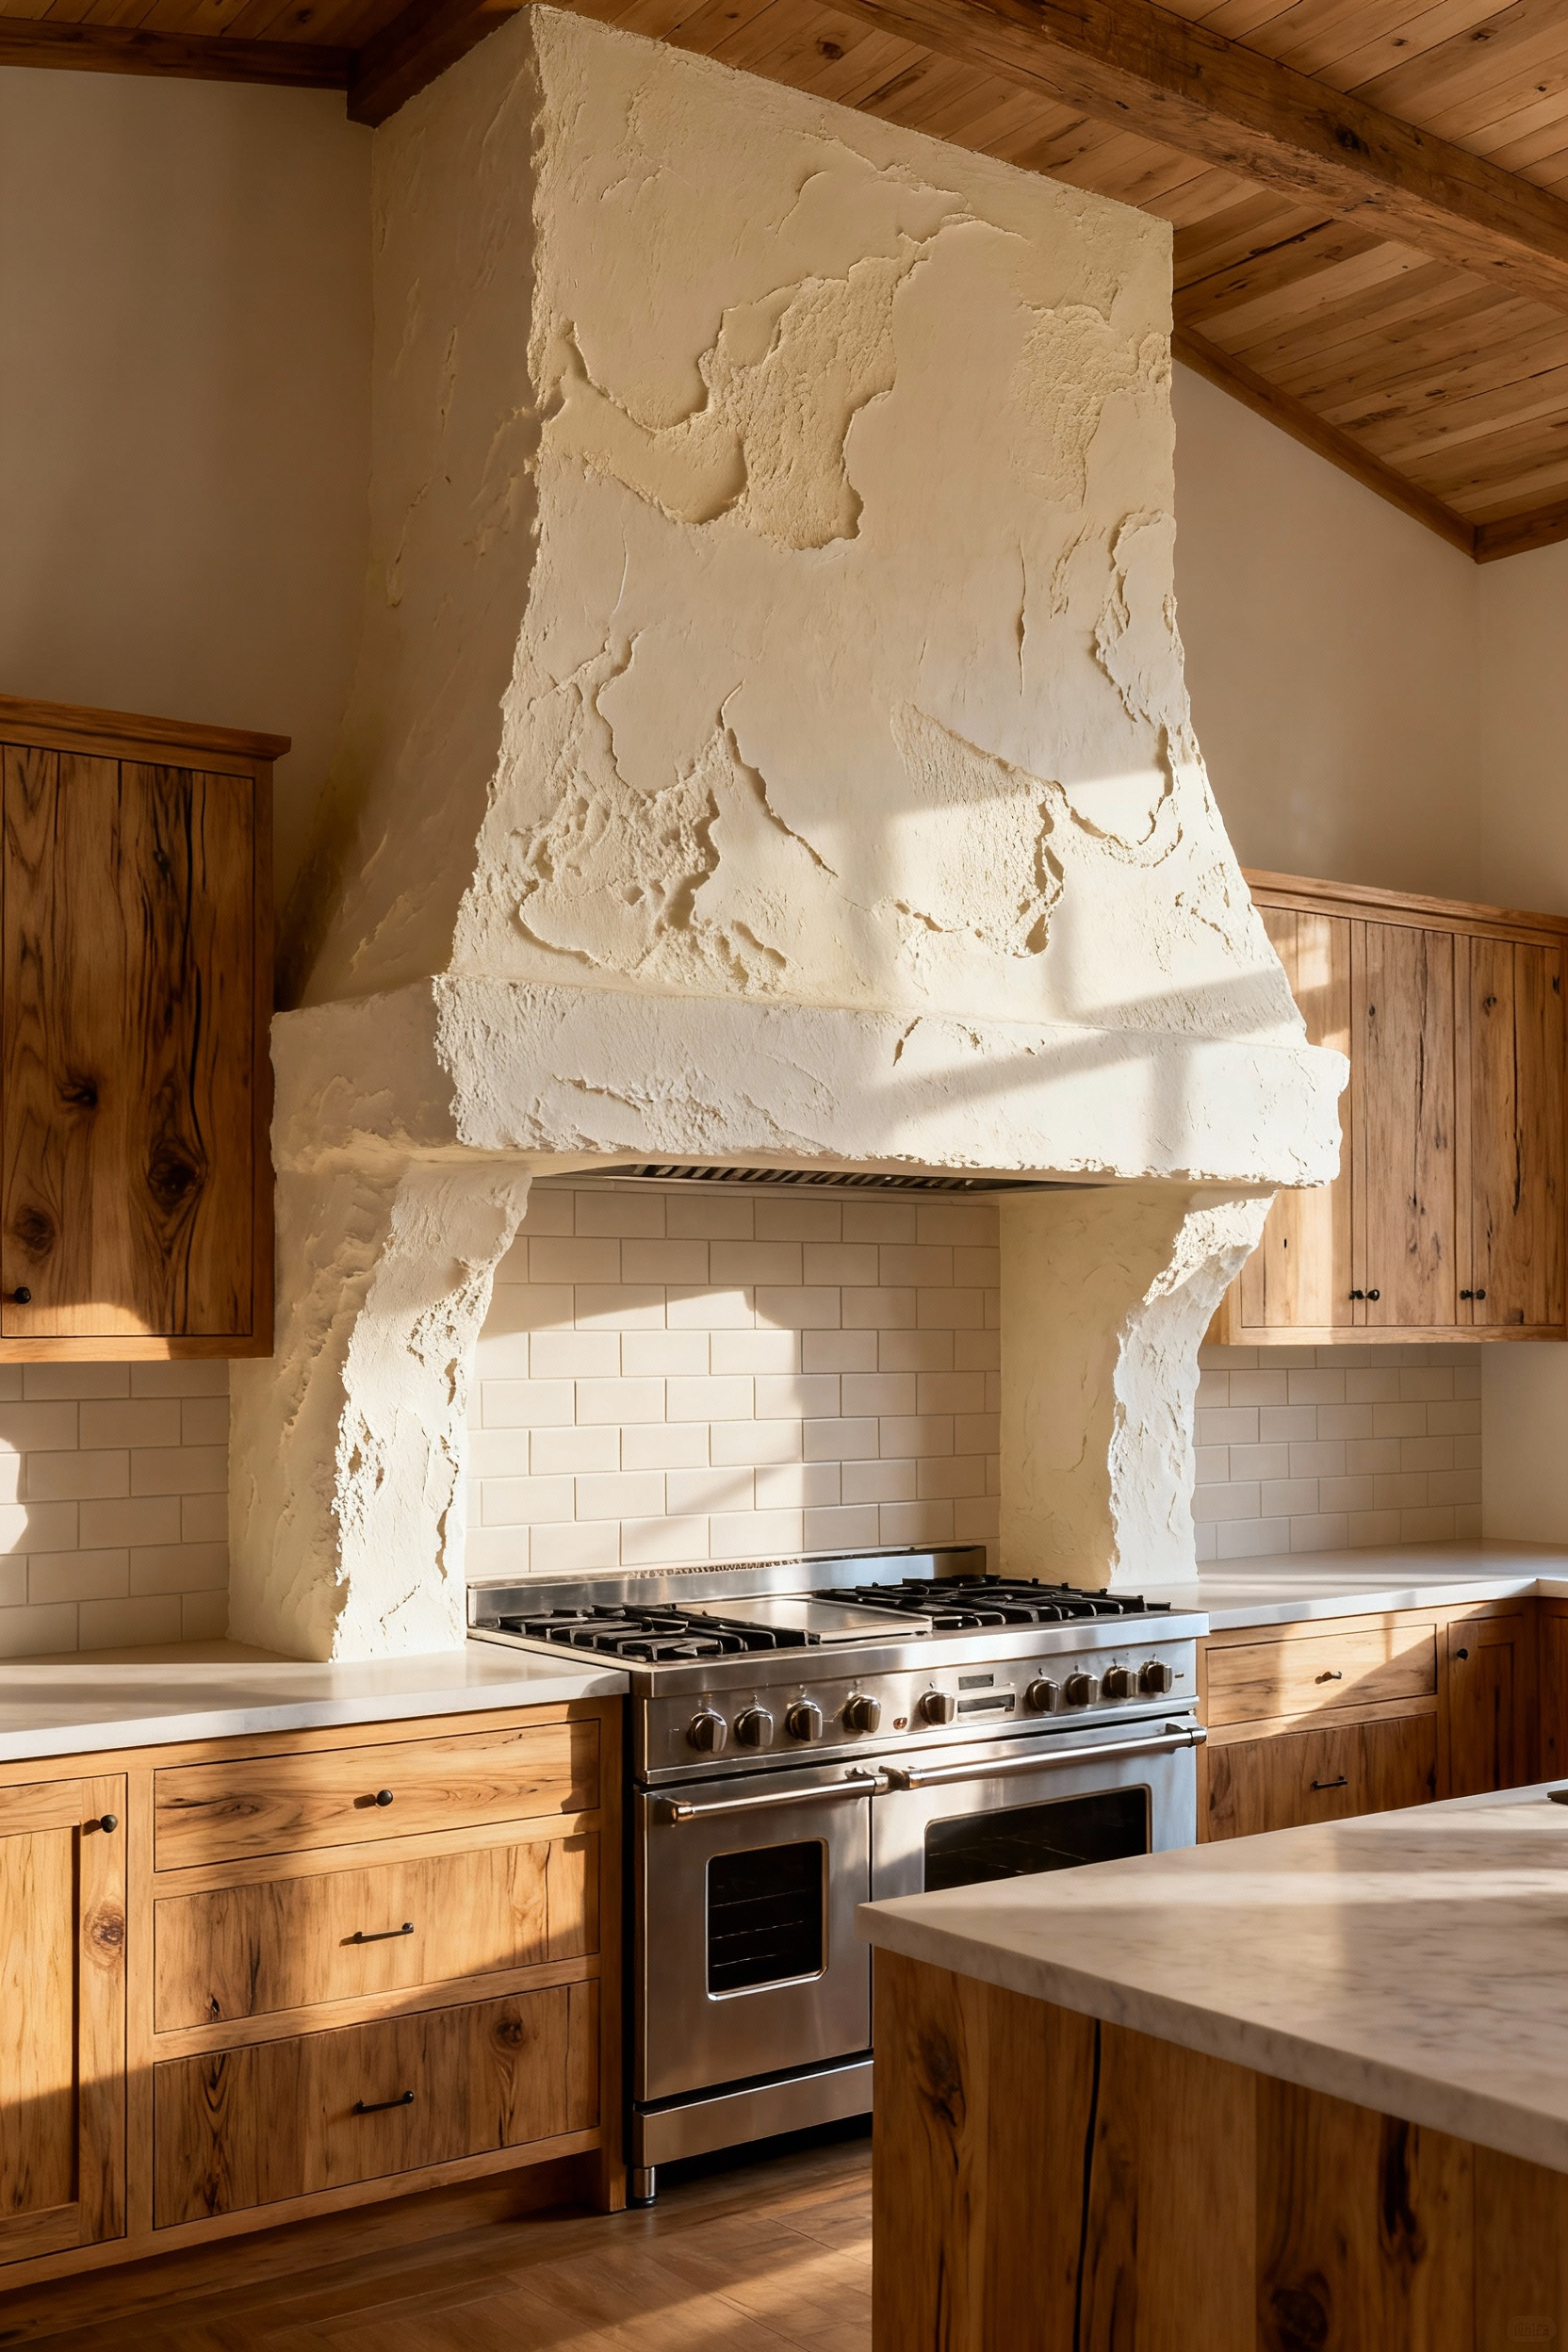
However, as any vintage treasure hunter knows, good bones matter more than a pretty face. To successfully execute this look while maintaining a healthy, sustainable kitchen environment, you must prioritize the structural “guts” of the design:
- Invest in the Insert: Never compromise on the mechanics; allocate your budget to a professional-grade ventilation liner first, as the cladding is secondary to air quality.
- Scale for Impact: Ensure the hood matches the width of your cooking surface and connects seamlessly to the ceiling to establish a strong, chimney-like anchor.
- Texture over Color: If using wood beadboard or shiplap, paint it the same shade as your surrounding walls to ensure the texture reads as seamless architecture rather than rustic décor.
10. Industrial Illumination: integrating salvaged factory pendants to anchor the room’s vertical space
There is a distinct thrill in unearthing a heavy, enamel-coated pendant from a salvage yard—you aren’t just buying a light; you’re rescuing a piece of labor history. In the airy context of a Modern Farmhouse kitchen, these industrial giants act as essential vertical anchors, offering a gritty, grounded contrast to the typical expanse of white shiplap and light oak. I always encourage clients to hunt for original chipped enamel in matte black or deep forest green; this dark visual weight prevents the room from feeling sterile or overly precious, effectively balancing the horizontal lines of your cabinetry with a bold statement of resilience.
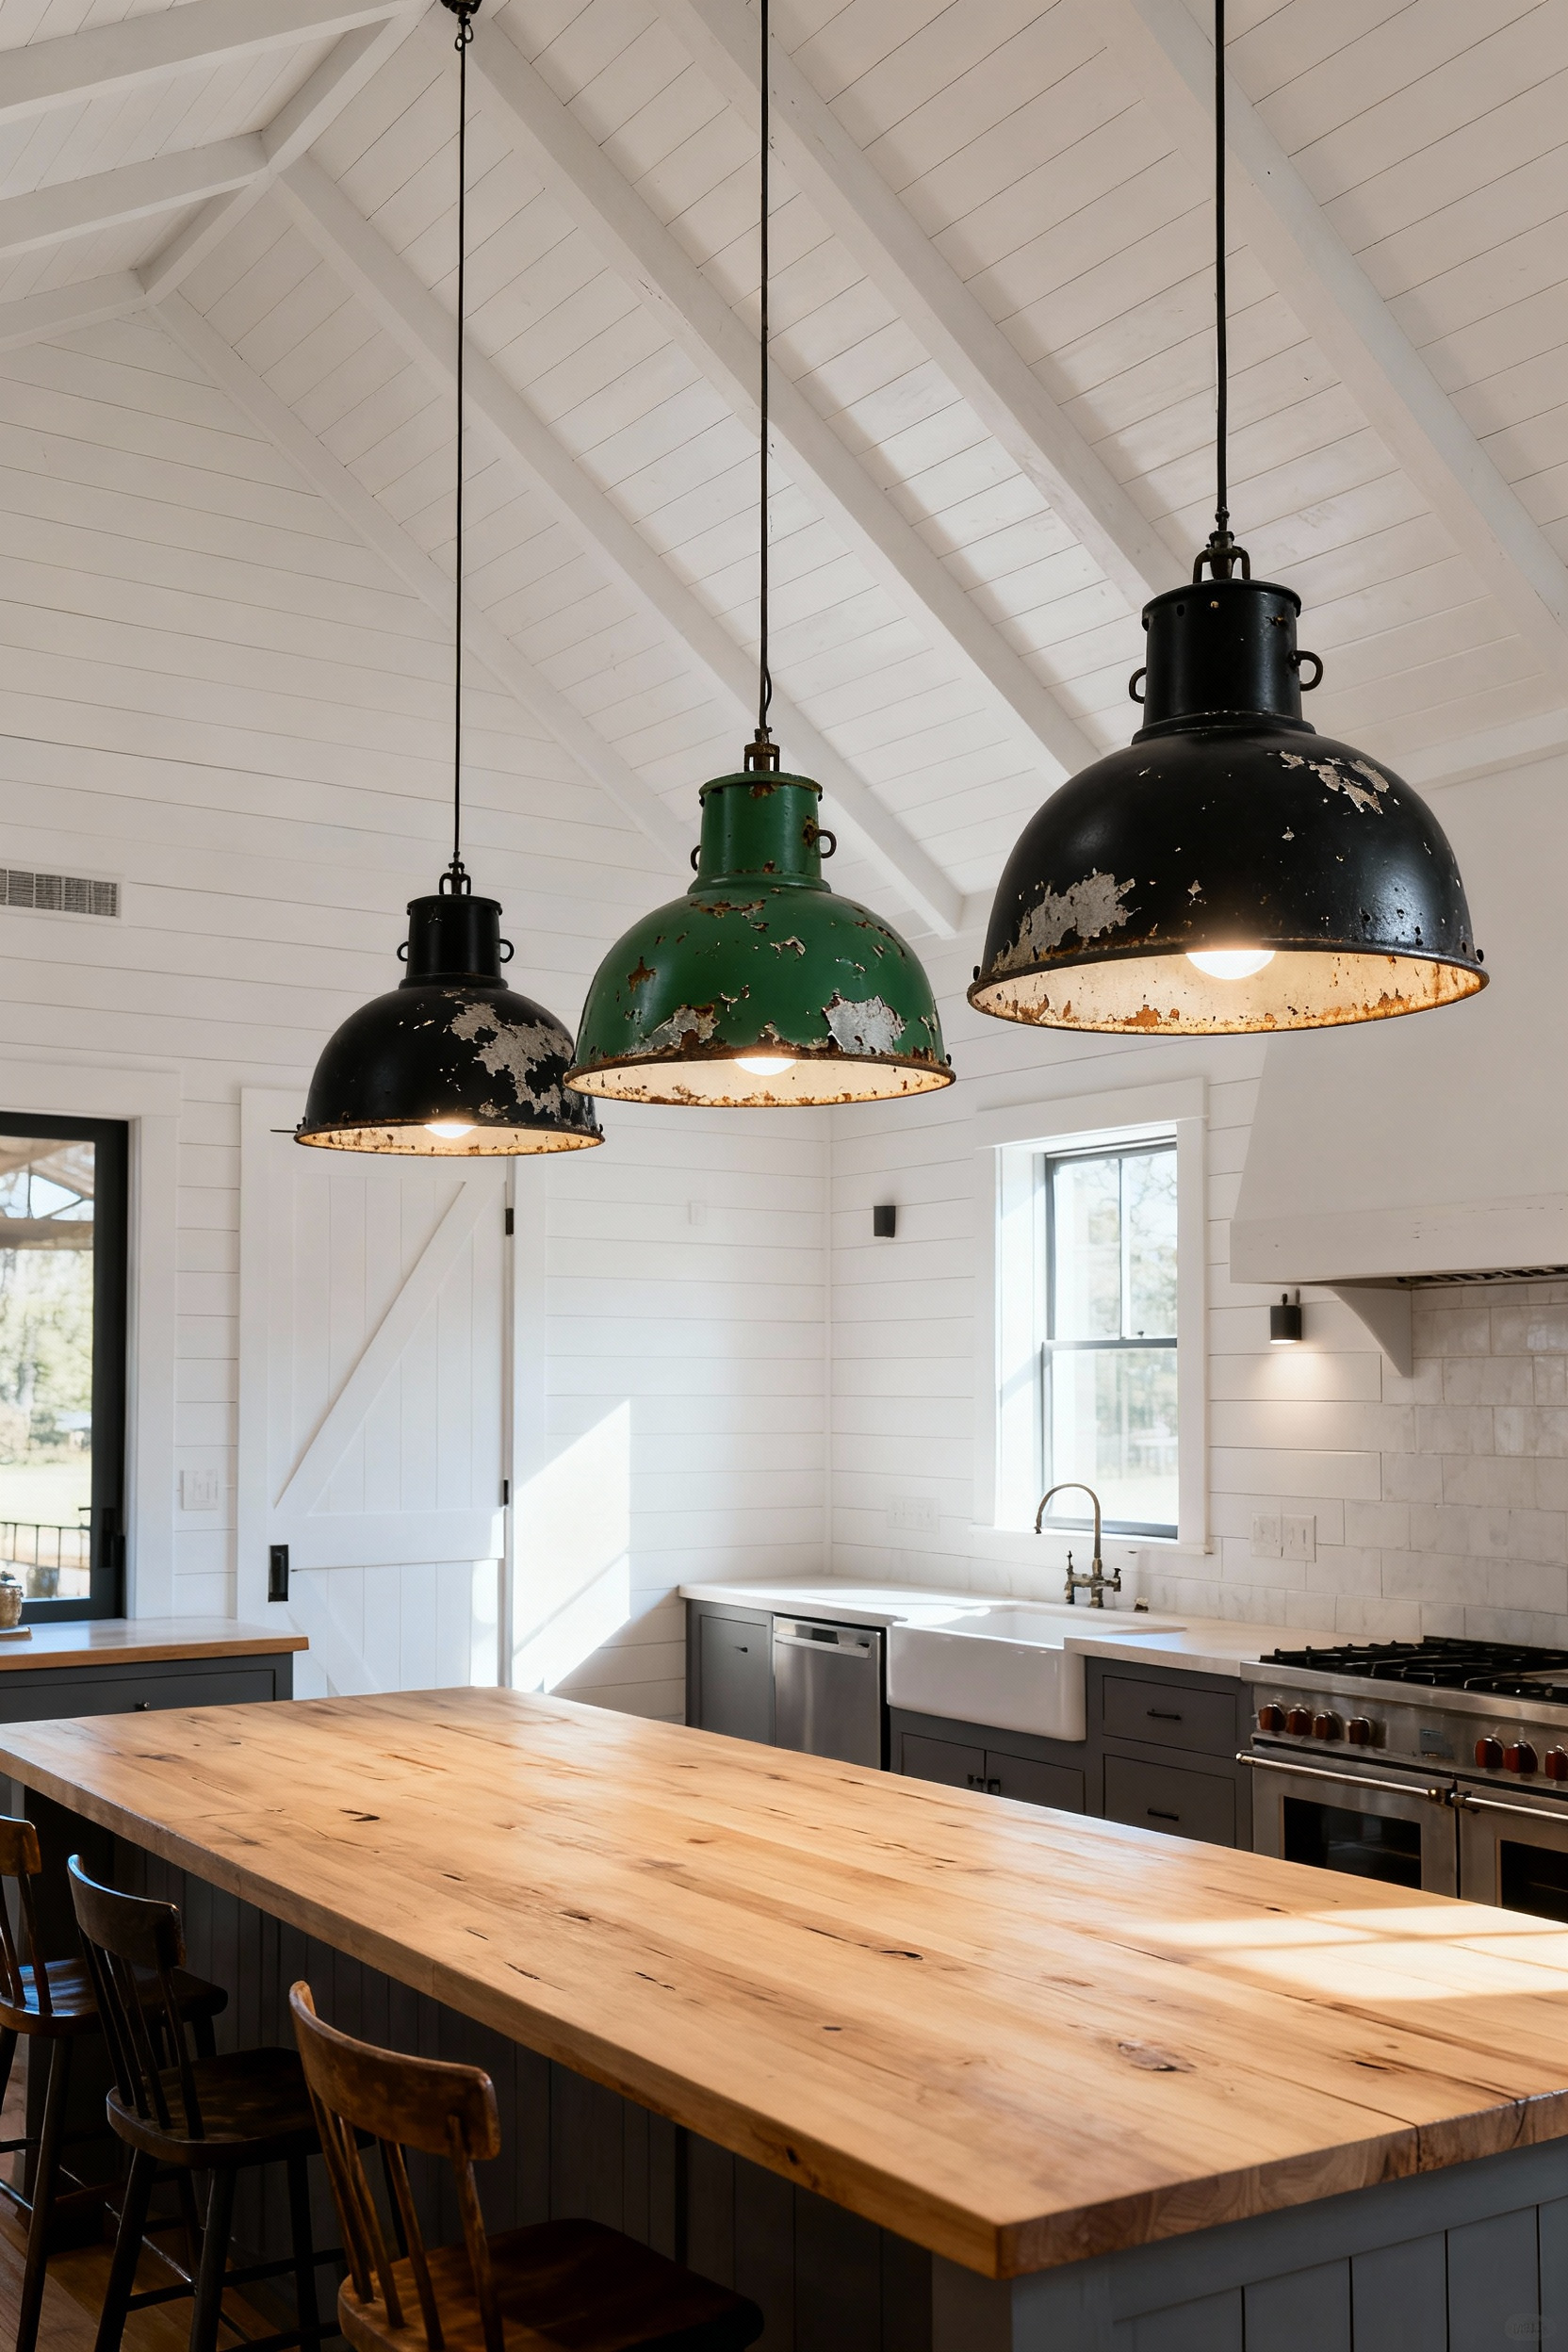
However, integrating these salvaged beasts requires a blend of bold styling and strict safety precautions to ensure they function as well as they look. To successfully anchor your room with industrial history:
- Master the Scale: Don’t shy away from size. For islands 8 feet or longer, large factory shades are necessary to hold the space. Hang them slightly higher than standard—33–36 inches above the counter—to maintain open sightlines while preserving their commanding presence.
- Refine the Hardware: Elevate the look by pairing the battered patina of the shade with new, sleek mounting hardware. A polished brass or matte black chain and canopy will bridge the gap between “utilitarian” and “modern.”
- Rewire Responsibly: Sustainability shouldn’t come at the cost of safety. Always have vintage industrial electricals professionally rewired and UL-certified to meet residential standards before installation.
11. Curated Utility: The art of styling open shelving with ironstone and functional vintage cookware
There is a quiet thrill in rescuing a stack of heavy, white ironstone from a dusty estate sale; these pieces are durable survivors that bring instant soul to a kitchen without demanding attention. To bridge the gap between farmhouse nostalgia and modern restraint, I rely on monochromatic stacking. Grouping creamy ironstone platters and pitchers creates a calming visual rhythm, but the secret lies in grounding that lightness. I always anchor my white displays with the deep, seasoned black of a cast-iron skillet or the warm, scarred patina of a salvaged wood cutting board. This material contrast prevents the shelf from floating away visually and reminds us that these items are meant to be used, not just admired.
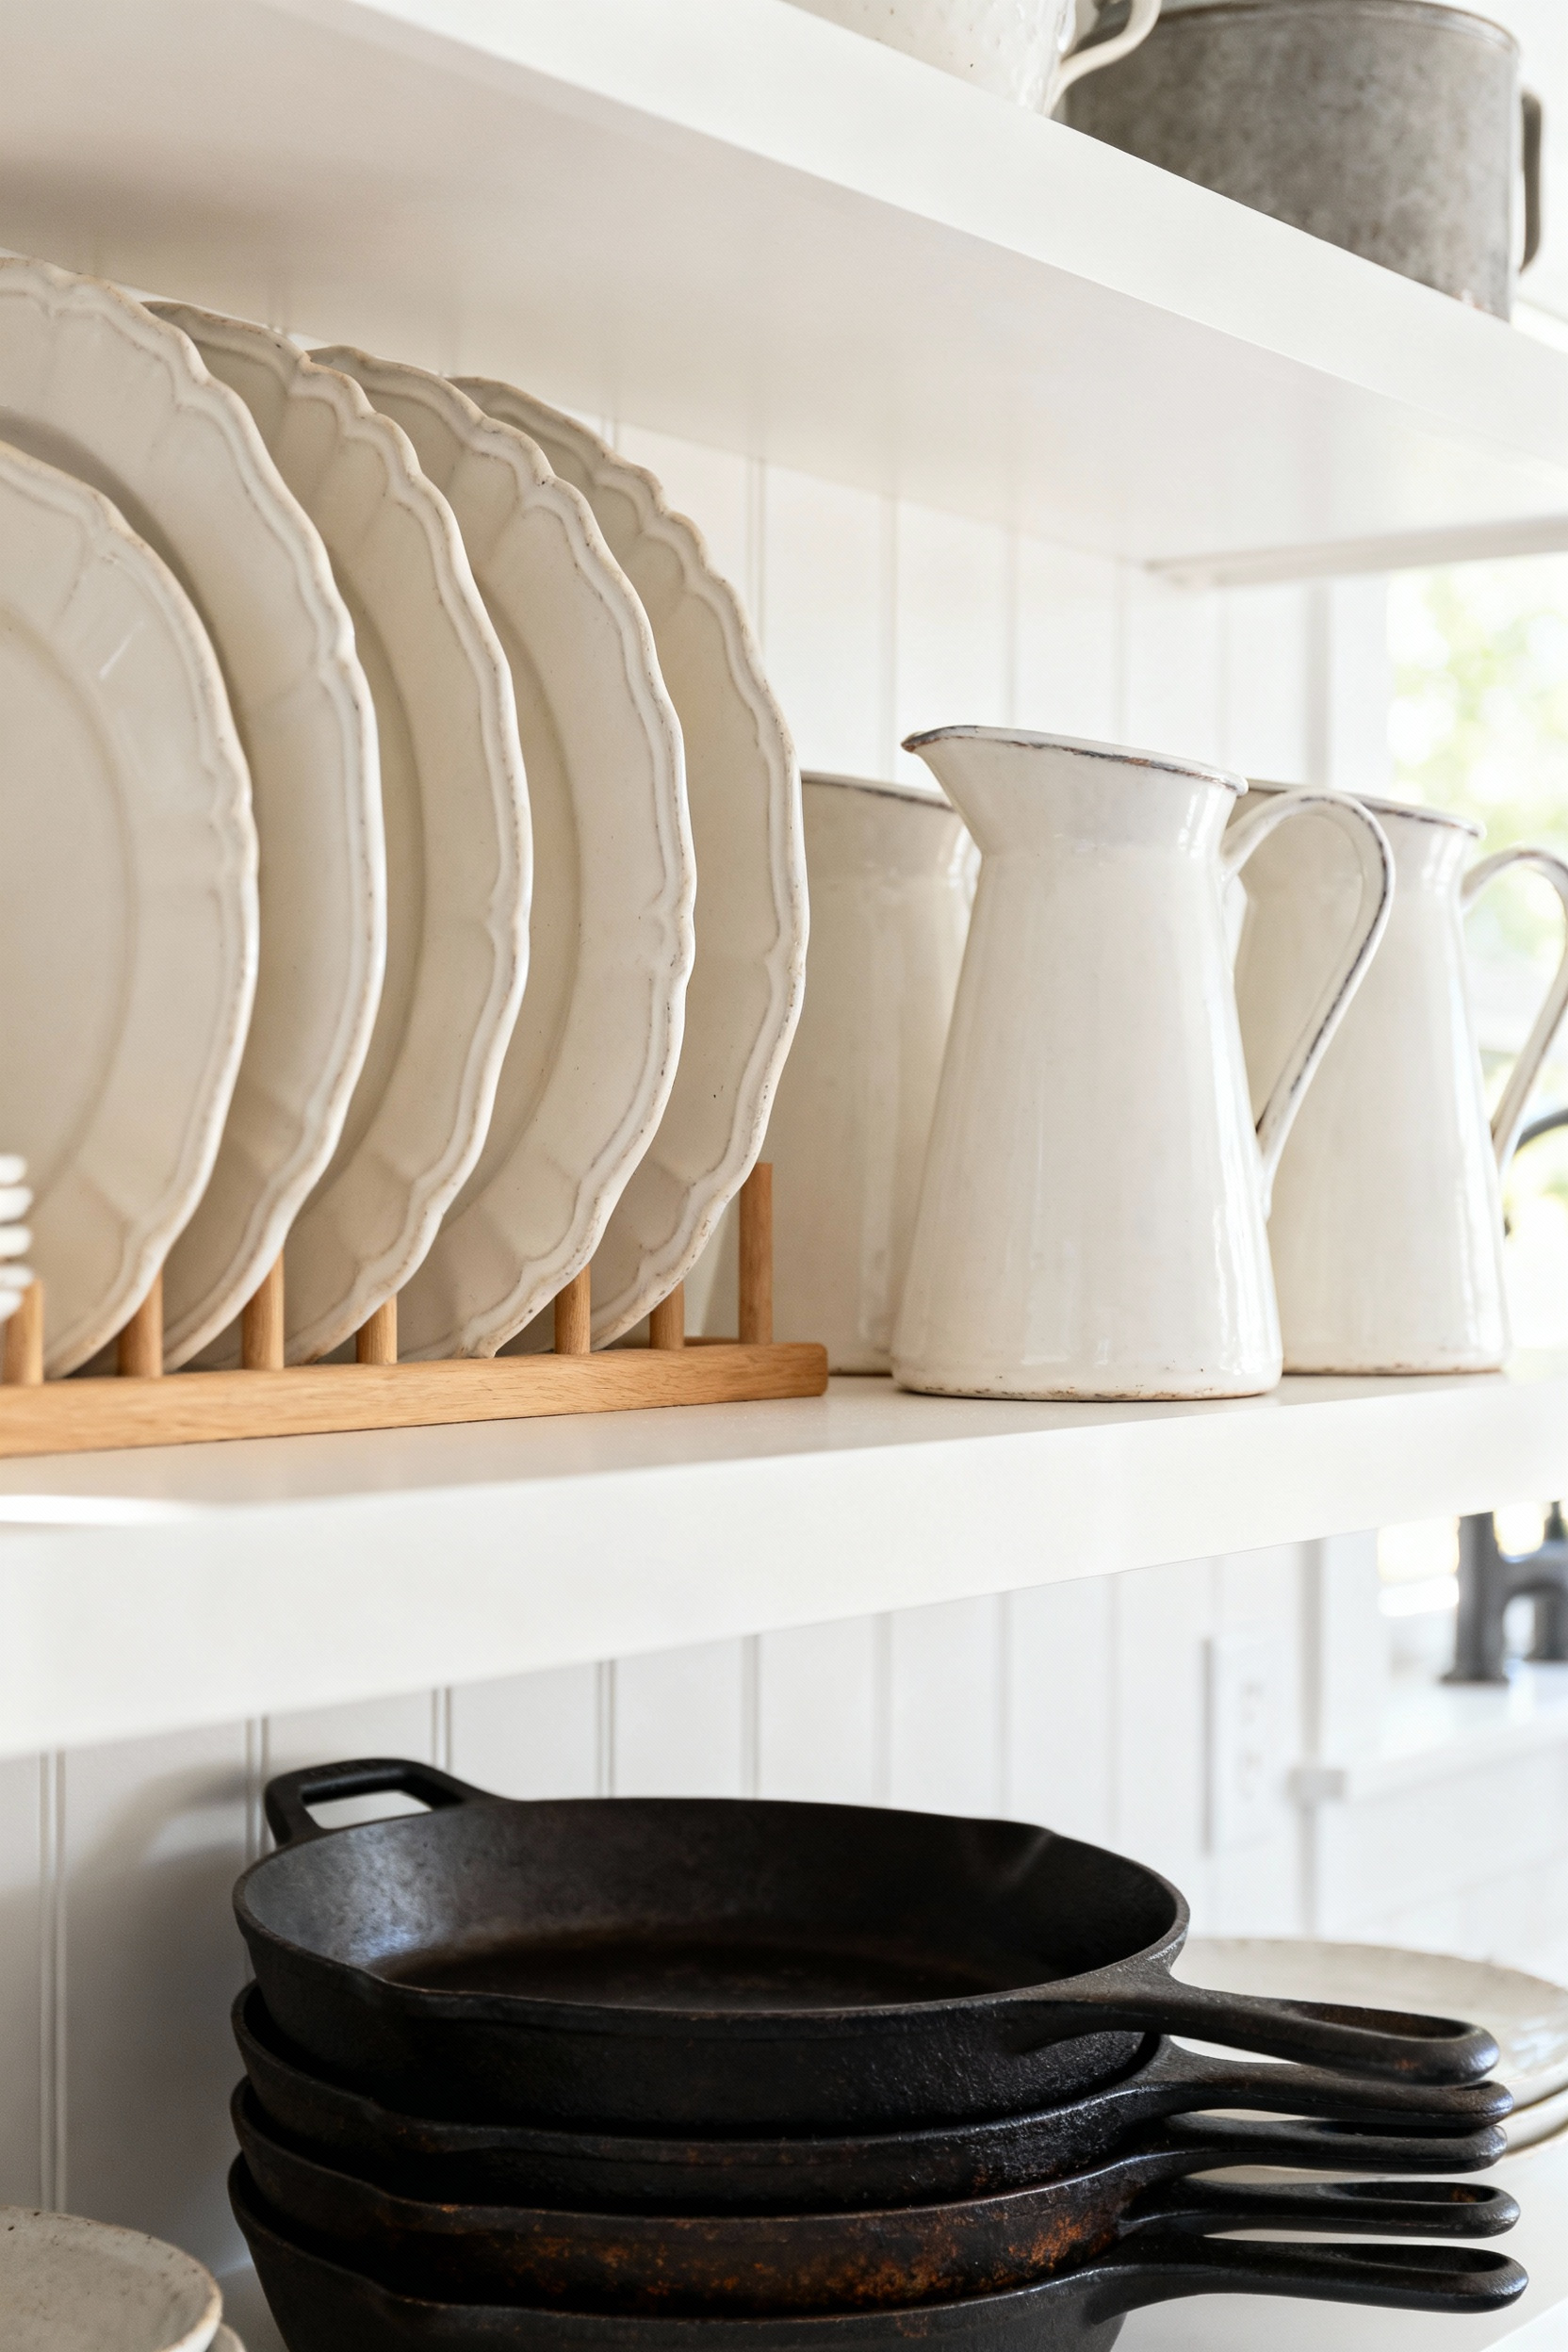
True sustainability means putting our vintage finds to work, ensuring they don’t become “dust catchers.” To maintain a curated look that honors the history of the pieces while serving a busy modern cook, apply these styling mechanics:
- The 70/30 Edit: Resist the urge to overfill. Dedicate 70% of the shelf to daily functional items (dishes, glasses) and leave the remaining 30% as negative space. This breathing room highlights the silhouette of your favorite vintage scale or ceramic bowl.
- Integrated Utility: Install a simple brass rail or S-hooks beneath the bottom shelf to hang copper or enamelware saucepans. This clears shelf surface area and keeps your most-used “workhorses” directly in the cooking zone.
12. The Soft Layer: Introducing vintage runners and linen textiles to dampen acoustics and add warmth
Open-concept kitchens often suffer from the “echo chamber” effect, where clattering dishes and conversation bounce off hard surfaces like quartz and shiplap. The most sustainable and soulful solution is to ground the space with a vintage Turkish Oushak or Persian runner. I recently rescued a distressed rust-colored runner from an estate sale that added instant history to a stark white renovation, but the secret to its performance is actually underneath. You must pair these low-pile treasures with a high-density felt rug pad (at least 1/4 inch thick). This recycled layer provides the necessary acoustic absorption that a vintage weave lacks on its own, while protecting the fibers for another generation of use.
Title: Vintage Runner Grounding a Modern Farmhouse Kitchen
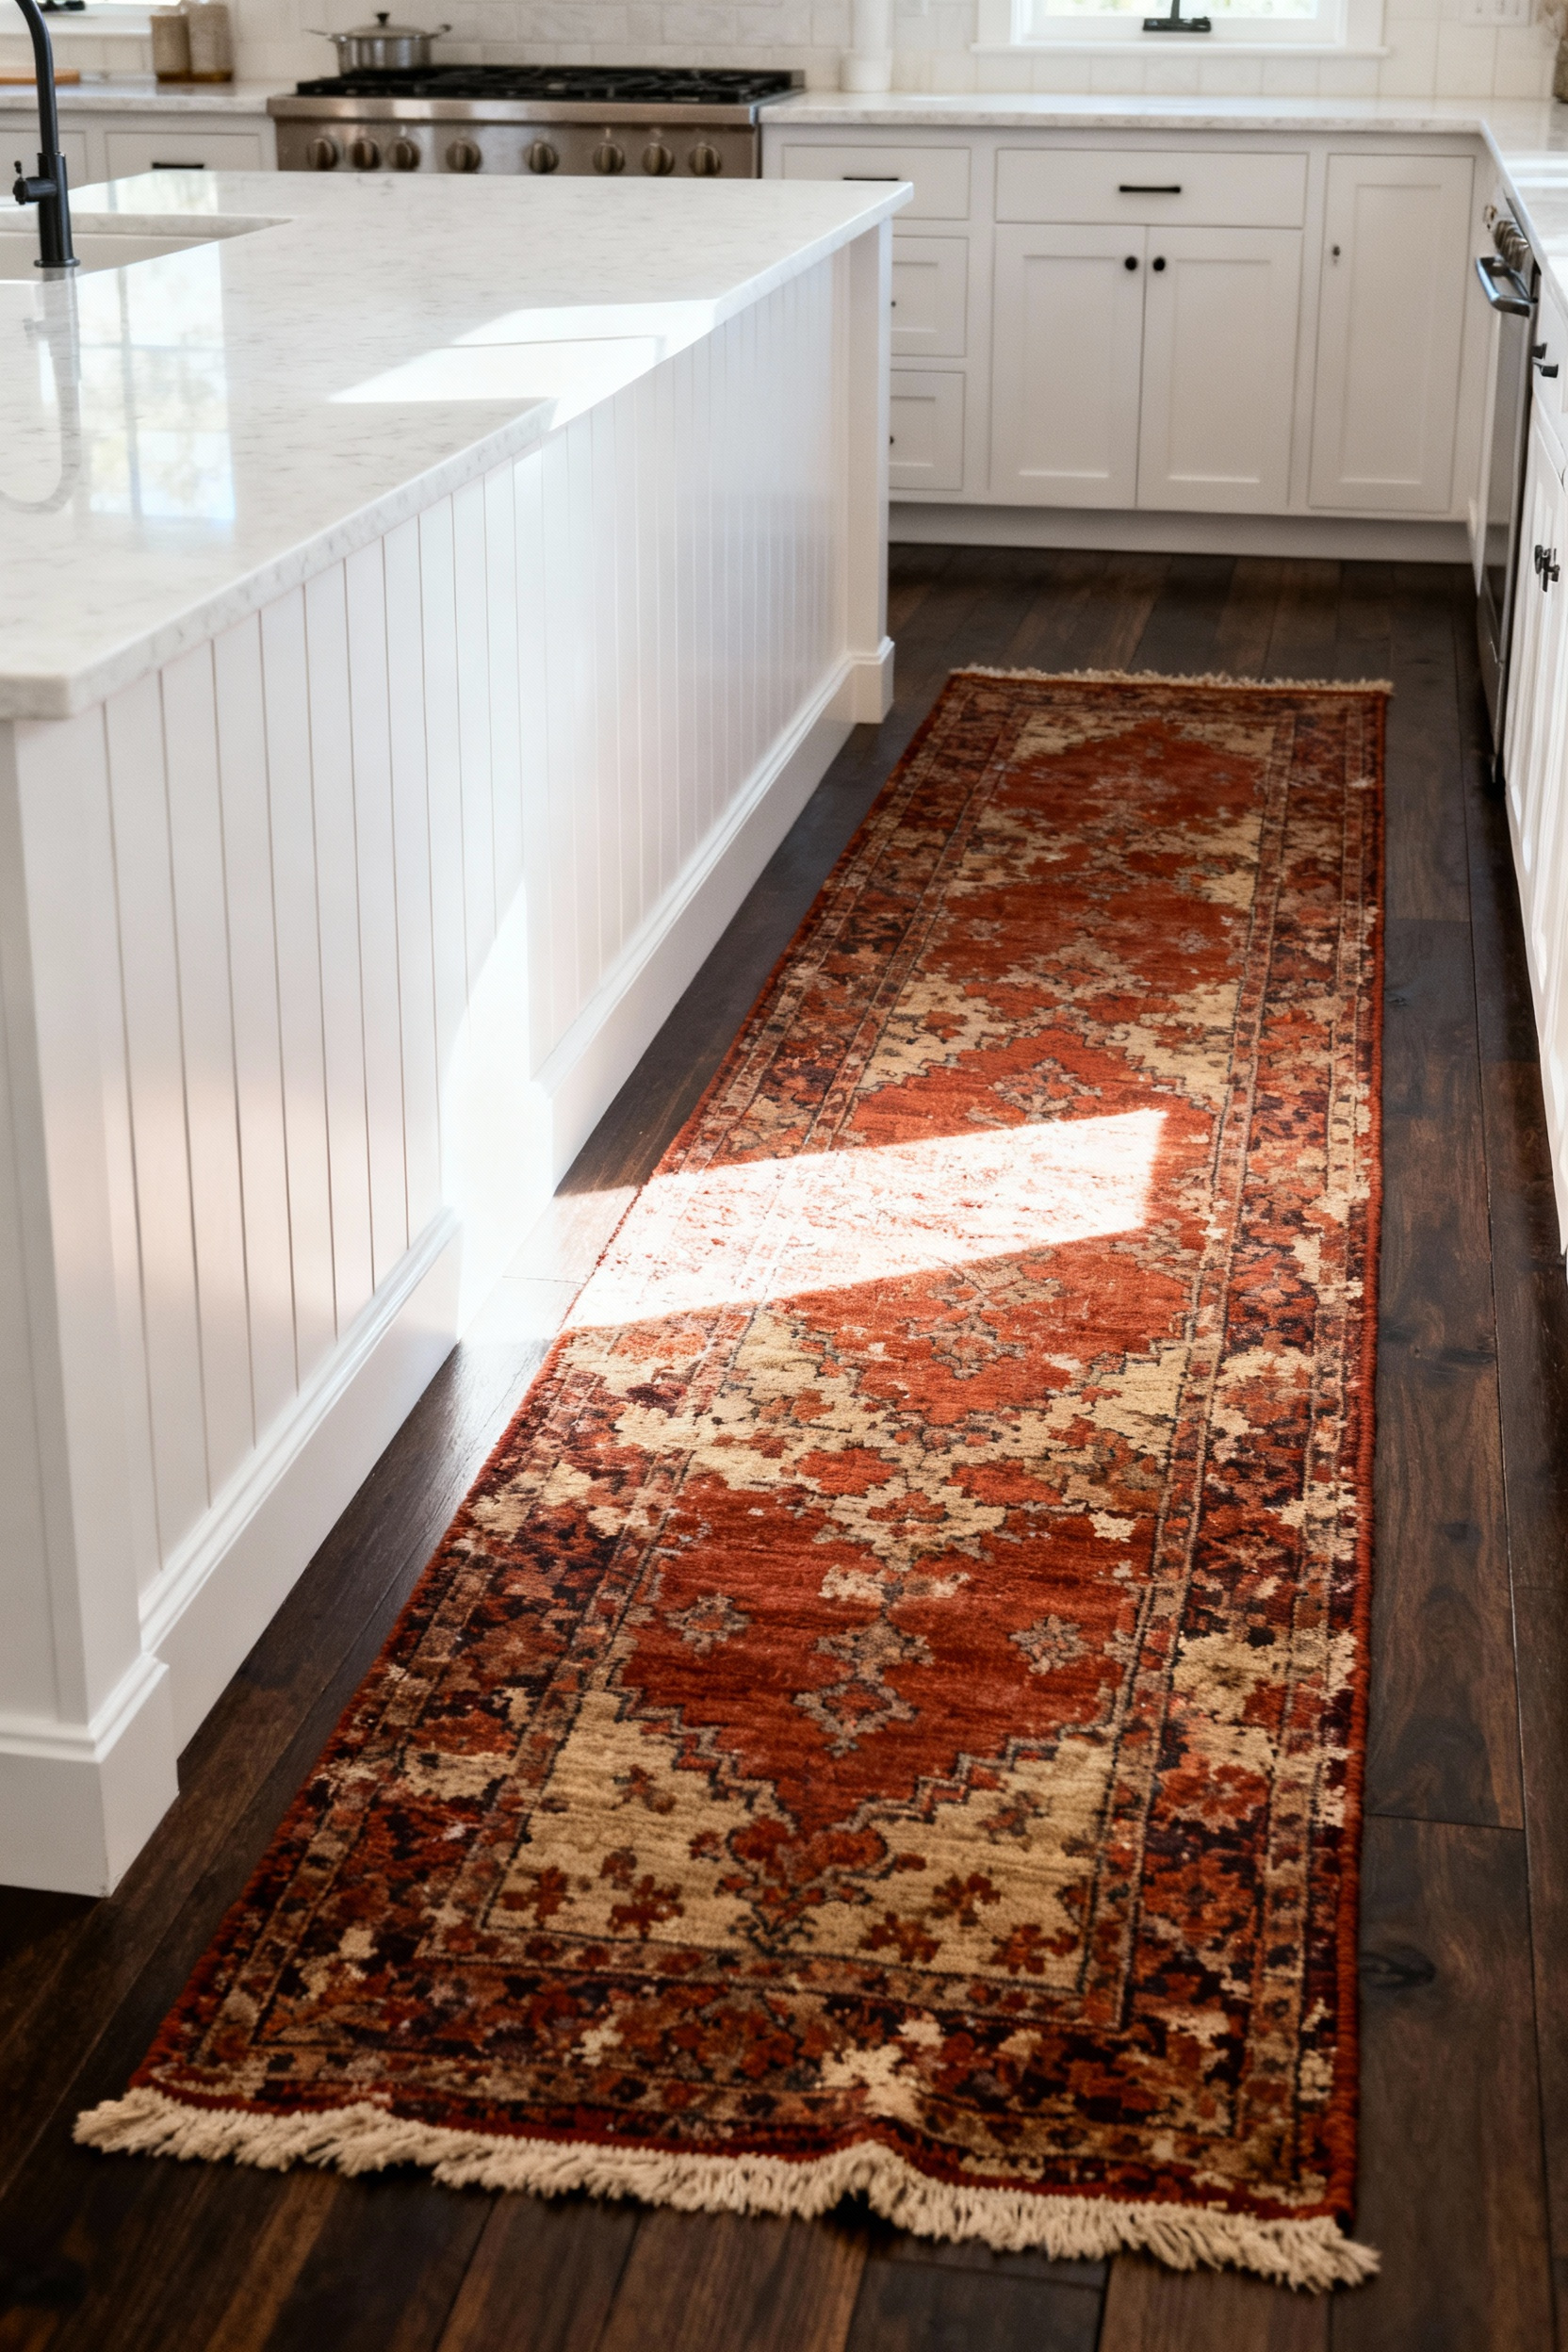
To fully soften the sharp lines of modern cabinetry and dampen sound, you need to layer organic textiles strategically rather than cluttering the space. Here is my formula for adding warmth without visual noise:
- Scale the Runner: Ensure your vintage find spans at least two-thirds (2/3) of your island’s length; anything shorter looks like a floating postage stamp and fails to anchor the room.
- Embrace Stonewashed Linen: Swap stiff, starched fabrics for stonewashed linen aprons and tea towels in flax or oatmeal. The relaxed drape visually softens stainless steel appliances and adds tactile comfort.
- Hang “Silent” Curtains: Install floor-length, unlined cotton or linen curtains. Even if they remain open, the vertical fabric panels act as hidden sound absorbers, catching noise before it bounces off glass and window casings.
13. The Return of the Larder: Designing dedicated pantry zones that hide modern appliances
One of my favorite restoration projects was an early 20th-century Hoosier cabinet; it was the original “appliance garage,” designed to house flour bins and sifters behind beautiful wood doors, keeping the workspace calm and orderly. We can apply that same resourceful spirit to the modern farmhouse by reclaiming the larder. Instead of cluttering your reclaimed wood counters with plastic air fryers and sleek espresso machines—which can jar against a vintage aesthetic—tuck them away in a dedicated “breakfast cupboard” or scullery zone. This approach allows you to honor the architectural history of your home, letting your shaker cabinets and vintage stoneware take center stage while keeping 21st-century convenience within arm’s reach.
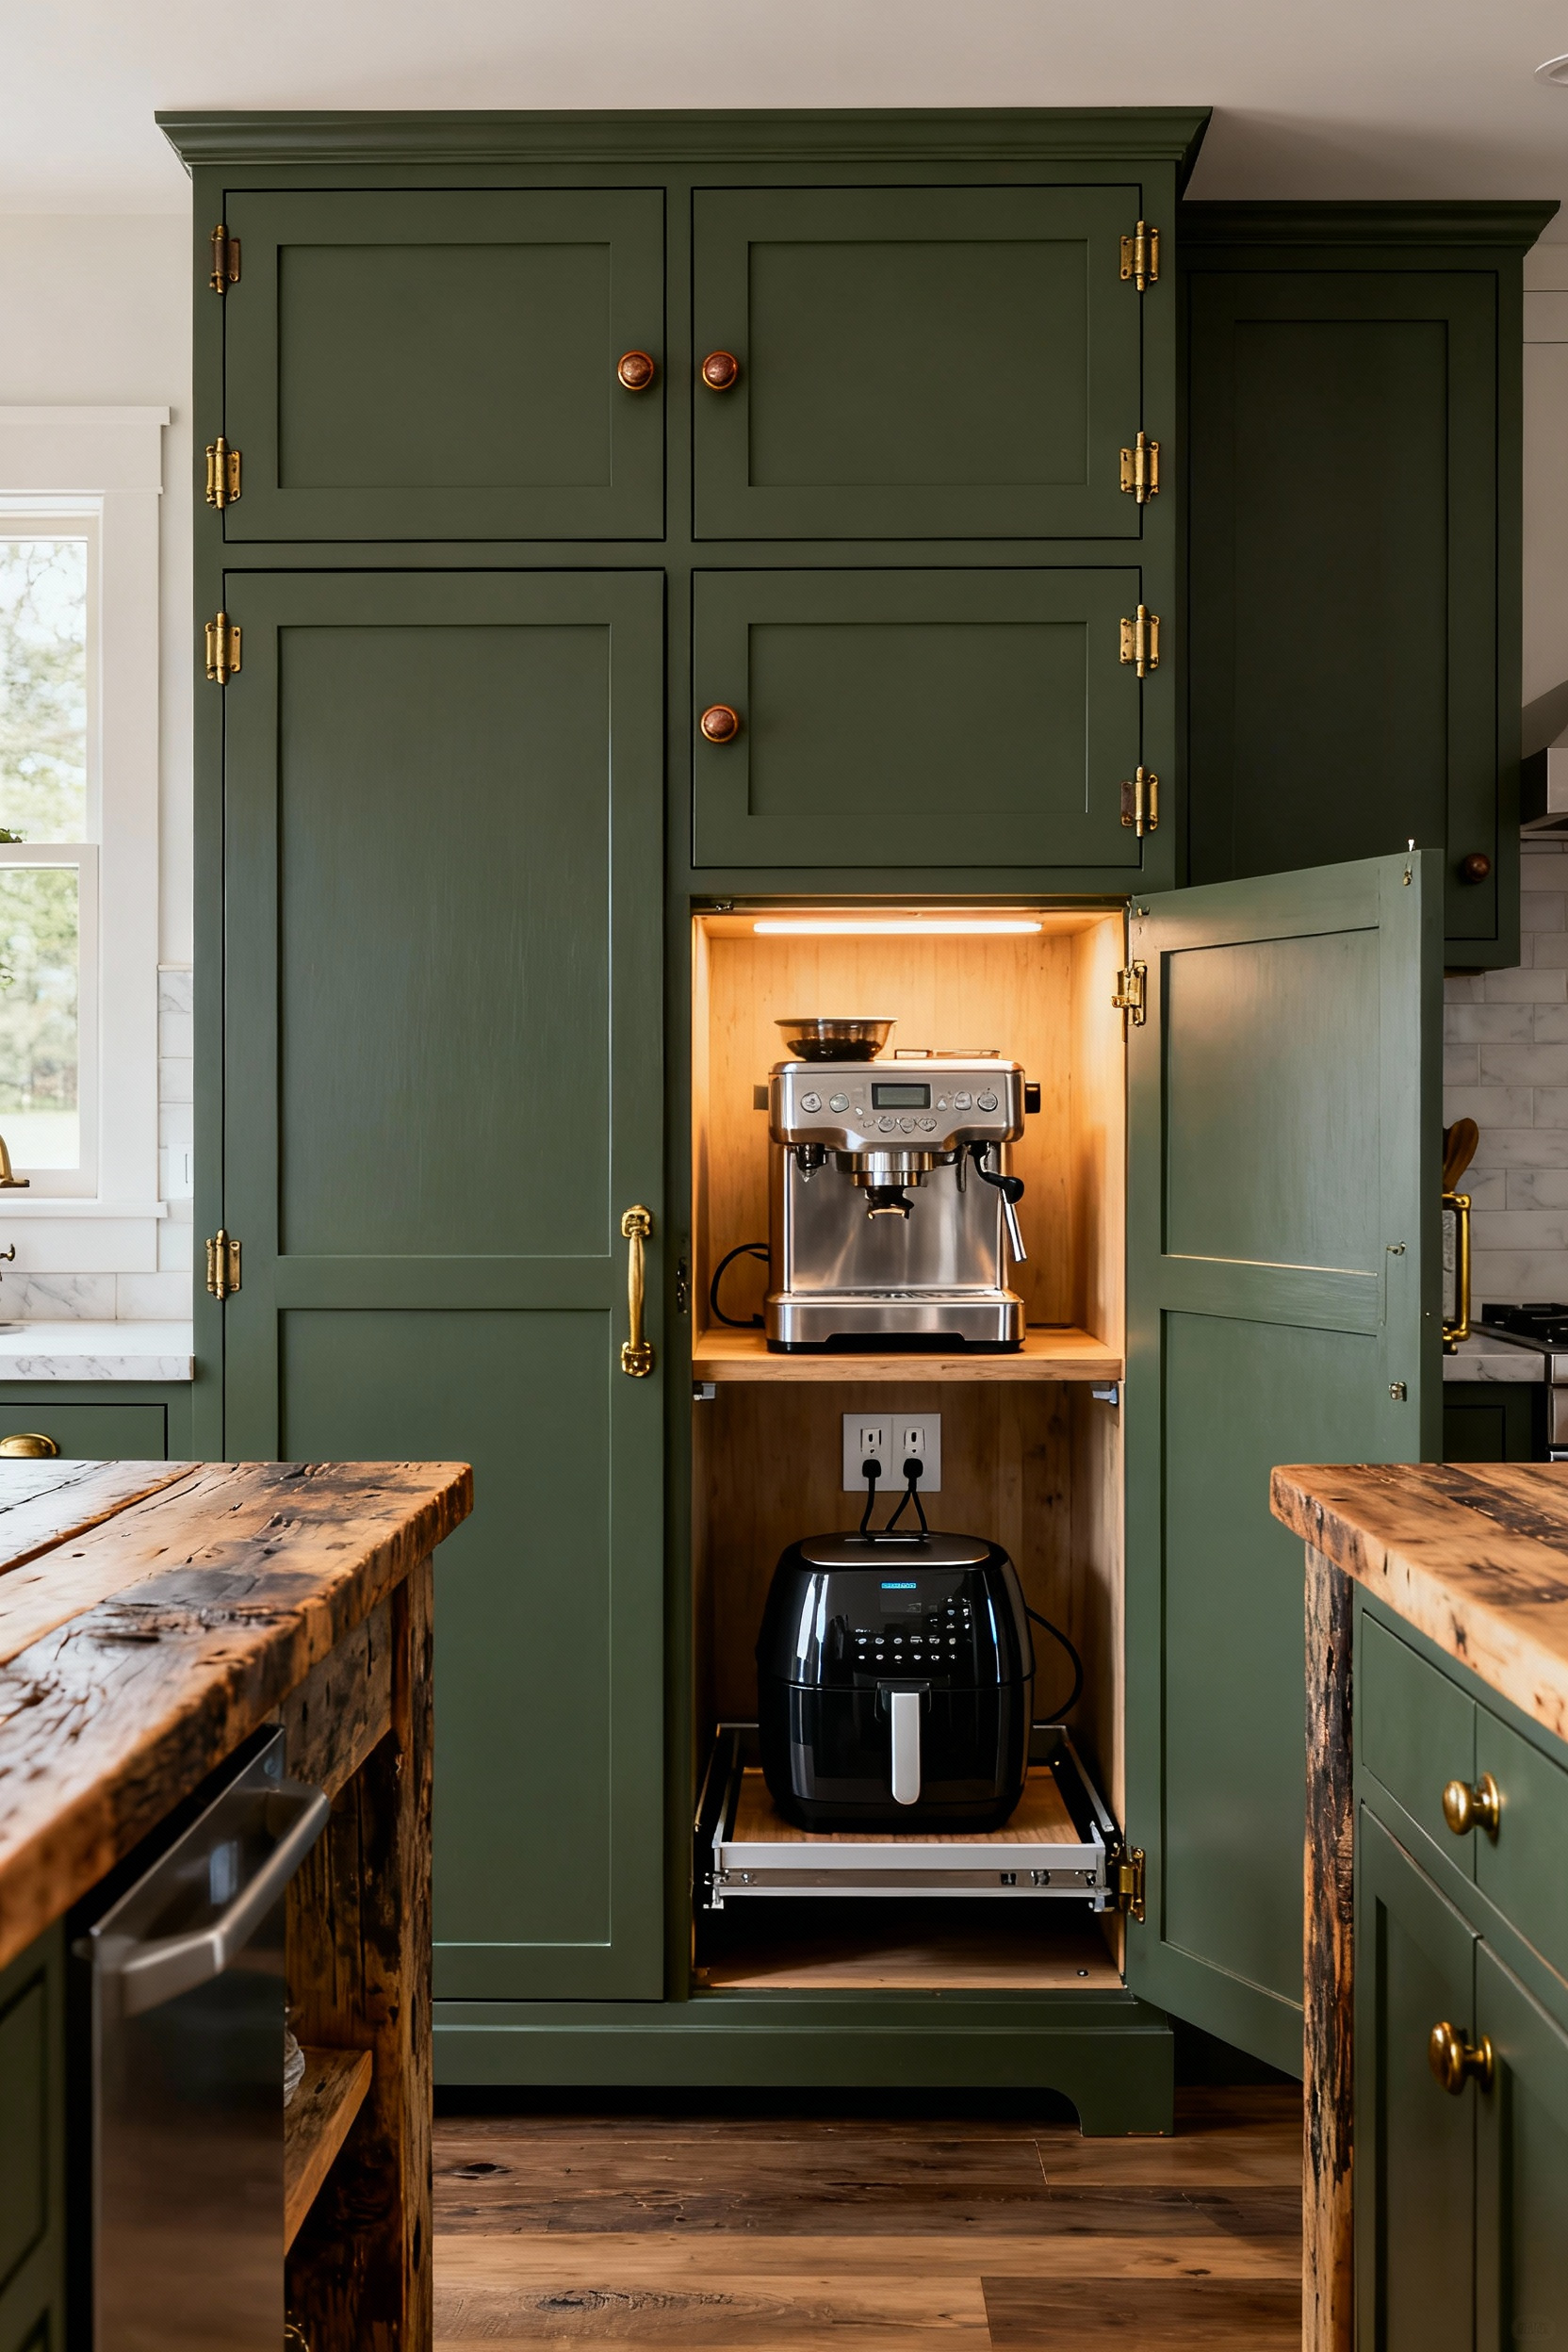
To successfully create a larder that functions as a working zone rather than just storage, you must design from the inside out. Here is how to blend utility with timeless style:
- Plan for Power: Install dedicated outlets inside the cabinetry so appliances stay plugged in and ready for immediate use, eliminating unsightly cord tangles.
- Let it Breathe: For heat-generating items like toaster ovens, incorporate discreet ventilation grills or cutouts at the back of the cabinet to ensure safety and longevity.
- Smart Access: Opt for pocket or bi-fold doors fitted with heavy, traditional hardware (like oil-rubbed bronze latches); they tuck away completely while you cook to keep the workflow seamless.
- Hidden Illumination: Install motion-sensor LED strip lighting that sparks to life when the doors open, providing necessary task lighting that disappears the moment you close up shop.
14. Sustainable Salvage: Where to hunt for antique doors and hardware to add instant soul
There is a specific thrill in rescuing a solid wood door or a set of cast-iron bin pulls that have survived decades of use—it’s the ultimate act of sustainable design. Skip the reproduction aisle and head straight to architectural salvage yards for your large statement pieces, like full pantry doors or transoms, where you’re more likely to find the dimensional inventory required for a renovation. For the smaller details, I turn to digital niche sourcing on Etsy or eBay; searching for specific terms like “vintage bronze ice box latch” allows you to curate a matching set of hardware that brings history to your fingertips every time you open a drawer.
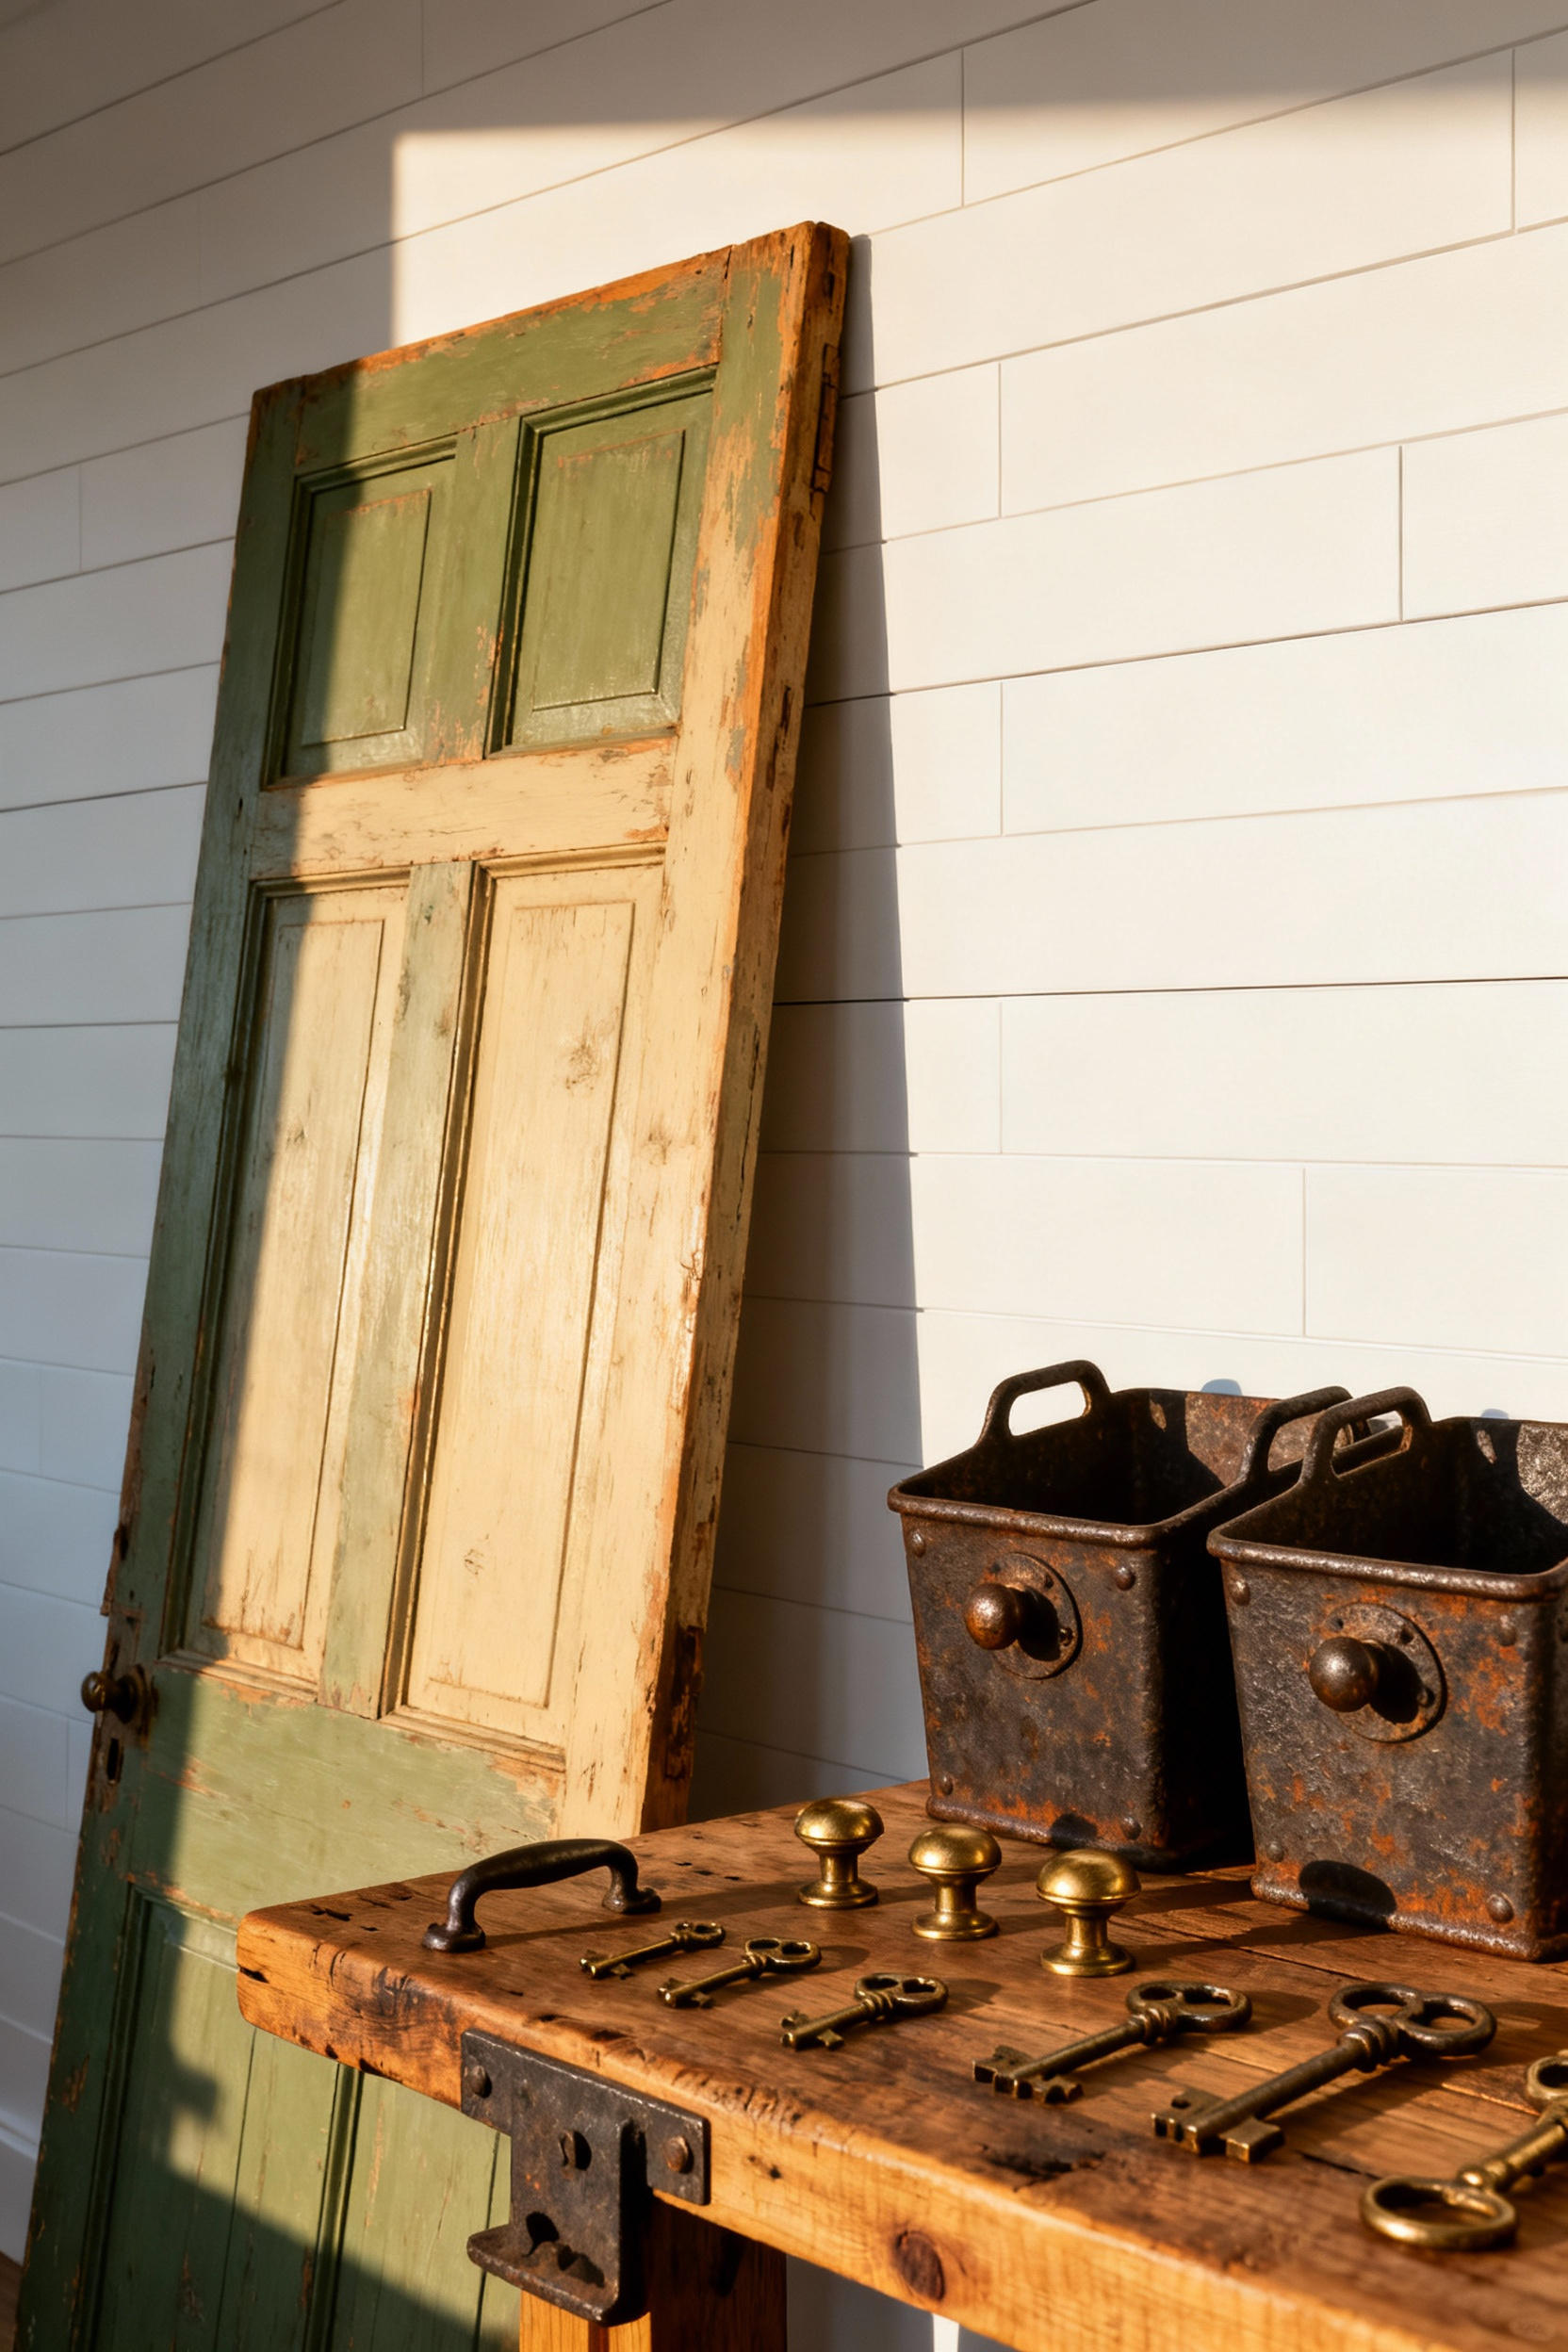
Once you have your finds, the key to avoiding a “junk shop” aesthetic is applying the Salvage Principle of Contrast. As I often tell my restoration clients, the goal is to let the age of the object highlight the freshness of the renovation, creating a space that feels timeless rather than tired. Here is how to strike that balance:
- The Patina Pop: Mount heavily oxidized steel or unlacquered brass hardware against pristine, flat-panel or white Shaker cabinets. The weathered texture creates a tactile focal point against the clean backdrop.
- The Statement Door: Use a single weathered sliding door as a centerpiece, but mount it on a sleek, matte black or stainless steel modern track. This juxtaposes the rough, “soulful” wood against industrial precision, breathing new life into the piece without sacrificing modern functionality.
15. Bringing the Outside In: Biophilic elements and window treatments that frame the ‘farm’ view
The most valuable asset in a farmhouse kitchen isn’t a pristine appliance, but the view outside your window; treat it like a vintage masterpiece by prioritizing unobstructed sightlines. I always encourage “hunting” for window treatments made from sustainable, natural fibers like bamboo or jute. Unlike synthetic blinds, these materials add organic texture and gently filter light without severing your connection to the outdoors. A favorite resourceful trick of mine is to mount drapery hardware high and wide—extending well beyond the casing—so your shades stack completely off the glass. This not only maximizes natural light, a key tenet of sustainable design, but frames your landscape like a piece of art.
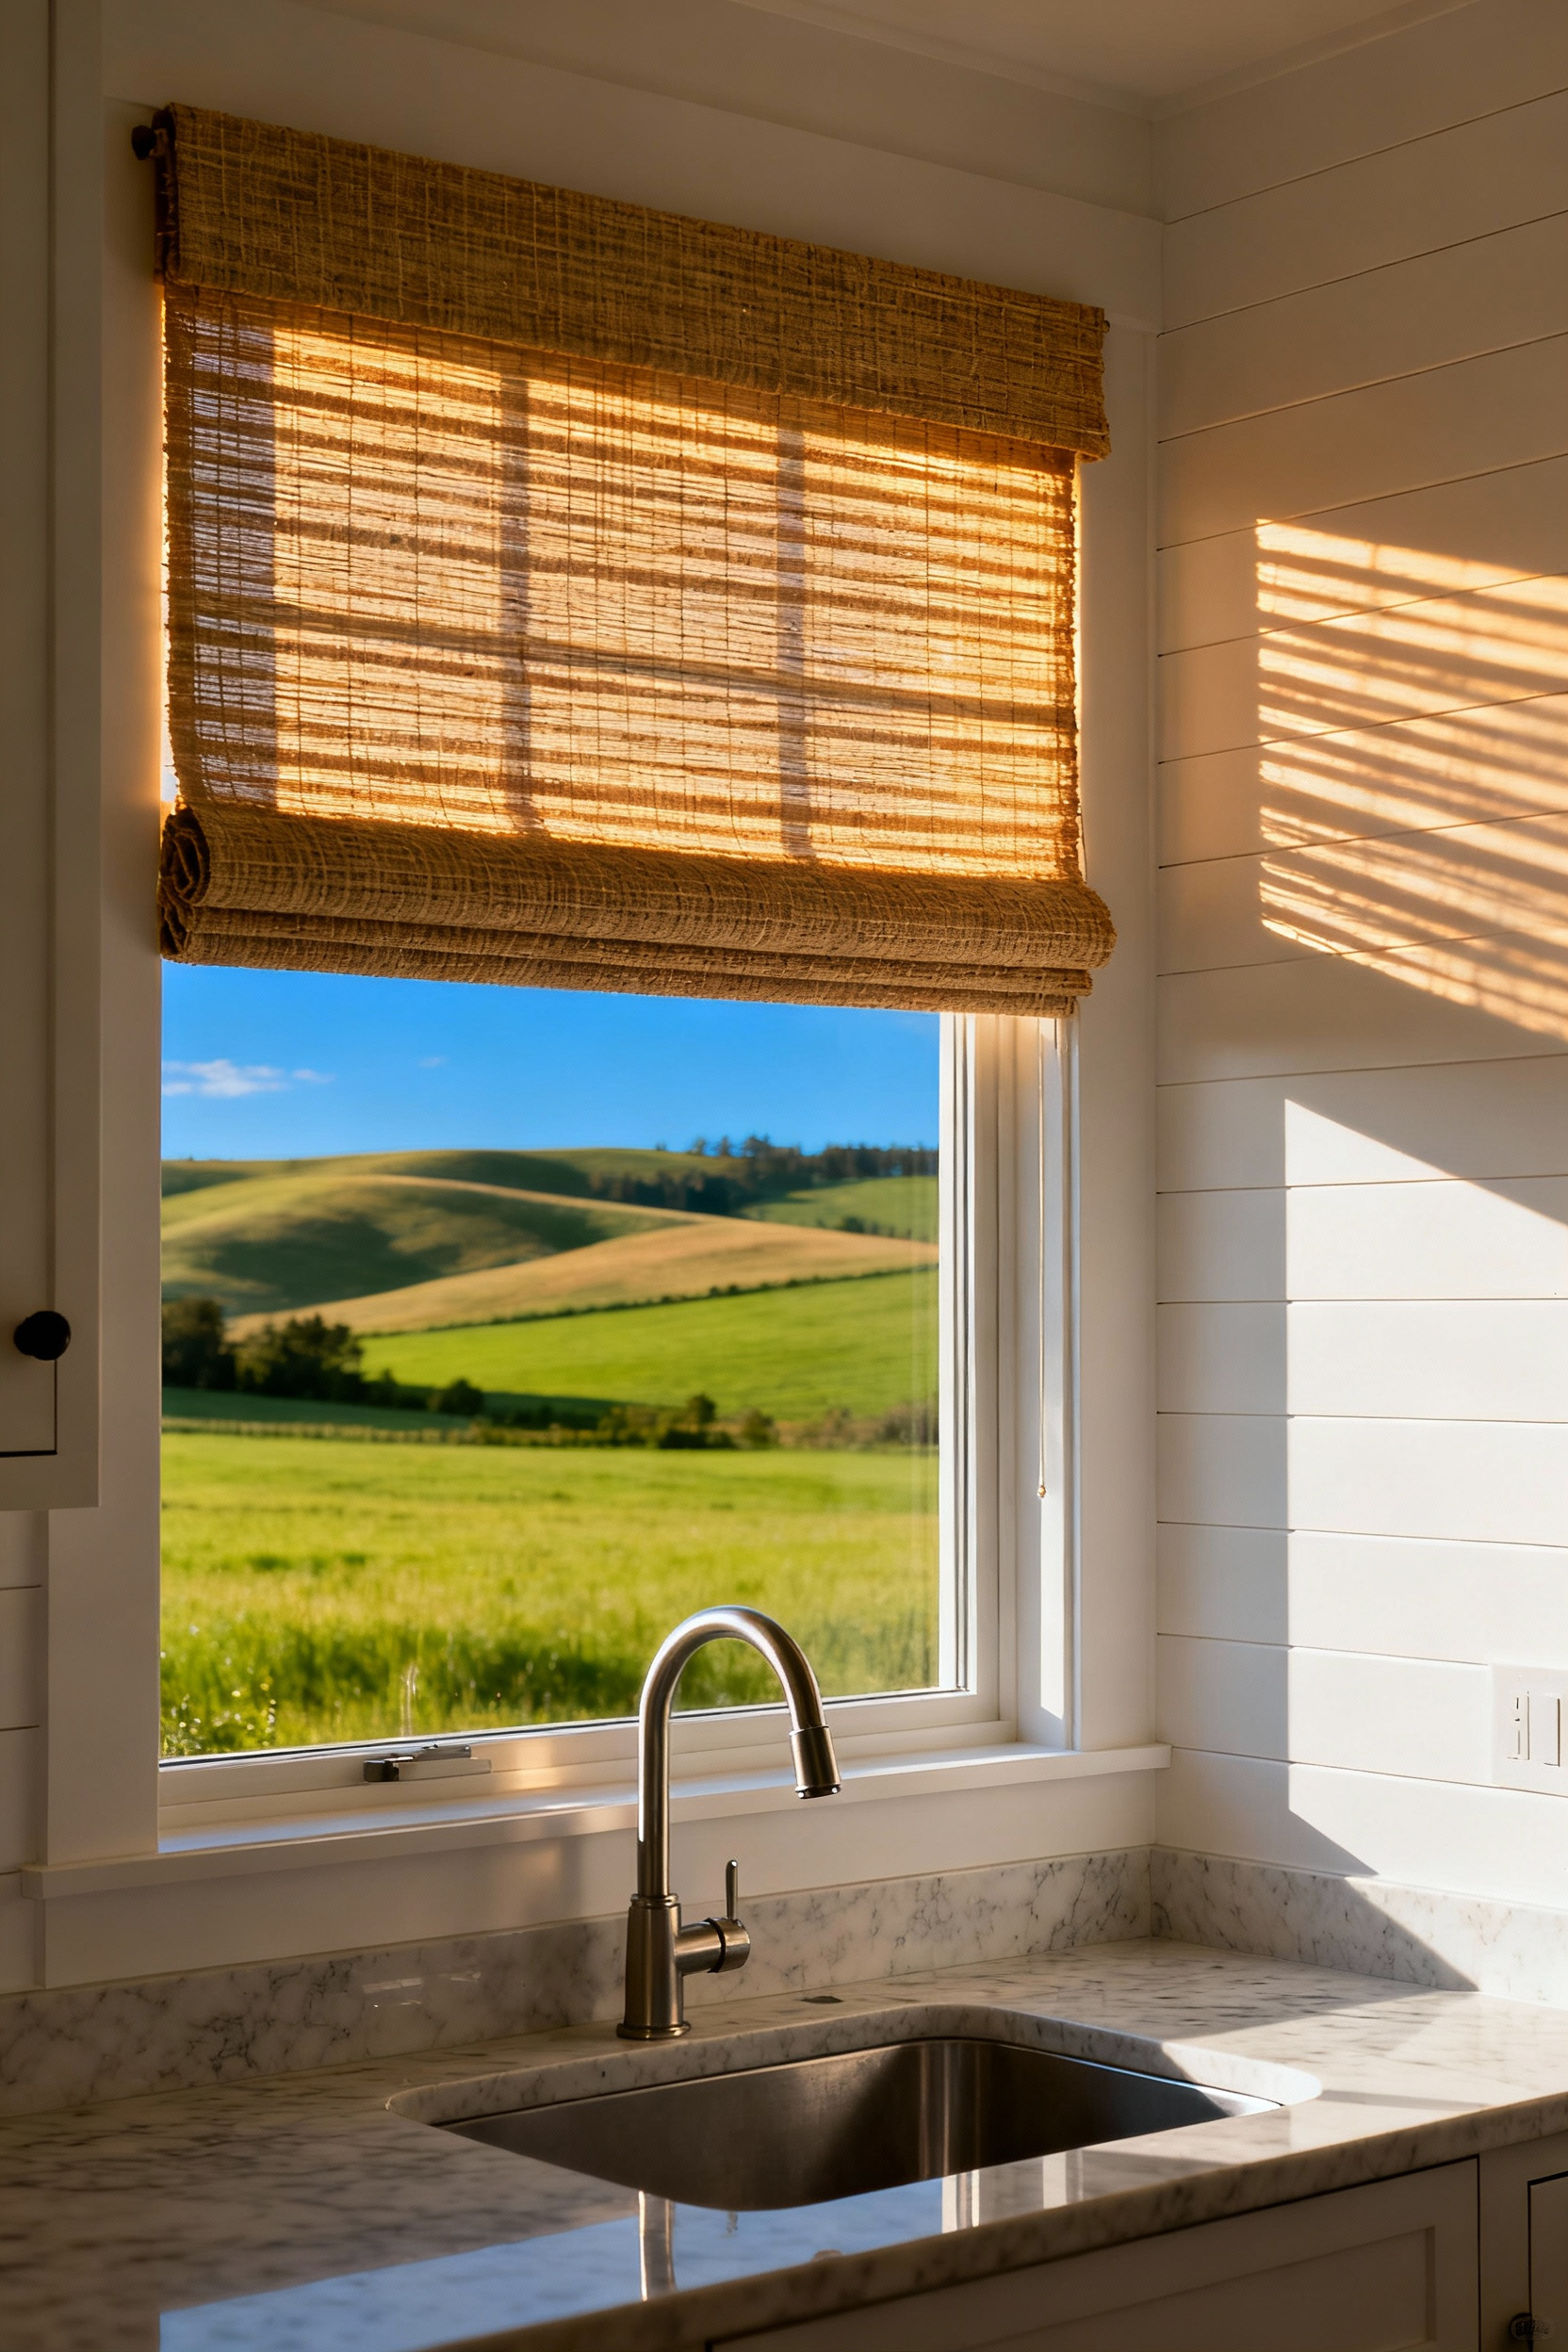
To truly blur the line between the farm and the hearth, introduce biophilic elements that echo the landscape you’ve just framed. I once repurposed a salvaged wooden crate into a windowsill herb garden, instantly adding life, fragrance, and a story to the washing-up station. Consider these steps to ground your space in nature:
* Simplify the Glass: If renovating, opt for large casement windows without central muntins (grids) to maintain a panoramic, uninterrupted connection to nature.
* Living Textures: Incorporate large potted olive trees or hanging plants to improve air quality and soften hard surfaces with organic movement.
* Foraged Decor: Style open shelves with river stones or branches found on your property to create a tactile, zero-waste link to your specific location.