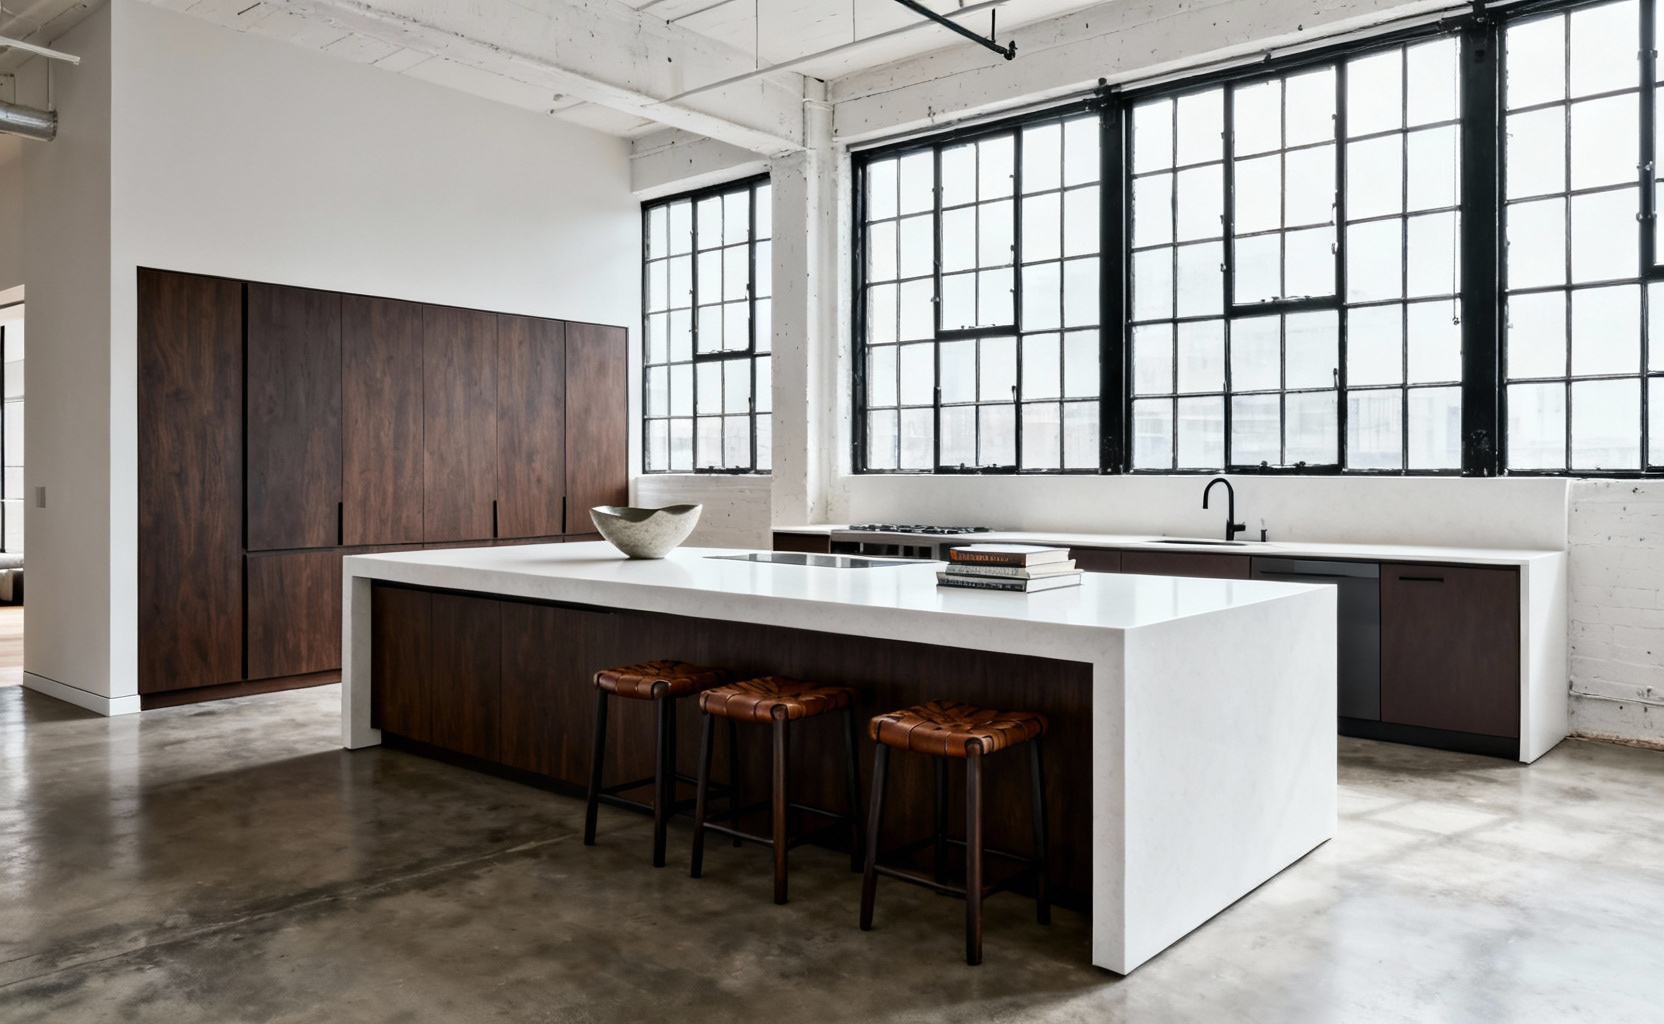

Standing inside the shell of a converted garment factory in SoHo, I once stared at a massive structural column bisecting the floor plan. Where most saw a frustrating obstacle, I saw the spine of a future home. We didn’t just build a kitchen near it; we anchored the entire loft with a massive, concrete-topped central island wrapped around that steel beam. That structure became the gravitational center of the room, proving that the kitchen island is no longer just a place to chop vegetables. It has evolved into the modern architectural hearth, replacing the fireplace as the home’s primary gathering point. Central to this evolution is the strategic design of high-utility kitchen island cabinets, which transform a simple prep area into the home’s primary storage and social hub.
This transformation reflects a seismic shift in residential design. Decades ago, the “island” was a utilitarian beast—often a scarred butcher block or a stainless steel prep table hidden behind closed doors. It offered zero integrated storage and served a strictly industrial function. However, as architects tore down partition walls to embrace open-concept living, the island was forced into the spotlight. Consequently, it transitioned from a back-of-house tool into a front-of-house showpiece, serving as the critical visual divider between the culinary workspace and the living lounge.
Today, successful design demands that we treat these units as freestanding furniture rather than standard built-in cabinetry. They require complex storage solutions and high-end finishes visible from every angle. In this article, we will trace the structural journey of the central island from industrial necessity to social anchor. We will explore how to specify base cabinetry that maximizes utility, integrate furniture-grade details, and design a unit that commands the room. Let’s dissect the anatomy of the modern kitchen’s most vital asset.
Phase 1: Spatial Philosophy & Zoning
In my years converting garment factories into residential lofts, I have learned that open floor plans require rigorous definition. An island acts as architecture, not just furniture. Therefore, you must abandon the dated “working triangle” and design specific Working Zones. Establish the island as either a dedicated Prep Zone with integrated trash and recycling, or a Social Zone focused on seating. Crucially, respect the Rule of 42/36. Maintain a 42-inch clearance for primary work aisles to accommodate open oven doors, and allow 36 inches for secondary traffic paths. Without these structural minimums, even the sleekest urban kitchen fails functionally.
Once clearances are established, manipulate cabinet depth to maximize utility in tight city footprints. While the work side demands a standard 24-inch depth, I often specify 12-to-18-inch shallow cabinets for the seating side to support heavy stone overhangs while housing stemware. Furthermore, prioritize flow through logical proximity. Follow these zoning principles for optimal efficiency:
- Apply the One-Step Rule: Locate pot drawers directly beneath the range and dish storage above the dishwasher to minimize crossover traffic.
- Visual Zoning: Use deep drawers for heavy tools in work zones, but opt for open shelving in social zones to display curated cookbooks.
1. Scale and Proportion: Calculating Mass to Avoid the ‘Monolith’ Effect in Open Concepts
In my work transforming cavernous garment factories into livable lofts, I often encounter the “Monolith Effect”—where a kitchen island becomes a heavy, space-killing roadblock rather than a gathering point. To avoid this, you must calculate mass with architectural precision. Start by applying the 10% Footprint Rule. Measure your total usable open floor space; ensure the island’s length and width never exceed 10% of that area. This strict baseline prevents the structure from hijacking the room’s volume, ensuring the layout remains breathable and urban-appropriate.
To counteract this effect, manipulate the visual weight to break up the remaining density. A solid, floor-to-ceiling box feels oppressive, even in a large warehouse conversion. Instead, treat the island as a distinct structure by applying these tactics:
- Recess the Base: Use a deep toe kick or furniture-style legs to create a shadow line, giving the illusion that the heavy mass is floating.
- Inject Negative Space: Interrupt continuous cabinetry with open shelving or glass fronts to allow light to penetrate the form.
- Cantilever the Countertop: Extend the surface material beyond the base to create a sharp visual separation between the user and the cabinet mass.
These adjustments shift the aesthetic from a dense industrial crate to a sophisticated, airy anchor.
2. Traffic Flow Dynamics: Engineering Clearance for High-Traffic Urban Kitchens
In the converted textile factories I renovate, raw square footage often masks tight pinch points. Precision is non-negotiable here. Demand a 48-inch minimum aisle width between the island and perimeter cabinets. While standard 42-inch clearances suffice for solo cooks, dynamic urban entertaining requires room for two people to work back-to-back safely. If structural columns or transitions compress your footprint, specify 20-inch deep island cabinets instead of the standard 24. Shaving those four inches grants critical circulation space without sacrificing the island’s central utility.
Consequently, you must engineer the space for motion, not just storage. Treat the kitchen layout like a city street grid and eliminate gridlock with these strategies:
- Calculate the Appliance Buffer: Measure the fully extended depth of dishwasher or oven doors, then add 18 inches of standing room to ensure traffic flows even during cleanup.
- Zone for Velocity: Position high-use island features, like trash pull-outs, on the side closest to their associated prep zones.
- Reduce Crossing: Align utensil drawers opposite the stove to minimize movement across the main thoroughfare.
This strategic zoning maintains velocity and safety, keeping your culinary workflow seamless.
3. The Multi-Zone Mandate: Defining Prep, Social, and Storage Quadrants
Treating a kitchen island as a static monolith is a structural failure. In the open-plan lofts I restore, the island acts as the architectural anchor, so it must function like a precision-engineered machine. I recently renovated a converted factory in the Garment District where the island needed to serve as a prep station, a cocktail bar, and a pantry simultaneously. To achieve this level of utility, you must engineer the cabinetry into distinct quadrants. This approach directs traffic flow, prevents bottlenecking, and maximizes the structural footprint of the unit.
- *Camera Settings:** Shot with a full-frame mirrorless camera (e.g., Sony A1) using a 24mm prime lens. Aperture set at f/8.5 to ensure sharp focus across the entire island surface and deep depth of field. ISO 200. White balance set for cool daylight temperature. Studio strobes feathered high and used minimally to fill shadows underneath the cabinets.
Assign a specific, high-value purpose to every cubic inch of the cabinet framework.
- Prep Zone: Install heavy-duty, pull-out waste and recycling bins immediately adjacent to the sink to contain mess during the highest-use phase.
- Social Zone: Integrate shallow 12-inch cabinets on the seating side to store entertaining staples like linens or glassware without sacrificing essential knee space.
- Storage Zone: Prioritize full-extension, high-load drawers over standard doors to hoist heavy stand mixers or cast iron without deep bending.
- Transitions: Utilize the gaps between zones for utility pull-outs or hidden charging stations to keep surfaces architecturally clean.
Phase 2: Materiality & Structural Integrity
True structural integrity begins at the core. Specify 3/4-inch furniture-grade plywood for your cabinet boxes; particleboard inevitably fails under the static load of quartzite or concrete. In my warehouse conversions, I treat every island like a miniature skyscraper. Consequently, never rely on wood frames alone for seating overhangs deeper than 10 inches. Instead, integrate recessed steel plates or T-bar brackets directly into the chassis. This invisible engineering prevents stone failure while maintaining a sleek, architectural silhouette.
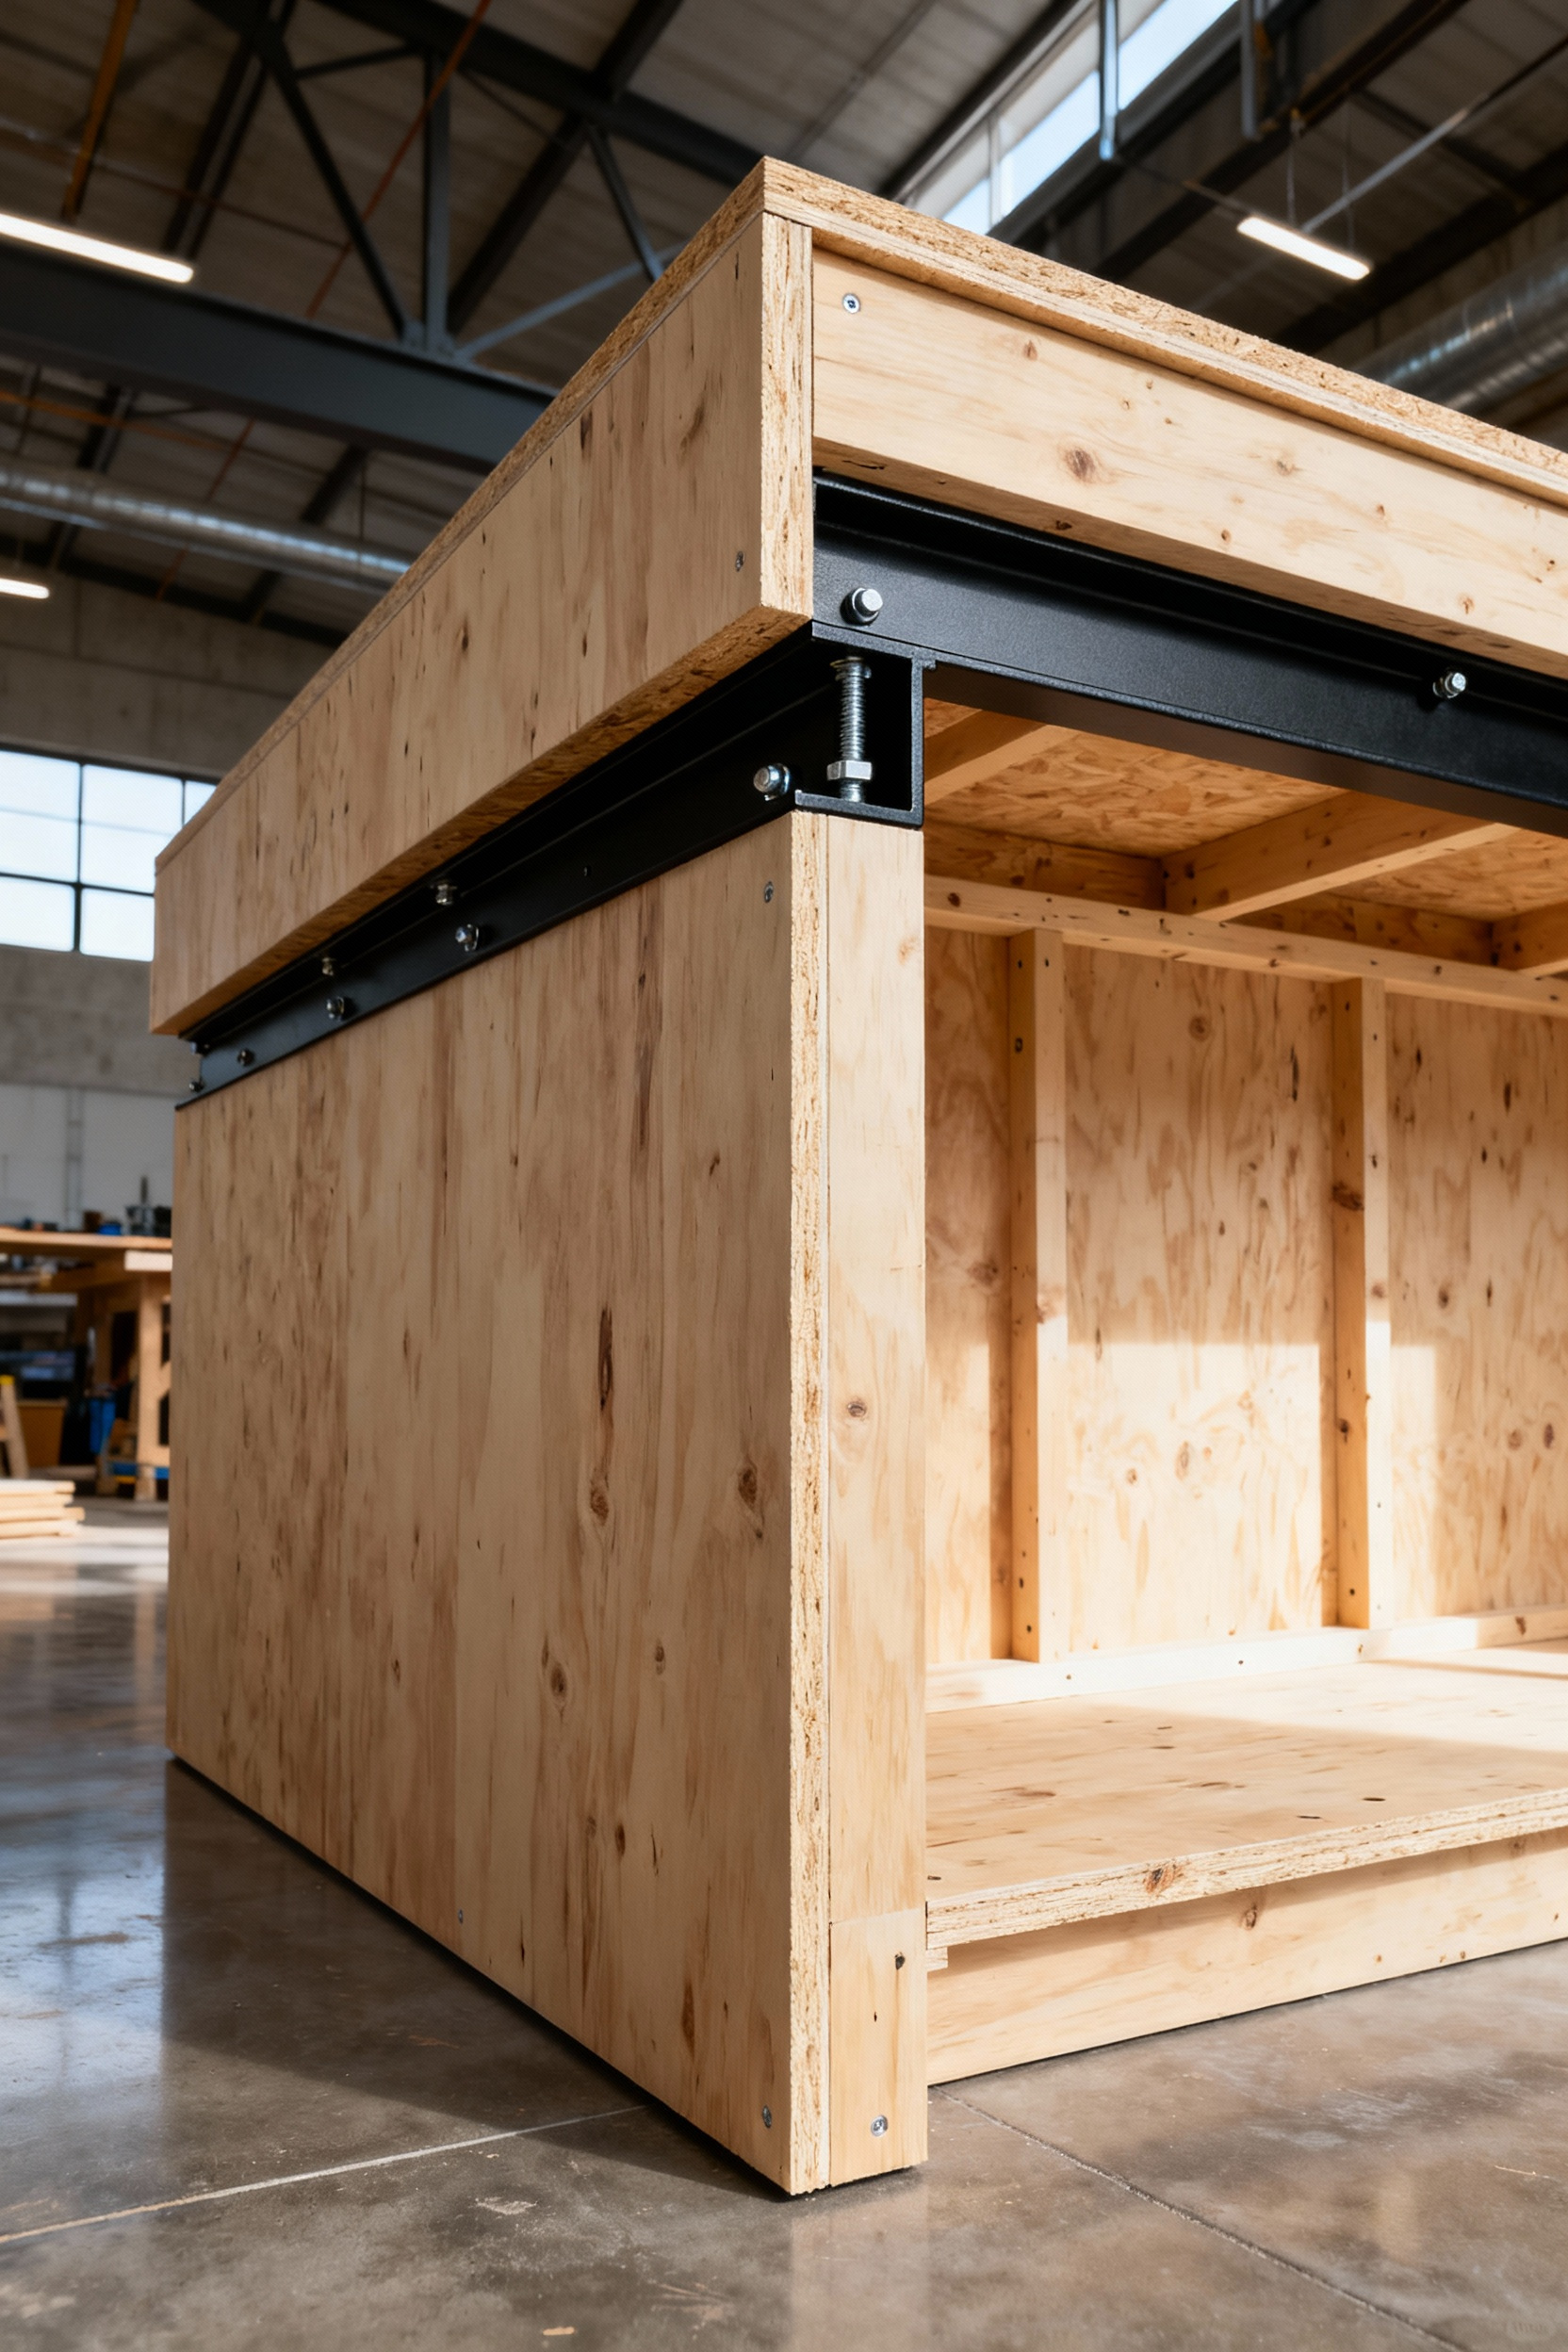
Beyond the shell, prioritize dynamic durability. Demand dovetail joinery and heavy-duty, full-extension glides rated for at least 100 pounds; your cast iron cookware requires nothing less. Finally, lock the unit in place. An unanchored island is a safety hazard in a high-traffic loft. Follow these steps for rigidity:
- Install solid blocking inside the cabinet base.
- Secure cleats directly to the subfloor.
- Fasten the unit effectively to prevent tipping before the stone arrives.
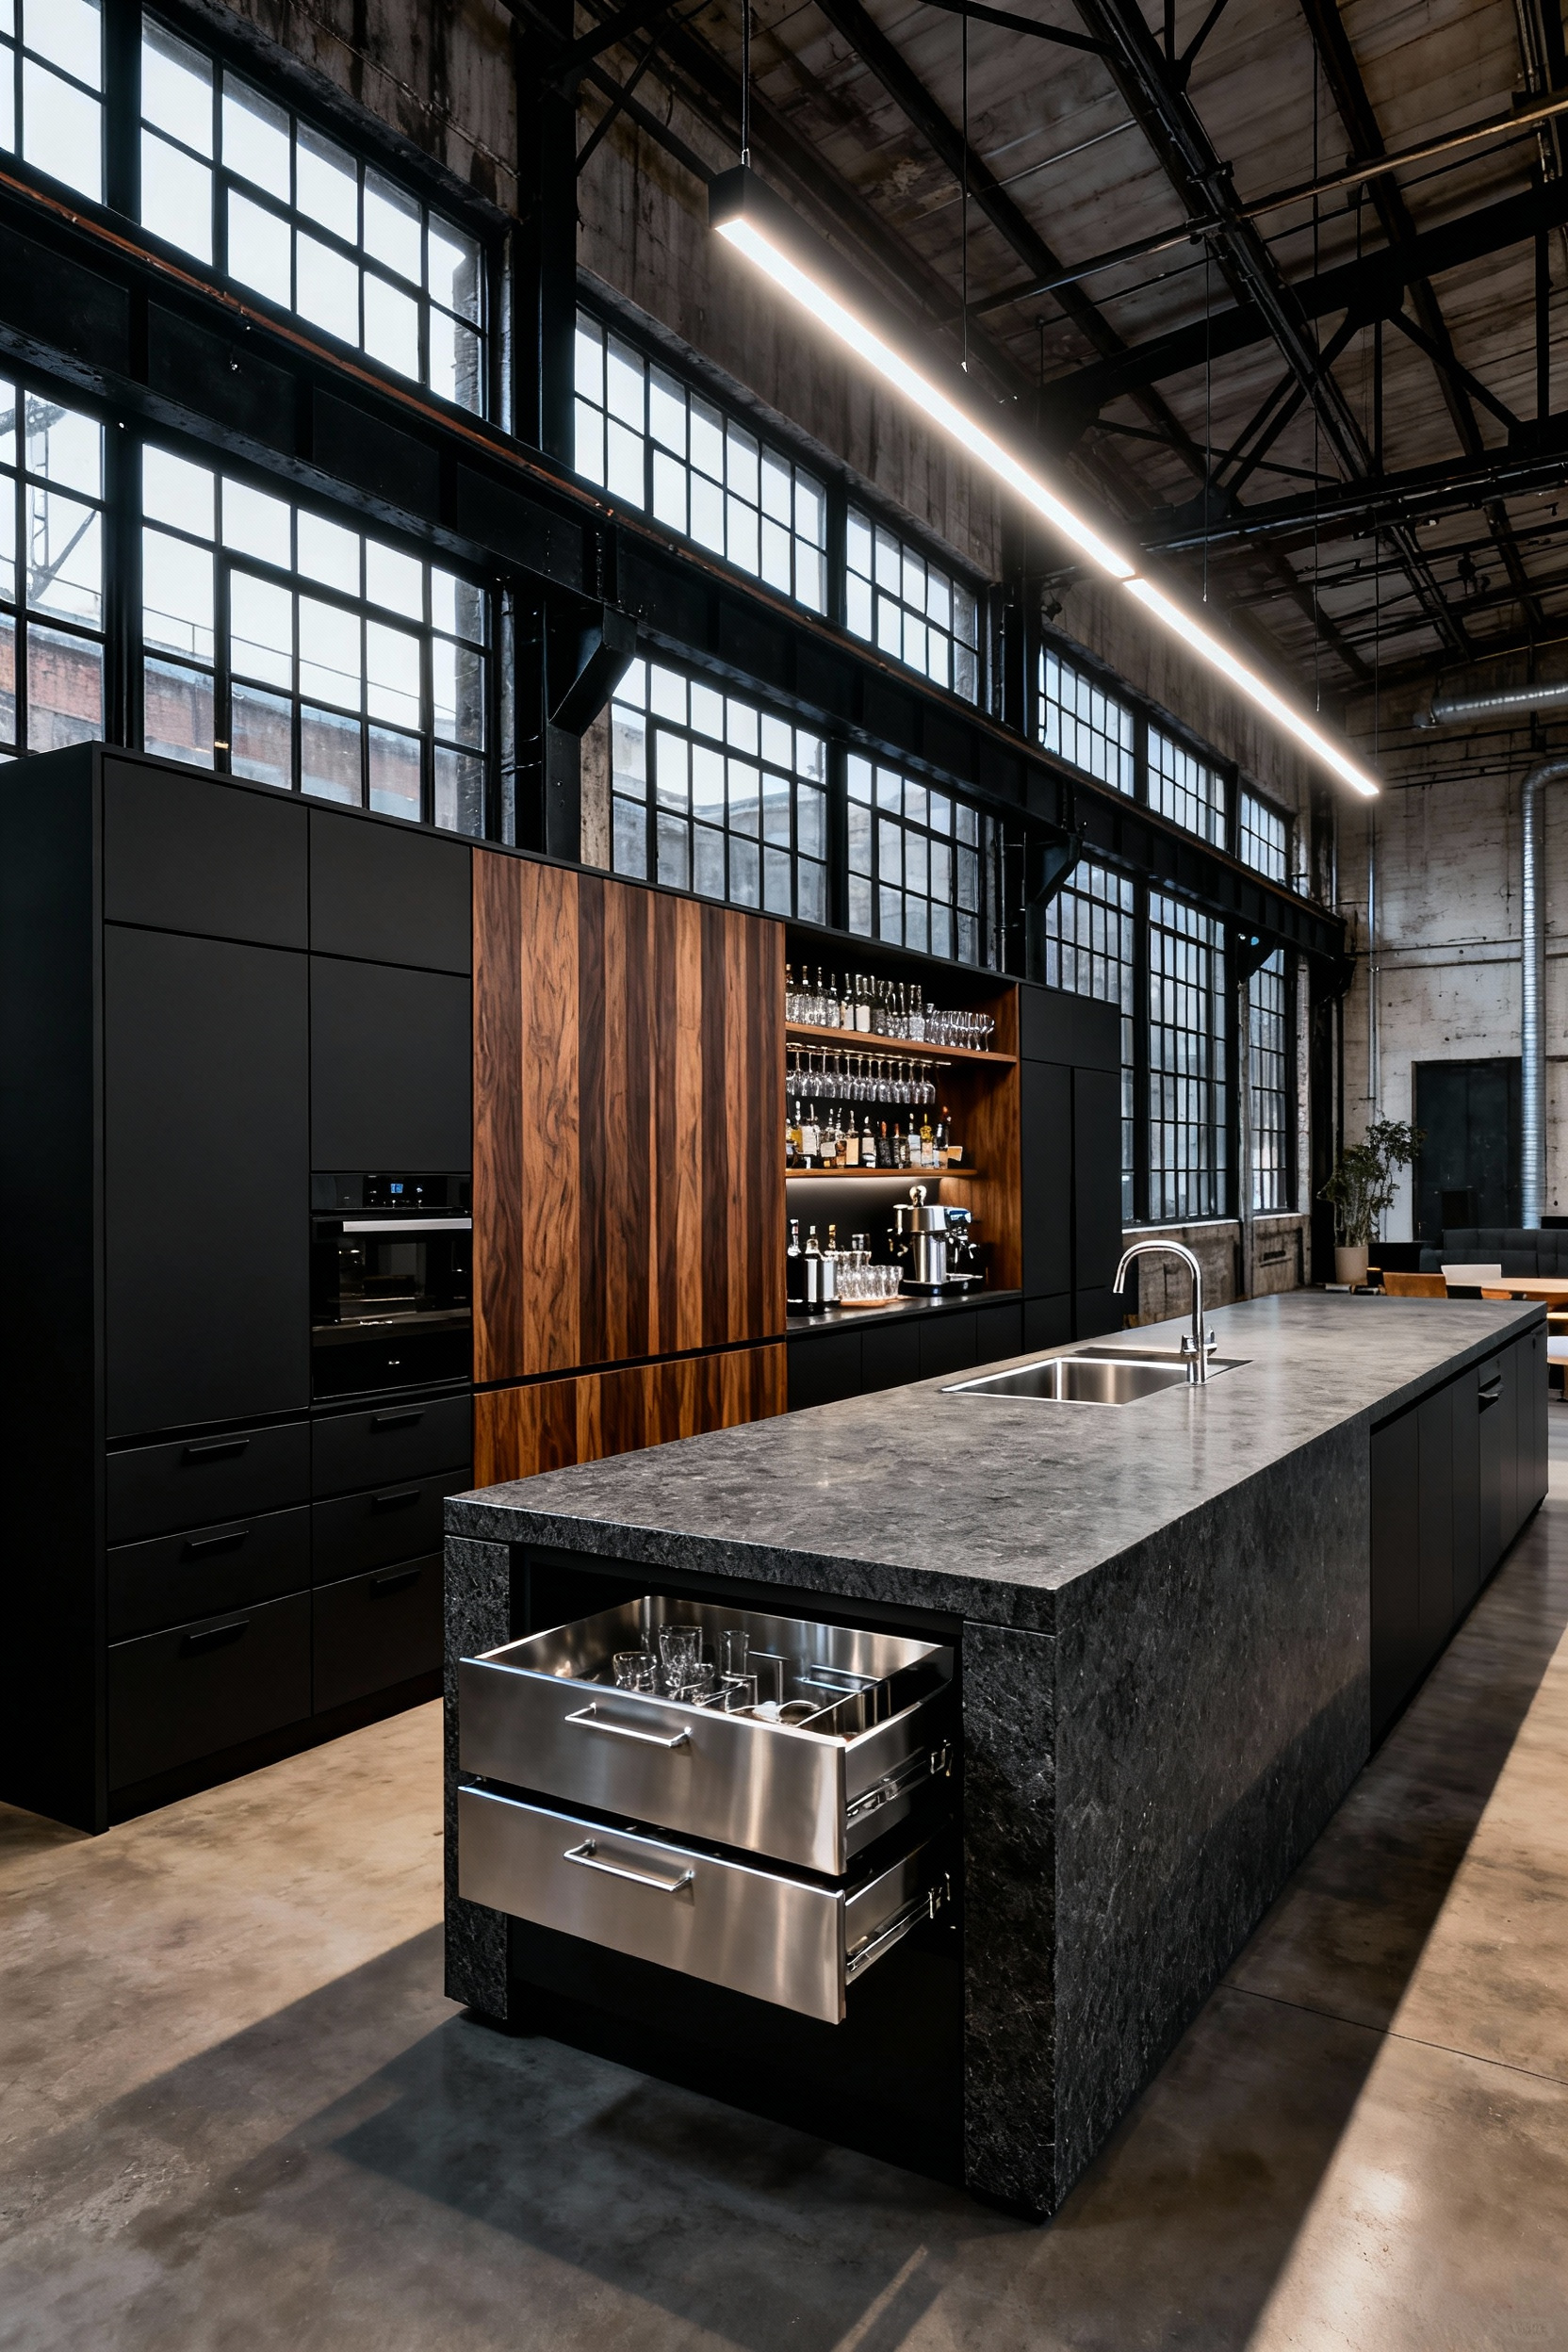
4. The Brutalist Statement: Integrating Raw Concrete Casings with Warm Wood
Brutalism demands visual weight, not necessarily physical mass. In my work converting old garment factories into residences, I often steer clients away from heavy site-poured slabs that threaten structural integrity. Instead, specify fiber-reinforced concrete panels (GFRC) or high-quality micro-cement. These materials deliver a raw, monolithic aesthetic without overloading floor joists. Balance this industrial “shell” by pairing it with deeply saturated woods like Black Walnut, Teak, or darker Rift-Sawn Oak. Use the wood for drawer fronts or recessed inserts; this strategic material pairing warms the space and prevents the island from feeling like a cold bunker.
Execute this look by treating the concrete as the dominant casing and the wood as a precise inlay. Design a waterfall edge that encases slightly recessed cabinetry to emphasize the concrete’s volume. However, never ignore the material’s porosity. To preserve the unpolished, gritty texture while ensuring the surface survives urban living, follow these sealing protocols:
- Select the right finish: Use a matte or ultra-low-sheen penetrating sealer to avoid a plastic appearance.
- Prioritize resistance: Ensure the formula specifically protects against oil stains and acid etching.
- Maintain the raw look: Avoid high-gloss topical coatings that ruin the material’s authenticity.
5. Structural Steel Framing: Open Shelving and Industrial Rigidity
Regard structural steel framing as an architectural necessity, not just an aesthetic choice. High-mass countertops like poured concrete or solid zinc impose compressive loads that standard wood cabinetry cannot sustain. Consequently, a steel skeleton becomes mandatory. In my work restoring industrial lofts, I leverage this rigidity to create massive, unsupported overhangs. A welded steel frame creates up to 24 inches of cantilevered seating space, eliminating knee-knocking corbels and maximizing legroom. This engineering feat delivers the ultimate clean, modern line.
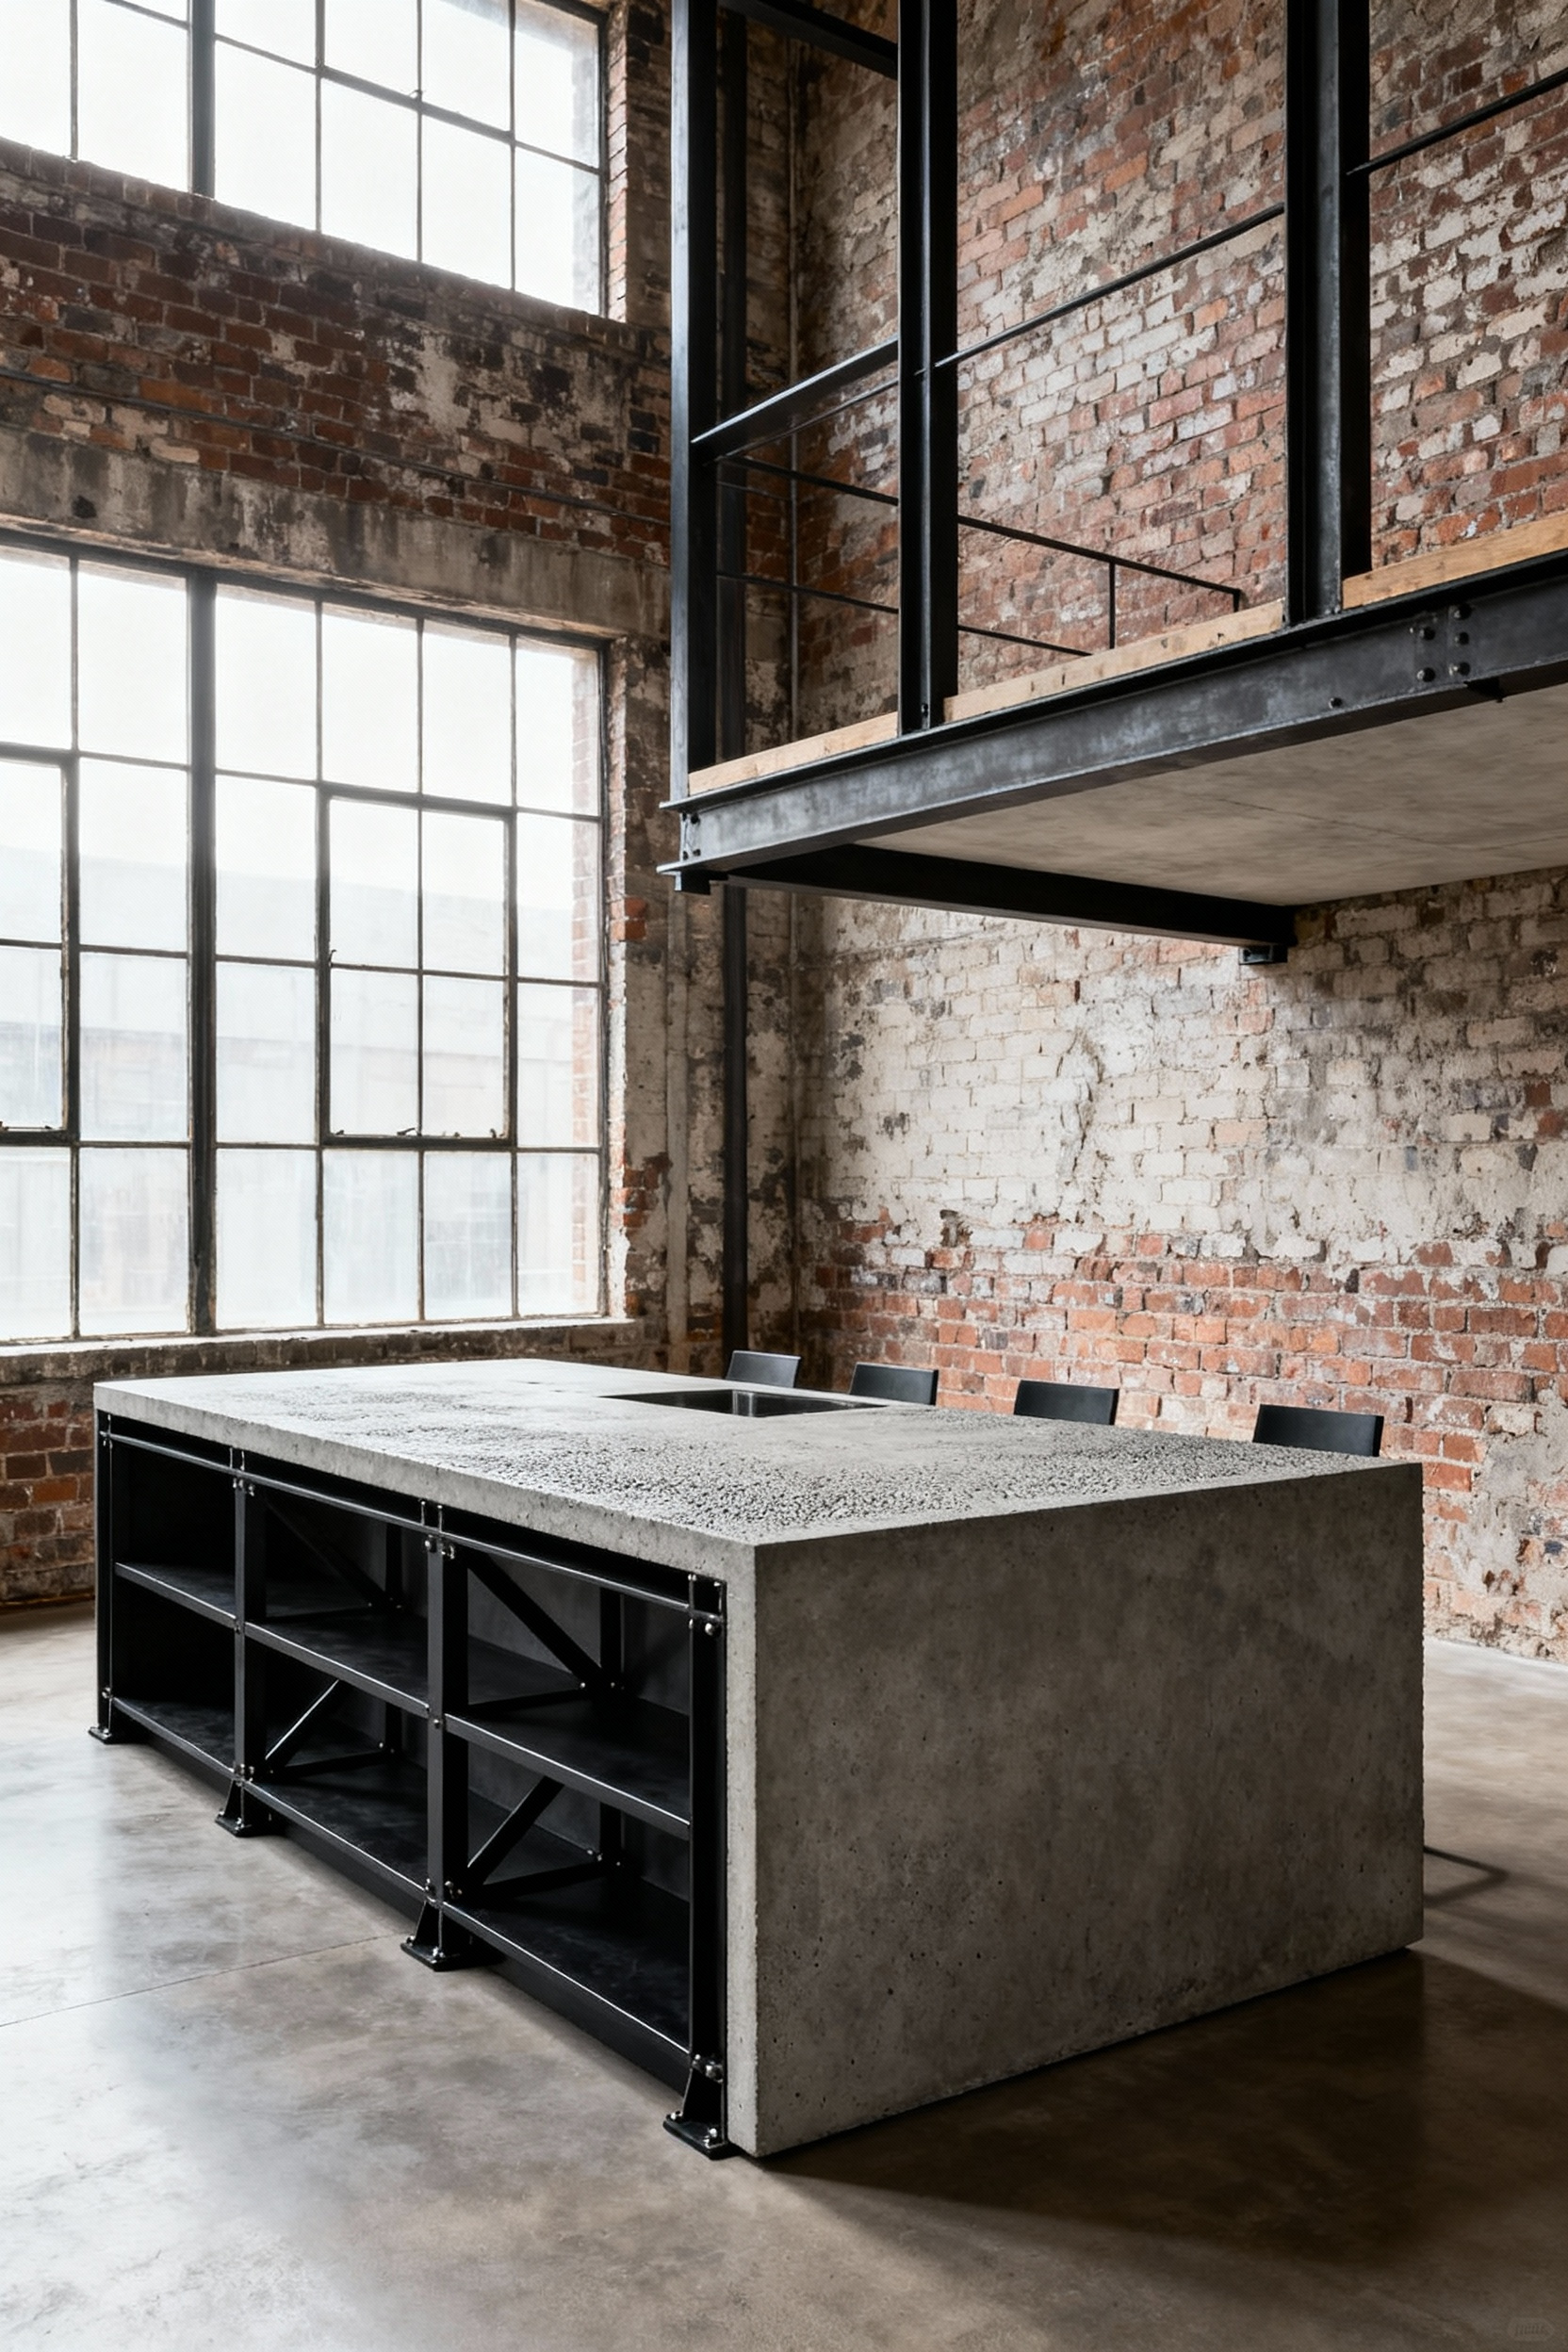
However, steel feels cold without intervention. Balance the matte black or gunmetal structure with organic materials to avoid a sterile, commercial kitchen vibe. Insert thick walnut planks or reclaimed barn wood into the open grid to soften the visual weight. Furthermore, approach open shelving with a practical strategy regarding dust and grease. Use these guidelines to maintain the look:
- Curate strategically: Store high-turnover items like daily plates here to prevent dust accumulation.
- Clean often: Wipe down steel surfaces weekly to remove airborne kitchen grease.
- Add texture: Integrate woven wire baskets to hide clutter and introduce warmth.
6. Reclaimed Heritage: Cladding Modern Boxes in Historic Timber
Reclaimed timber injects the soul of a century-old warehouse into a high-rise kitchen, but aesthetics cannot outrank physics. Genuine historic timber is heavy and dimensionally unstable. Therefore, you must anchor the cladding to a rigid, high-quality substrate like marine-grade plywood or furniture-grade MDF to prevent warping. In my recent SoHo loft conversion, we wrapped a precise modern box in 19th-century factory beams, ensuring the structure remained immovable even as the city’s humidity shifted. Furthermore, you need to protect that patina without creating a plastic shell. Specify a low-sheen catalyzed lacquer or conversion varnish; these finishes repel grease while strictly preserving the wood’s raw, architectural character.
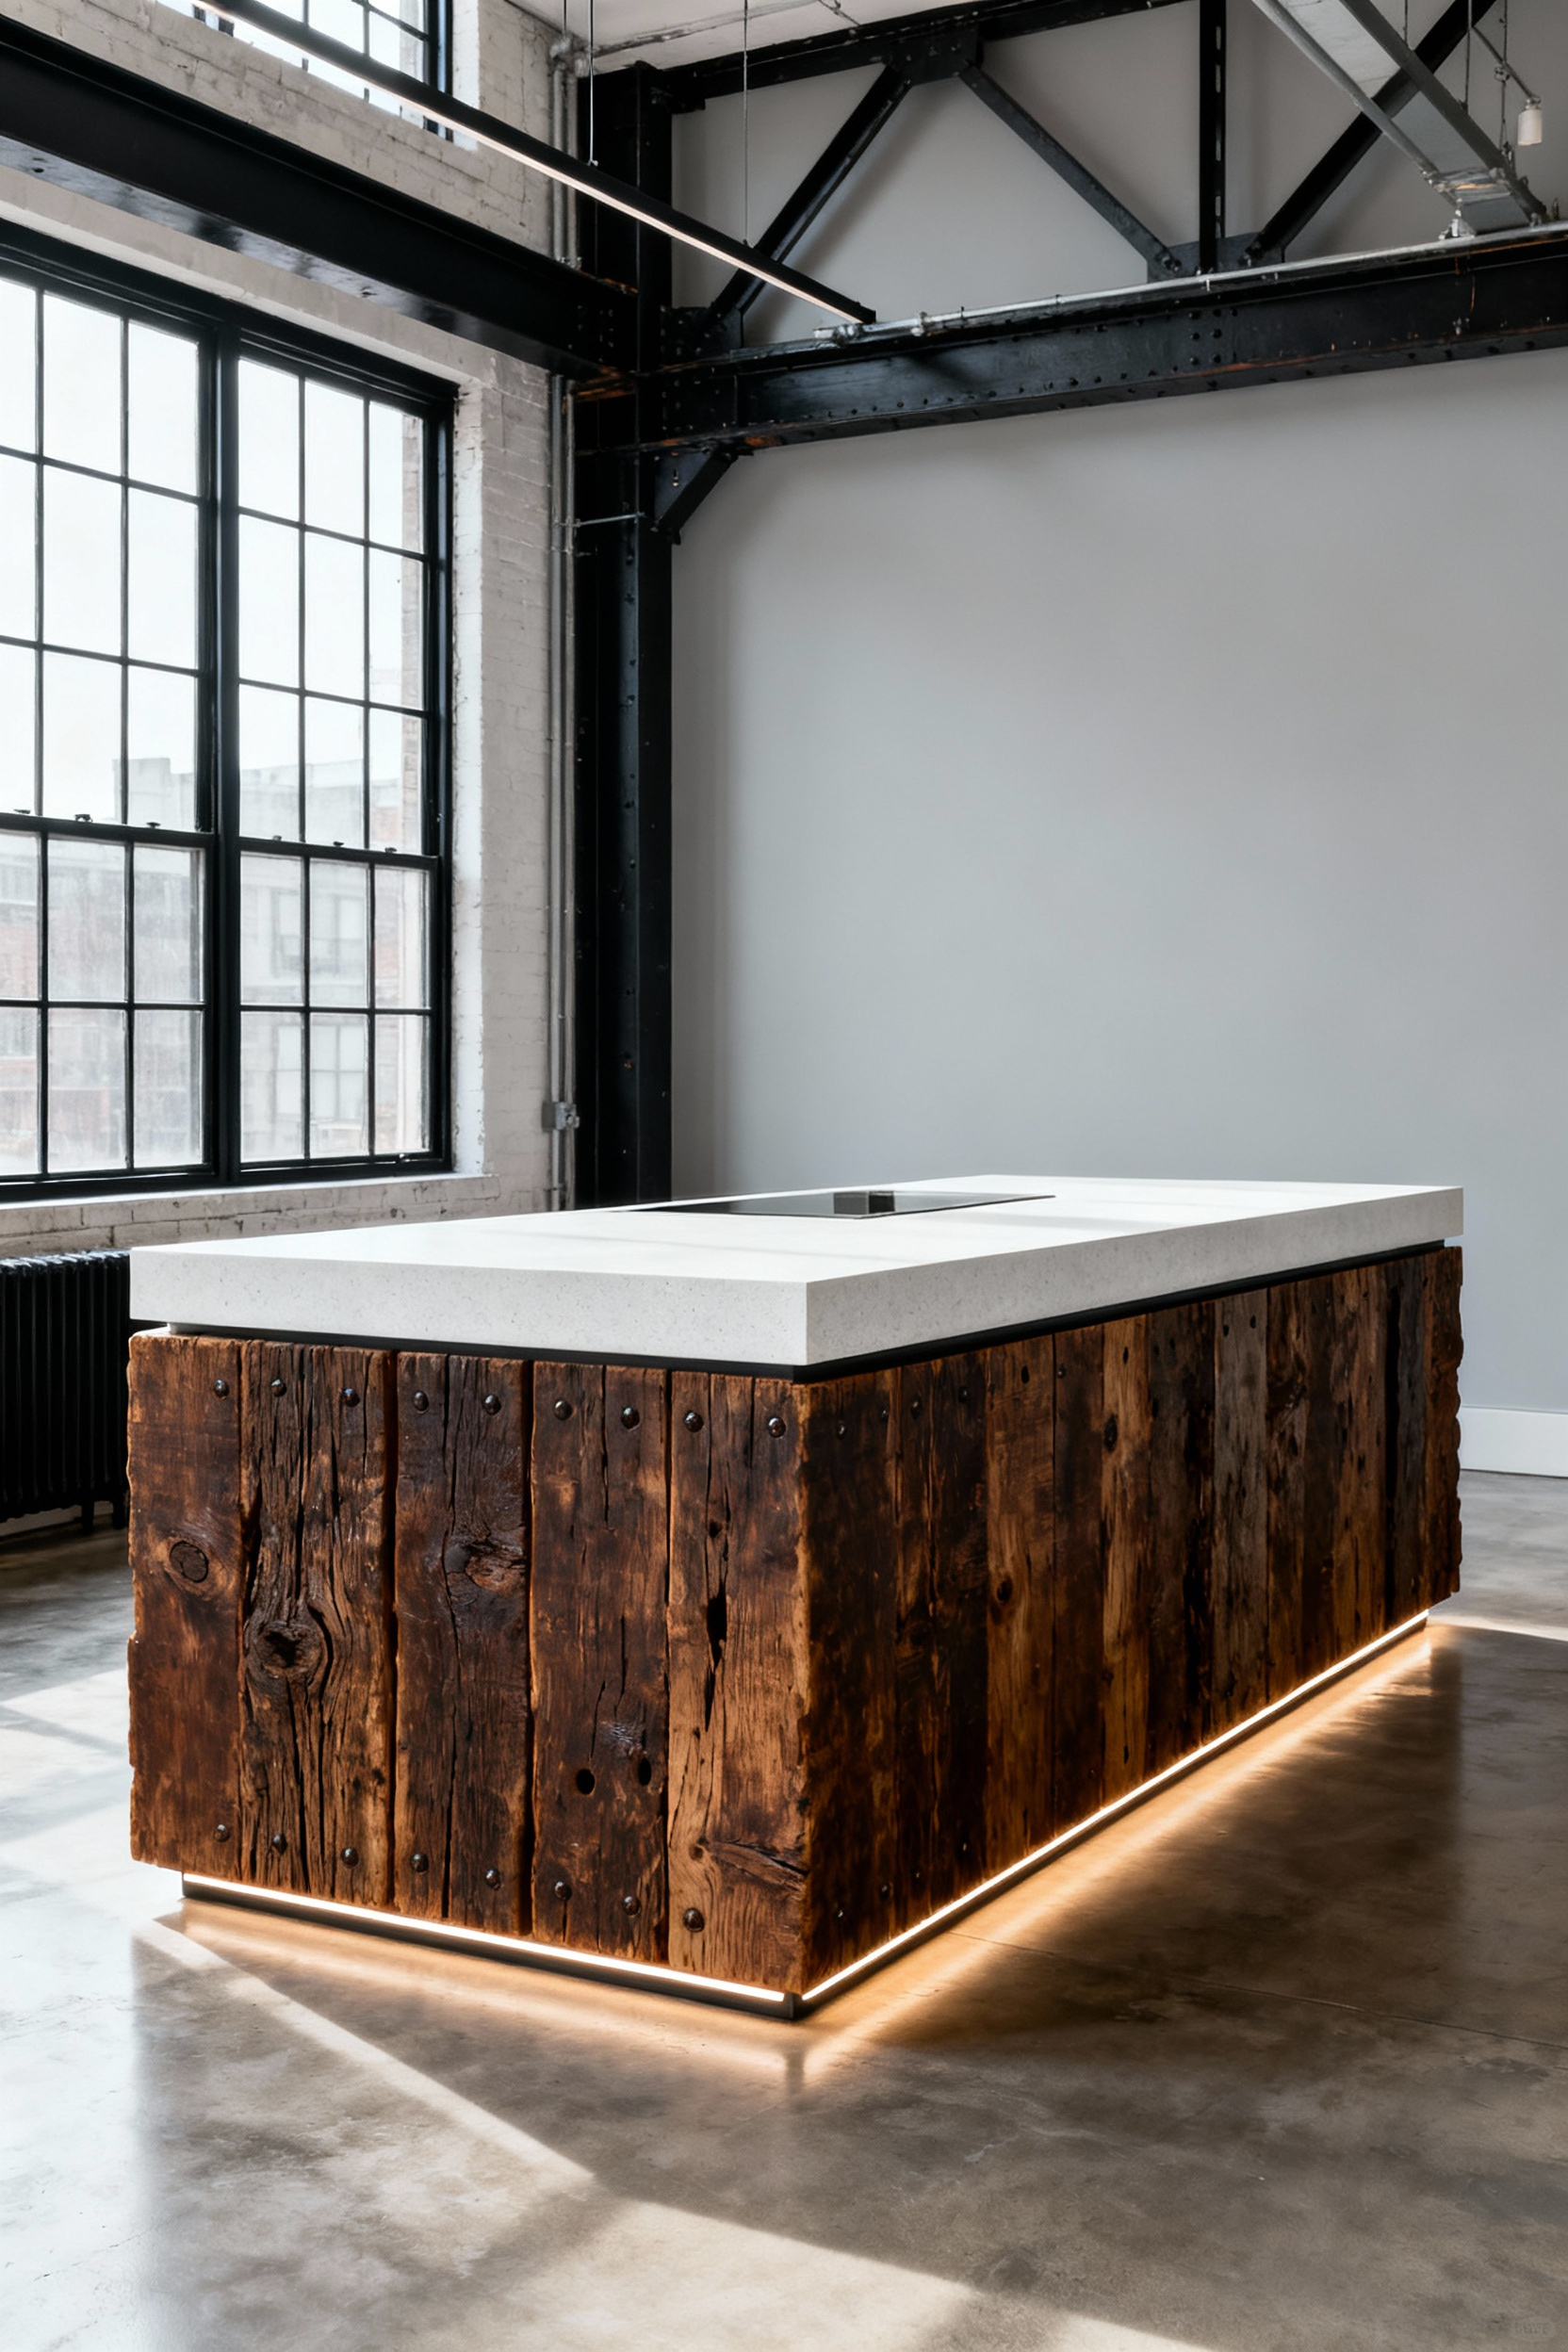
Smart design balances this texture with utility. Rough surfaces trap food, so limit the reclaimed cladding to the island’s “public” faces—the seating back and side panels—while using smooth, painted cabinetry on the working side for effortless maintenance. Finally, create necessary tension between old and new through hardware selection. Avoid rustic knobs. Instead, select stark, minimalist fixtures to emphasize the modern functionality hidden beneath the historic surface:
- Integrated finger pulls for a seamless, architectural profile.
- Matte black bar pulls to ground the aesthetic visually.
- Push-to-open latches to eliminate visual clutter entirely.
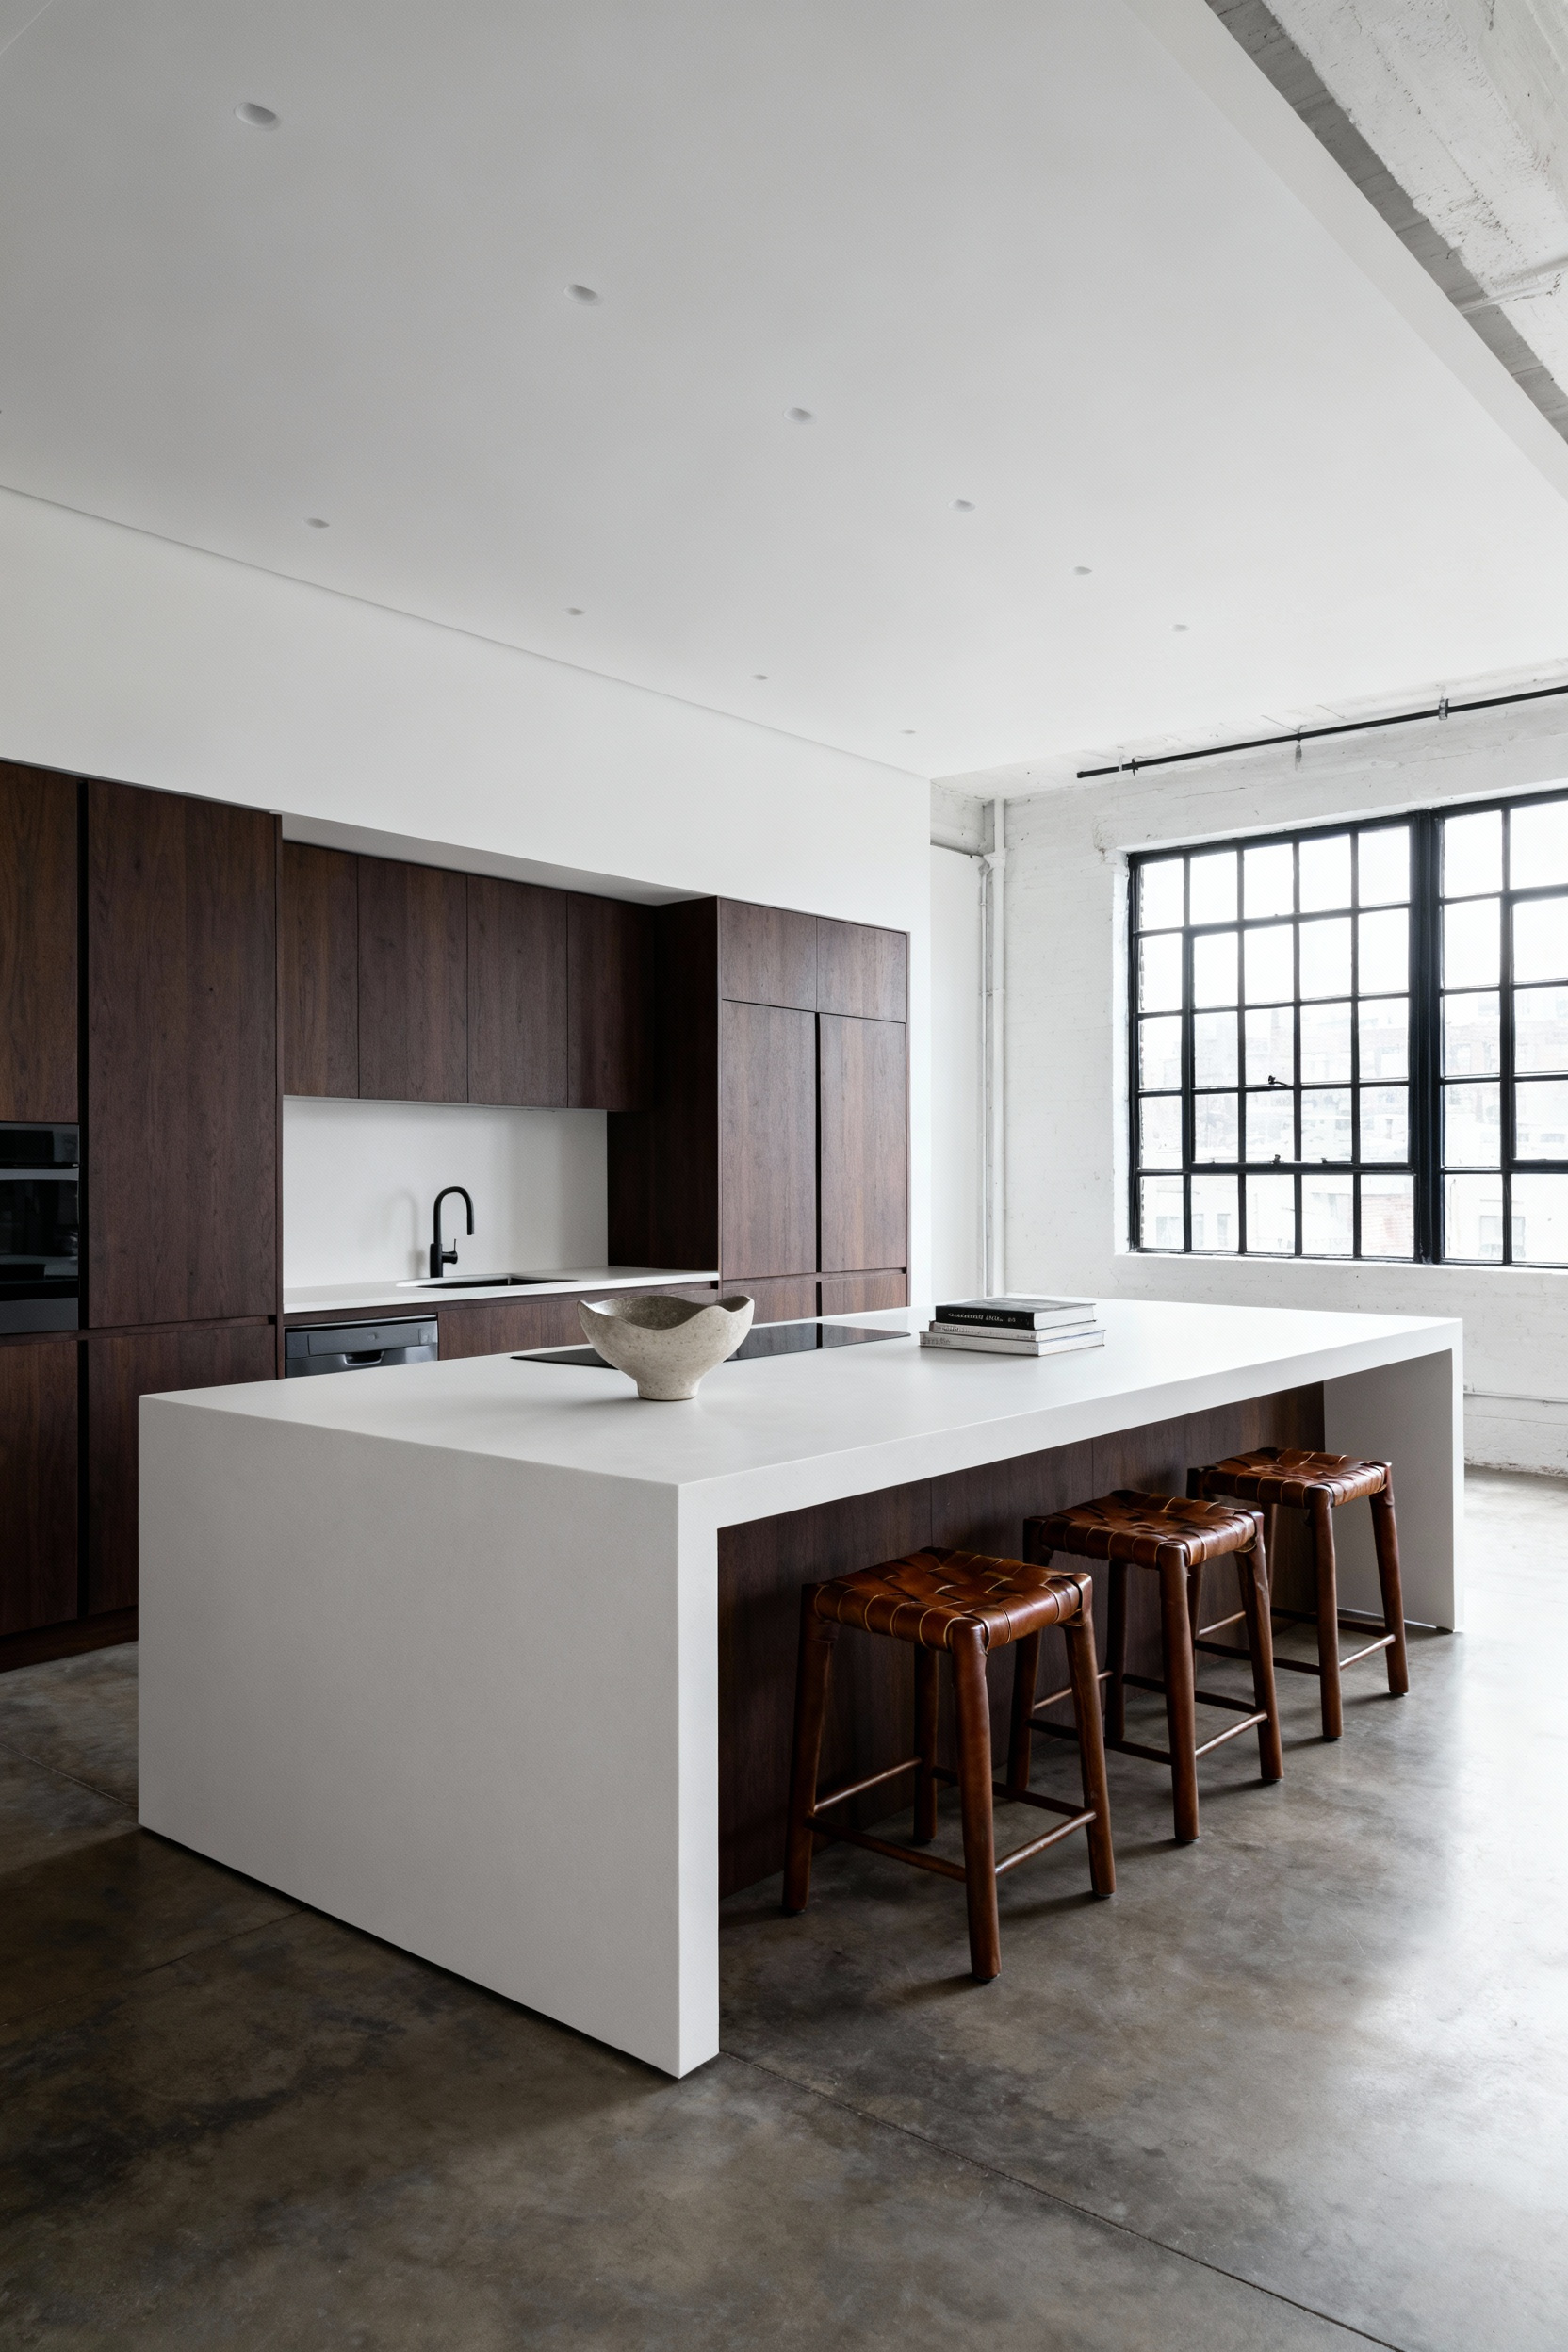
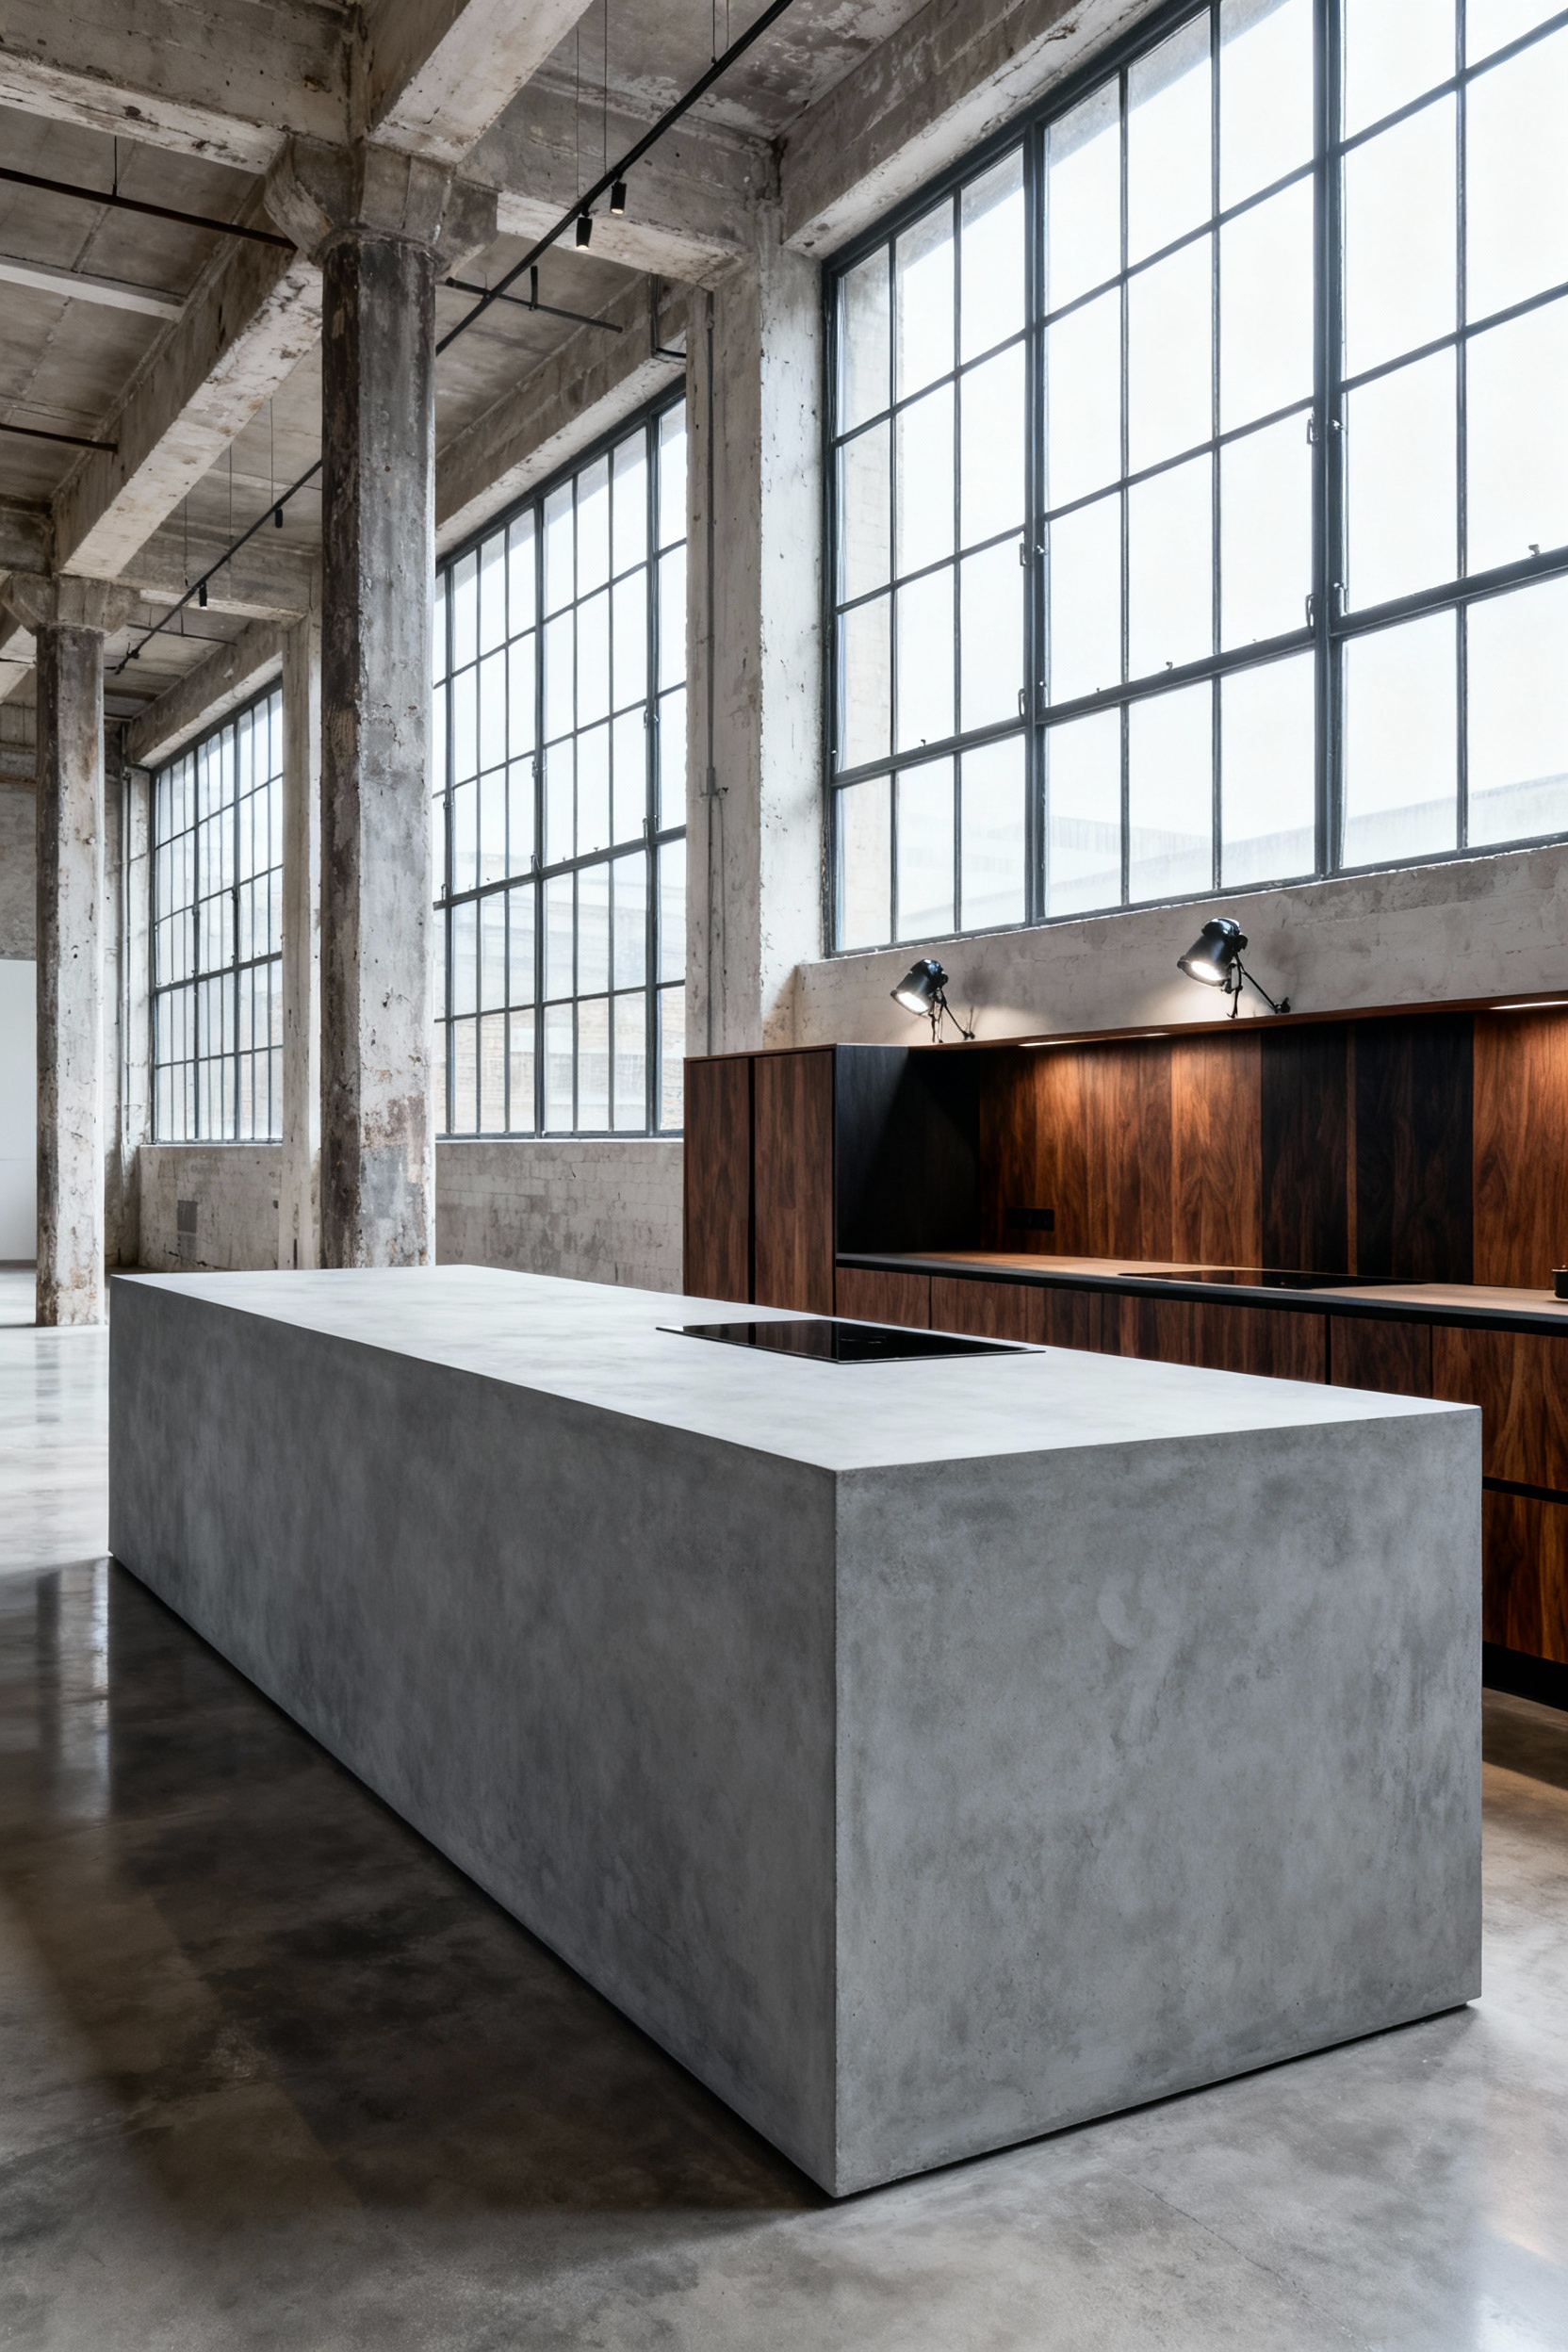
7. The Waterfall Edge: Creating Visual Continuity with Stone or Quartz
Waterfall edges transform a standard kitchen island into a monolithic architectural statement. In my work converting open-plan warehouses, I rely on this design to visually anchor the cooking zone against vast industrial backdrops. However, precision determines success. You must demand bookmatching, ensuring the veining flows seamlessly over the edge like water. Without this alignment, the illusion shatters. Additionally, instruct your millworker to recess the cabinet end panel by half an inch. This technical nuance ensures the heavy vertical stone sits flush with your cabinet faces rather than protruding awkwardly.
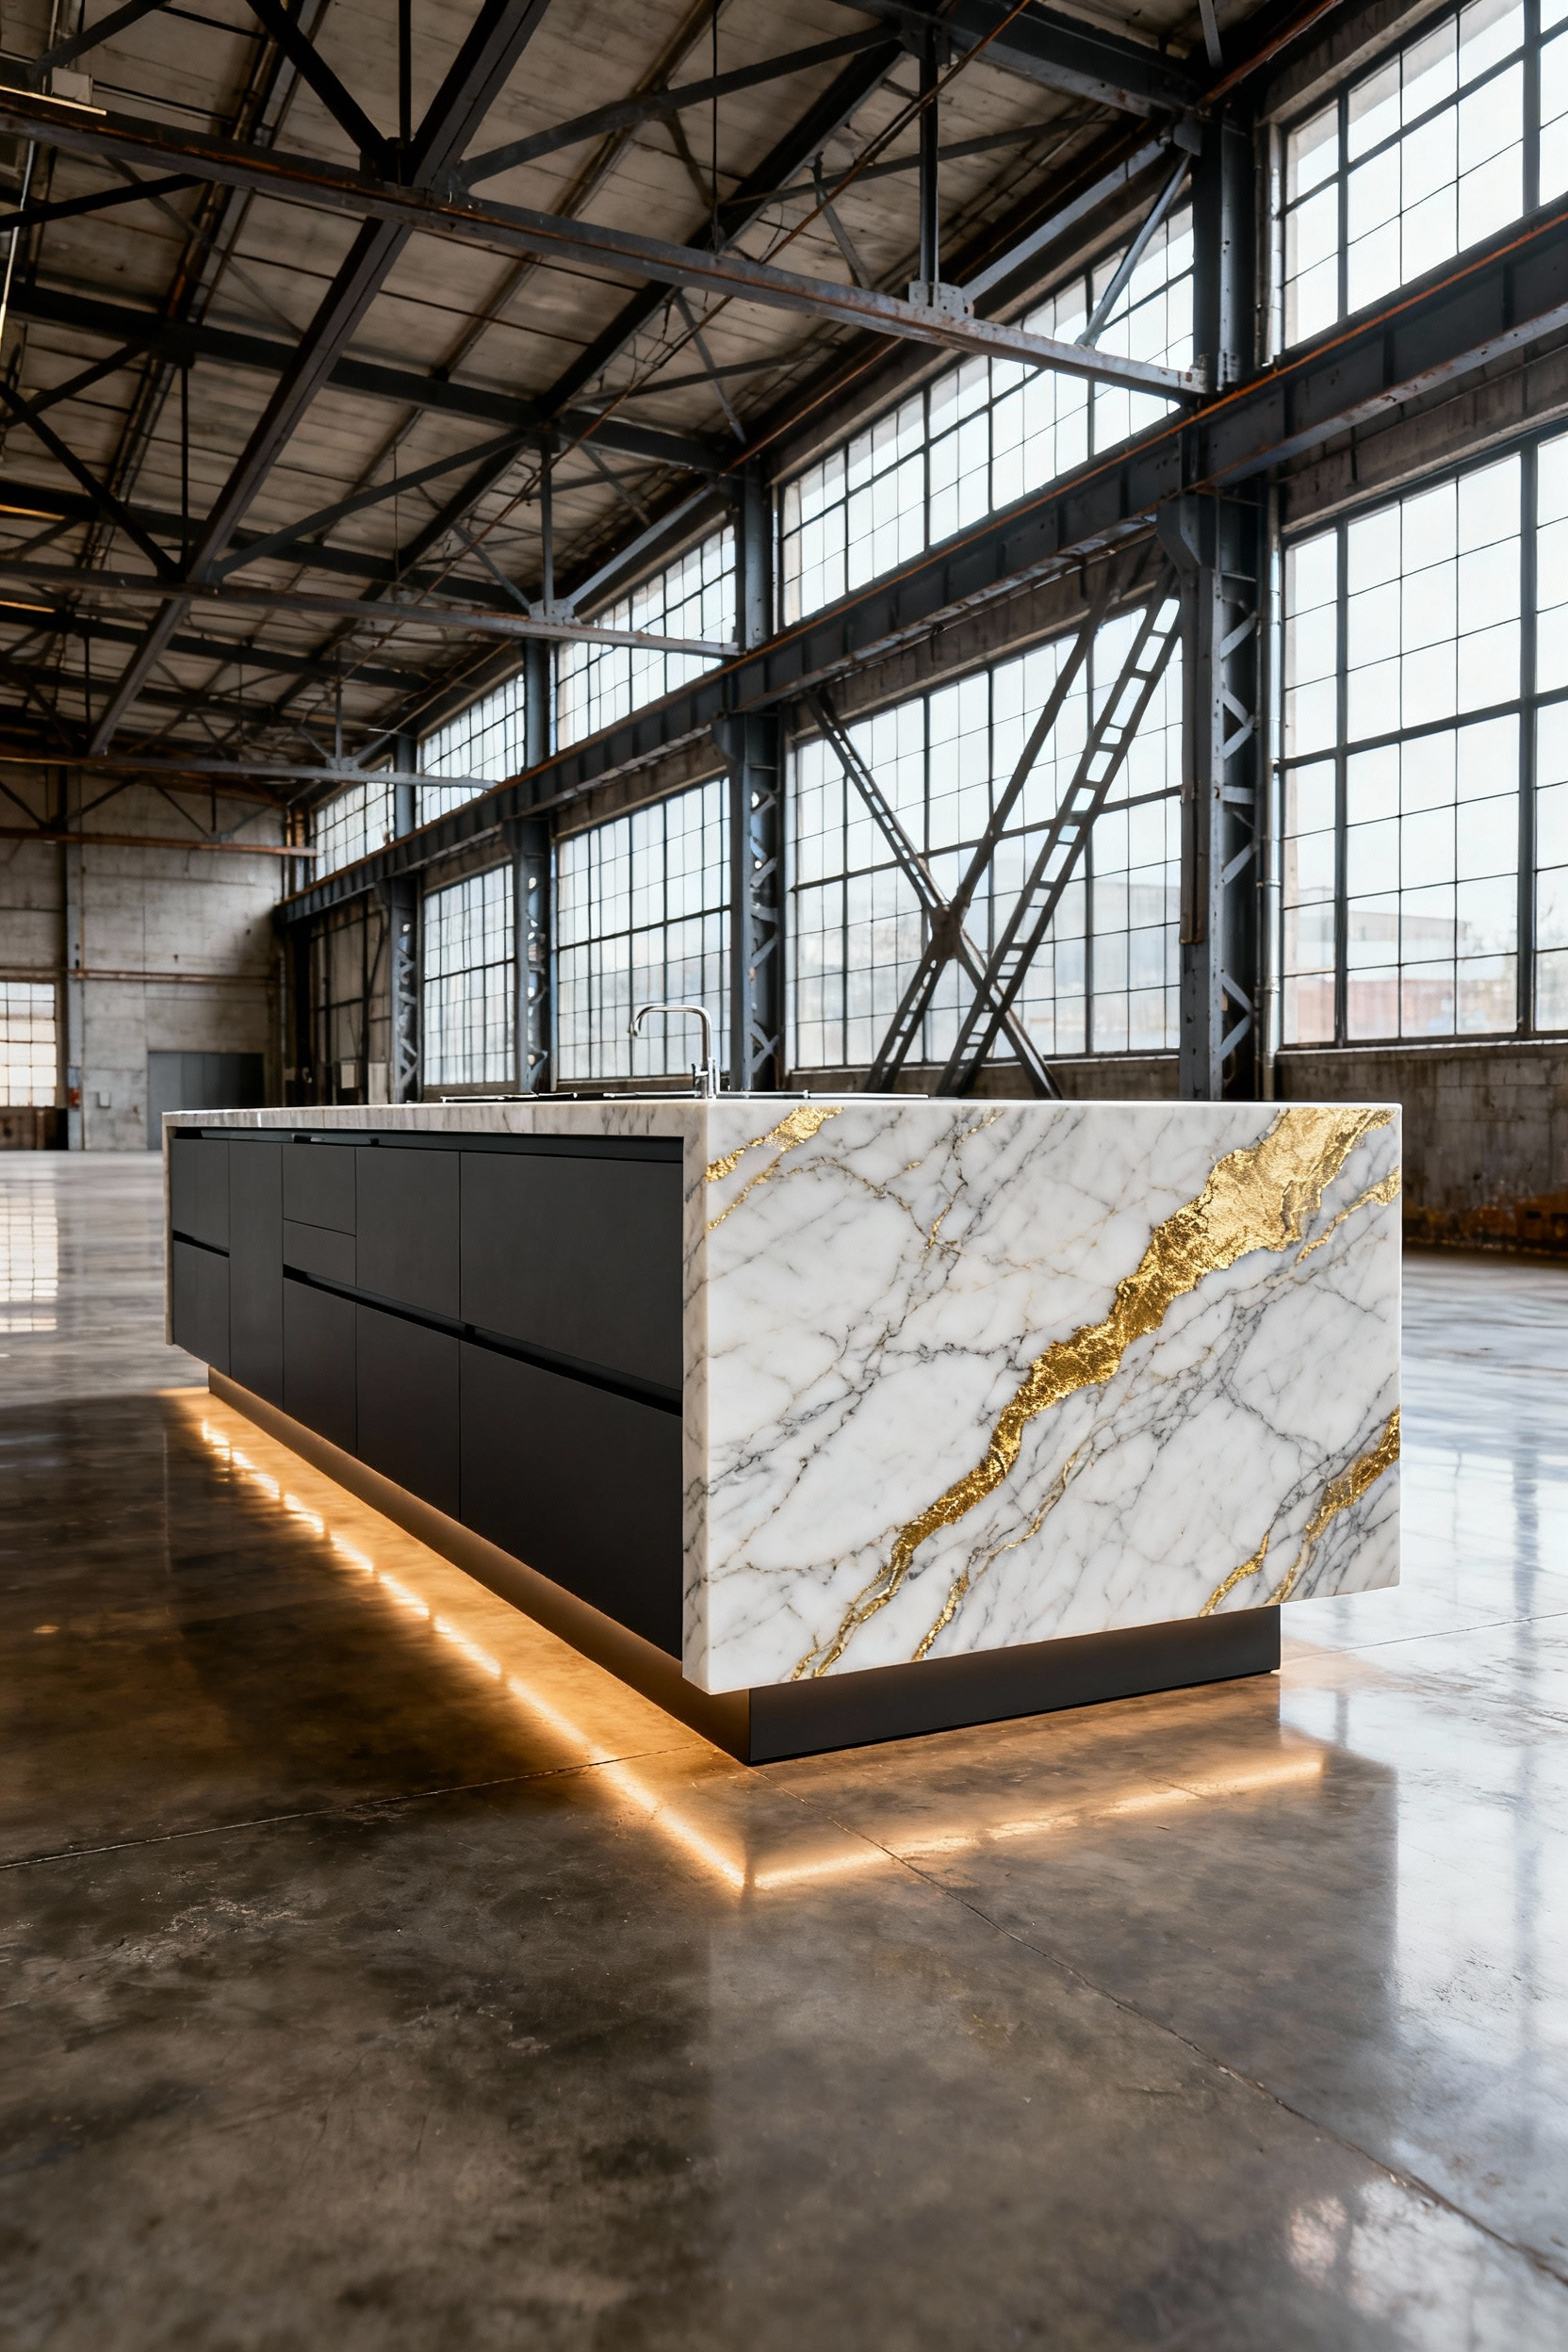
Consequently, this investment offers more than just sophisticated lines. The vertical slab acts as armor, shielding delicate veneers from the scuffs and kicks inevitable in a busy city home. Before committing, consider these structural and financial realities:
- Budget for Slabs: You will likely need an additional half or full slab to guarantee consistent color and grain alignment.
- Select Directional Stone: Choose materials with strong, linear veining to maximize the cascading visual effect.
- Prioritize Protection: View the stone end cap as a durable guard against daily foot traffic and cleaning wear.
Phase 3: Functional Architecture & Kitchen Island Cabinets
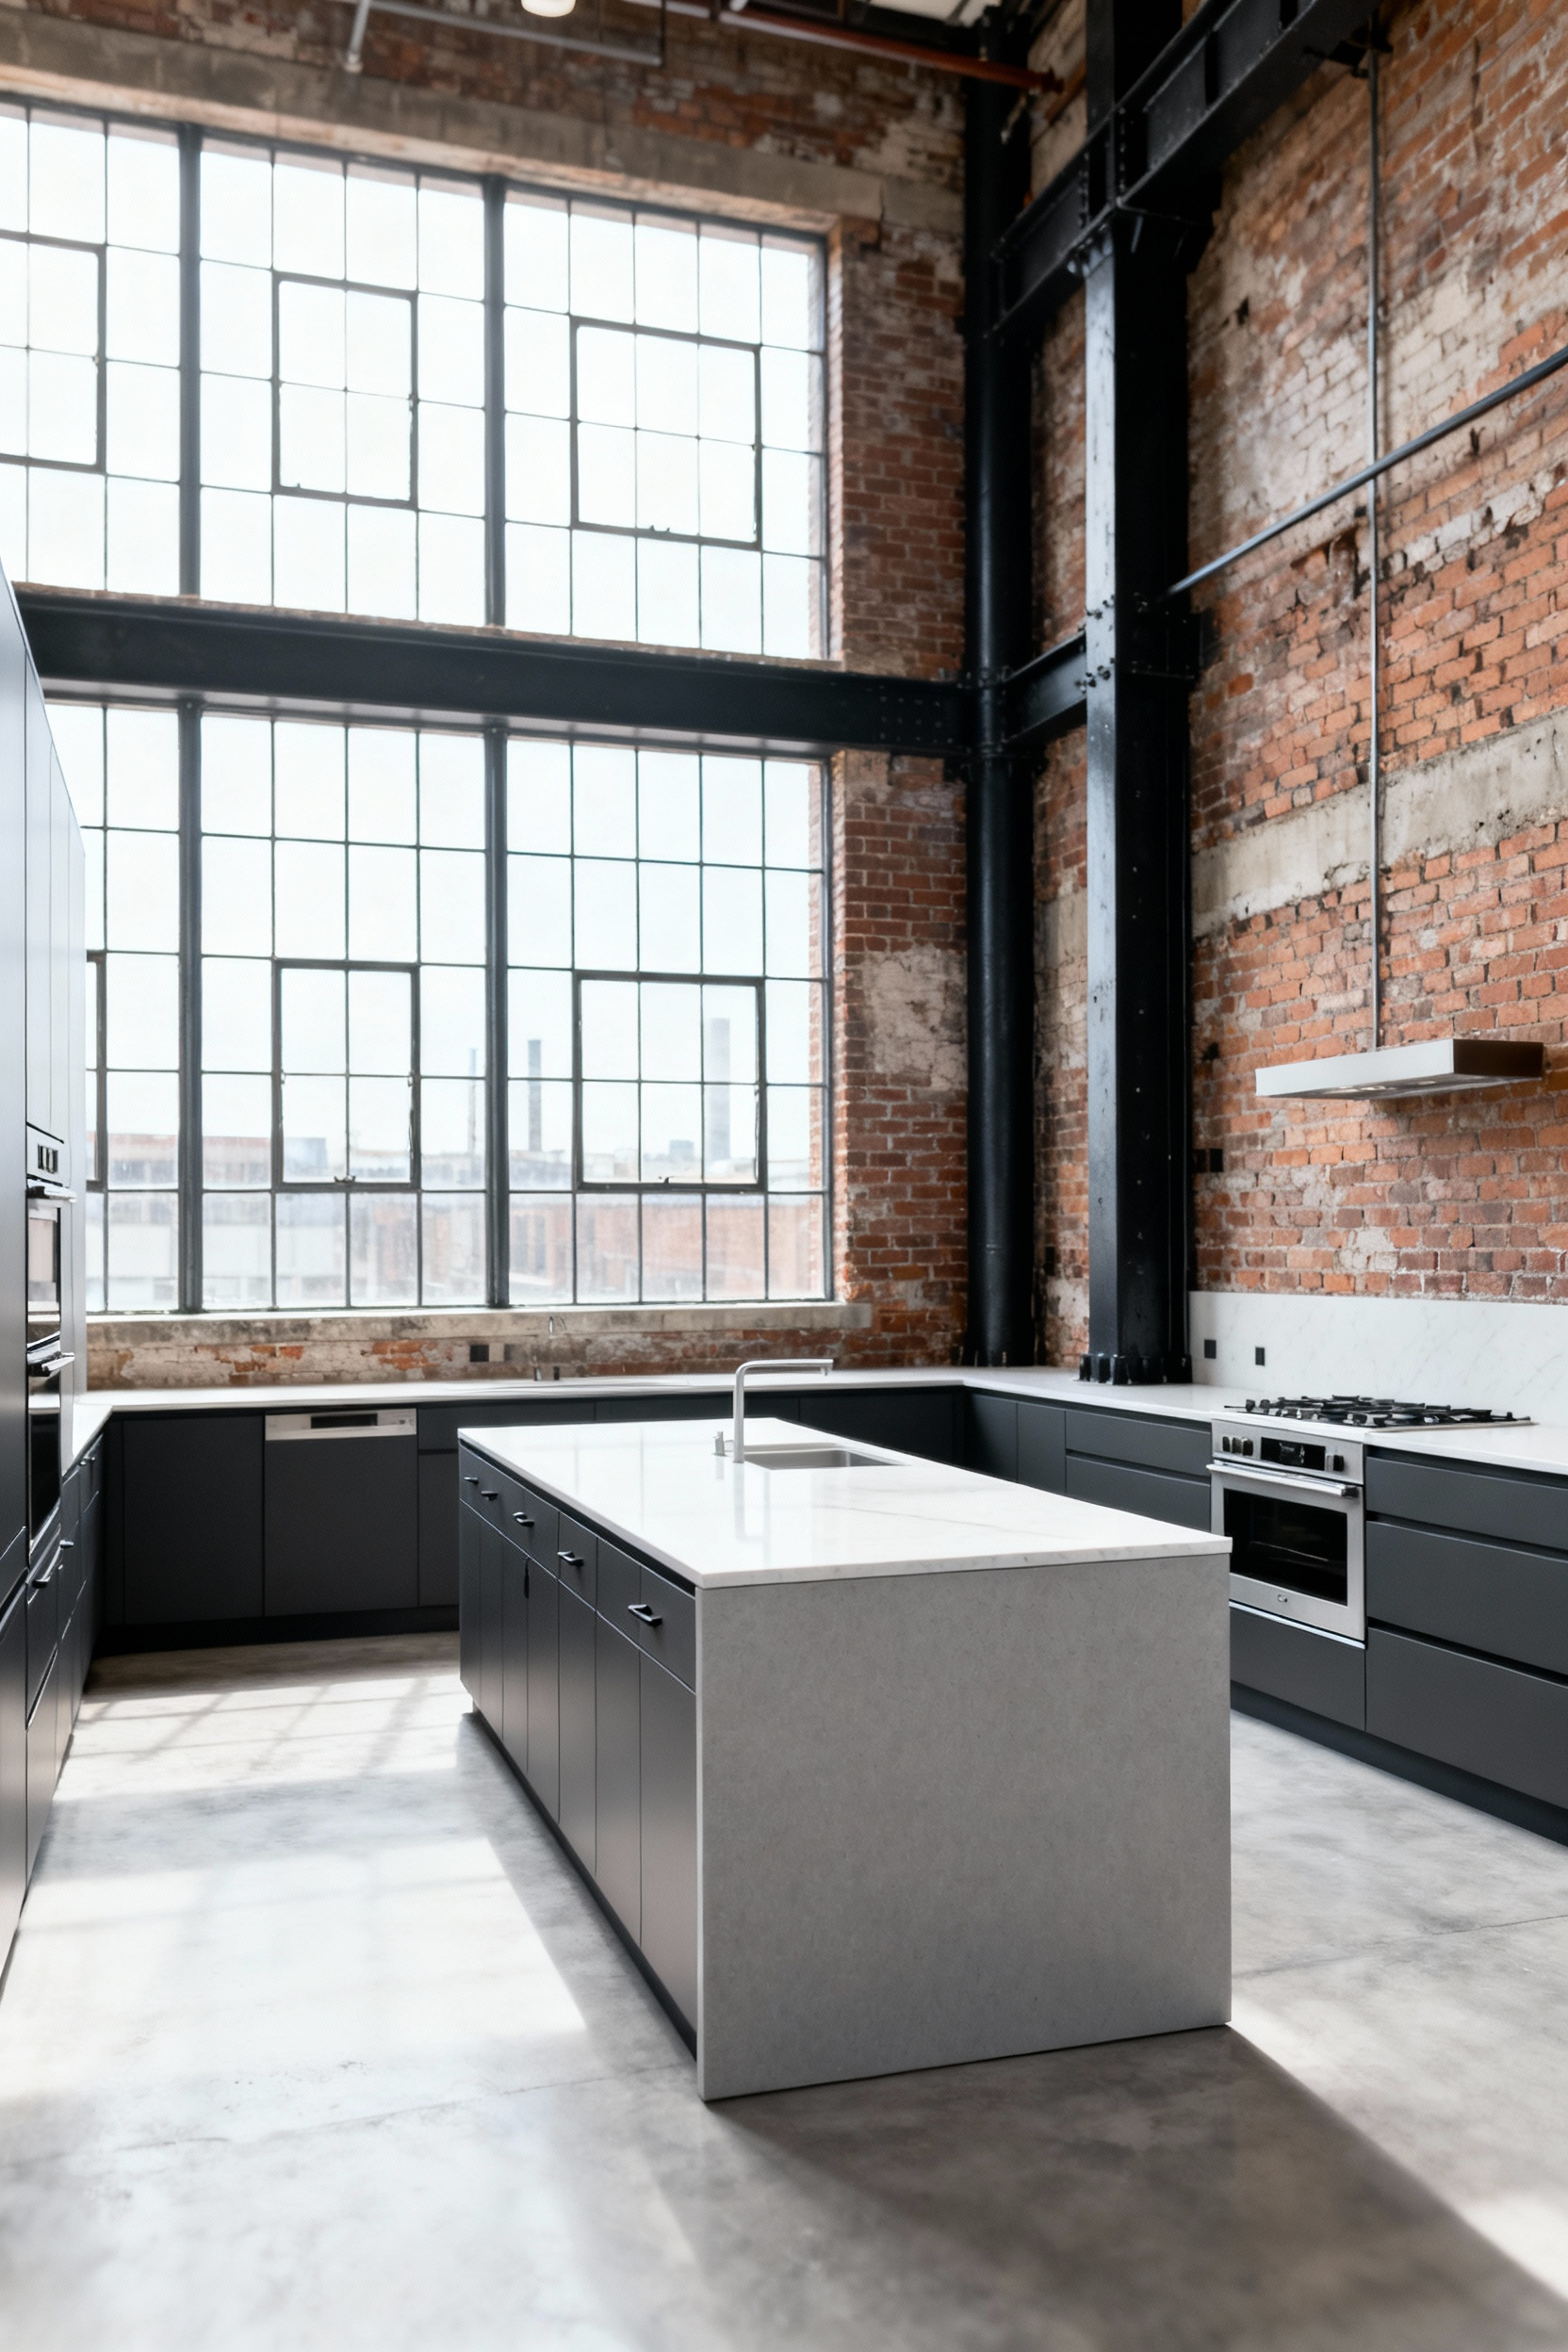
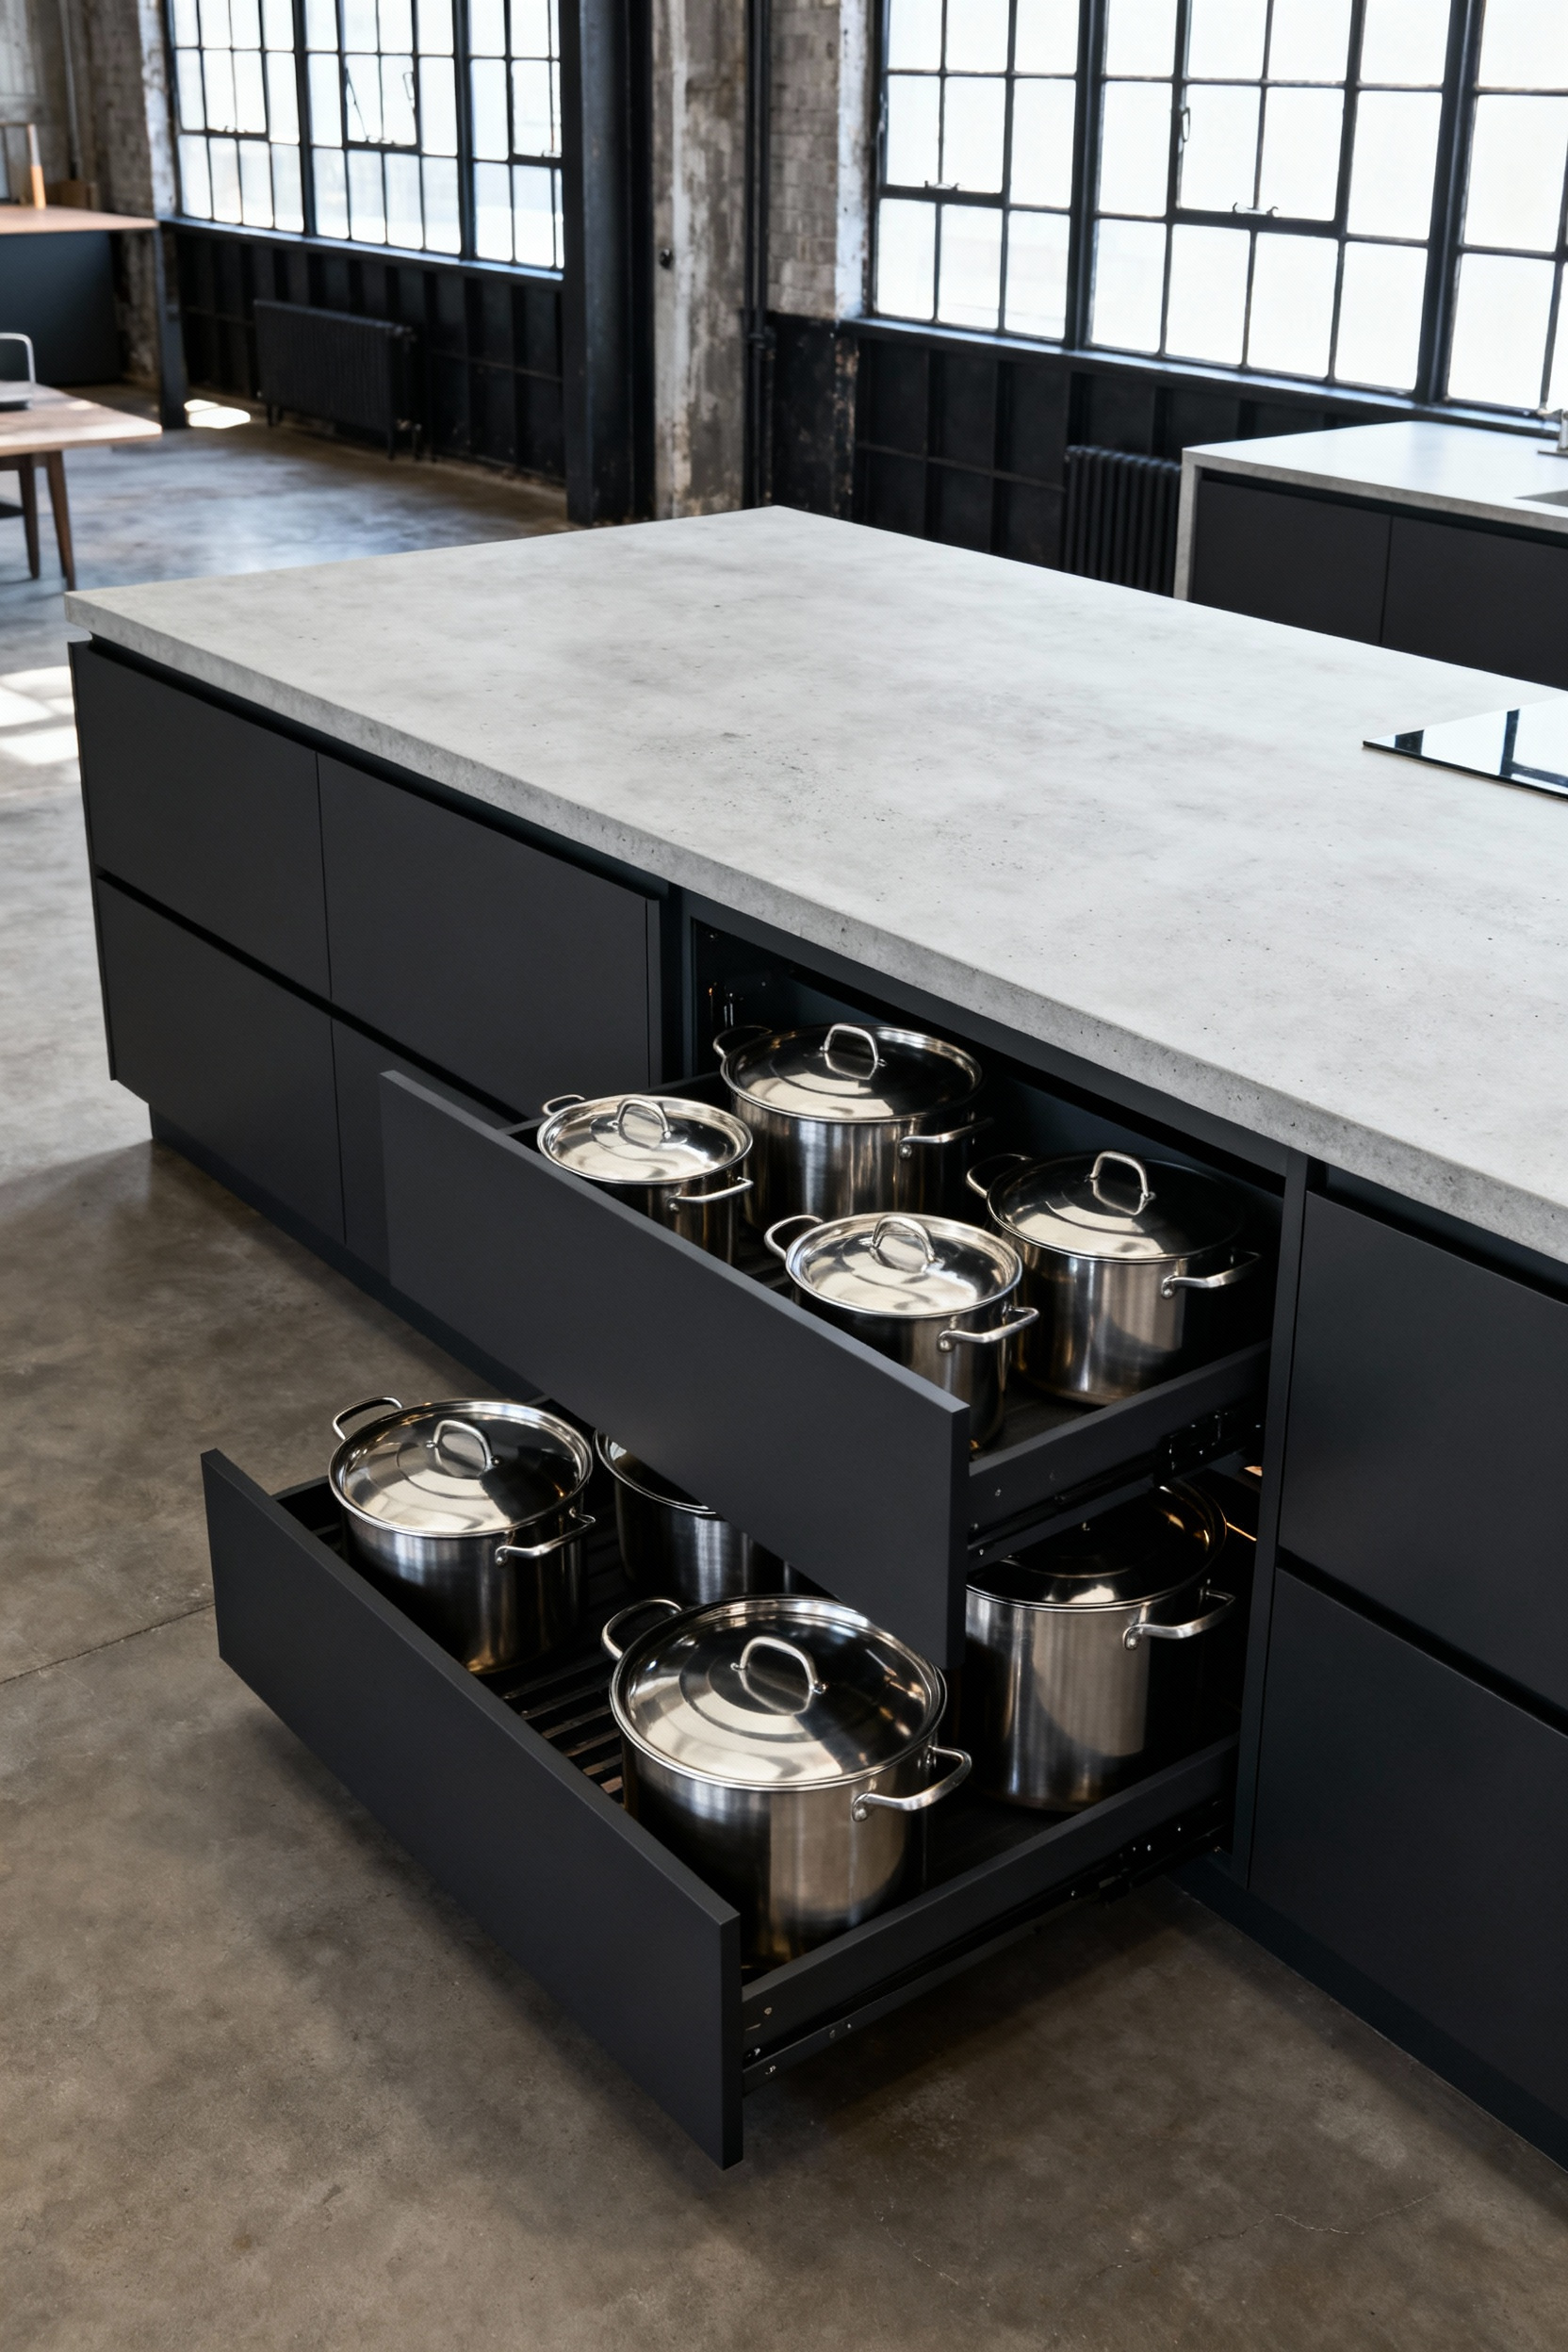
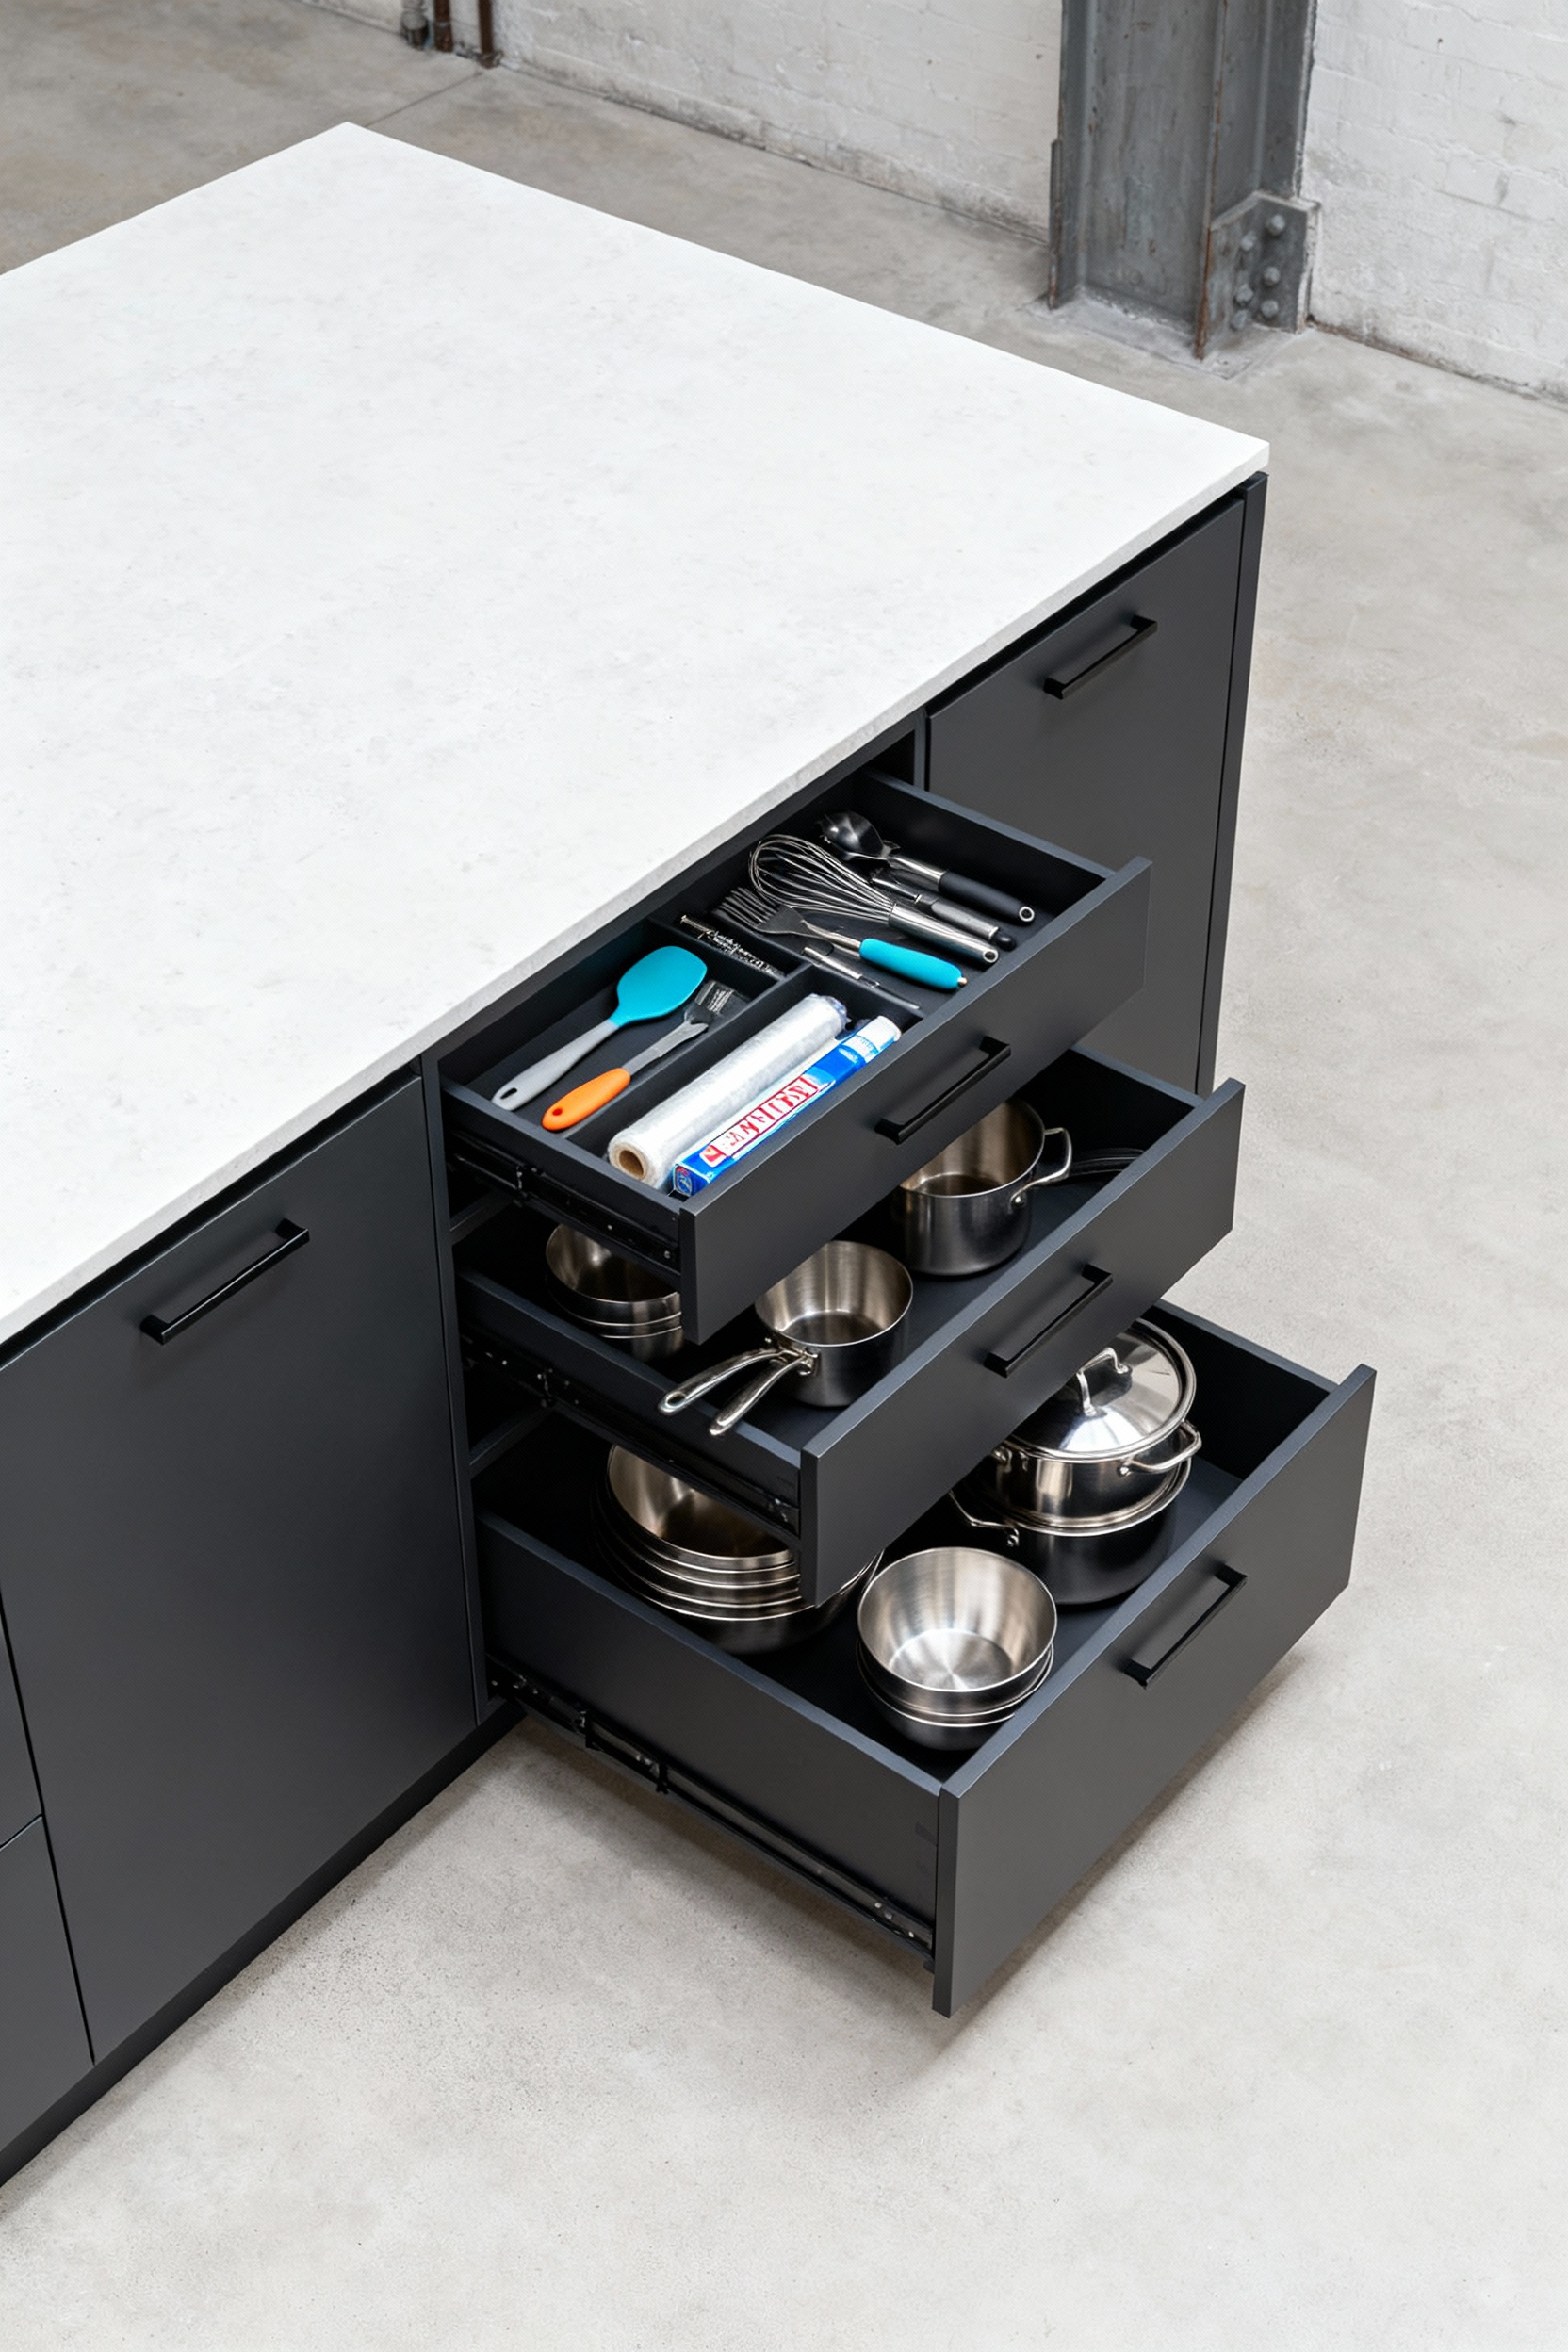
Treat your island as a high-performance machine, not just a storage box. In my work transforming converted factories, I refuse to install standard base cabinets with doors; they simply waste valuable volume. Instead, prioritize 36-inch and 48-inch wide deep drawers. These massive pull-outs grant instant access to heavy cookware without the need to kneel or dig. Furthermore, architecturally segment the joinery into specific workflow zones:
- Prep Zone: Align cutlery dividers directly beneath the cutting surface.
- Cleanup Zone: Install peg systems for dishware adjacent to the sink.
- Social Zone: Dedicate reduced-depth cabinets for barware facing the living area.
- *Camera & Lighting Details:** Captured using a high-resolution DSLR (e.g., Sony A7R V) with a 35mm prime lens. Aperture set to f/8 for maximum depth of field across the island structure. ISO 200. Lighting is controlled natural daylight mixed with warm, recessed LED strip lighting under the countertop edge, emphasizing the texture of the materials. Low, slightly dramatic shooting angle to highlight the mass and substantiality of the island. High contrast, sharp focus, architectural color grading.
Structural integrity requires foresight. Therefore, design internal clearances for electrical junction boxes and plumbing lines before construction begins, as retrofitting utilities in a concrete loft is a nightmare. To prevent the island from dominating the room like a monolithic block, integrate furniture-grade details. Utilize exposed legs or open steel shelving on the non-working side to reduce visual mass. This architectural detailing transforms a utilitarian block into a sculptural element, ensuring the unit functions like a commercial kitchen but reads like a sophisticated piece of urban furniture.
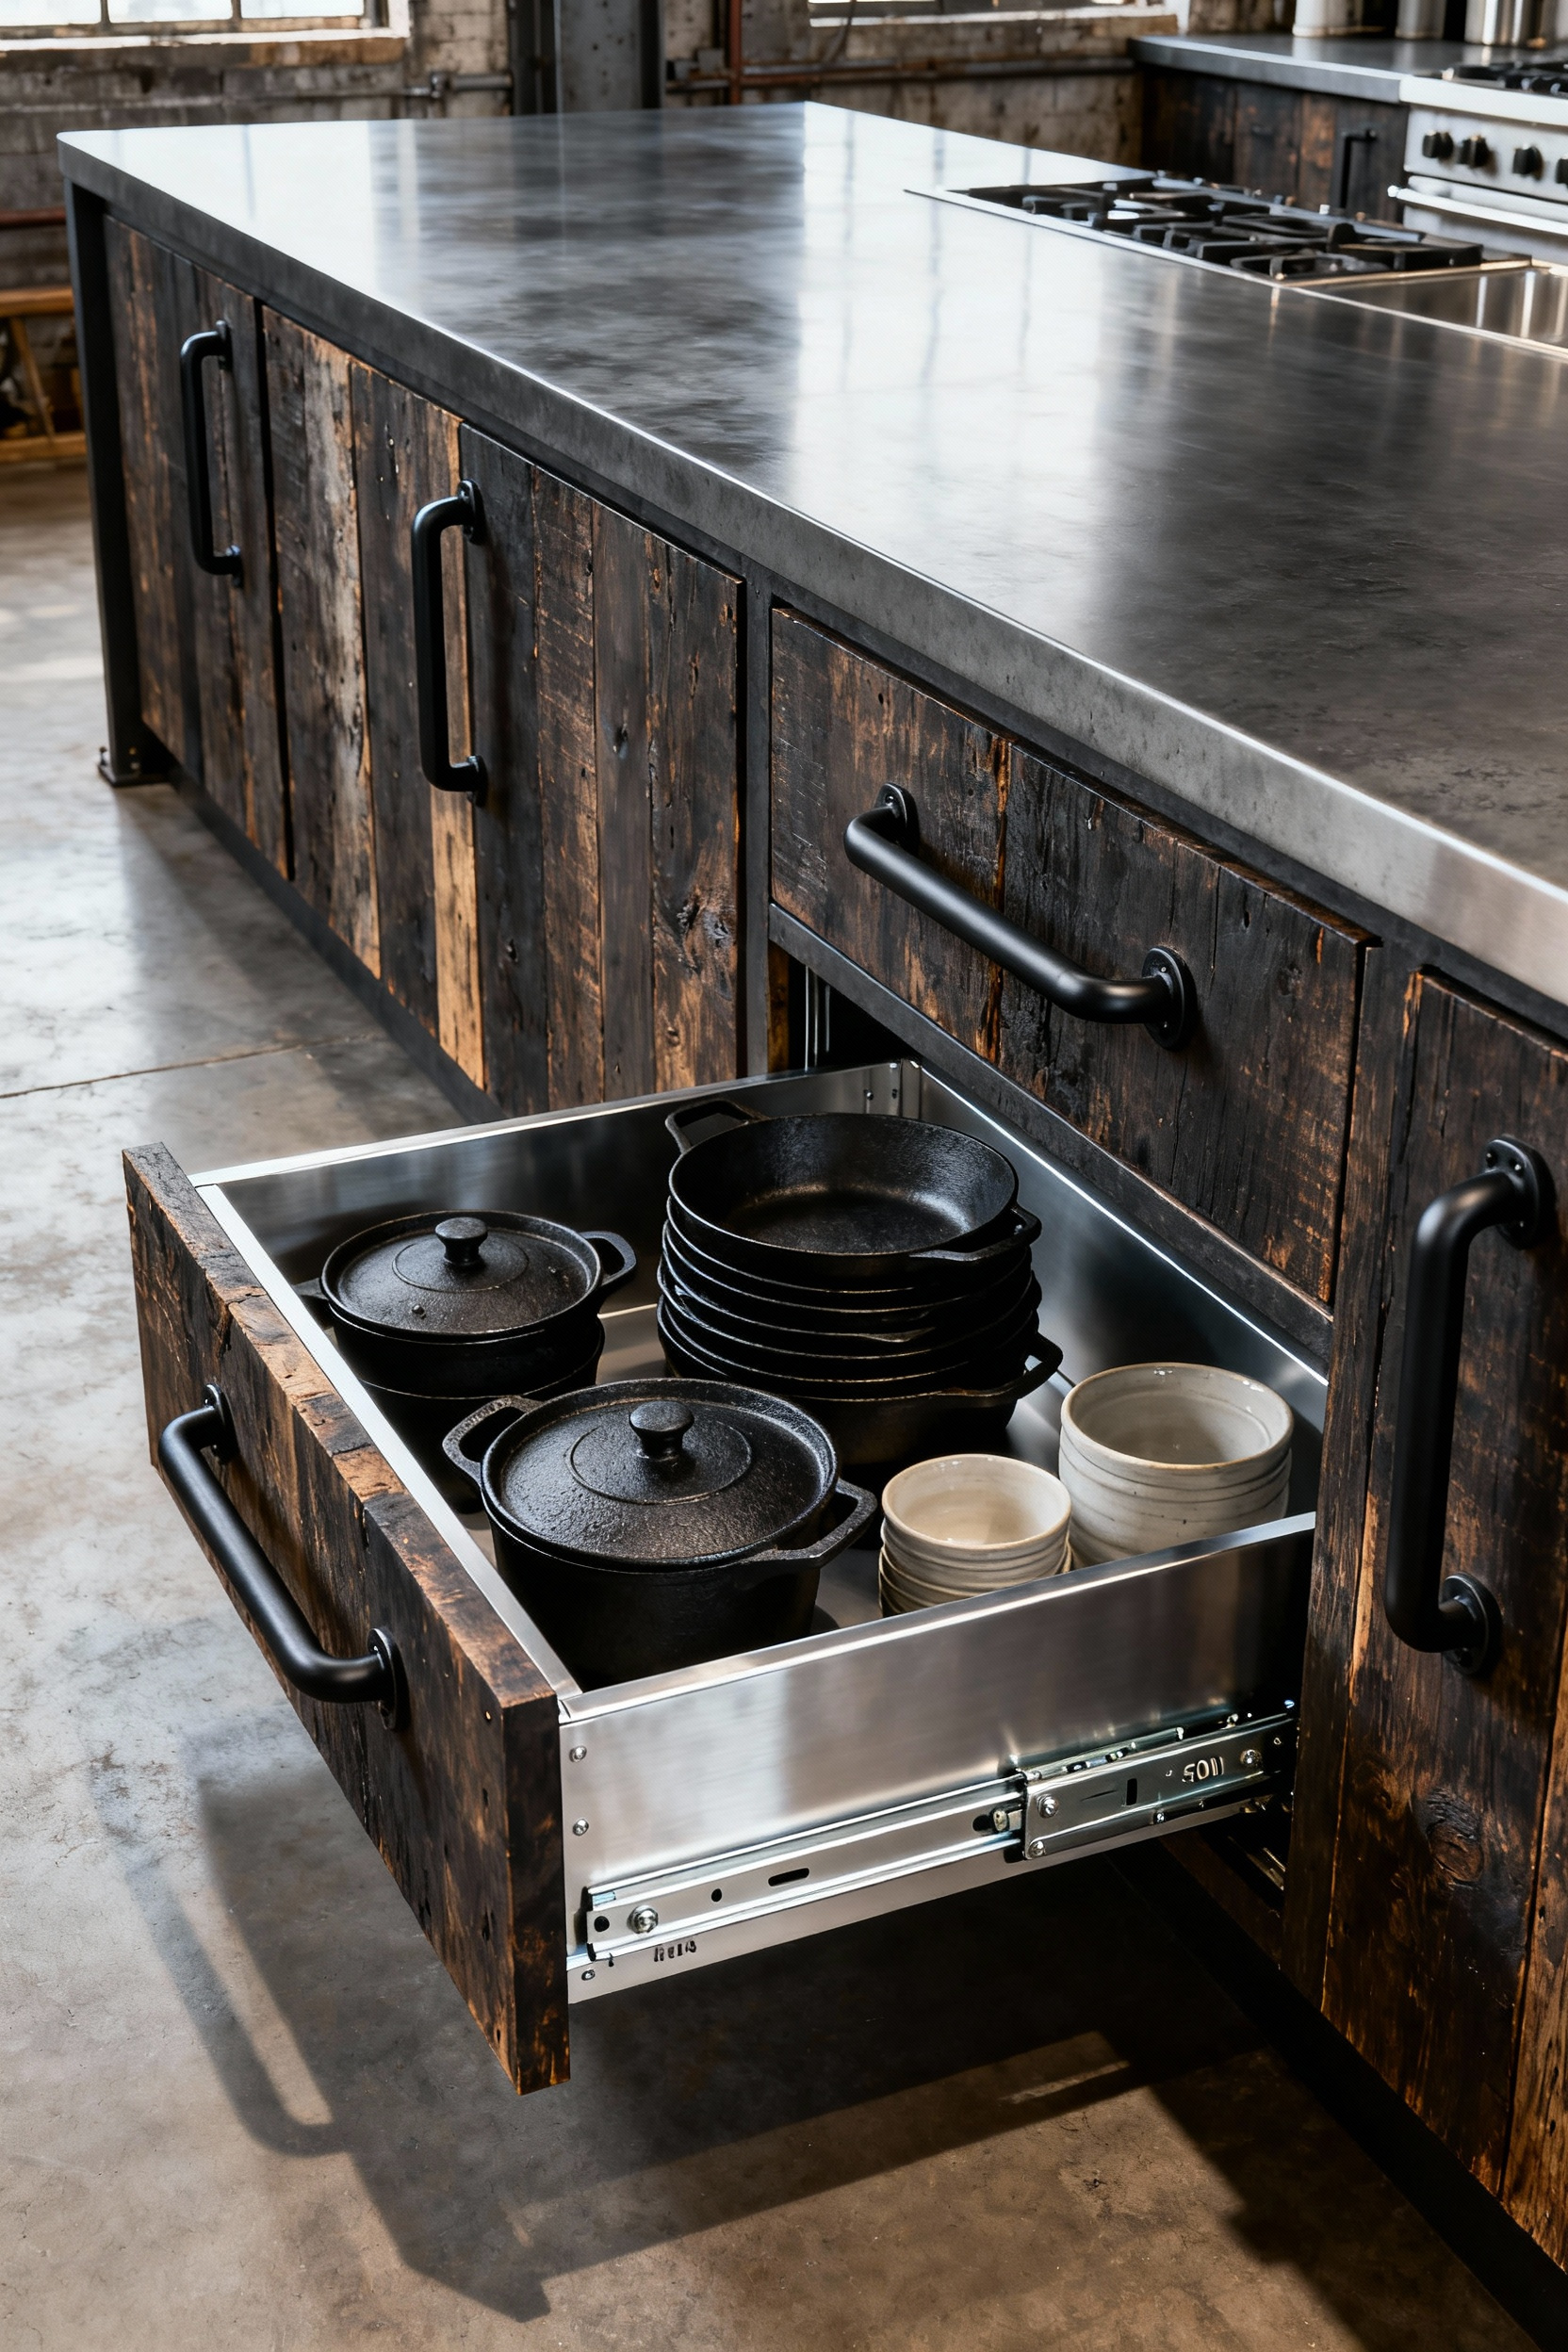
8. Ergonomic Accessibility: Prioritizing Deep Drawers Over Standard Swing Doors
Standard swing doors create architectural “dead zones.” In a recent factory conversion, I stripped every island base cabinet and installed deep drawers to eliminate the “dark back corner.” This shift removes the need to squat or kneel, providing absolute top-down visibility. For the most ergonomic layout, specify a three-drawer stack:
- Top Tier: A 4–6 inch shallow drawer for precision tools and wraps.
- Lower Tiers: Two 8–12 inch deep drawers for bulk storage and cookware.
- *Lighting and Camera Details:** Captured using a Canon R5 DSLR with a 35mm prime lens. Studio-quality softbox lighting is used to create even, bright illumination across the entire open drawer area, minimizing shadows within the cabinet depths (emphasizing the lack of dead zones). Aperture set to f/8 to ensure maximum depth of field, rendering the contents of all three drawers sharply. ISO 100, Shutter Speed 1/100s. Minimalist, clean post-processing with high dynamic range.
However, structural integrity is paramount. Deep drawers often house heavy cast iron or stand mixers, so you must insist on full-extension slides rated for a minimum of 100–150 lbs dynamic load. Soft-close mechanisms are non-negotiable for safety. Furthermore, use these heavy-duty drawers for small appliances. This minimizes lifting strain and keeps counters clear. Treat your cabinetry as infrastructure; build it for heavy rotation and immediate access.
9. Visual Silence: Concealing Appliances with Integrated Panel-Ready Cabinetry
Achieve architectural continuity by eliminating visual noise. In my open-plan loft conversions, the kitchen island acts as a central monument rather than a machine. Consequently, I mask appliances behind custom millwork to maintain a refined furniture aesthetic. I recently designed a raw concrete island for a former textile factory; fully concealing the under-counter refrigeration and dishwasher transformed the structure from a cluttered utility station into a seamless, sculptural anchor.

However, true concealment demands rigorous technical execution. Simply attaching a matching door is insufficient; the appliance must vanish. Therefore, prioritize these structural details for a flawless installation:
- Demand Flush Overlays: Specify appliances designed for complete overlay (like high-end Miele or Sub-Zero units) so the panel sits entirely flush with adjacent cabinetry.
- Mind the Gap: Enforce strict tolerances by matching appliance panel gaps to your standard cabinetry reveals—typically 1/8 inch or less.
- Eliminate Hardware: Utilize push-to-open mechanical latches on drawers and wine centers to remove visual interruptions caused by handles.
10. The End-Cap Evolution: Utilizing Dead Space for Curated Open Display
In my work converting industrial warehouses into habitable lofts, I view the side of a kitchen island not as a finishing panel, but as a structural opportunity. Ignore the standard impulse to simply clad the end-cap; instead, excavate that dead space. By utilizing a mere four to six inches of depth, you create a recessed niche that remains flush with your cabinetry profile. This architectural sleight of hand eliminates visual bulk while offering a curated stage for artisanal olive oils or a vertical wine rack. Consequently, the island transitions from a monolithic block into a dynamic, multi-faceted structure.
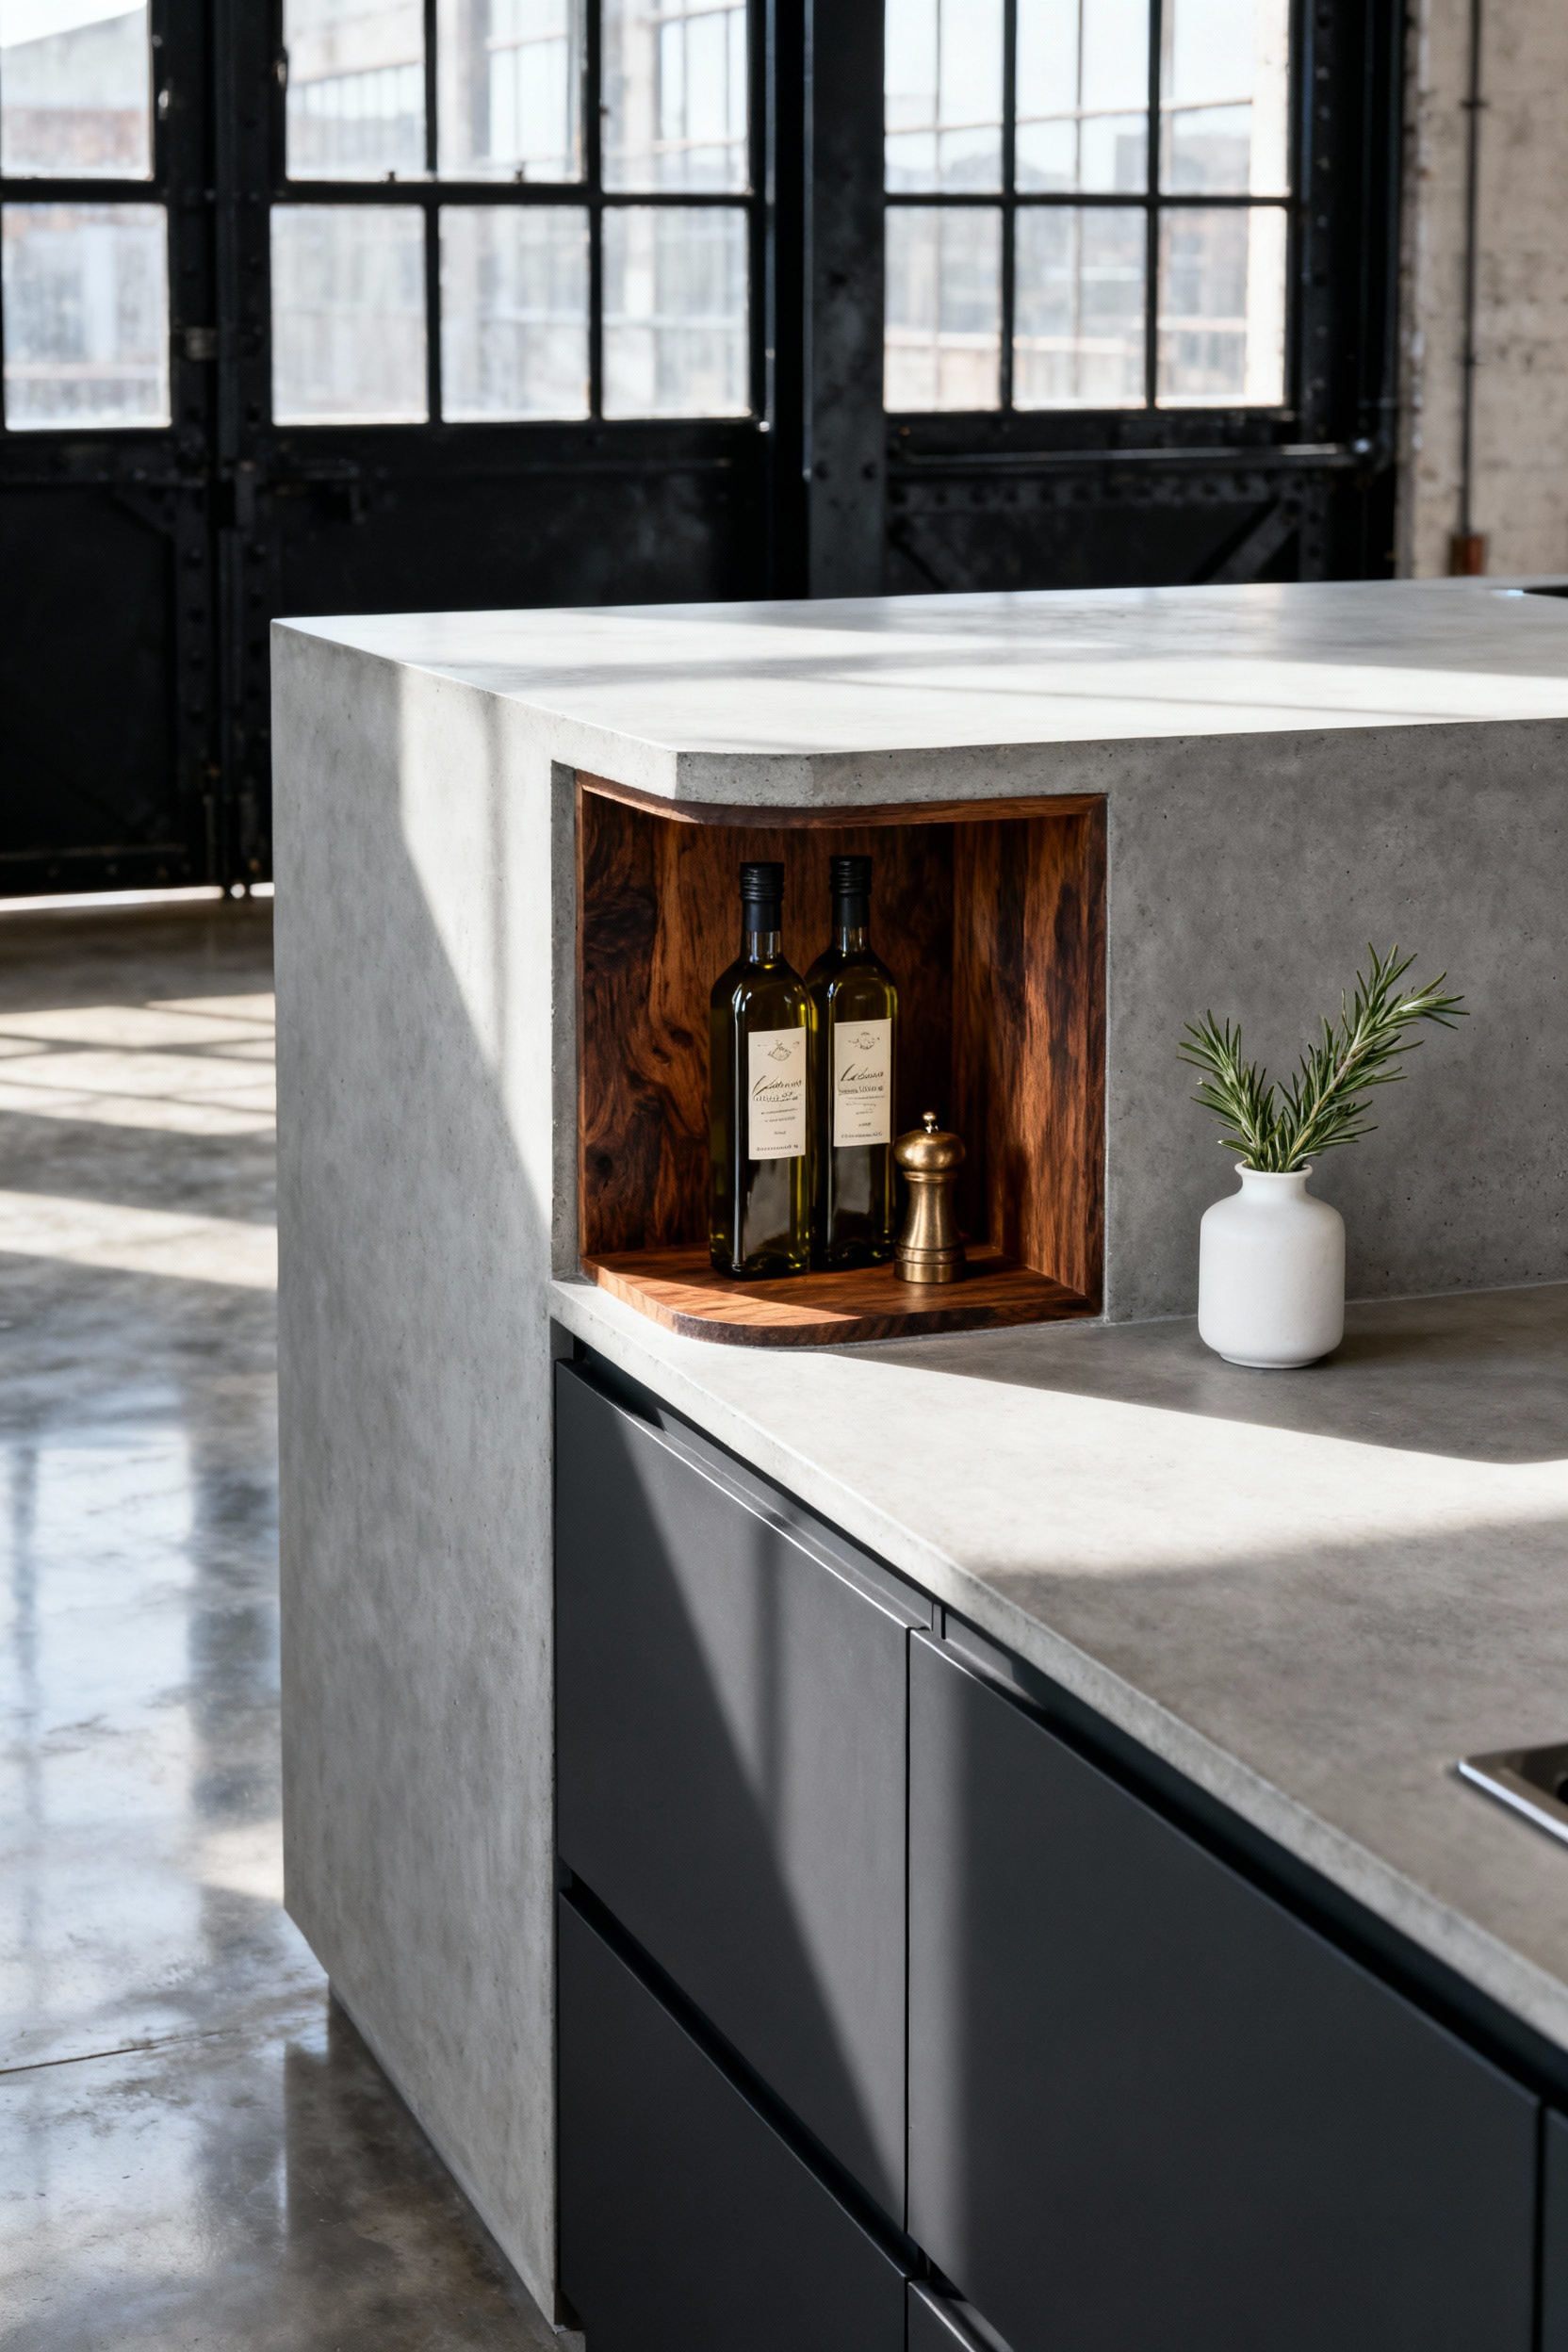
Functionality must dictate form in tight urban footprints. Orient this end-cap toward your primary cooking range to unlock an immediate “prep zone.” Install brushed steel rails or integrate a discreet tech hub directly into the millwork. This turns a passive surface into an active command center. Consider these integrations:
- Embed USB ports into the shelving edge for clutter-free charging.
- Mount retractable stands for seamless recipe viewing on tablets.
- Install side-rails to hang measuring spoons or oven mitts within arm’s reach.
11. Hardware Mechanics: Heavy-Duty Slides and Industrial Pulls for Longevity
Treat your kitchen island as infrastructure, not just furniture. In my recent factory conversion projects, I approached the central island as a high-traffic industrial zone, recognizing that standard residential hardware inevitably creates a weak link. To ensure your cabinetry survives the static and dynamic loads of cast-iron cookware and bulk storage, adhere to these structural mandates:
- Load Capacity: Specify slides rated for 100 lbs generally and 150+ lbs for appliance lifts or waste pull-outs.
- Extension: Utilize full-extension slides for deep storage access and over-travel slides to ensure waste bins clear the frame.
- Bearings: Demand corrosion-resistant steel ball bearings rather than brittle nylon components.
Additionally, master the physics of daily interaction. Heavy, architectural drawers require substantial leverage, so reject dainty knobs in favor of pulls ranging from 5 to 12 inches. This scale provides proper grip surface and reduces stress on the screw mounts. Furthermore, for wide storage units, invest in synchronized soft-close technology. Unlike standard mechanisms, these systems use cables or gears to balance movement across the drawer width, effectively preventing racking and binding. Precision hardware guarantees your island functions as beautifully as it looks.
Phase 4: Social Integration & Lifestyle
In open-plan lofts, the kitchen island functions as the social anchor. Treat this volume distinctly from your perimeter walls to create visual hierarchy. Select a contrasting wood species or bold finish for the cabinetry to intentionally designate the island as the primary gathering zone. However, a social hub fails if it is cluttered with cables. Integrate shallow technology drawers with internal AC and USB outlets directly into the joinery. This conceals laptops and charging phones, preserving clean architectural lines for cocktails and conversation.
When I convert industrial warehouses, controlling traffic flow determines success. You must separate the observer from the chef. Install beverage centers or wine coolers on the outward-facing “social side” of the island to keep guests out of the active cooking triangle. Furthermore, maximize the structural footprint by utilizing the dead space under the seating overhang:
- Install shallow cabinets: Use 12-to-15-inch depths for linens and glassware while maintaining essential knee space.
- Customize interiors: Specify vertical dividers for oversized charcuterie boards and catering trays.
- Streamline hosting: Ensure entertaining essentials are accessible without disrupting the prep zone.
12. The Cantilevered Overhang: Structural Considerations for Bar Seating
Gravity remains the one rule you cannot break in a loft renovation. While 3cm quartz or granite exudes luxury, an overhang exceeding 10 inches invites structural cracking without reinforcement. Forget bulky corbels that bruise knees; modern industrial design demands invisibility. Consequently, I always specify flat steel plates routed directly into the cabinet frame before the stone arrives. This hidden infrastructure supports the optimal 15-inch depth for knee clearance while preserving the sleek, floating silhouette required in a refined urban kitchen.
Furthermore, physics dictates that a deep cantilever acts as a powerful lever against your cabinetry. Without proper counter-weight, a heavy user leaning on the edge can tip an unsecured island. To ensure safety and stability, prioritize these architectural safeguards:
- Anchor the chassis: Bolt the cabinet base securely to the subfloor, particularly for overhangs exceeding 15 inches.
- Counter-balance: Maintain a minimum 24-inch cabinet depth to oppose the lever force of the seating area.
- Verify ratios: Consult a structural engineer if the overhang surpasses one-third of the total island depth.
13. Tech Integration: Hidden Charging Docks and Pop-Up Power Towers
In my work converting warehouses, preserving the monolithic aesthetic is non-negotiable. Nothing ruins a sleek industrial island faster than a tangle of white cords. Therefore, utilize an integration strategy by placing a “charging garage” directly into your cabinetry infrastructure. Install ventilated drawers equipped with rear-mounted USB and AC outlets to eliminate visual noise while keeping devices secure. Alternatively, embed Qi-standard wireless charging pads beneath non-metal countertop overhangs. This design maneuver delivers power without the peripherals.
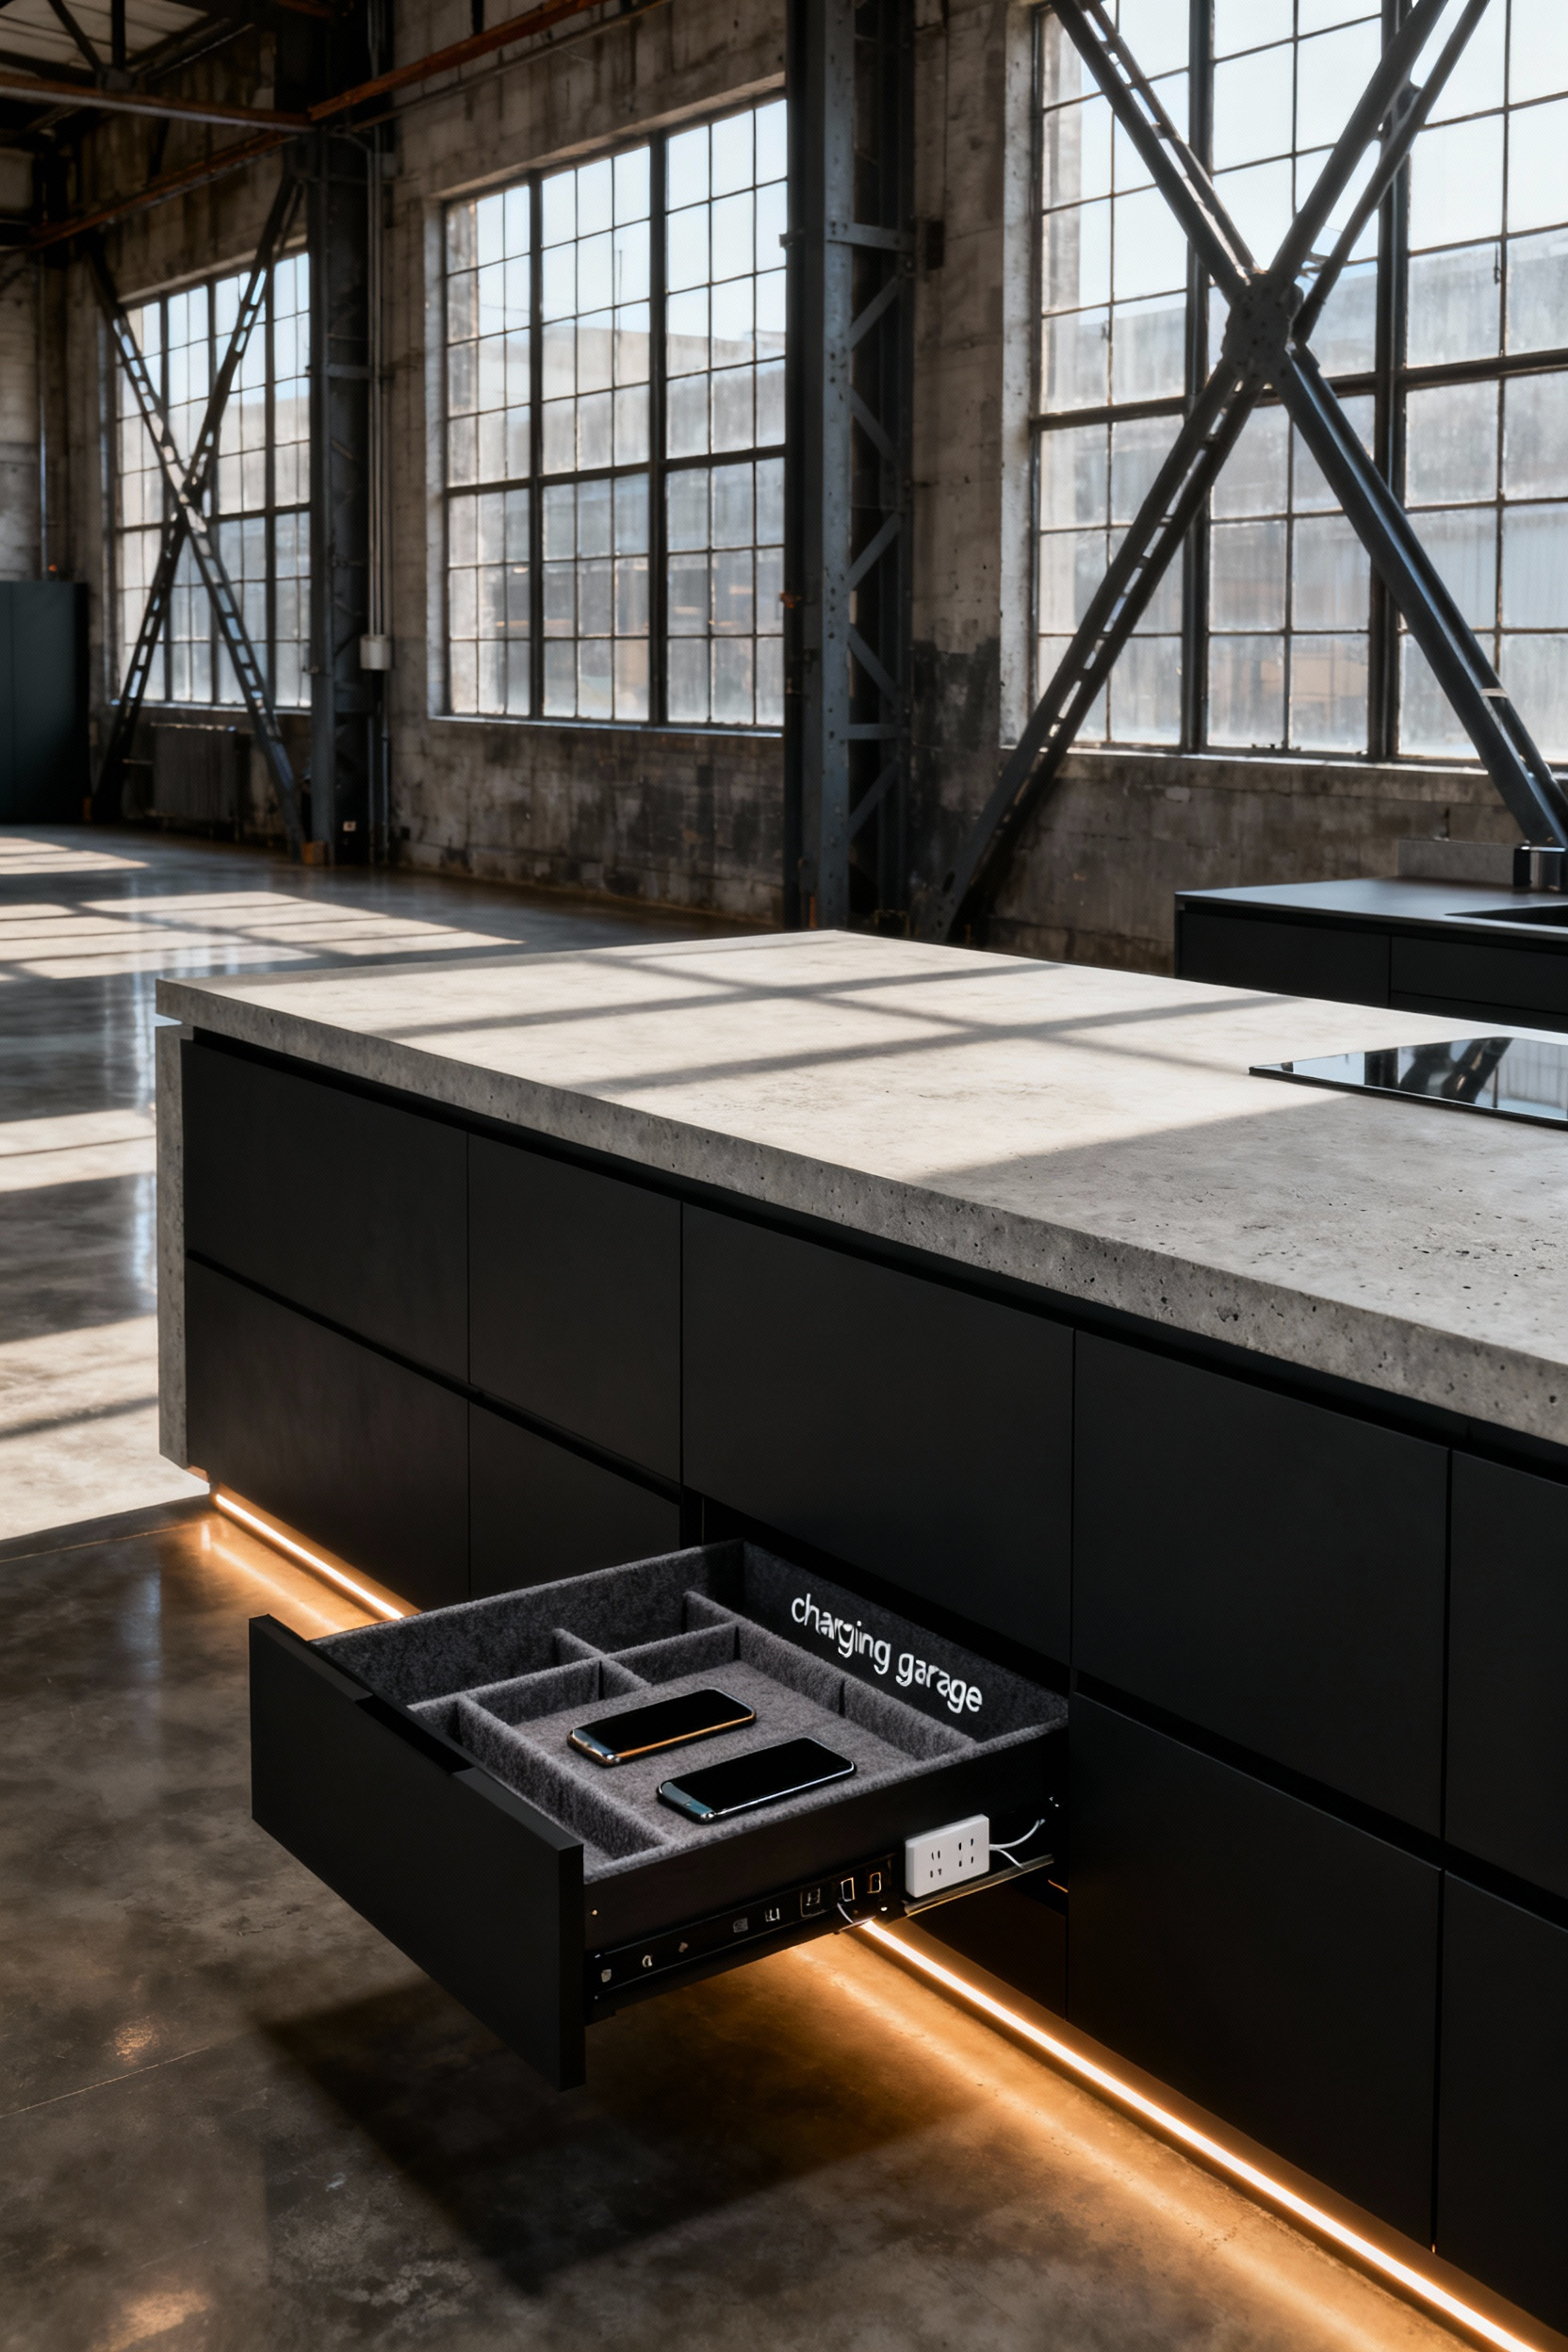
For active prep zones, specify retractable pop-up power towers. These motorized or spring-loaded units sit flush against the surface until needed, then rise to offer USB-C and standard outlets. However, functionality implies responsibility. Consult your electrician to ensure these three critical safety features:
- Ingress Protection (IP) Rating: Select IP44 or higher to resist inevitable kitchen splashes.
- GFCI Protection: Mandatory for all wet-zone power sources to prevent shock.
- UL Listing: Verify certification for furniture integration to prevent overheating in enclosed spaces.
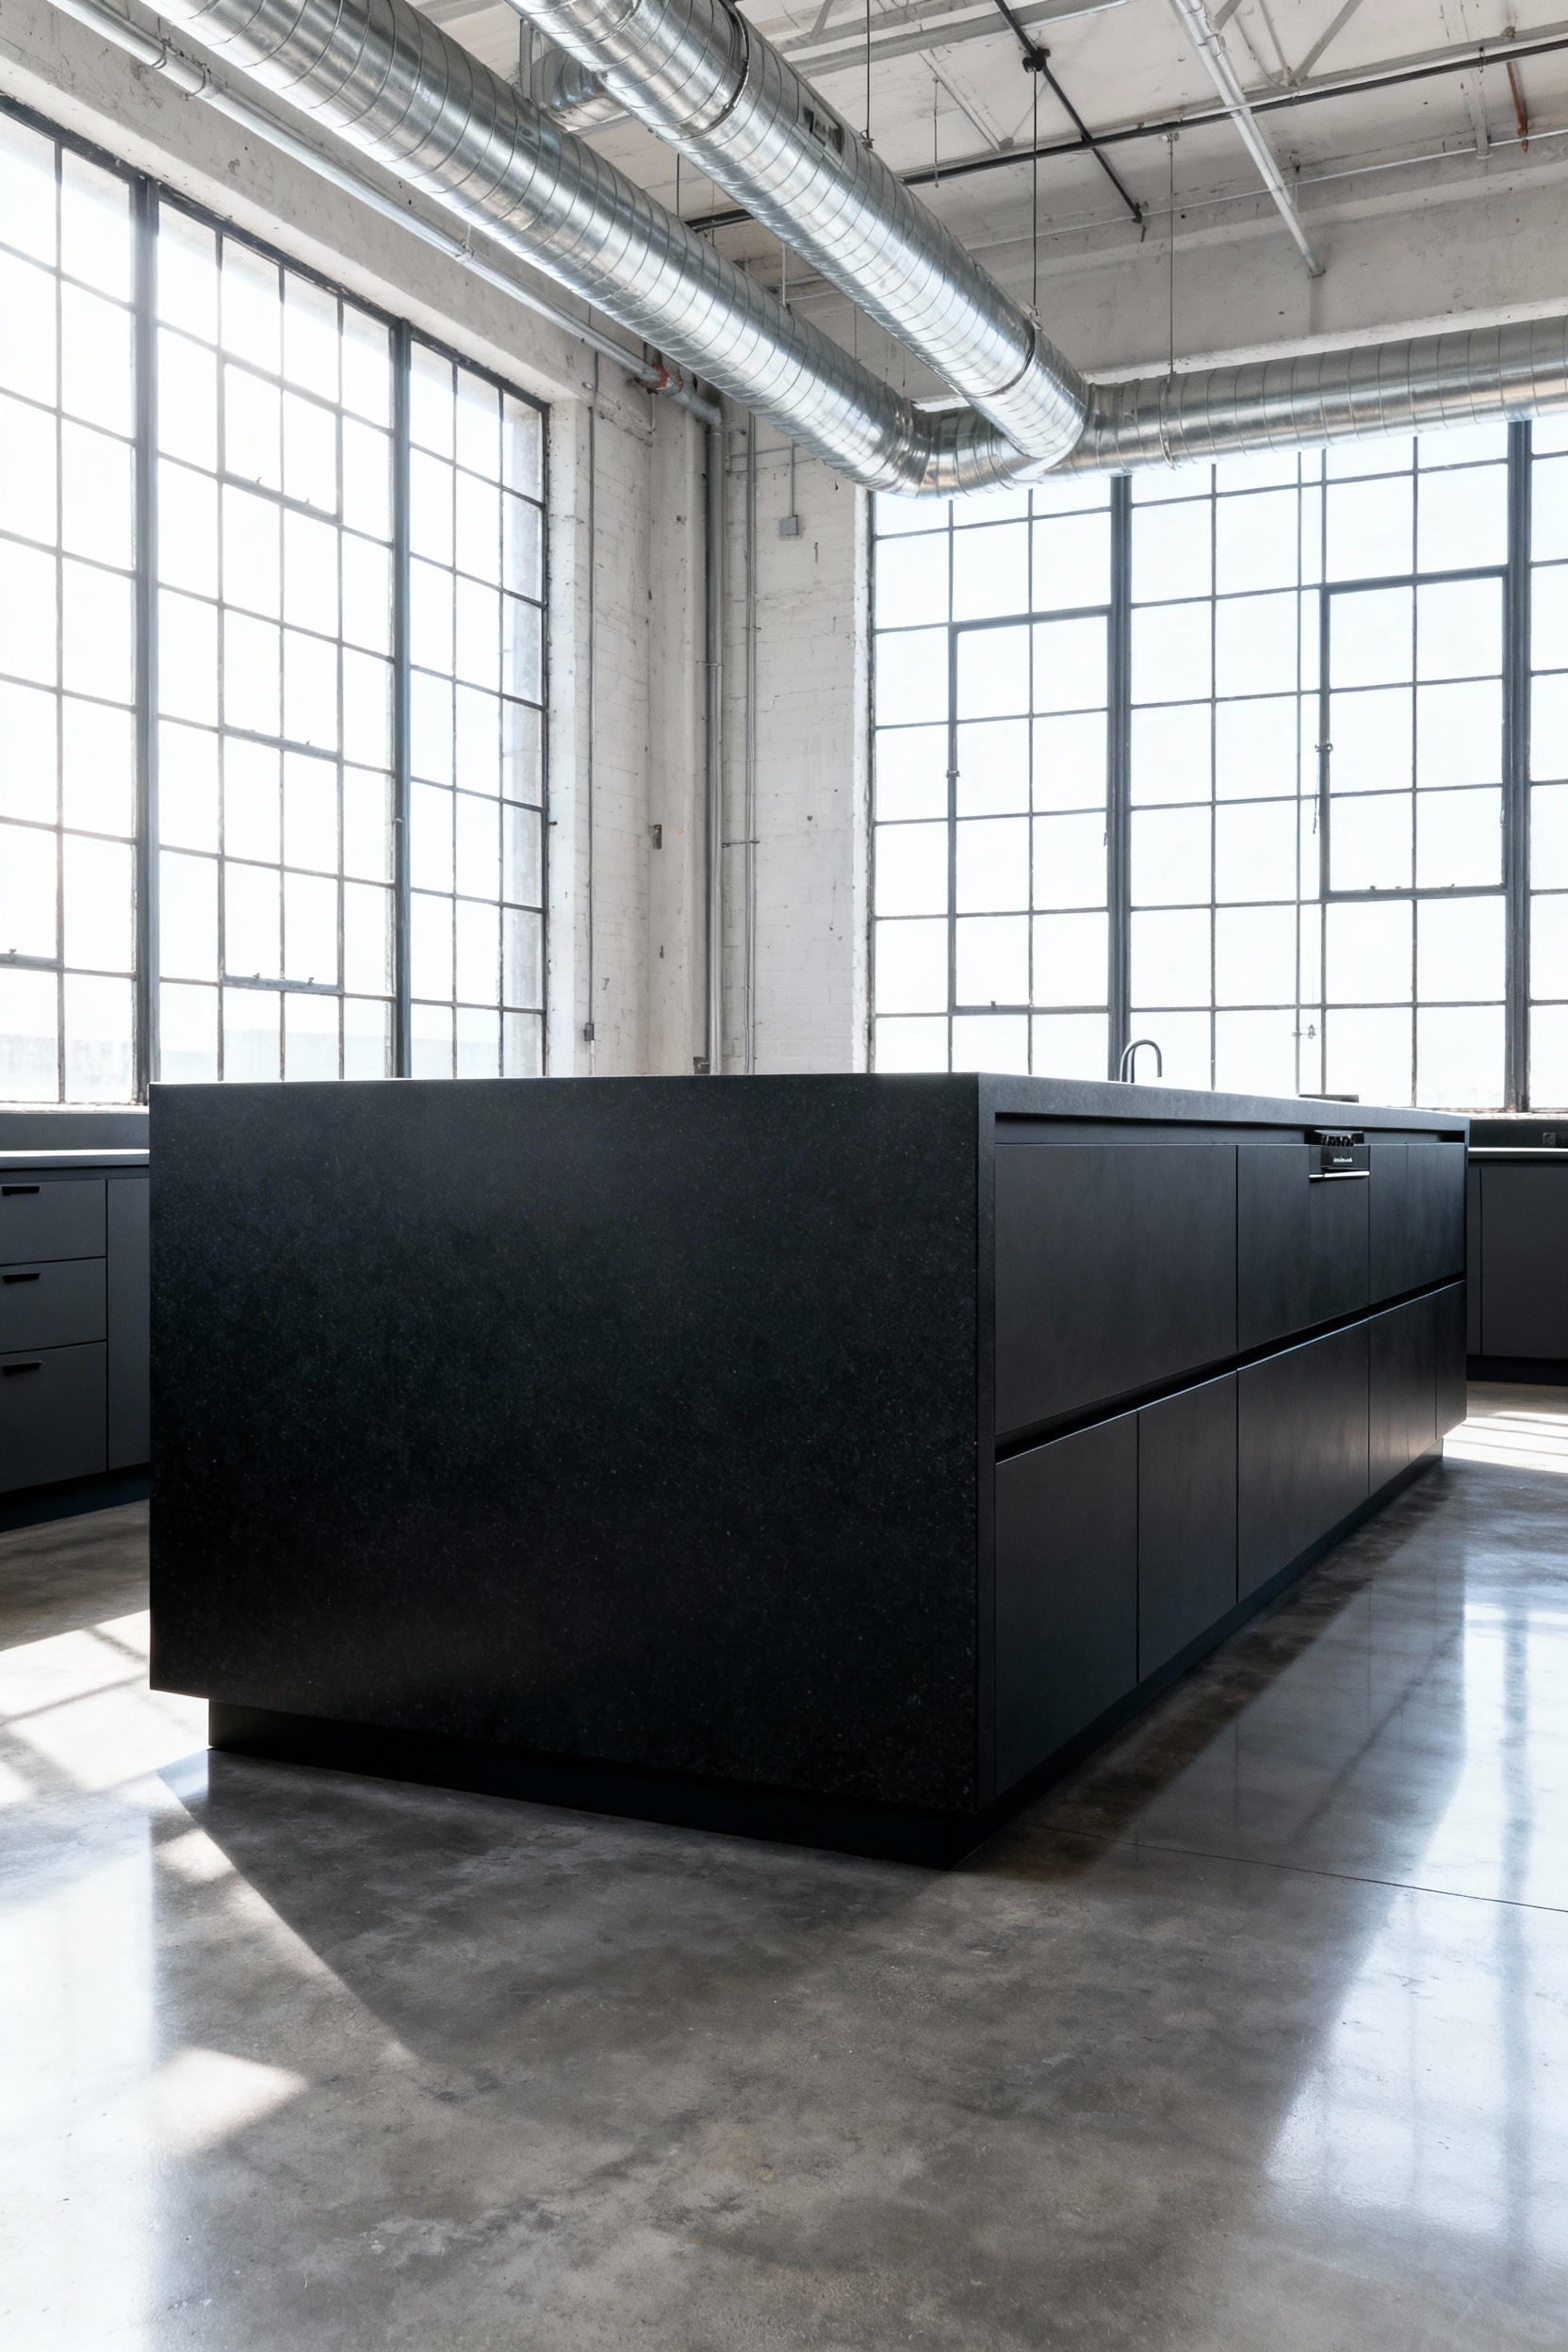
14. Dual-Tone Finishes: Grounding the Island with Contrast Colors
A kitchen island acts as the structural anchor of an open-concept floor plan. Without visual weight, it disappears into the vastness of a converted warehouse or loft. Create immediate spatial hierarchy by treating the island as a distinct, monolithic volume. Contrast lighter perimeter cabinetry with deep, saturated hues like Navy Blue, Forest Green, or wire-brushed black oak. In a recent garment district renovation, I utilized a matte charcoal finish on the island to absorb intense light from floor-to-ceiling steel windows. Consequently, this “grounding” technique stops the eye and defines the cooking zone without requiring partition walls.
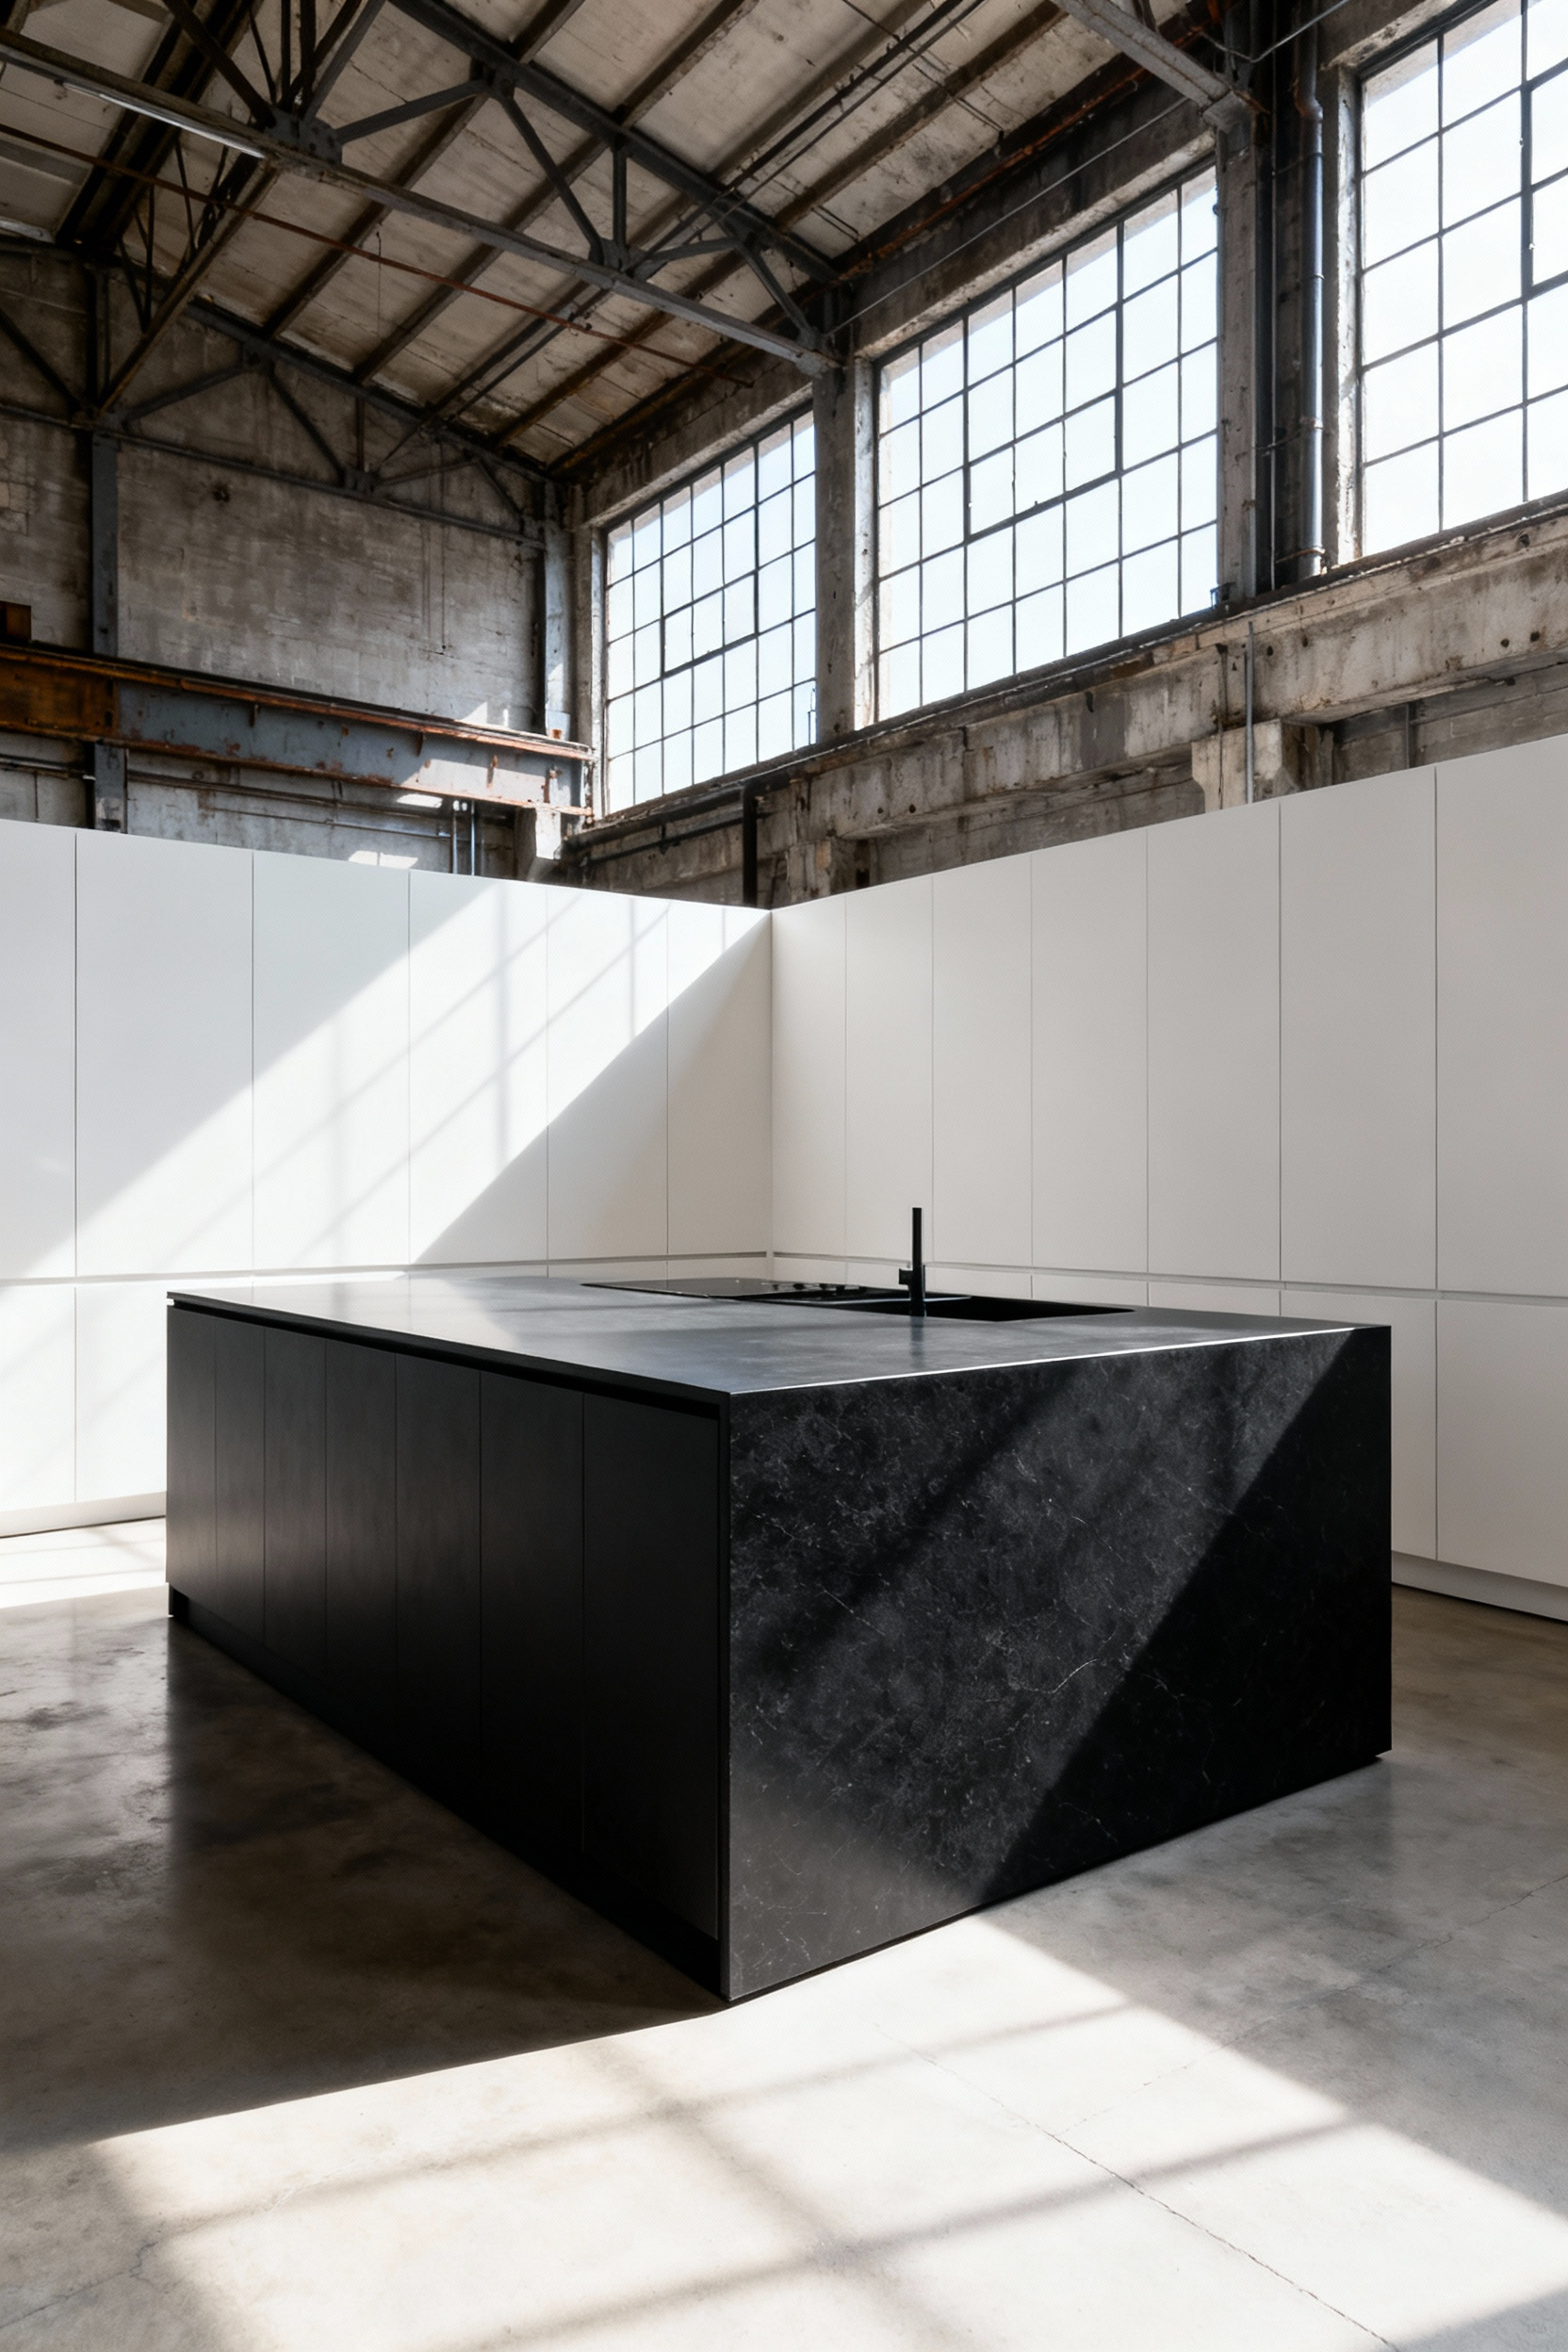
However, contrast demands connection to prevent visual chaos. The island’s hue must reference fixed architectural elements, such as the aggregate in concrete flooring or specific veining in the countertops. Maintain a deliberate design language through precise detailing:
- Unify Hardware: Install identical pulls and knobs on all cabinetry to bridge the color gap.
- Control Sheen: Select matte finishes for dark colors to reduce glare and enhance depth.
- Bridge Tones: Pull accent colors from adjacent dining areas to establish flow.
Design is not just about decoration; it is about engineering a cohesive visual experience.
Conclusion: The Anchor of the Home – Balancing Raw Aesthetics with Culinary Precision
Treat your kitchen island as a structural anchor rather than mere cabinetry. It demands a dual nature. On the surface, let raw materials like rift-sawn oak or untreated steel assert architectural weight through seamless, handle-less facades. Inside, however, cultivate precision. Employ the “jewelry box” strategy, where walnut organizers and velvet liners offer a hidden layer of sophistication. This deliberate contrast turns a functional block into a tactile experience.
Functionality must never compromise the aesthetic. Maintain a monolithic silhouette by cloaking appliances behind full-height panels and utilizing push-to-open mechanisms. Divide your surfaces intelligently. Designate non-porous zones for heavy prep, but reserve expressive stone or live-edge wood for social interaction. Furthermore, ground the structure visually. By replacing standard toe-kicks with recessed plinths, the island gains the gravity of a permanent fixture.
Ultimately, this balance defines the sophisticated urban home. You require a workspace that performs with culinary rigor yet stands as a sculptural centerpiece. Do not settle for generic modular solutions. Embrace the raw, respect the precision, and design an island that commands the room.